File Recovery
- Recovers deleted or lost files effectively, safely and completely.
- Supports data recovery from 500+ data loss scenarios, including computer crash, partition loss, accidental human error, etc.
- Supports 1000+ file formats recovery with a high success rate and without any quality loss.

How to Fix Diskpart failed to clear disk attributes in Windows

Jun 23, 2026 • Filed to: Windows Computer Solutions • Proven solutions
 TL;DR:
To fix the Diskpart failed to clear disk attributes error in Windows, you must remove the target drive's write protection, repair bad sectors, or execute the commands with Administrator privileges.
● Verify the external storage device's physical write-protect switch is turned off, and ensure you launch Command Prompt as an Administrator before executing the attributes disk clear readonly command.
● Modify the Registry Editor by setting the WriteProtect value to 0 under the HKEY_LOCAL_MACHINE\SYSTEM\CurrentControlSet\Control\StorageDevicePolicies path to remove system-level write restrictions.
● Run the CHKDSK /F /R command to repair underlying file system errors and bad sectors, or reformat the drive to FAT32 using Diskpart if the storage media is in a RAW format.
Ask AI for a summary
 ChatGPT
 Perplexity
 Gemini
 Claude
 Grok
Grok
If you’re familiar with Diskpart and use it to manipulate your device’s drivers, you may encounter a problem saying that it failed to clear disk attributes. In this article, we will provide you with 8 solutions to fix this error.
🔍 Diskpart Attribute Error Triage Matrix
Identify the underlying cause of your storage write-protection to select the correct repair path:
| Disk Error Presentation | Underlying System Root Cause | Most Effective Repair Path |
| Access Denied / Loop Errors | Command Prompt running under standard user permissions. | Run Command Prompt as an Administrator |
| Persistent Read-Only Flag | Windows Registry StorageDevicePolicies override is active. |
Modify Registry WriteProtect DWORD |
| RAW File System Layout | Partition table corruption or invalid file system markers. | Execute Quick Format via Diskpart |
| I/O Device Hardware Error | Damaged connection ports, bad sectors, or loose cables. | Run CHKDSK Sector Scan & Swap Hardware |
Part 1. What Causes the "Diskpart Failed to Clear Disk Attributes" Error?
Diskpart is a highly effective command-line utility built into Windows to manage storage disk partitions. However, when trying to erase a read-only parameter, the process can fail due to several system obstacles:
- Insufficient Account Privilege Levels: Executing commands without full elevated administrator permissions blocks low-level hardware modifications.
- Physical Hardware Lock Mechanism: The storage media features an external manual lock switch that enforces physical read-only limits.
- Corrupted File System (RAW Storage): Windows can no longer read the drive's file allocation layout, marking it write-protected to prevent further data loss.
- Storage Device Policy Restrictions: The Windows Registry contains explicit global security instructions blocking storage device write access.
Part 2. 8 Ways to Fix Diskpart Failed to Clear Disk Attributes
For whatever reason you may be encountering this error, there are sure solutions you can use. Here are 8 solutions to Fix Diskpart that failed to clear disk attributes.
Method 1. Inspect and Toggle the Drive's Physical Lock Switch
Many SD card adapters, USB flash memory sticks, and external drive enclosures feature built-in hardware protection switches designed to shield your data against accidental deletion.
- Disconnect the Storage Media (Safely remove the device from your computer)
Eject your USB flash drive or SD card safely from your Windows PC link slot. - Inspect the Enclosure Outer Housing (Locate the physical write-protect lock toggle)
Examine the sides and back of your drive casing for a tiny slider switch typically labeled Lock or showing a padlock graphic icon. - Slide the Toggle Switch to Open Access (Disable the hardware write-protection barrier)
Move the switch away from the Lock configuration position to enable write access. Reinsert the drive and execute your Diskpart command.
Method 2. Modify the Windows Registry WriteProtect DWORD Key
If the hardware is clear, Windows may be using an internal registry policy rule to block storage write commands across your USB ports.
- Launch the Windows Run Dialogue Utility (Open the primary command executor box)
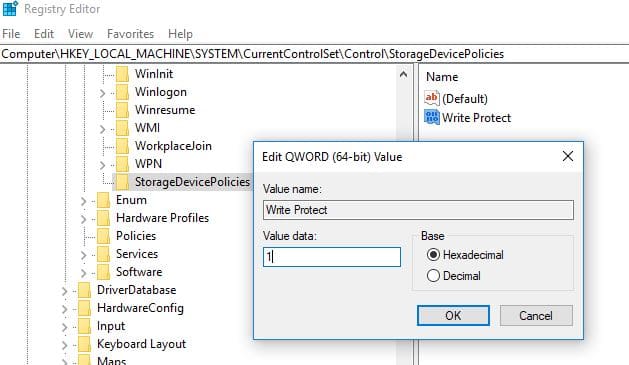
Press the Windows Key + R shortcut on your keyboard to open the Run dialogue box. - Access the Windows Registry Editor (Open the system configuration hierarchy database)
Typeregeditinto the field and press Enter. Click Yes when the User Account Control (UAC) prompt appears. - Navigate to the Storage Devices Control Key (Follow the system path structure mapping)
Copy and paste the following path into the top address bar of the Registry Editor window and press Enter:HKEY_LOCAL_MACHINE\SYSTEM\CurrentControlSet\Control\StorageDevicePolicies
(Note: If StorageDevicePolicies does not exist, right-click the Control key, choose New > Key, and name it exactly StorageDevicePolicies). - Reset the WriteProtect Configuration Value (Change the numeric permission values)
Locate the WriteProtect value in the right-side details panel and double-click it. Change the Value data field number from1to0, set the base to Hexadecimal, and click OK. Close the editor and restart your computer.
Method 3. Execute CHKDSK to Scan and Repair Disk Sector Corruption
Bad storage sectors or file system indexing bugs can cause Windows to lock a drive into a defensive, read-only state.
- Open an Elevated Command Prompt Screen (Launch console with administrative rights)
Typecmdinto your Windows Search bar, right-click the Command Prompt icon in the results list, and select Run as administrator.
- Run the Direct Volume Repair Parameters (Identify and clean drive block allocation bugs)
Type the following command, replacingE:with the actual drive letter of your problematic device, and press Enter:
Here,chkdsk E: /f /r /x/ffixes file errors,/ridentifies bad sectors, and/xforces the drive volume to unmount before scanning.
Method 4. Fix Read-Only State on RAW Partition File Formats
When an external drive's file system drops into an unconfigured RAW format, executing a quick format clears out the structural errors blocking Diskpart.
- Launch the Native Diskpart Subsystem (Initialize the disk partition tool via CMD)
Open an elevated Command Prompt console as an administrator, typediskpart, and press Enter. - Locate and Select the Damaged RAW Volume (Index and highlight the targets)
Input the following commands sequentially, pressing Enter after each line:
(Replacelist volume select volume nnwith the specific volume number assigned to your unreadable RAW drive). - Run a Quick Volume Format Sequence (Build a clean file allocation structure)
Type the formatting command line below and press Enter:
(You can swapformat fs=exfat quickexfatout forntfsorfat32depending on your storage device compatibility preferences).
Method 5. Inspect Connection Hardware Components and Ports
Loose cables, worn-out device pins, or faulty USB hubs can disrupt data transfers, causing Windows to lock down permissions for safety.
- Switch the Drive USB Connection Port (Bypass damaged connection points)
Unplug your drive from its current slot and connect it directly to an alternative high-speed USB port built into your computer motherboard.
- Swap out the Data Interconnect Cables (Rule out broken internal wire strands)
Replace old or worn-out USB connection cables with a fresh, certified high-throughput cable to ensure clean electrical connection signals.
Method 6. Run Diskpart Under Elevated Administrator Privilege Accounts
If your user account lacks administrative privileges, Windows will block commands like `attributes disk clear readonly`.
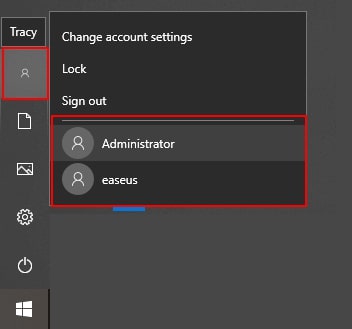
- Switch Over to an Administrator Profile (Gain full operating system permissions)
Click your Windows Start Menu icon, select your user profile portrait, and switch to an account with full Administrator rights.
- Initialize the Target Read-Only Storage Disk (Target the write-protected drive)
Typecmdinto the search box, launch Command Prompt as an administrator, typediskpart, and hit Enter. - Clear the Read-Only Storage Attribute Flag (Remove the restriction on the drive)
Input the following commands one by one, hitting Enter after each command string line:
(Make sure to replacelist disk select disk n attributes disk clear readonlynwith the exact disk index number of your read-only drive).
Method 7. Run an Anti-Malware Deep System Scan
Certain rootkits and malware variants lock down storage device attributes to protect themselves from being deleted by formatting tools.
- Launch Your Native Windows Security Core (Open the default protection interface)
Open Settings, go to Privacy & Security, click Windows Security, and select Virus & threat protection. - Run a Full Offline Security Scan Sequence (Detect deep-rooted malware infections)
Click on Scan options, check the box for Microsoft Defender Offline scan (or choose your preferred third-party antivirus app), and click Scan now to remove background malicious files.
Method 8. Disable the File Level Read-Only Attribute Flags
If the overall disk attributes are clear but you still cannot modify individual folders, check for file-level write protection flags in File Explorer.
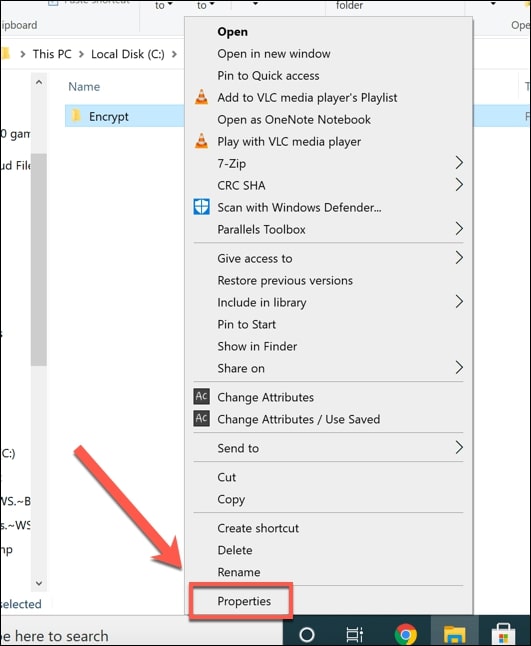
- Access the Target Volume Properties Menu (Open directory file options configurations)
Open File Explorer, navigate to your external drive, right-click the specific file or folder throwing errors, and select Properties.
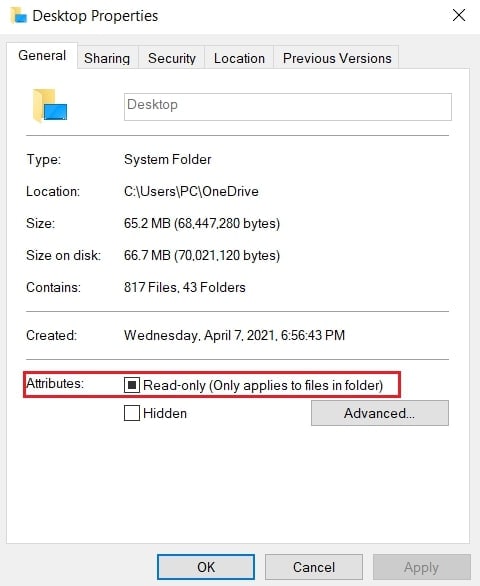
- Uncheck the Local Folder Read-Only Parameter (Remove folder-level access restrictions)
Under the General settings tab, go to the Attributes section at the bottom. Uncheck the box next to Read-only, click Apply, and press OK to apply the changes.
Conclusion:
Diskpart is a powerful built-in tool created Windows so you can manage your disks and partitions on your own. But sometimes, you might encounter some errors while running this utility. With any of these solutions, you’ll surely find a fix to your Diskpart issues.
Partition Solutions
- Manage Your Partition
- Top 9 Partition Manager for Mac
- How To Partition a Hard Drive
- RAW partition to NTFS
- Convert GPT to MBR
- Remove partition on Mac
- Recover deleted partition
- Create a boot partition
- Create partition on Win/Mac
- Convert exFAT to NTFS
- Fix Partition Errors
- Fix "Active Partition Not Found" Error
- Fix "No Bootable Partition in Table"
- Fix current read only state yes
- Repair a damaged partition
- Can't create new partition
- Partition Tips


Theo Lucia
chief Editor