How to Remove Partition on Mac
To safely remove a partition on a Mac, back up your essential files first to prevent permanent data loss, launch Disk Utility, select your target drive, click the Partition button to access the Partition Map, highlight the specific region on the pie chart, click the minus symbol, and apply the changes.
● Ensure MacBooks remain connected to a power charger and external hard drives stay securely plugged in throughout the entire removal process to avoid compromising the drive.
● If you are unable to remove a Windows-based partition using the native Bootcamp utility, default to Disk Utility by selecting the "Bootcamp" partition on the sidebar, clicking "Erase", and deleting it manually.
● Accidentally deleted partitions can be restored by cloning the drive using Disk Utility's "Restore" button, whereas retrieving permanently lost files from a deleted partition requires dedicated tools like Recoverit Data Recovery for Mac to scan and extract the data.
Ask AI for a summary
Hard drives can be partitioned for any number of reasons, and most importantly depending on the user's preferences. For example, some may choose to create a partition to keep system files and personal files separated from one another while others would want to install different operating systems.
Whatever your motives are for partitioning your disk, it becomes imperative that you learn how to delete partition in Mac in case you change your mind later, or something goes wrong. One of the most amazing features Mac OS has been offering its users for years is Disk Utility. The beauty of this program is that it simplifies multiple processes, including partitioning your hard drive.
Reasons for partitioning a hard drive are plentiful, a common one being installing a different operating system to serve distinct purposes. But there are times when things might go wrong, the partition fails, or the hard drive suffers a glitch, resulting in the accidental deletion of the partition and consequently the loss of all your files.
Part 1. When to Delete Partition on Mac?
Partitioning the hard drive is breaking it into pieces or "regions" each with a unique volume value. Mac OS handles these partitions individually to prevent conflicts between these pieces.
Creating a partition is usually done before installing the operative system. However, companies like Apple tend to leave the hard drive as one big partition. So, why would you even consider partitioning your drive if most computer manufacturers believe that one is more than enough?
Well, truth be told, creating a partition has its advantages.
- First of all, separating your files, programs, apps, etc. From the systems files, creates a perfect and efficient workplace. Additionally, they create the perfect environment to run the same program under two different "users" avoiding conflictive situations.
- Secondly, if you use the Boot Camp utility, you can create two different partitions on your Mac, one with Mac OS and the other one with Windows. Upon startup, you are giving the choice to initiate one or the other.
- Finally, you can create partitions to run "beta operating systems" without risking permanent damage to the drive and possible data loss. For example, you can create a small volume partition using the Disk Utility to run the latest beta OS from Apple.
Once you learn how to partition a hard drive on Mac and how to remove a partition on Mac, you can format and manage them individually, you will be getting two computers for the price of one.
An aspect you need to consider when creating or deleting a partition is if you intend on running older versions of Mac OS via Time Machine, the volume given should be at least twice as big as the minimum requirement.
Part 2. How to Remove Partition on Mac?
Before you continue reading, remember this, manipulating the hard drive, whether to create or delete a partition, involves removing data. In conclusion, make sure you have a backup of all your important files before you continue with the steps below.
The best and safest way to remove a partition on Mac is by using the Disk Utility.
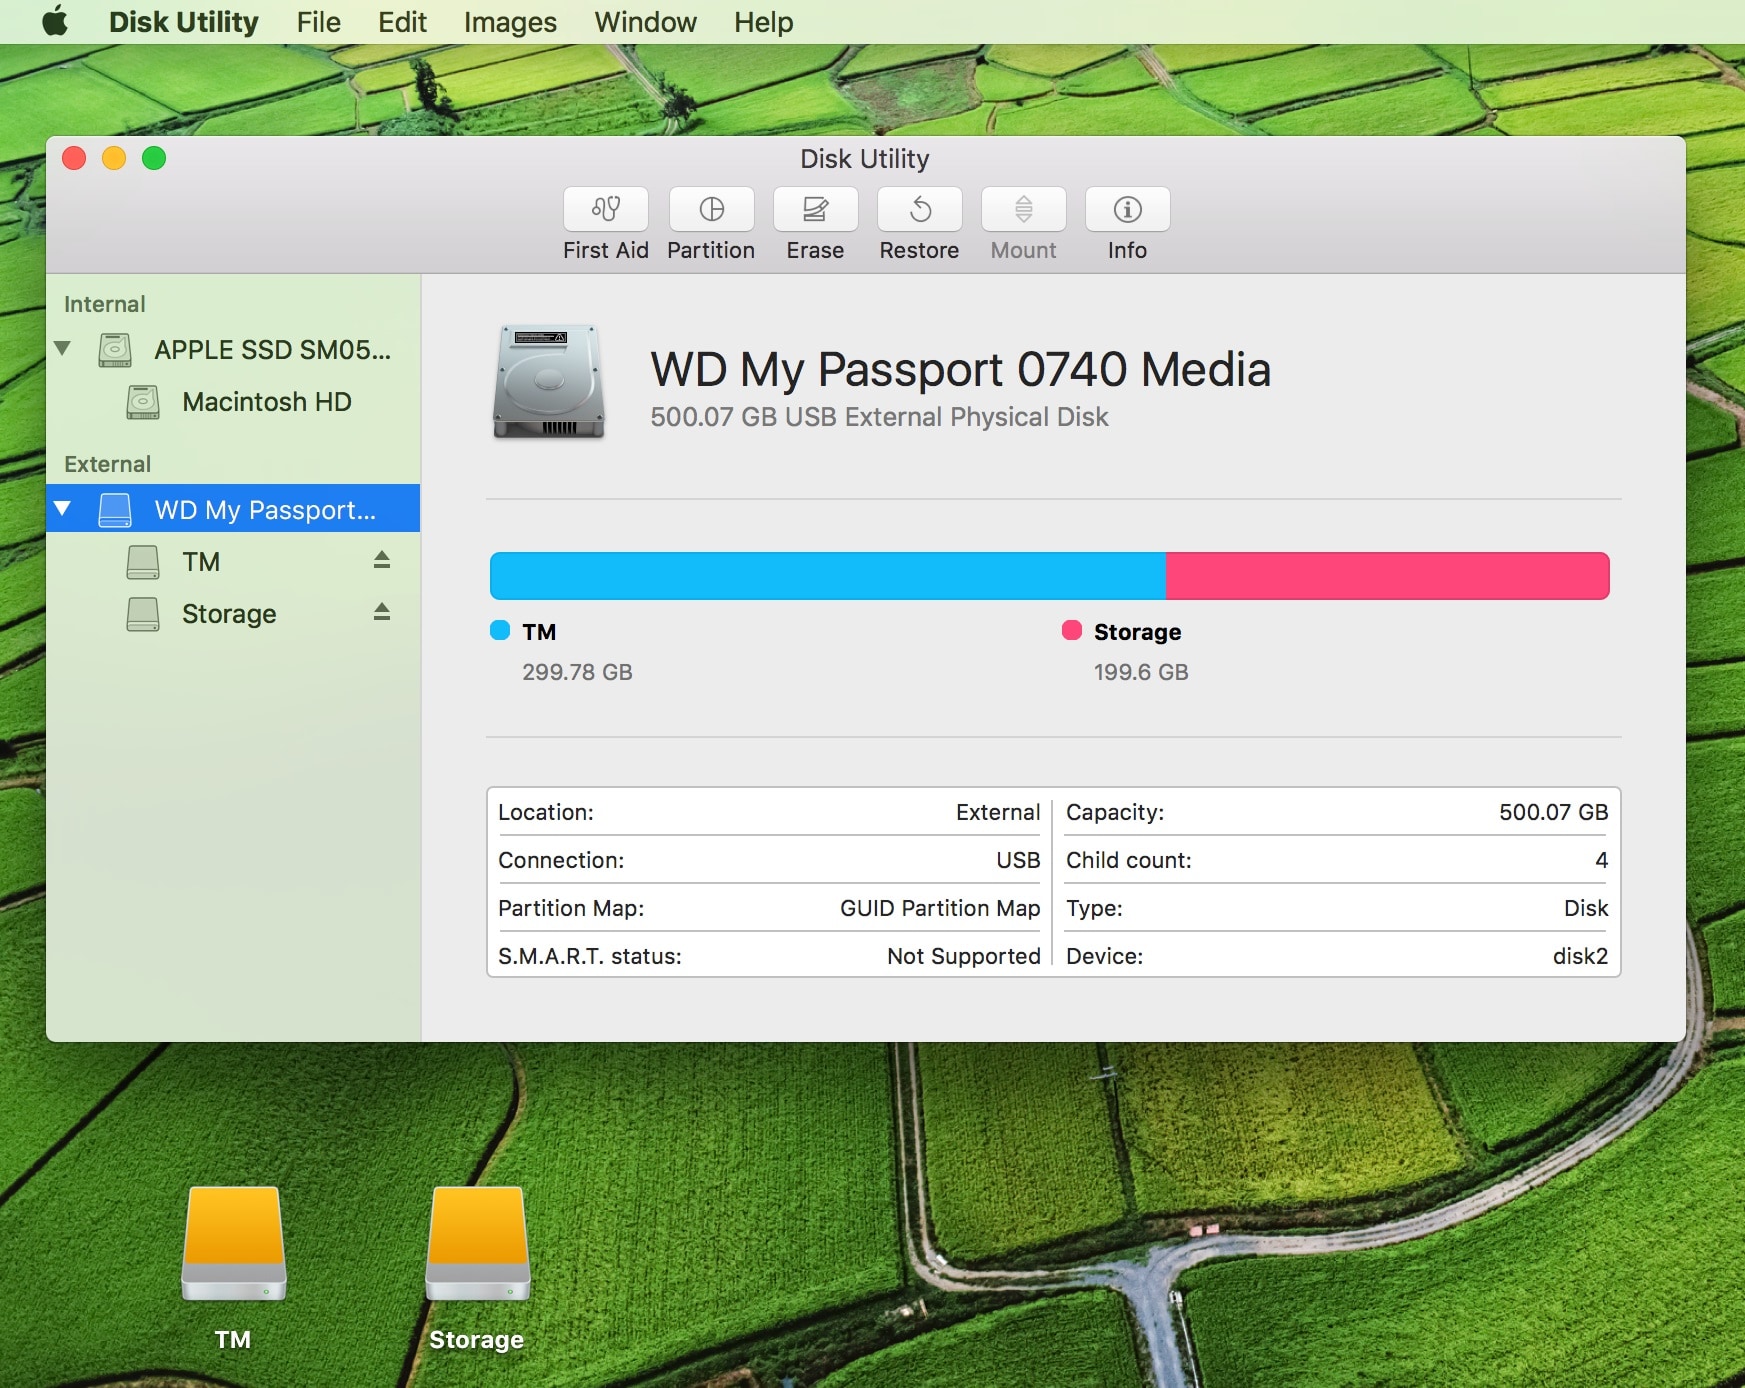
Step 1: Disk Utility
First, launch the Disk Utility via Spotlight. As you can see, the sidebar shows you all the available hard drives and their partitions. The main panel highlights the information about the drive you have selected.
Step 2: Look for Location.
Using the sidebar, look for the disk containing the partition you want to remove, if you cannot find the drive there, make sure is properly connected, in case you are working with external hard drives. Try the old-fashioned disconnecting and reconnecting if necessary. If the Drive you are looking for does not appear on the sidebar, you won't be able to move forward.
Step 3: Select the Location
Make sure you are selecting the Drive which contains the partition. It should appear on the information in the main panel.
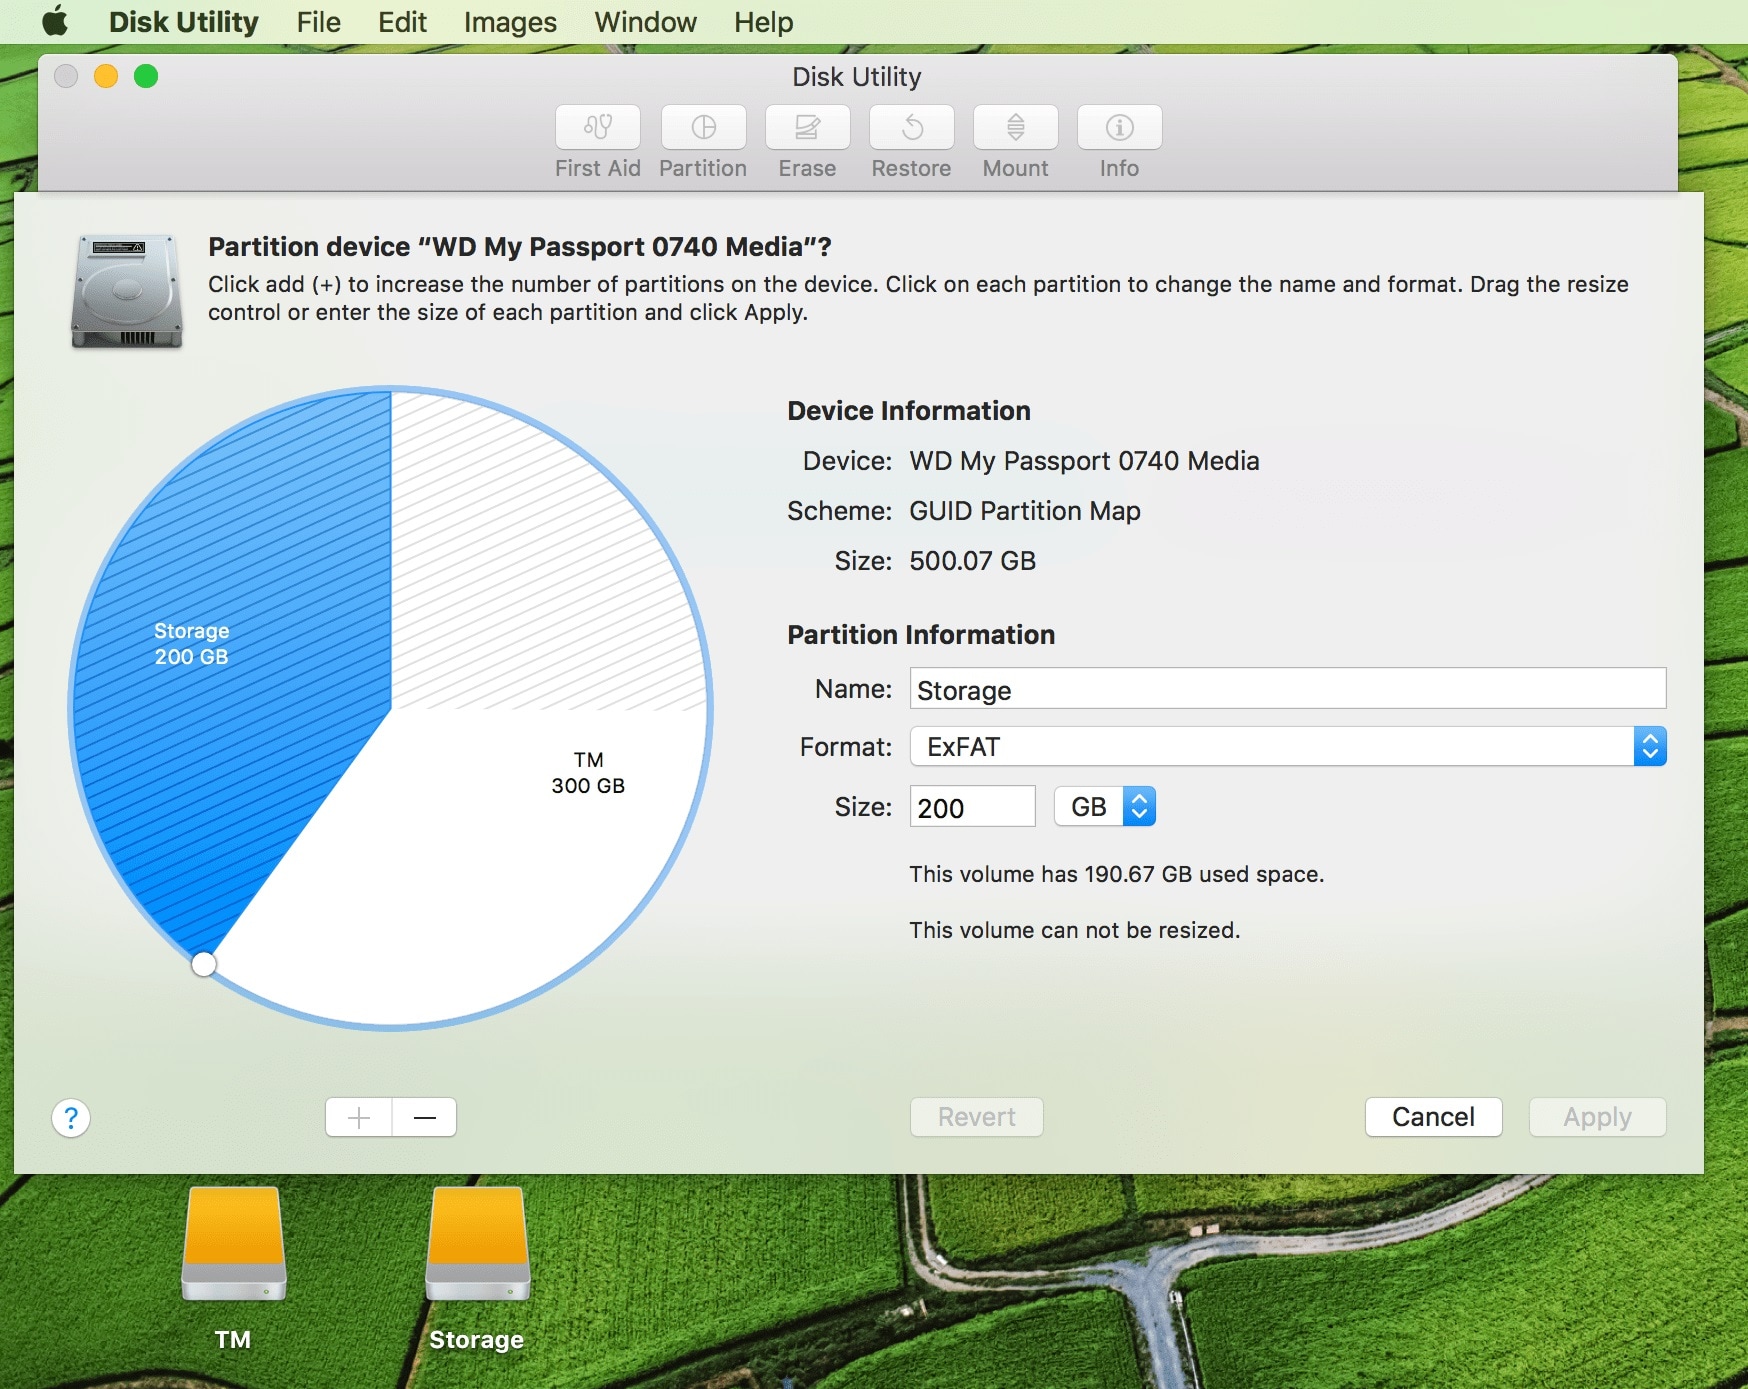
Step 4: Partition Map
At the top bar of the Disk Utility window, you will see the "Partition" button, click on it and another window will pop-up, this time highlighting the partition map.
Step 5: Remove Partition
To remove a partition you have to click on it in the Pie Chart displayed on the partition map window. After that, click on the minus symbol beneath the chart.
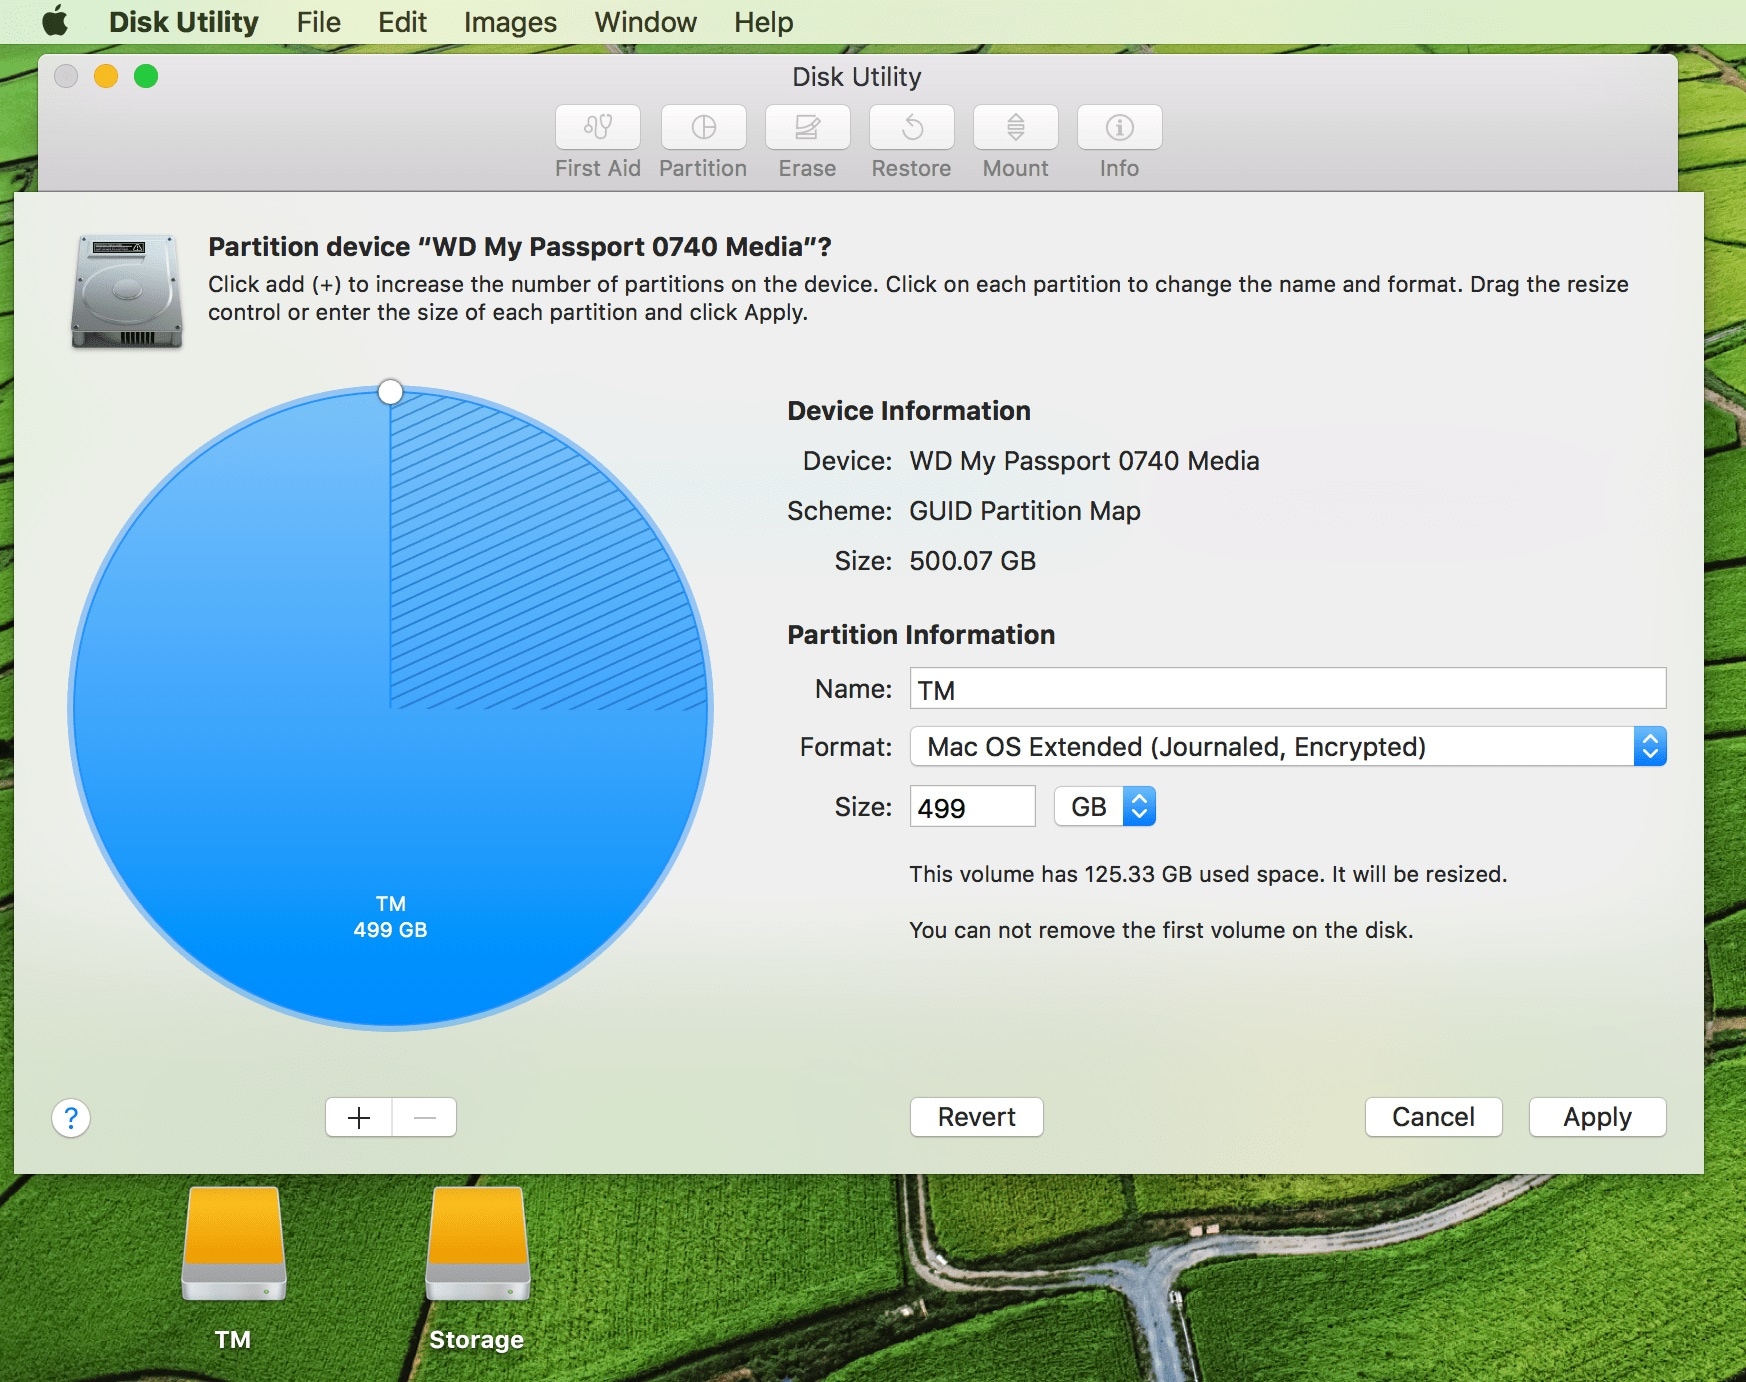
Step 6: Applying Changes
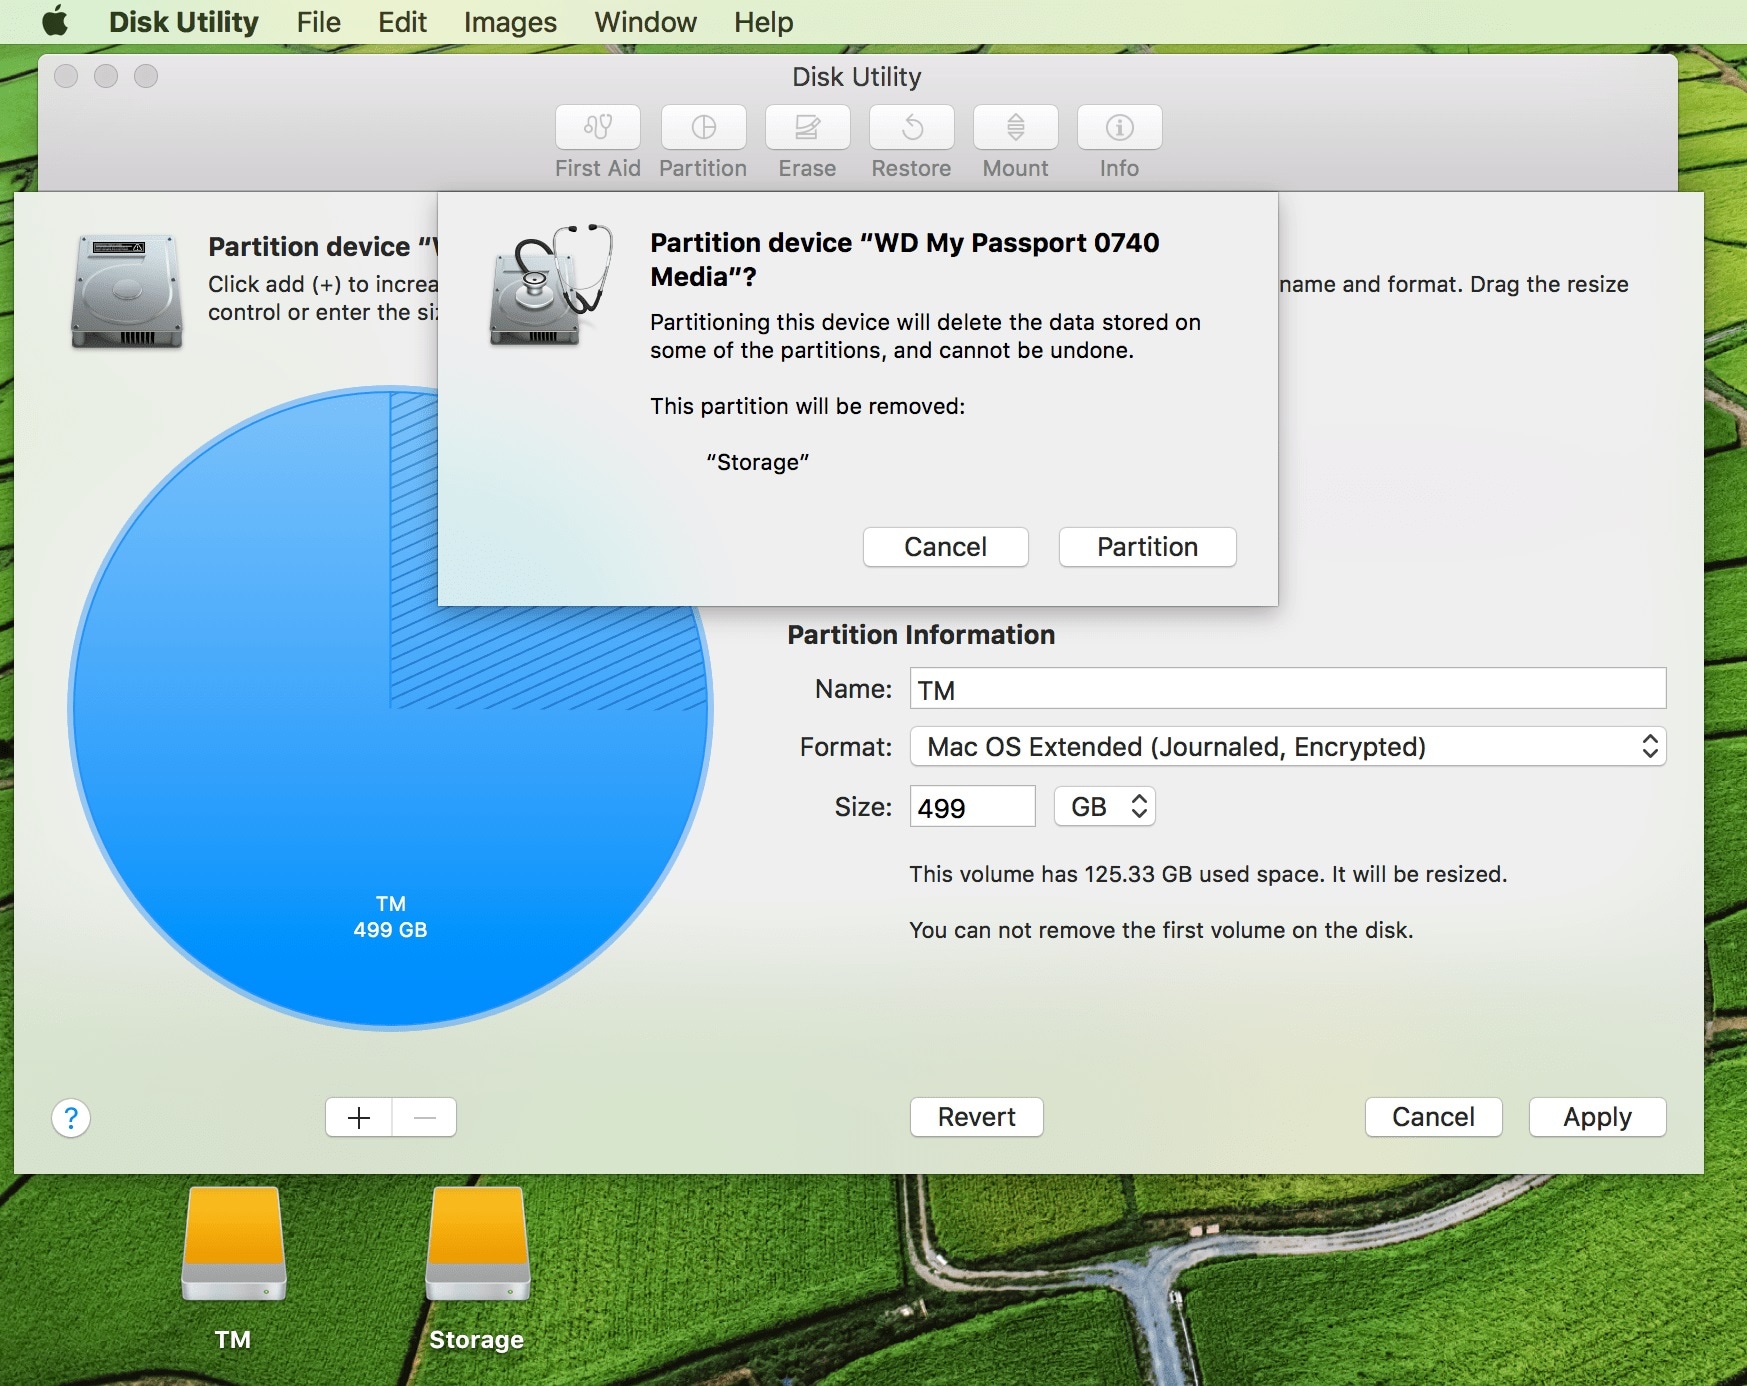
Finally, after removing the partition or partitions you wanted from your drive and resized the ones you have left or assigned that new space to the main hard drive, all you are left to do is click on the "Apply" button.
A confirmation window will appear, summarizing everything you have done so far. A word of advice at this point would be to read the confirmation dialog carefully before continuing. Make sure everything every change you made was made on the Drive you meant to.
Part 3. What If Deleted Mac Partition By Mistake?
If you have accidentally deleted mac partition there is no need to panic. Mac OS Disk Utility is here to help you recover a deleted partition. Since it first came out as part of the operating system, this utility has offered recovery services in the form of "cloning" the Drive.
This incredible feature allows you to have access to an identical copy of your hard drive and all partitions, and therefore, to the precious data you thought was lost forever.
The advantages of cloning your drives and their partitions are plentiful, but the most important one, or at least, the most relevant one at this moment, is the ability to restore an accidentally deleted mac partition.
As always, before moving forward, make sure you read all the steps carefully and pay close attention to the images to avoid potentially damaging mistakes.
- First, launch the Disk Utility feature using Spotlight, the Finder, Cmd+Shift+U, or, since you are using Mac OS Sierra, just tell Siri to launch the Utility for you.

- Second, the traditional Disk Utility window will appear, on the left sidebar you will see all your hard drives and partitions, and on the main panel, you will see the general information belonging to each disk.

- Third, select the disk or partition you want to restore, and then click on the "Restore" button at the top of the window. This is the partition that you accidentally erased.

- Fourth, on the pop-up menu that just appeared, choose the disk or partition you want your files to be restored at.
- Fifth, finally, click on the "Restore" button, and then hit click on "Done."
Part 4. Can't Remove Bootcamp Partition Mac
Bootcamp is an incredibly useful tool for Mac users to be able to install Windows in a separate partition on Mac. However, sometimes it can fail, and causes you trouble, other times, you just want to remove the partition and free that space for other purposes.
Whatever your reasons are to remove windows partition from mac if somehow you find yourself unable to do it, just follow these simple steps.

- Launch the Disk Utility App
- On the sidebar select the Windows Partition (by default it is named "Bootcamp.")
- Click on the "Erase" button at the top of the Disk Utility window.
- Delete the partition.
Part 5. How to Recover Lost Data When Deleting Partition
Losing a few files is one thing, but losing a whole partition is another one. Finding yourself in this terrible situation is certainly a cause for concern, you are the only one who knows how valuable those files were, and if you don't know how to handle the situation it only worsens it.
Luckily there are lots of ways to recover lost data from a deleted partition. But the absolute best way to go about it is through Recoverit for Mac. Keep on reading to find out exactly what this program does and how to use it to retrieve your files.
Free Download Recoverit Mac Data Recovery
Losing an entire partition can be disconcerting. It can happen for any number o reasons, accidental deletion, hard drive glitch, etc. But what you need to hold on to get you through this terrible ordeal is that the files can be recovered. More often than not, you'll find yourself formatting your Disk in a desperate attempt to gain more storage space or fix an issue with the OS. All you need is an efficient data recovery software.
Recoverit Data Recovery software for Mac is by far the best partition recovery software out there. Retrieving potentially lost files is a sensitive task, one that cannot be successfully performed by built-in utilities. You're gonna need a sophisticated and dedicated recovery software like Recoverit for Mac.
- Recover Word documents from all storage devices like Mac.
- Recover 1000+ types and formats of files in different situations.
- Scan and preview the files before you recover them from MacBook hard drive.
When you accidentally delete a partition on mac and subsequently all the files in it, the first question that pops into your head is "how can I recover my data?" there is where Recoverit for Mac comes in.
Step 1: Select the Location
To recover lost files in a partition on Mac, the first you need to do, after running Recoverit, is to select the location where the files used to be, and then click on the Start button.

Step 2: Scan the Location
Recoverit will start the scanning process on the selected location. This is a very thorough search that will take some time to complete.

Step 3: Preview and Recover
Once the scanning process is finished, a list containing all the recoverable files will appear. You can use the preview feature to check them all and pick those you want to save. After you're done, click on the Recover button.

Part 6. Tips for Removing Partitions on Mac
- If you are removing a partition from an external drive, make sure is properly connected to the Mac computer through the entire process.
- Unless you intend on using the Disk Utility or Recoverit for Mac to handle the partition removal, do not install third-party software from questionable developers.
- If you suspect the entire hard drive is compromised, you can use the "First Aid" feature of the Disk Utility app to repair any possible damage.
- When you are attempting to remove a partition from a MacBook, make sure it remains connected to the charger.
- If the partition you want to remove is Windows-based, use the Disk Utility to deal with it instead of the Bootcamp app.
All Mac computers, iMacs, MacBook Pro, MacBook Air, or any other Apple device have a limited amount of storage. Depending on how you use that space you may end up needing more, probably buying an external drive or uploading files to the cloud.
Conclusion
Whatever the case is, you now know exactly how to handle this situation. You've learned how you can partition your hard drive using built-in utilities, you've learned how to delete said partition, how to recover an accidentally deleted partition and a few tips that will make the entire process much easier for you while ensuring the safety of your data, which is the ultimate goal, preventing losing your vital files.
While you may be hesitant to create partitions on your Mac to avoid having to go through all the steps listed in this guide in the event of a hypothetical data loss, you should know that the benefits of partitioning your hard drive outweigh your hesitation.
Partition Solutions
- Manage Your Partition
- Fix Partition Errors
- Partition Tips


 ChatGPT
 Perplexity
 Gemini
 Claude
 Grok
Grok


Theo Lucia
chief Editor