How to Recover and Backup the Deleted Photos
"Is it possible to get a backup of deleted photos? I have accidentally deleted some of my important photos, but can't seem to retrieve them anymore!"

These days, I get queries like this from a lot of people who want to know how to backup deleted photos of theirs. Since data recovery has evolved so much in the last few years, it has become possible to get back our deleted photos under different scenarios. After extensive research, I finally decided to come up with this well-curated guide on how to back up the deleted photos under all possible scenarios.
Part 1: What Does Deleted Photo Recovery and Backup Mean?
Since you might end up losing your data unexpectedly, you must be prepared to recover it as well. To avoid this situation altogether, you can maintain its dedicated backup in advance.
What Does It Mean to Back Up Our Photos?
- It simply means that we are maintaining a second copy of our photos and retrieving them from the source in case of data loss of the original copy.
- To do that, you can use the inbuilt feature in your device to backup your photos.
- Besides that, you can also save your important photos to a different source or location (like an external hard drive).
- These days, a lot of people also upload their photos to cloud storage to save them.
What Does It Mean to Recover Our Photos?
When our photos are deleted, they are not removed from the storage right away. It is just that the space that was previously allocated to them now becomes available to be overwritten by something else. Your photos might be inaccessible, but for a while, they would still be there in the storage. As we can't get them back the usual way, we need to implement different tactics to recover them. This is implemented when we don't have a backup of our photos already stored.
Part 2: A Universal Method of Photo Recovery and Backup on Different Devices
To start our guide on recovery and backup of deleted photos, I want to cover some universal methods. Ideally, you can first follow these troubleshooting tutorials to perform data recovery and back up deleted photos.
Recover Deleted Photos under Different Scenarios Using Recoverit
If you are suffering from an unwanted loss or deletion of your photos on Mac or Windows, then you can try Recoverit Data Recovery. It is a complete data recovery tool that can help you get back your files lost under different scenarios. This includes the corruption of the storage, accidental deletion, formatting of the drive, and so on. You can perform data recovery on your Windows/Mac system or several external sources as well in the following way.
Step 1: Select A Location to Start
To start with, just Launch Recoverit Data Recovery on your Windows PC or Mac and select a location to scan. You can pick any drive, partition, or even an external device (like a USB drive or hard disk) from here. To save time, you can browse to a specific location too from where you lost your photos.

Step 2: Wait for The Scan to Be Completed
After selecting an appropriate location, just start the recovery process and wait for the scan to be over. You can view the progress of the data recovery operation on the interface and can even halt the process in between.

Step 3: Preview And Recover Your Data
That's it! Once the application can back up deleted photos, it will let you preview them. You can use its inbuilt search and filter options to handpick the pictures you want to get back. In the end, just select your photos and click on the "Recover" button to restore them to a secure location of your choice.

What Else Can You Do To Recover Deleted Photos?
Although Recoverit Data Recovery has one of the highest success rates in the industry, here are some other techniques that you can follow to get your lost data back.
Fix 1: Check the Trash/Recycle Bin
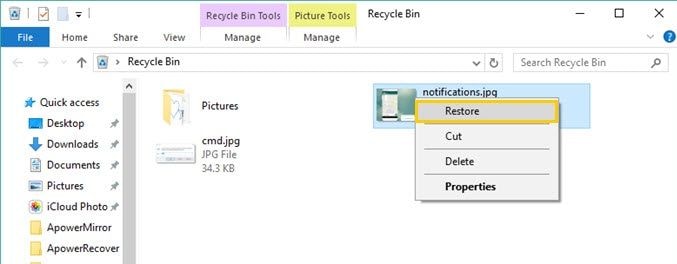
As you know, when we delete something from our computer, it is first shifted to the Recycle Bin. Before you take any drastic measures for the backup of deleted photos, make sure that you check the Recycle Bin or Trash folder. While Windows users can find Recycle Bin on the desktop, Mac users can check the Trash folder from the Dock (or Finder). From here, you can select your deleted photos and choose to recover them to their original location.
Fix 2: Recover Pictures from An Existing Backup
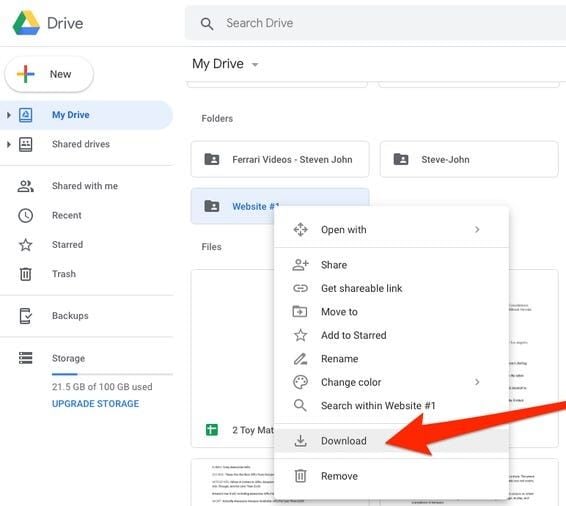
These days, there are so many ways to back up our data. Apart from saving it to an external hard disk, you can also take a dedicated Mac/Windows backup. Also, a lot of users choose to sync their photos with Google Drive or iCloud. In this case, you can just go to the cloud service where your photos are saved and you can just download them to the local storage again.
Fix 3: Repair the Disk Storage
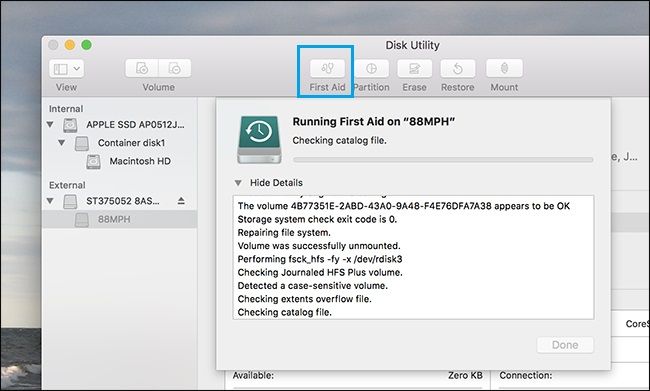
As stated above, sometimes the drive where your photos are stored can also get corrupt, leading to the loss of your data. If you want, you can learn how to backup deleted photos by fixing the partition or the entire drive. Mac users can just go to Finder > Applications > Utilities and launch the Disk Utility application. From here, you can select any drive or partition and click on the "First Aid" button to repair the drive.
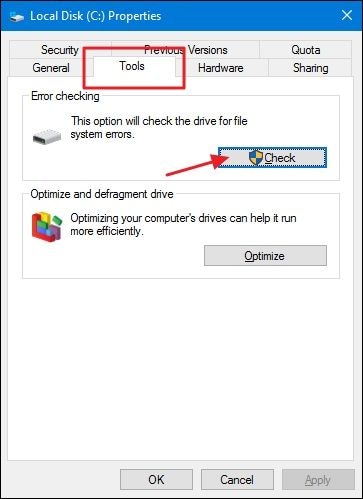
Similarly, Windows users can also launch Explorer and select the partition from My Computer that they wish to fix. Now, right-click to get its context menu and visit its Properties > Tools tab. Under the "Error-checking" section, click on the "Check" button and follow a simple wizard to repair the partition.
Part 3: Methods to Perform Deleted Picture Recovery and Backup on a System
If the above-listed methods can't do the backup of deleted photos, then you need to try more specific solutions. To learn how to backup deleted photos on Mac or Windows, I would recommend the following suggestions.
How to Recover Accidentally Deleted Photos on Windows?
If you have a previous version of the file, a system backup, or even a restore point stored, then you can easily retrieve a backup of deleted photos on your Windows.
Fix 1: Retrieve Photos from A Previous Version
A lot of times, Windows automatically stores a previous version of our documents and folders. Therefore, if you have recently made some changes or deleted your photos, then you can try this technique. To back up deleted photos, just select the folder where they were stored and right-click. Now, you can choose to restore a previous version or go to its properties to get this option.
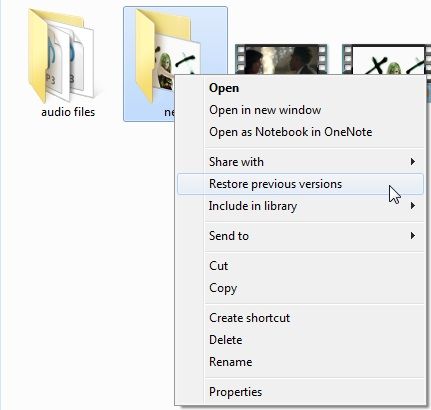
Fix 2: Restore Photos from A Backup
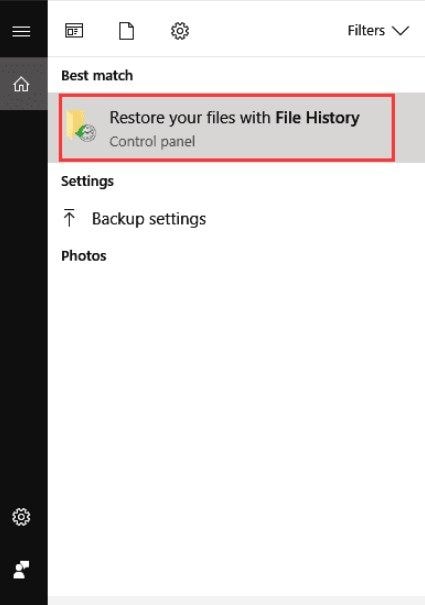
Almost all the major Windows versions have an inbuilt Backup and Restore option, which is known as File History. If you have already taken a backup of your photos, then you can select it, and restore it to your Windows. For this, you can just look for the File History option from the Startup menu or go to Control Panel > Backup & Restore option.
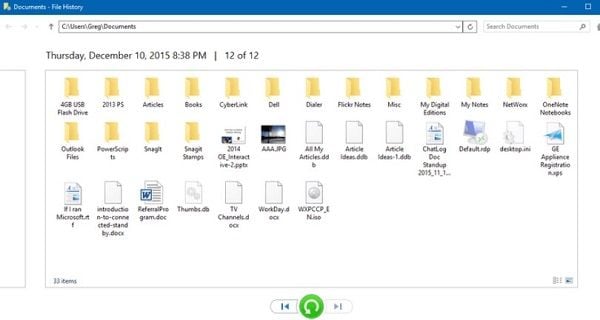
After that, you can select a backup file from the list of the File History available. This will let you browse the available data in the backup file so that you can restore your photos to their original location (or anywhere else).
Fix 3: Perform A System Restore
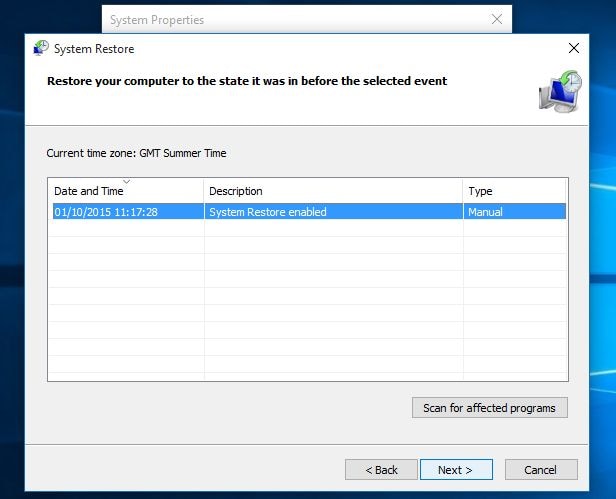
If you have created an existing restore point for your Windows, then you can use it to take a backup of deleted photos. For this, you can attach the source where the system restore is maintained and perform an Advanced Startup on your Windows. Once you get the Advanced Startup menu, go to Troubleshooting and select the "System Restore" option.
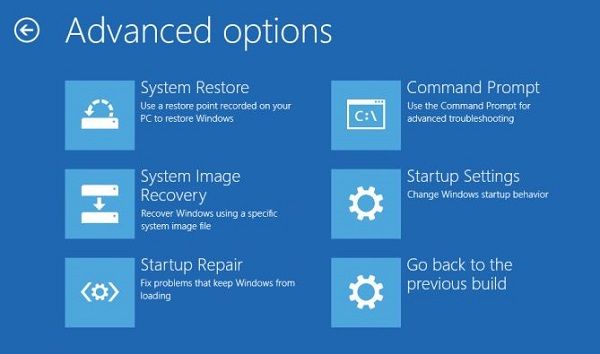
This will list the available restore points on the interface that you can view and select an appropriate option. Later, you can follow a simple click-through process to back up deleted photos from a restore point.
How to Retrieve Deleted Photos on Mac?
Just like Windows, Mac users can also implement some smart tips to learn how to back up deleted photos.
Fix 1: Retrieve Recently Deleted Photos
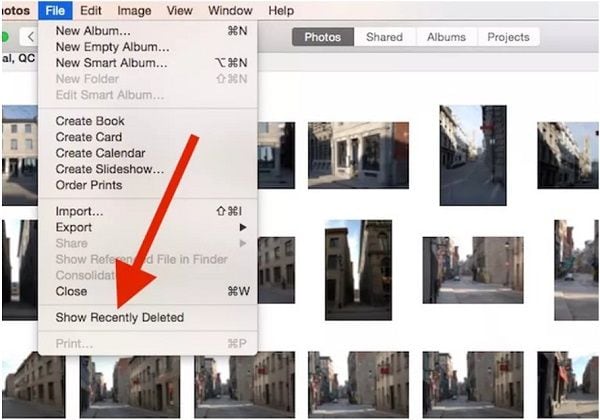
By default, Mac stores the recently deleted photos from the last 30 days that we can easily access. Therefore, if it has not been that long, then you can learn how to back up the deleted photos on your Mac this way. To check this, just go to Finder > Files > Show Recently Deleted option. This will launch all the recently deleted photos that you can select and restore to their original location.
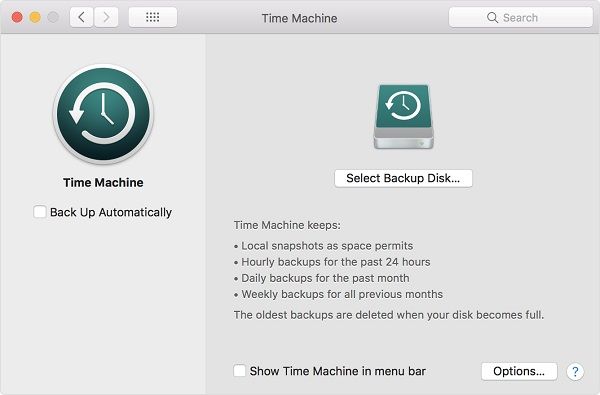
Fix 2: Back Up Deleted Photos from Time Machine
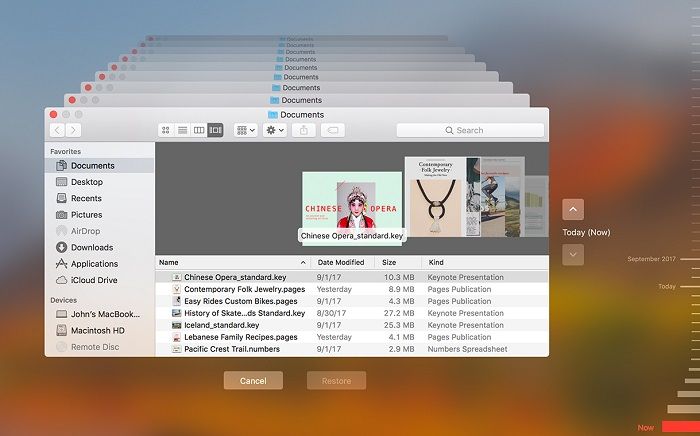
If you are a Mac user, then you might already know that Time Machine lets us maintain a backup of our data and restore it afterward. Thus, if a prior backup of your photos is there on the Time Machine, then you can just launch the app, and connect the Time Machine drive to your Mac. Now, choose to restore your data from the Time Machine app and browse it to select what you wish to backup. To back up deleted photos, just select them, and click on the "Restore" button on Time Machine's interface.
How to Backup Your Photos on Windows and Mac?
From the above-listed solutions on how to backup deleted photos, you can see the importance of maintaining a backup. Since both, Windows and Mac, provide an inbuilt solution to backup our data, you should consider exploring them.
Fix 1: Use File History in Windows
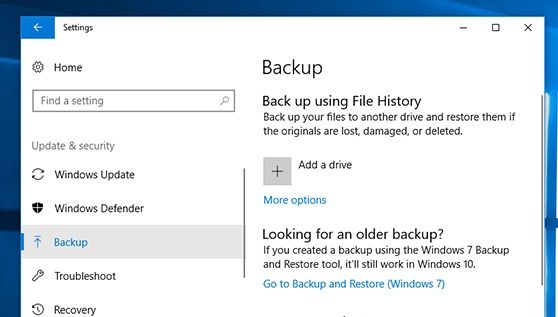
If you own a Windows PC, then you can go to its Settings > Backup or Control Panel > Backup & Restore option for this. Here, you will view a feature for "File History" where you can add a device. Just attach an external hard drive to your Windows and use File History to take a complete backup of your system. Later, you can attach the data source and use the File History feature to take a backup of deleted photos.
Fix 2: Use Time Machine on Mac
Time Machine is the inbuilt application in Mac that you can use to learn how to back up deleted photos. Firstly, you can just connect the external hard disk to your Mac and go to Finder > System Preferences > Time Machine to launch the application. Now, you can select the connected drive and follow a simple click-through process to take your backup on the connected source using Time Machine.
Part 4: A Guide to Retrieve and Back up Photos on Phones
After learning how to backup deleted photos on Windows and Mac, let's get to know different techniques to do it on iOS and Android devices.
How to Recover Deleted Pictures on iPhone?
If you own an iPhone, then you can go to the Recently Deleted album or just restore an existing backup of deleted photos as well.
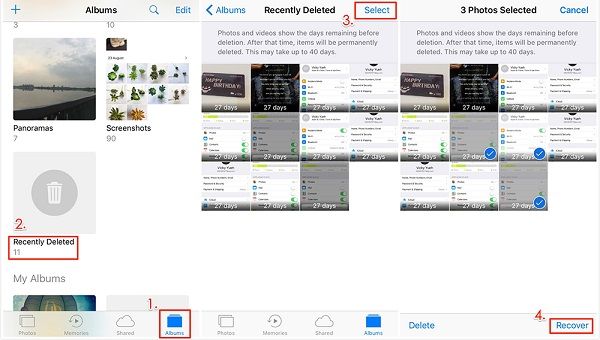
Fix 1: Check the Recently Deleted album
When we delete a picture from an iPhone, it isn't removed right away but is moved to the Recently Deleted album instead. Here, all the photos are stored for a maximum of 30 days on your iPhone. You can just go to your iPhone Gallery and tap on the Recently Deleted album from here. Now, select the photos that you accidentally deleted and tap on the "Restore" button.
Fix 2: Restore Photos from iTunes Backup
If you have maintained a prior backup of your iPhone on iTunes, then why not restore it instead. To learn how to back up the deleted photos this way, just connect your iPhone to the system and launch iTunes on it. Now, select your device and go to its Summary tab > Backups section. From here, click on the "Restore Backup" option and select a backup that you want to restore to your iPhone.
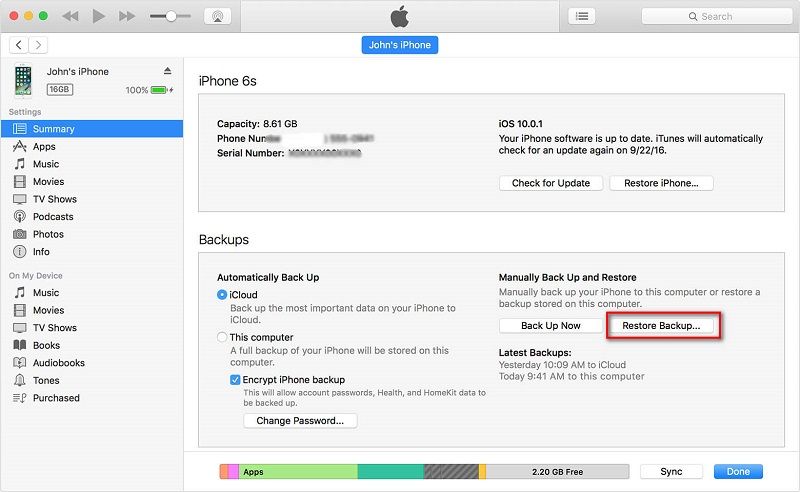
Please note that while doing so, the existing data on your iPhone would be deleted and replaced by the iTunes backup instead.
How to Do Deleted Pictures Recovery on Android?
Just like iPhone, Android users can also back up deleted photos from a second copy or check the Trash folder in their drive.
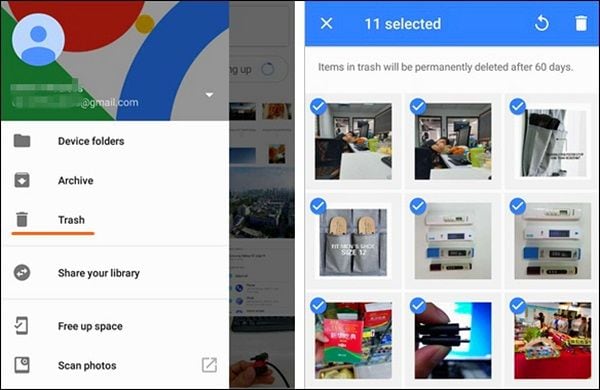
Fix 1: Check the Trash Folder in Drive
If you have synced your photos with Google Drive, then you can consider checking its Trash folder. Just launch the app, tap on the hamburger icon from the top, and visit the Trash folder. Here, you can view the photos that were deleted in the last 30 days on your device. Just select the pictures you want to get back and choose to restore them from here.
Fix 2: Restore An Existing Backup
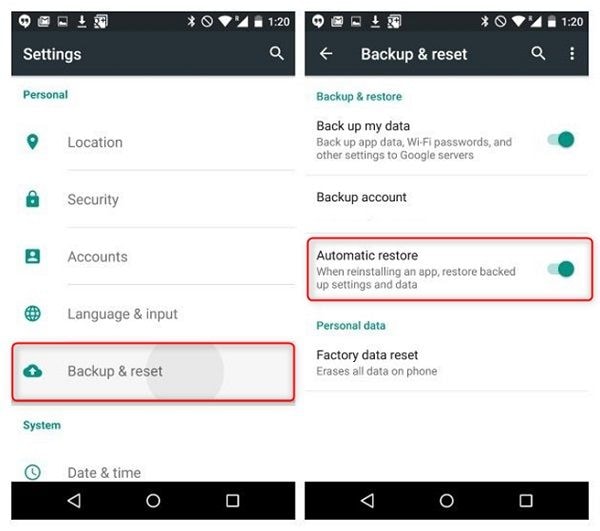
In case you have taken a prior backup of your Android, then you can restore the backup of deleted photos easily. Just go to its Settings > Backup &Restore, and choose to restore your data from a prior backup. You can also enable the automatic restore option from here to do an instant backup of deleted photos.
A Smart Way to Recover Deleted Photos from SD Card
Have you accidentally deleted your photos from an SD card or formatted it by mistake? Well, in these scenarios, you can also take the assistance of Recoverit Data Recovery to restore photos from an SD card. Just connect your SD card to your computer and launch Recoverit Data Recovery on it. From its home, go to the External Devices section, select the connected SD card, and start the recovery process. In the end, you can just select the recovered photos and save them to a secure location instead.

Different Ways to Backup your iPhone Photos
If you don't want to do the backup of deleted photos in the future, then make sure that you have maintained its dedicated copy in advance.
Fix 1: Backup iPhone Photos on iTunes
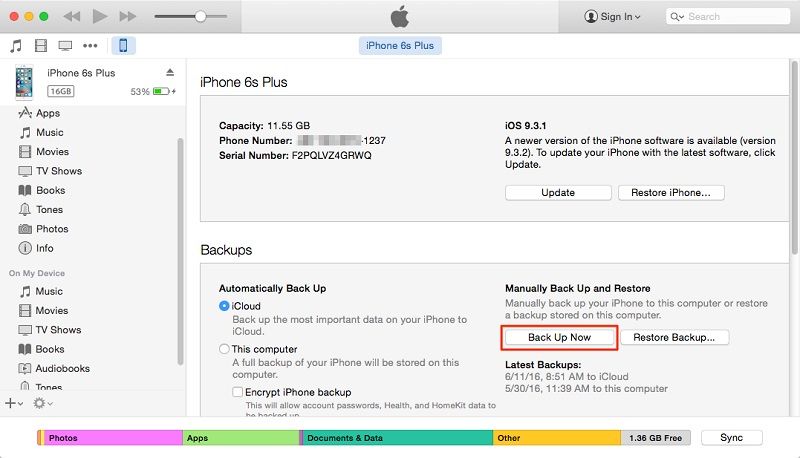
This is the easiest way for backing up your iPhone photos on your computer. Just connect your iPhone to the system, launch iTunes, and go to its Summary tab. Now, click on the "Back up now" button under the Backups section and choose to take your device's backup on the computer.
Fix 2: Turn on iCloud Photo Library
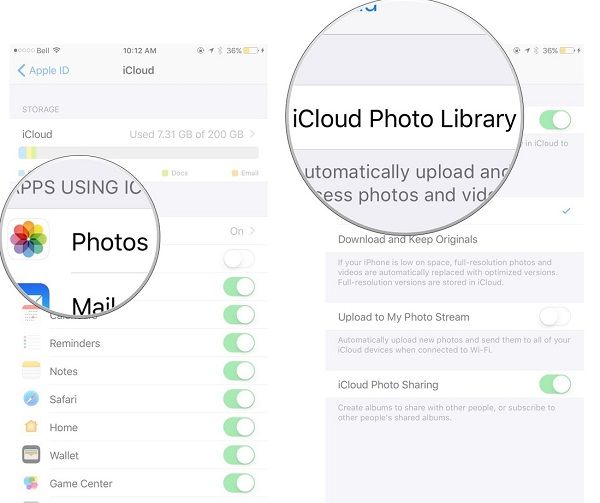
Besides iTunes, you can sync your iPhone photos to your iCloud account as well. To do that, just go to your iPhone's Settings > iCloud > Photos and turn on the "iCloud Photo Library" feature. This will sync your iPhone photos to iCloud – just be sure that there is enough free storage in your iCloud account beforehand.
How to Take Backup of your Android Device?
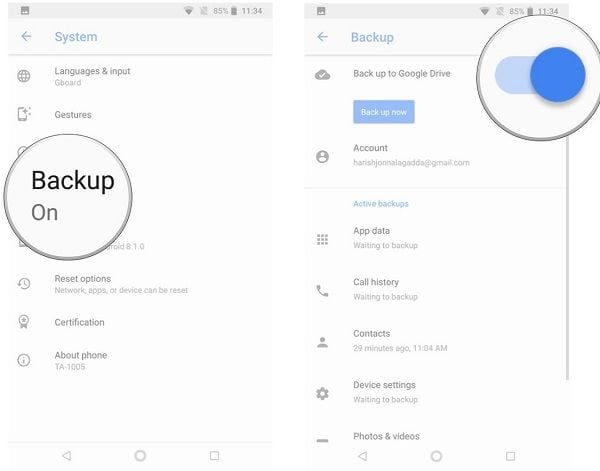
Lastly, if you don't want to end up losing your photos on Android, then turn on the backup option on it. To learn how to backup deleted photos, just go to its Settings > System > Backup and turn on the option to backup your data on Google Drive. In some phones, it is listed under Settings > Backup & Restore as well or Settings > Google > Backup. You can also customize what you wish to backup on Google Drive from here to save its storage.
Part 5: Tips to Avoid the Loss of your Photos in Future
As you can see, there can be all kinds of reasons and scenarios under which we end up losing our photos. If you don't want to go through the hassle of performing a backup of deleted photos, then I would recommend the following tips:
- Always maintain a second copy of your important photos so that you can easily retrieve them from their backup.
- Consider syncing your photos with Google Drive, iCloud, or any other reliable cloud-based service.
- Before editing your photos, make sure you have their copy, and only use a reliable application to manage them.
- Avoid using third-party photo editors and image viewers from sources that you can't trust.
- Turn on the firewall on your system or use a trusted anti-malware application to keep it safe.
- While transferring your photos or just viewing them, don't halt the process in between or restart your computer abruptly.
- The location where your photos are stored should be secure and not cluttered.
- Avoid storing your photos in the Windows drive (like C: Drive) and keep them in a separate partition instead.
- Only use dedicated SD cards for your Android phones and digital cameras. Try not to mix them or use different cards simultaneously.
- Try not to detach your SD cards, USB drives, hard disks, etc. abruptly from the system and make sure you remove them safely.
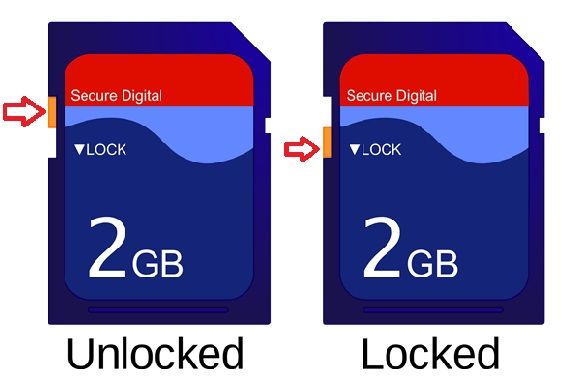
- If you use SD cards to store photos on your digital cameras or phones, then make sure you enable the write-protection feature. You can find a write-protection switch on the side that would make sure the SD card's data won't be deleted accidentally.
I hope that after reading this guide on how to back up the deleted photos under different scenarios, you would be able to get your data back. I would recommend keeping a recovery tool (like Recoverit Data Recovery) handy. In this way, whenever you would accidentally delete your photos, you can instantly run a scan and get them back. Feel free to implement these suggestions and share this guide on how to back up deleted photos with your friends to help them too!
Fix Media File Issues
- Recover & Repair Photos
- Recover Videos
- Repair Videos
- Recover & Repair Audio
- Recover & Repair Cameras


Eleanor Reed
staff Editor