


 TL;DR:
The 0xc10100be video error typically indicates missing codecs or file corruption, which can be resolved by installing specific HEVC/AV1 extensions, playing the file in VLC, or using a specialized video repair tool.
● For 4K or 8K smartphone and streaming videos, Windows requires installing the HEVC Video Extensions or AV1 Video Extension directly from the Microsoft Store to read modern compression formats.
● If the default media player fails, opening or converting the file to an MP4 format using VLC Media Player bypasses system codec limitations due to VLC's comprehensive built-in codecs.
● For severely corrupted files, Wondershare Recoverit can reconstruct broken internal data structures, provided you supply a working "Sample File" recorded on the exact same device with identical settings for its Advanced Repair feature.
Ask AI for a summary
 ChatGPT
 Perplexity
 Gemini
 Claude
 Grok
Grok
If you've run into the annoying 0xc10100be video error, you're not the only one. The good news is that there are several ways to fix the 0xc10100be video error and get your videos working again.
In this detailed guide, we'll look at what causes this error and give you step-by-step instructions on how to fix 0xc10100be error. Whether you're new to computers or have been using them for a long time, you'll find useful tips on how to fix "this file isn't playable 0xc10100be" error and enjoy your videos again.
| If this happened... | The Probable Cause | Fastest Solution |
| Error after transferring from iPhone/Camera | Missing HEVC/AV1 Codec | Install HEVC Extensions |
| Error after a partial download | Incomplete/Broken Header | Recoverit Video Repair |
| Error on a specific Media Player only | Player Compatibility Issue | Switch to VLC Player |
| Error on all players & all PCs | Severe File Corruption | Advanced Video Repair |
Try Wondershare Recoverit to Perform Video Recovery
 Security Verified. Over 7,302,189 people have downloaded it.
Part 1: What Causes the 0xc10100be Video Error?
Before we dive into the solutions, it's important to understand what might be causing the 0xc10100be video error. Here are some common reasons:
- Corrupted video file: The video file itself may be damaged or incomplete.
- Missing or outdated codecs: Your system might lack the necessary codecs to play the video.
- Incompatible file format: The video format may not be supported by your media player.
- Incorrect file associations: Your computer might be trying to open the video with the wrong program.
- System glitches: Temporary issues with your operating system can sometimes cause playback errors.
- Malware infection: In some cases, malicious software can interfere with video playback.
- Hardware problems: Faulty hard drives or other hardware issues can lead to video errors.
- Incomplete downloads: If the video file wasn't fully downloaded, it may result in playback issues.
Understanding these potential causes can help you better diagnose and fix the 0xc10100be video error when you encounter it.
Part 2: How to Fix the Video Error Code 0xc10100be?
Now that we've identified possible causes, let's explore various methods to fix the 0xc10100be video error. We'll discuss why each fix is helpful and provide step-by-step instructions for implementation.
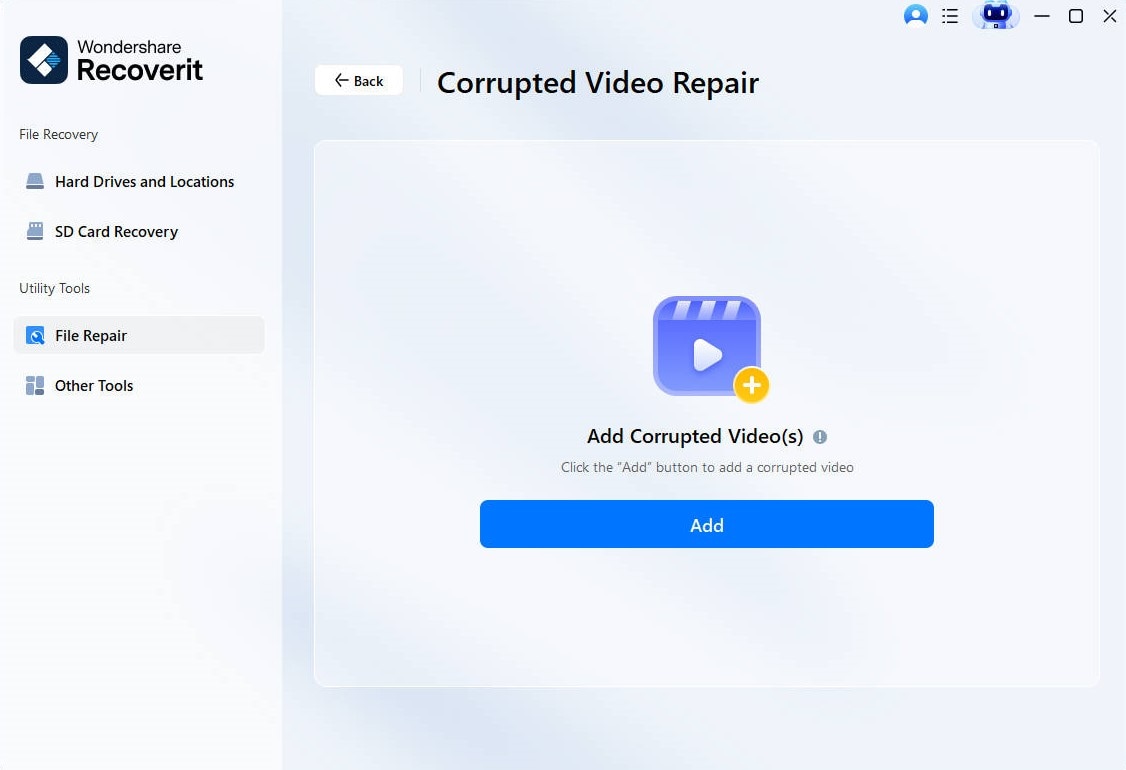
Fix 1: Repair Videos With 0xc10100be Error With Recoverit Corrupted Video Repair
When you're dealing with the 0xc10100be video error, one of the most effective solutions is to use a specialized tool like Recoverit to repair corrupted video files. This method is particularly useful when the error is caused by file corruption, which is a common issue.
Recoverit is designed to handle various types of file corruption that can lead to the 0xc10100be video error. It can repair videos with 0xc10100be Error by analyzing the file structure and attempting to reconstruct damaged segments. This tool is user-friendly and can often recover video content that might otherwise be lost.
Steps to repair videos with 0xc10100be Error with Recoverit Corrupted Video Repair:
- Install Recoverit on your computer. Launch the program and select the "Corrupted Video Repair" option from the main interface. Click on "Add Video" and browse to select the video file that's showing the 0xc10100be error.
- Once the file is added, click on "Repair" to start the process.
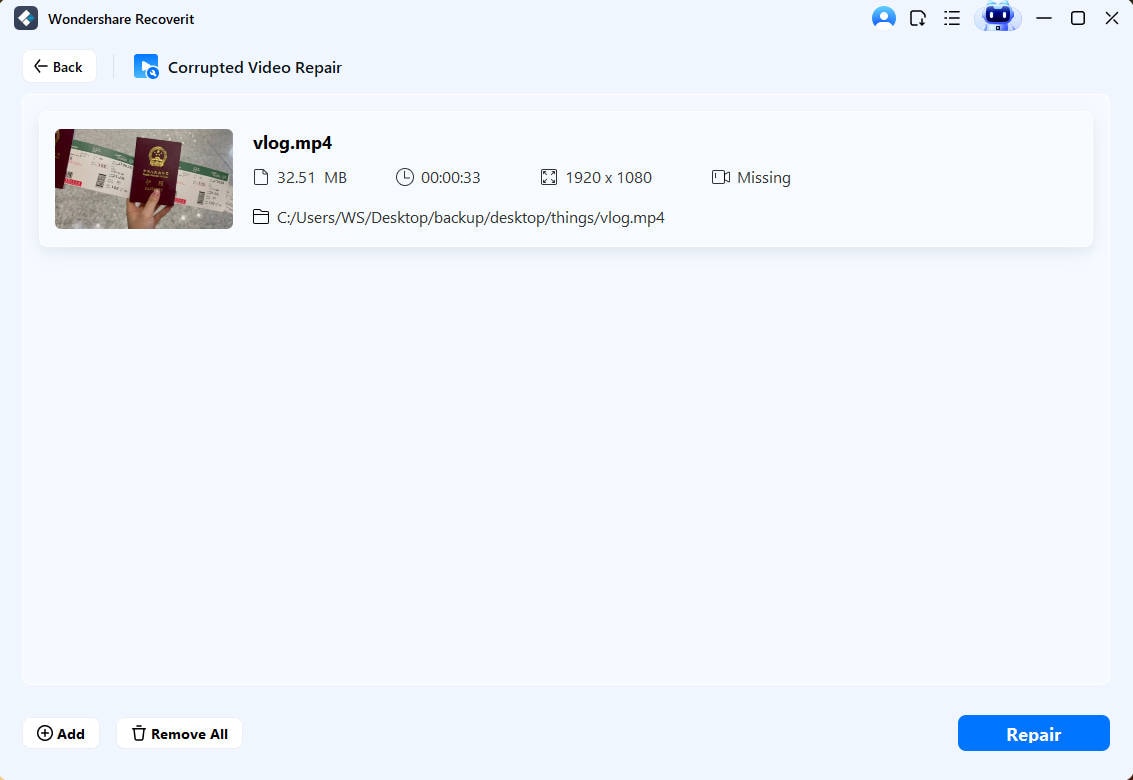
- After the repair is complete, preview the video to ensure it plays correctly. If satisfied with the result, click "Save" to save the file on your PC.
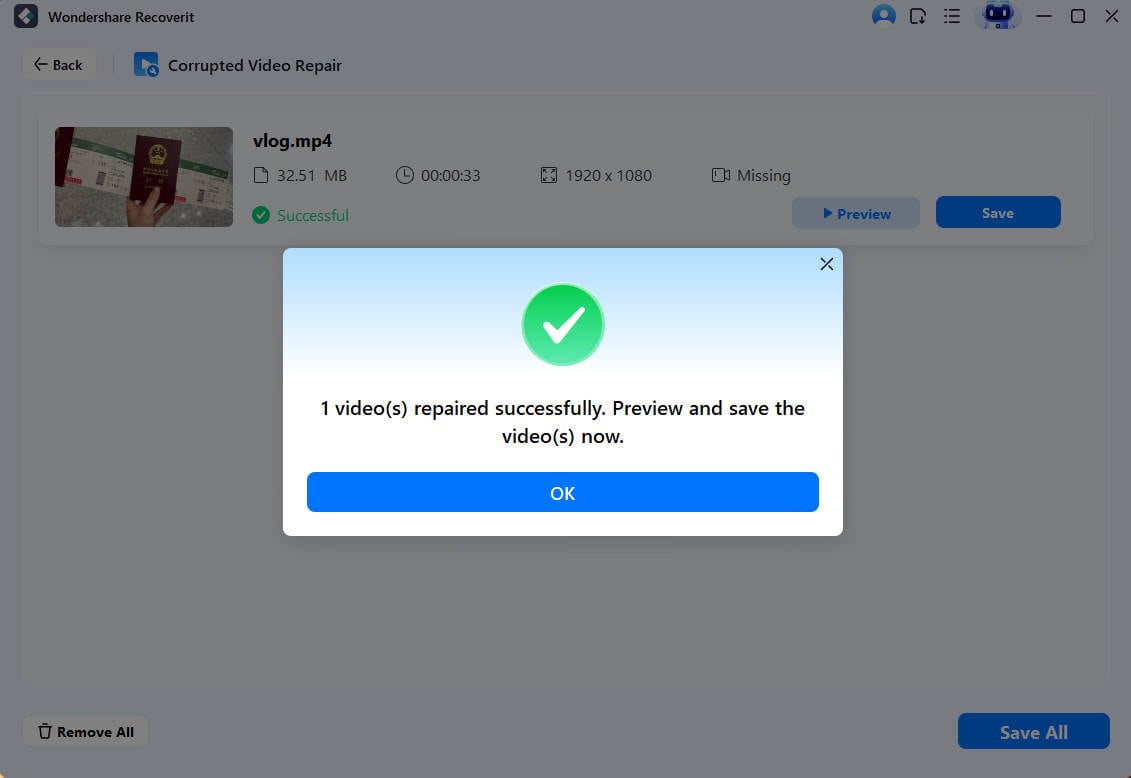
- Using Recoverit to fix the 0xc10100be video error can often resolve issues that other methods can't address, making it a powerful tool in your troubleshooting arsenal.
Fix 2: Open Video File in VLC Player
VLC Media Player is renowned for its ability to play a wide variety of video formats and its robust error-handling capabilities. When you're facing the 0xc10100be video error, trying to open the file in VLC can often bypass the issue.
VLC comes with a comprehensive set of built-in codecs, which means it can often play files that other media players struggle with. It also has advanced error correction features that can sometimes overcome corruption or formatting issues that cause the 0xc10100be video error.
Here’s how to Fix 0xc10100be Video Error using VLC:
- If you don't already have VLC, download and install it from the official VideoLAN website. Right-click on the video file that's giving you the 0xc10100be error. Select "Open with" from the context menu. Choose "VLC media player".

- If VLC successfully plays the video, you've found a workaround for the error.
- If VLC plays the video without the 0xc10100be error, it suggests that the issue might be with your default media player or missing codecs on your system. In this case, you might want to consider using VLC as your primary media player or updating the codecs on your system.
Fix 3: Download the Right Codecs
Codecs are essential components that enable your computer to encode and decode digital video files. The 0xc10100be video error can often occur when your system is missing the necessary codecs to play a particular video format.
Downloading and installing the correct codecs can provide your system with the tools it needs to properly read and play video files, potentially resolving the 0xc10100be video error.
Modern Codec Alert: HEVC and AV1 Support
If you are trying to play 4K or 8K video from a smartphone (HEVC) or a streaming site (AV1), Windows may throw the 0xc10100be error simply because the HEVC Video Extensions or AV1 Video Extension are missing from the Microsoft Store. Before assuming the file is corrupt, ensure these extensions are installed. Without them, your system literally cannot "read" the modern compression used in 2026-era video files.
Here’s How to Fix 0xc10100be Video Error:
- Identify the format of the video file that's causing the error. You can do this by right-clicking the file, selecting "Properties", and looking at the file extension.

- Search for a reputable codec pack that includes support for your video format. K-Lite Codec Pack is a popular and comprehensive option. Download the codec pack. Run the installer and follow the on-screen instructions to install the codecs.

- Restart your computer to ensure all changes take effect. Try playing the video file again to see if the 0xc10100be error has been resolved.
- Remember to exercise caution when downloading codec packs and only use trusted sources to avoid potential malware. Installing the right codecs can often fix the 0xc10100be video error by providing your system with the necessary tools to decode and play the problematic video file.
Fix 4: Convert the Video File Format in VLC
Sometimes, the 0xc10100be video error occurs because your system or preferred media player doesn't support the current format of the video file. In such cases, converting the video to a more widely supported format can resolve the issue.
Converting the video to a different format can eliminate compatibility issues that may be causing the 0xc10100be video error. It can also help if the original file is corrupted in a way that affects its current format.
Here’s How to Fix 0xc10100be Video Error:
- Open VLC media player. Click on "Media" in the top menu, then select "Convert / Save". Click "Add" and select the video file that's giving you the 0xc10100be error.

- Click the "Convert / Save" button at the bottom of the window. In the new window, click the "Profile" dropdown and select a widely supported format like MP4.

- Click the "Browse" button next to "Destination file" to choose where to save the converted video. Click "Start" to begin the conversion process. Once complete, try playing the newly converted video file.
- Converting the video format can often fix the 0xc10100be video error by creating a new file that's more compatible with your system or media player. If the conversion is successful and the new file plays without errors, you've effectively resolved the issue.
Fix 5: Rename the Video File
While it might seem too simple to be effective, renaming the video file can sometimes resolve the 0xc10100be video error. This method is particularly useful if the error is caused by an issue with file associations or if the Image name contains special characters that are causing problems.
Renaming can reset file associations and eliminate any issues caused by special characters or overly long Image names, which can sometimes trigger the 0xc10100be video error.
Steps to rename the video file:
- Locate the video file that's causing the 0xc10100be error in File Explorer. Right-click on the file and select "Rename" from the context menu.

- Give the file a simple, descriptive name without any special characters. Press Enter to save the new name. Try playing the renamed video file to see if the 0xc10100be error has been resolved.
- If renaming the file fixes the 0xc10100be video error, it suggests that there was an issue with how your system was interpreting the Image name or its associations. This simple fix can often resolve playback issues without the need for more complex solutions.
Fix 6: Run the Video Playback Troubleshooter
Windows comes with built-in troubleshooters designed to automatically detect and fix common issues, including video playback problems. The Video Playback troubleshooter can be a useful tool in resolving the 0xc10100be video error.
The troubleshooter can identify and correct system settings, update drivers, and resolve other issues that might be causing the 0xc10100be video error. It's an automated way to apply several potential fixes at once.
Steps to run the Video Playback troubleshooter:
- Open the Windows Settings by pressing Windows key + I. Click on "System", then scroll down and click on "Troubleshoot". Click on "Other Troubleshooters".

- Look for the Video Playback troubleshooter. Click Run. Follow the on-screen instructions and allow the troubleshooter to detect and fix any issues it finds. Once the process is complete, restart your computer.
- Try playing the video file again to see if the 0xc10100be error has been resolved.
- Running the Video Playback troubleshooter can often fix the 0xc10100be video error by addressing underlying system issues that may be causing the problem. It's a good option to try if you're unsure about making manual changes to your system.
Bonus Video Tutorial: How to Fix Corrupted/Broken MP4 Videos?
Part 3: Tips to Avoid the Video Error Code 0xc10100be
Preventing the 0xc10100be video error is often easier than fixing it. Here are some tips to help you avoid encountering this error in the future:
- Keep your system updated: Regularly install Windows updates and driver updates to ensure your system has the latest compatibility fixes and security patches.
- Use reputable video downloading tools: When downloading videos, use trusted sources and tools to minimize the risk of corruption or incomplete downloads.
- Maintain a good antivirus program: Keep your antivirus software up-to-date and run regular scans to prevent malware that could interfere with video playback.
- Use a reliable media player: Stick to well-known, regularly updated media players like VLC or MPC-HC that are known for their wide format support and robust performance.
- Be cautious with codec packs: Only download codec packs from reputable sources, and avoid installing unnecessary or outdated codecs that could conflict with your system.
- Check file integrity after downloads: Use checksum tools to verify that downloaded video files are complete and uncorrupted.
By following these tips, you can significantly reduce the likelihood of encountering the 0xc10100be video error and enjoy smoother video playback experiences.
Conclusion
The 0xc10100be video error can be a frustrating obstacle when you're trying to enjoy your favorite videos. However, as we've seen in this comprehensive guide, there are numerous ways to fix this error and get your videos playing smoothly again. Remember, the key to 0xc10100be fix often lies in identifying its root cause.
Don't let the 0xc10100be video error keep you from enjoying your video content. With patience and the right approach, you can overcome this issue and get back to watching your favorite movies, TV shows, and personal videos without interruption.
Try Wondershare Recoverit to Perform Data Recovery
Security Verified. Over 7,302,189 people have downloaded it.
FAQ
-
What does the 0xc10100be video error mean?
The 0xc10100be video error is typically an indication that your system is unable to play a video file. This can occur due to various reasons such as file corruption, missing codecs, incompatible file formats, or system issues. When you encounter this error, it means that your media player or operating system has run into a problem while trying to decode or play the video file. -
Can the 0xc10100be video error damage my computer?
No, the 0xc10100be video error itself cannot damage your computer. It's simply an error message indicating a problem with playing a specific video file. However, if the error is caused by malware or a system issue, those underlying problems could potentially cause harm to your computer. It's always a good idea to keep your system updated and protected with antivirus software. -
Is it safe to use third-party software to fix the 0xc10100be video error?
Generally, it's safe to use reputable third-party software like Wondershare Recoverit to fix the 0xc10100be video error. However, it's crucial to download such software only from official sources and to be cautious about granting system permissions. Always research the software and read reviews before installing. Stick to well-known, trusted programs to minimize any potential risks to your system.


