Photo Booth application on the Mac is an excellent way to take pictures with good built-in features such as iSight camera images. However, it is frustrating when Photo Booth pictures are lost or accidentally deleted. Many users face this issue with online queries like “Is it possible to recover deleted pictures from the photo booth?” and “Where are the photo booth photos stored? I can't find it”.
Quick Answer: Yes, you can recover deleted Photo Booth pictures and videos. The easiest ways are checking your Mac's Trash, restoring from a Time Machine backup, or using a data recovery tool. This guide covers 5 proven methods.
In this article
Reasons Behind Pictures Become Inaccessible in Photo Booths
It is frustrating to lose precious photos in a Photo Booth on your Mac. There might be many reasons for the problem ranging, from hardware-related to software bugs.
Following are some of the primary reasons why your pictures are inaccessible in the Photo Booth on your Mac:
- Abrupt Mac Shutdown: One of the common causes for inaccessible photos on Photo Booth on Mac is due to abrupt system shutdown while editing. Thus, if you are editing your photos on Photo Booth, make sure to save your edits before shutting down your Mac.
- Virus or Malware Attacks: Often viruses and malware can corrupt or damage photos on your Mac, resulting in Photo Booth photos inaccessibility. Therefore, you should consider installing robust Anti-virus software on your Mac to keep your photos safe and accessible in Photo Booth.
- Accidental Deletion: If you have deleted your photos mistakenly, then it will make them inaccessible in the Photo Booth on your Mac. Hence, be extra careful when editing or viewing photos to avoid accidental deletion of your pictures.
- Transfer or Software Error: Interruptions while transferring photos to your Mac can cause you to lose them. This can occur because of unexpected interruptions when transferring photos from external devices to your Mac.
Where do Photo Booth Photos Go?
Every time you capture a photo or video in Photo Booth, the pictures are automatically saved in the Photo Booth Library folder inside Pictures. Unless you have specified another location to save the captured photo or video on the Photo Booth app, you can find them in the Photo Booth Library in the Pictures folder. After capturing a photo, if you are wondering where do photo booth photos go, go to the Pictures folder on your Mac and then to Photo Booth Library to find all the photos.
How To Recover Deleted Pictures and Videos from Photo Booth on Mac
It is annoying to not find your pictures in the Photo Booth on your Mac. This could be due to multiple reasons mentioned earlier. However, there are many easy methods you can follow to easily recover deleted photos in Photo Booth on your Mac.
Here is a brief overview of the solutions with their pros and cons for your easy reference:
| Solutions | Pros | Cons |
| Check Mac’s Trash for Deleted Photos & Videos | Quick and easy if recently deleted. | Limited to items recently deleted and not emptied. |
| Check the ‘Pictures’ folder in Finder | Simple to search for images. | Might not contain all images, especially if not saved directly there. |
| Check the shared Photo Booth pictures | Could find images shared with others. | Limited to images shared via Photo Booth. |
| Restore Files with a Time Machine Backup | Restores the photos to a previous point. | Requires a Time Machine backup to be set up before deletion. |
| Use Data Recovery Software (For Photos & Videos) | Can recover lost photos even after emptying Trash. | Might require a purchase for full functionality. |
Here are the following methods to resolve how to get deleted photo booth pictures back on your Mac:
Method 1: Check Mac’s Trash for Deleted Photos & Videos
If you have accidentally deleted or recently deleted photos from the Photo Booth Library, they will be moved into the Trash bin on your Mac. Unless you have emptied the Trash bin or deleted photos permanently, the Trash bin stores deleted photos for 30 days.
Follow the below steps for deleted photos and how to get a Photo Booth on Mac:
- Open the “Trash” app from the Dock on your Mac.
- Locate and select the deleted photos you want to recover back.
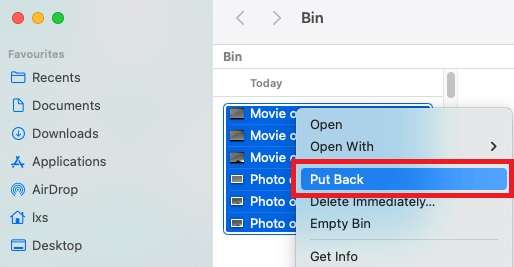
- Right-click on the selected photos and select the “Put Back” option.

- The restored photos will be stored back in their original location or Photo Booth Library.
Method 2: Check the ‘Pictures’ folder in Finder
As mentioned earlier, by default the photos in Photo Booth are saved in the Photo Booth Library located in the Pictures folder on Mac. In case you are not able to view photos in the Photo Booth application due to any error or bugs. But you can access the missing or deleted photos from the Photo Booth app in the library folder and download them from there.
Here is how to get Photo Booth on Mac images from the Pictures folder:
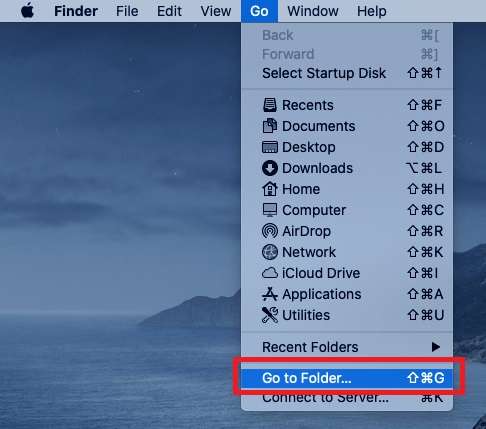
- Open the “Finder” app menu and select the “Go to Folder” option from the “Go” tab at the top.

- Enter the location “/Users/Pictures/Photo Booth Library/” and click the “Go” button.

- Next, right-click on “Photo Booth Library” and select the “Show Package Contents” option.

- Click on “Pictures” from the list and check if you can find your missing photos in the folder.
- If you can view the lost Photo Booth photos, restore them and take a backup at another location.
Method 3: Check the shared Photo Booth pictures
On the Photo Booth app, you can share photos through text, email, or AirDrop options. If you have shared your deleted Photo Booth pictures with your friends and family, you can ask them to share them back with you. Alternatively, if you have shared Photo Booth Pictures on social media platforms such as Facebook, you can search from your media gallery and re-download them back onto your Mac from there.
Method 4: Restore Files with a Time Machine Backup
Apple provides a built-in backup feature, Time Machine, to create incremental backups of your data on Mac. If you have previously created a Time Machine backup, before deleting the Photo Booth photos, you can easily restore them from backup.
Here is how to recover Photo Booth pictures on Mac using the Time Machine:
- First, connect the external drive where you took the Time Machine back of your Mac. Select the “Enter Time Machine” option from the menu.

- Select the timeline containing the lost Photo Booth photos. Navigate to the location where you have stored the Photo Booth photos, and press “Space Bar” on your keyboard to preview the photo.
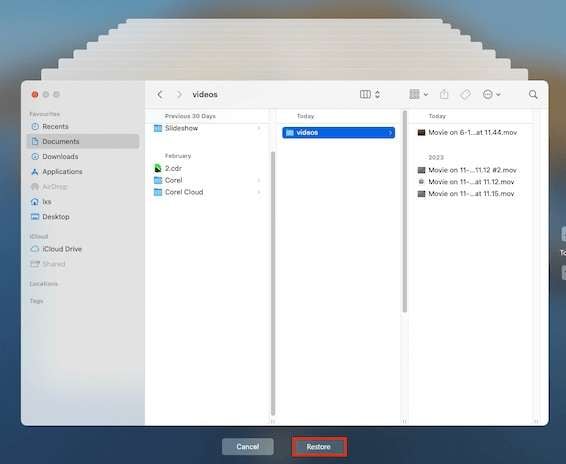
- Select the photos you want to recover back on your Mac and click on the “Restore” button.

- You can restore the photo to the original Photo Booth Library or provide a new location to save it.
Method 5: Use Data Recovery Software (For Photos & Videos)
If all else fails, consider using third-party data recovery tools like Recoverit - Data Recovery for Mac to resolve how to recover photo booth pictures back issue. It enables the recovery of images from Photo Booth through a secure and straightforward process, requiring only a few clicks.
Here are a few key aspects of the data recovery features of Recoverit:
- The program offers a user-friendly interface, making it suitable for those with varied levels of technical ability. You can effectively restore lost or deleted photos from any storage device.
- It includes a quick scan for fresh deletions and a deep scan for difficult-to-recover cache files.
- It supports a range of photo formats, including JPG, TIFF/TIF, PNG, BMP, GIF, PSD, CRW, CR2, NEF, ORF, RAF, SR2, MRW, DCR, WMF, DNG, ERF, RAW, and others.
- It allows you to recover pictures from the recycle bin, hard disk, memory card, flash drive, digital camera, and camcorder.
- You can recover pictures after a sudden deletion, formatting, lost disk, virus assault, or system crash in a variety of conditions.
- Before completing the recovery process, you can review recoverable cache files to check that they are restoring the right data.
Follow the below steps for how to get deleted Photo Booth pictures back issue using Recocverit:
- Download and install the Recoverit data recovery application on your Mac. Make sure not to install the program on the same partition or hard drive where your Photo Booth photos are lost.
- Launch the program and select the “Deleted File Recovery” mode option to recover deleted photos on Photo Booth.
- Click on the “Hard Drives and Locations” option on the left side panel and select the location of the disk or drive where you have lost your photos.

- Click the “Start” button to begin the finding lost data process. The app will start a quick scan of your Mac hard drive or selected partition.
- After the scan is completed, all the recoverable photos are displayed. Preview your lost photos and click the "Recover" button to retrieve them. Make sure to save the recovered data not in its original path.

Tips & Notes: Prevent Photo Booth Recovery Problems In The Future
While Photo Booth is a default photo tool for Mac users with multiple features, it sometimes can cause unwanted issues. With prior knowledge of probable issues, you can be well prepared to avoid any future problems rather than looking for solutions.
Here are some simple tips to follow to prevent Photo Booth recovery problems:
- Properly Remove SD or Memory Card: One of the primary causes of photo loss or corruption on Mac is to improper removal of external photo storage devices. If you remove the SD or memory card without properly ejecting it from the system first will result in the corruption of the photos.
- Check Memory Storage Full: Most modern digital cameras and smartphones come with a memory full indication system. However, often it is ignored at the moment while taking precious pictures. So, make sure to check if you have enough free space in the memory card before capturing or recording on your device.
- Enough Battery: Similar to memory storage space, enough battery percentage is also one of the important aspects that can cause photos to get lost or corrupted. With a low battery on your capture device, your device can turn off unknowingly causing photos to be lost.
- Safe Device and Memory Card Storing: Sometimes physical damage to the capturing device or memory card can result in Photo Booth recovery problems. Especially, due to water, dust, or static electric material can damage. Therefore, keep your device and memory card for photos in a safe place without any harmful environments.
- Formatting Errors: If you format your device or memory card will permanently erase all the data including photos. Before formatting, check if you have any photos stored in the device's internal memory or memory card to avoid Photo booth restoration errors. In case you find any photos stored, make sure to transfer them to a safer place before going ahead with formatting.
- No Photos Backup: Many users tend to keep their photos on the capture device or memory card, failing to take a backup for data loss issues. Without any backup of the photos, photos lost in the device or memory card can result in phone booth restoration problems. That is why it is advised to you to take multiple backups of your photos on Mac or external storage devices to avoid photobooth restoration mistakes.
Conclusion
Whether due to hardware or software issues, you have lost photos in the Photo Booth on your Mac. By following the above methods such as Trash bin or Time Machine, you can easily restore them. However, for a comprehensive data recovery solution, you can use Recoverit software for guaranteed results.
FAQ
-
1. Where are Photo Booth photos stored on a Mac?
By default, all the photos taken in the Photo Booth are stored in the Photo Booth Library folder inside Pictures with the “/Users/Pictures/Photo Booth Library/Pictures” location path on your Mac. You can follow the steps above to locate the photos in the Photo Booth Library on your Mac. -
2. How can I import photos into the Photo Booth?
You can import photos into the Photo Booth app on your Mac by clicking on the File at the top and selecting the Import option. Later, you have the option to import the photos from a camera, scanner, or other connected devices. -
3. Is there a 'recently deleted' on Photo Booth?
No, Photo Booth does not have its own 'Recently Deleted' album. Deleted files go straight to the Mac's main Trash bin. -
4. Can I get back videos deleted from the Photo Booth?
Yes, you can get back your deleted videos from the Photo Booth on your Mac by following various methods, including: 1. Look for it in the Trash Bin of the Mac; 2. Check in the Photo Booth Library folder in Pictures; 3. Get back deleted videos from the Time Machine backup; 4. Use the Recoverit data recovery software to easily get back the videos deleted.


 ChatGPT
 Perplexity
 Google AI Mode
 Grok
Grok


