

 TL;DR:
You can successfully recover deleted iPhoto library pictures on a Mac by acting immediately to prevent data overwriting and utilizing built-in features like Time Machine, iCloud's 30-day recovery window, or iPhoto's native rebuild tools before resorting to third-party software.
● For recent or synced deletions, retrieve photos from the Mac Trash or the iCloud Recently Deleted folder within its strict 30-day window, or restore complete libraries with intact metadata using prior Time Machine backups.
● If the iPhoto library is unreadable or photos disappear after a macOS update, hold the Command and Option keys while launching the app to access the First Aid Rebuild options, or search Finder for hidden .iPhoto library files.
● When dealing with emptied Trash or permanently deleted items, utilize specific recovery software like Recoverit, but strictly install the tool and save the retrieved files to a different external drive to avoid overwriting the original storage sectors.
Ask AI for a summary
 ChatGPT
 Perplexity
 Gemini
 Claude
 Grok
Grok
Precious photos stored in your iPhoto library—whether heartfelt family memories or essential work images—can feel irreplaceable when they’re accidentally deleted. But there’s good news. Recovery is possible. With the right tools and techniques, you can restore those images and breathe a sigh of relief.
Many Mac users face this problem daily. Photos disappear due to system crashes, accidental deletion, or software updates. Fortunately, there are effective ways to recover your iPhoto library. Permanent deletion doesn’t always mean your iPhoto data is gone for good. With today’s sophisticated recovery tools, retrieving lost files has become simpler and more efficient than ever.
This guide shows you how to recover iPhoto photos step by step. We'll cover multiple methods to restore iPhoto libraries. From professional software to built-in Mac features, you'll learn every technique. By the end, you'll master iPhoto recovery completely.
Table of Contents
-
- Method 1: Use Recoverit to Recover iPhoto Library Photos
- Method 2: Restore from Time Machine Backup
- Method 3: Recover from iCloud
- Method 4: Recover from Trash (if not emptied)
- Method 5: Search for Migrated Libraries via Finder
- Method 6: Check Archive and Shared Albums for Hidden Photos
- Method 7. Rebuild iPhoto Library for iPhoto Recovery

Part 1: Why Photos Go Missing from Your iPhoto Library?
Photo loss in iPhoto happens for various reasons. Recognizing the underlying causes of photo loss can help you avoid similar issues in the future and guide you toward the most effective recovery solution. Below are the key factors that often lead to the need for iPhoto restoration.
- Accidental deletion: Users accidentally delete photos while organizing libraries
- Software updates: macOS or iPhoto updates sometimes cause photo disappearance
- Hard drive failure: Physical damage to storage devices destroys photo data
- Power outages: Sudden power loss during photo import causes file corruption
- User errors: Incorrect library migration or backup restoration damages photos
- Storage corruption: File system errors make iPhoto libraries unreadable
Part 2: Can I Recover Deleted iPhoto Library Photos Easily?
Yes, you can recover deleted photos from iPhoto in most cases. The success depends on several factors. When it comes to recovering your iPhoto library, timing is everything. Acting quickly significantly improves the likelihood of successful data restoration.
When you delete photos, they don't disappear immediately. The system marks their storage space as available. Until new data overwrites this space, retrieving iPhoto photos remains possible. This is why immediate action improves recovery success rates significantly.
However, some situations make recovery harder. Permanent deletion, drive formatting, or physical damage complicates the process. But even in these cases, professional tools can often restore iPhoto libraries. The key is choosing the right method for your specific situation.
Part 3: Quick Methods: Recover Deleted Photos in iPhoto Library
Multiple methods exist to recover iPhoto library data. Each method works best in different situations. Some require special software, while others use built-in Mac features. Select the recovery method that best aligns with the nature of your data loss.
Method 1: Use Recoverit to Recover iPhoto Library Photos
Recoverit is a powerful data recovery tool. It focuses on retrieving lost photos from various sources. The software is compatible with all iPhoto library formats.
Even permanently deleted images can be recovered. Recoverit uses advanced scanning technology to dig deep. It locates files that other methods often miss.
This tool offers one of the highest success rates for iPhoto recovery. It supports all image formats used by iPhoto. If you're serious about getting your photos back, Recoverit is a strong option.
Here are some key features of Recoverit for iPhoto recovery:
- Supports All iPhoto Library Formats – Compatible with every version of iPhoto libraries.
- Advanced Scanning Algorithms – Detects deeply fragmented photo files that other tools often miss.
- Full Image Format Compatibility – Recovers JPEG, PNG, TIFF, RAW, and all other formats used by iPhoto.
- High Recovery Success Rate – Offers the most reliable recovery rates.
- Optimized for macOS – Designed specifically for Mac systems and file environments.
- Recovery After Permanent Deletion – Retrieves photos even if they've been permanently deleted.
- Preview Before Recovery – Allows users to view recoverable images before restoring them.
How it helps:
- Recovers photos from corrupted iPhoto libraries
- Works even after emptying the Trash completely
- Supports all image formats and file types
- Provides a preview before recovery to verify files
Step 1: Install Recoverit on your Mac. Launch the application. Choose the location where your iPhoto library was stored. Click "Start".

Step 2: The tool will now begin the deep scan process.
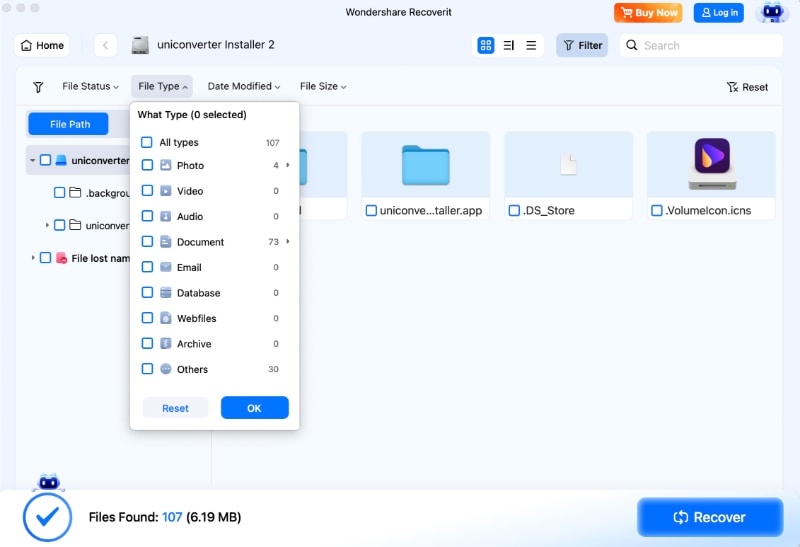
Step 3: Preview recovered photos. Select the ones you want to restore. Click "Recover". Save them to a new location.

Video Tutorial: How to Manage iPhone Photo Libraries?
Method 2: Restore from Time Machine Backup
Time Machine creates automatic backups of your Mac. If enabled, it backs up your iPhoto library regularly. This method works when you have recent backups available. It's the easiest way to restore iPhoto libraries completely.
Time Machine backup restoration is highly reliable. It preserves original photo quality and metadata. The process restores entire libraries or individual photos. This makes it perfect for comprehensive iPhoto recovery.
How it helps:
- Restores complete iPhoto libraries with metadata intact
- Maintains original photo quality and organization
- Works for any time period covered by backups
- Integrates seamlessly with the Mac system recovery
Step 1: Open Time Machine from System Preferences or the menu bar. Navigate to the date when your photos were still available. Browse through different backup versions using timeline controls.
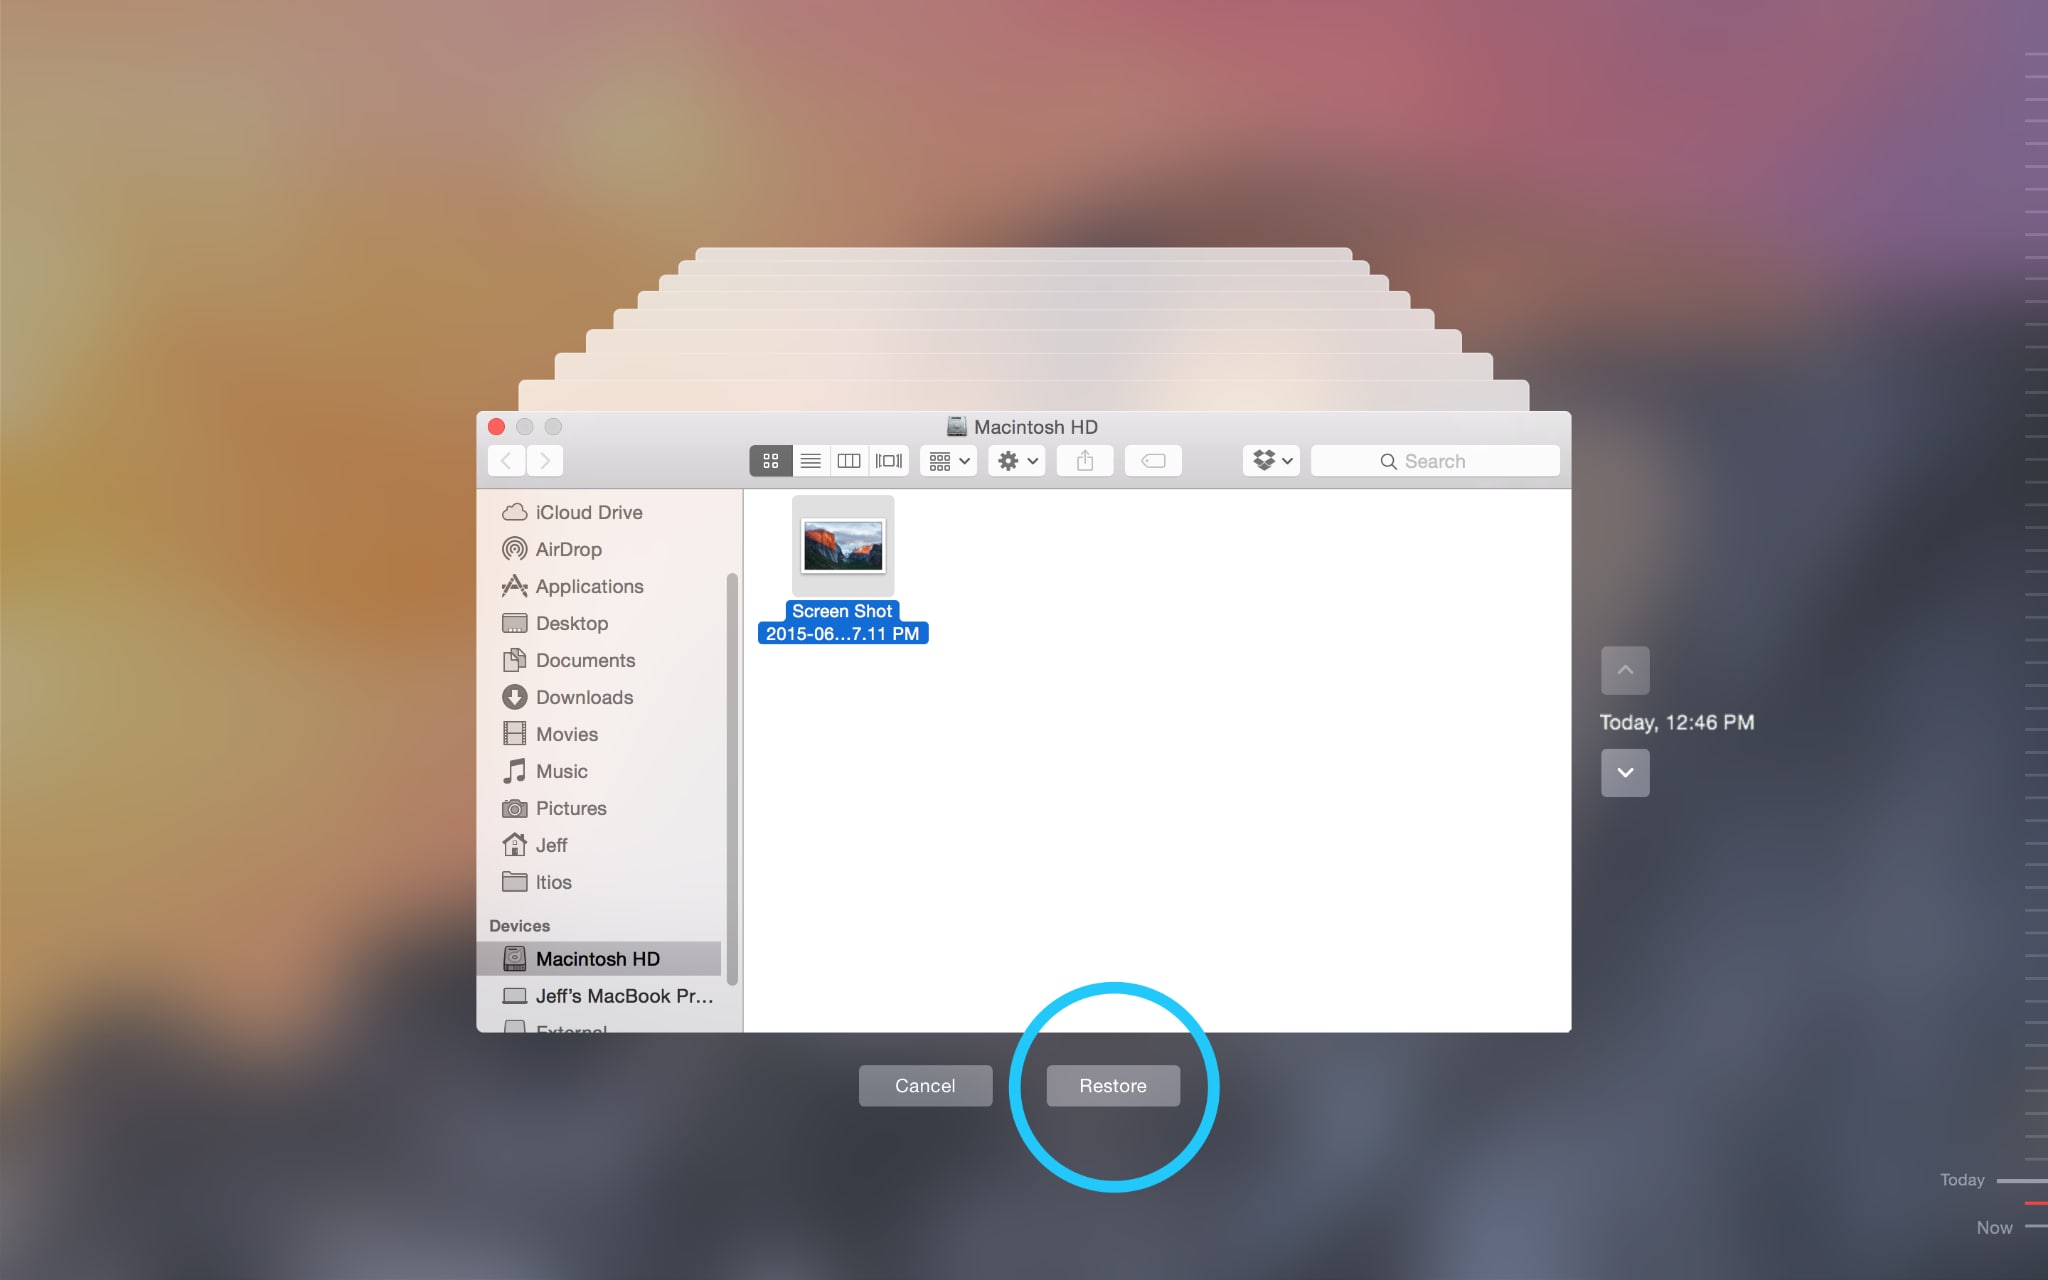
Step 2: Select your iPhoto library or specific photos. Click "Restore" to recover them to their original location.
Method 3: Recover from iCloud
iCloud automatically syncs photos across Apple devices. If you enabled iCloud Photos, your images might be recoverable. This method works when photos are deleted locally but remain in cloud storage. It's particularly useful for recent deletions.
iCloud recovery is convenient and free for Apple users. It works across all your Apple devices simultaneously. The process maintains photo quality and metadata. However, it only works if iCloud sync was enabled previously.
How it helps:
- Accesses photos stored in Apple's cloud servers
- Works across all Apple devices simultaneously
- Maintains high photo quality and metadata
- Provides a 30-day recovery window for deleted items
Step 1: Open the Photos app on your Mac or visit iCloud.com. Sign in with your Apple ID credentials. Check the "Recently Deleted" album for recoverable photos. Browse through available photos from the last 30 days.
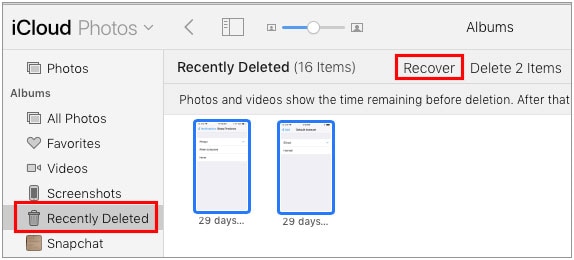
Step 2: Select the photos you want to recover. Click "Recover" to restore them to your main photo library.
Method 4: Recover from Trash (if not emptied)
The Mac Trash holds deleted files temporarily. If you haven't emptied Trash, your photos might be there. This is the simplest method for recent deletions. It works immediately without any special tools.
Trash recovery is the fastest iPhoto recovery method. It preserves the original file structure and metadata. The process takes only a few clicks. However, it only works if the Trash wasn't emptied.
How it helps:
- Provides instant recovery for recently deleted photos
- Maintains original file organization and metadata
- Requires no additional software or tools
- Works for any file type, including iPhoto libraries
Step 1: Open Trash from your Mac's Dock. Look for your deleted iPhoto library or individual photo files. Select the files you want to recover. You can select multiple files using Command+click.
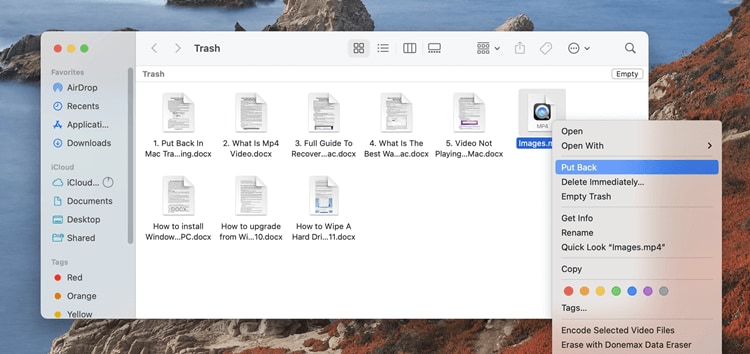
Step 2: Right-click selected files and choose "Put Back." Files return to their original locations automatically.
Method 5: Search for Migrated Libraries via Finder
iPhoto libraries sometimes move during system updates. The Photos app replaced iPhoto in newer macOS versions. Your old iPhoto library might still exist somewhere. Finder can help locate these hidden libraries.
This method often reveals forgotten photo collections. It's particularly useful after major system updates. The process requires no special software. It can uncover libraries you thought were lost forever.
How it helps:
- Locates iPhoto libraries moved during system updates
- Finds libraries created by different user accounts
- Discovers backup libraries created automatically
- Works without requiring additional recovery software
Step 1: Open Finder and press Command+F to open search. Set search location to "This Mac" for comprehensive scanning. Search for ".iPhoto library" or "iPhoto Library" files. Include system files and hidden folders in your search.
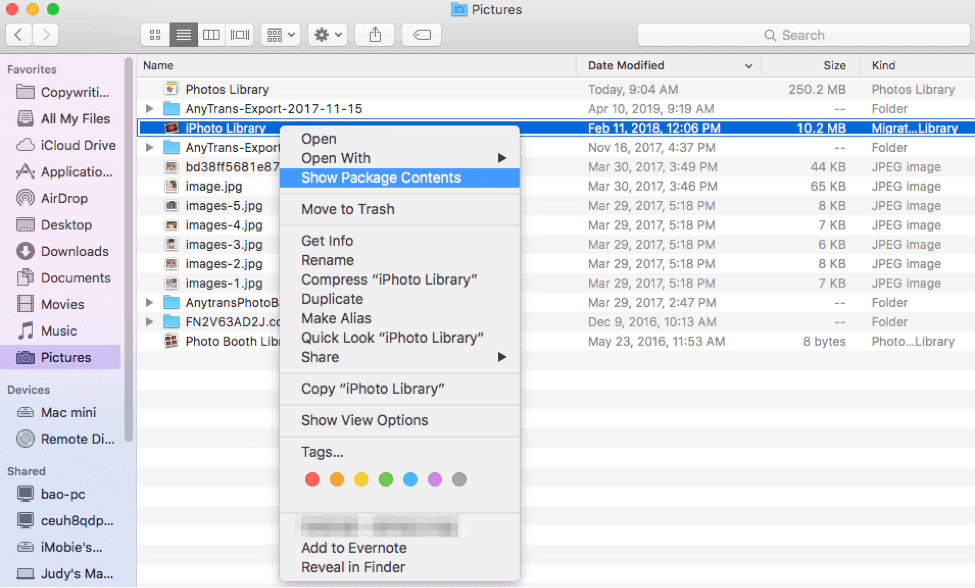
Step 2: Open found libraries by double-clicking them. Import photos to the current Photos app or copy to a safe location.
Method 6. Recover Missing Photos Using iPhoto Library First Aid
If you encounter any issues with your iPhoto library, you can utilize the First Aid tool to rectify it by following these steps:
- Quit the iPhoto application.
- Hold down the Command + Option keys and double-click on the Photos icon to open the repair dialogue window.
- Select the Repair option.
- Allow the repair process to finish. Afterwards, check if the problem has been resolved.
Method 7. Rebuild iPhoto Library for iPhoto Recovery
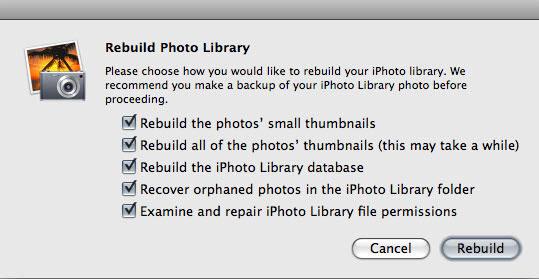
Accidentally delete iPhoto photos or unexpectedly lose them? Apple iPhone includes a feature to solve the issue. When your iPhoto library becomes unreadable, or your photos disappear from the iPhoto library, iPhoto for Mac allows you to rebuild the currently selected iPhoto library. And the way is as follows.
- Quit iPhoto first if it is running and re-open it.
- Press and hold the Command and Option keys when clicking on the iPhoto icon.
- A dialog box will appear with rebuild options.
- Choose the options you would like to use to rebuild the iPhoto library.
- Hit on Rebuild to start rebuilding your iPhoto library. A few minutes are needed.
 Rebuild iPhoto Library
Part 4: Pro Tips to Recover iPhoto Library Photos Successfully
Following professional tips increases your iPhoto recovery success rate. These recommendations come from data recovery experts. They help avoid common mistakes that worsen data loss. Apply these tips for better results.
- Stop using your Mac immediately after discovering photo loss to prevent overwriting
- Don't install recovery software on the same drive containing lost photos
- Create multiple backups of recovered photos to prevent future loss
- Use professional recovery tools for severe data loss situations
- Check all possible locations, including external drives and cloud storage
- Recover toa different drive than where the photos were originally stored
- Verify file integrity after recovery by opening and checking each photo
- Enable Time Machine immediately after recovery to prevent future incidents
Conclusion
iPhoto recovery is possible with the right approach and tools. We've covered five proven methods to retrieve iPhoto libraries. From professional software to built-in Mac features, each method serves different situations. The key is acting quickly and choosing the appropriate technique.
Remember that prevention is better than recovery. Regular backups protect against future photo loss. Enable Time Machine and iCloud Photos for automatic protection. These services create multiple recovery points for your precious memories.
Don't give up if one method doesn't work. Try multiple approaches to maximize success chances. Professional recovery services exist for extreme cases. With persistence and the right tools, you can restore iPhoto libraries successfully.
FAQs
-
Q1: How long do I have to recover deleted photos from iPhoto?
The recovery window depends on your Mac usage patterns. Deleted photos remain recoverable until new data overwrites their storage space. Light Mac usage gives you weeks or months for recovery. Heavy usage reduces this window to days or hours. The "Recently Deleted" album in Photos keeps items for 30 days automatically. Time Machine backups extend this period indefinitely if enabled. For best results, start recovery immediately after discovering data loss. Professional recovery software can find photos even after a significant time has passed. -
Q2: Can I recover iPhoto libraries after upgrading to macOS Big Sur or newer?
Yes, iPhoto library recovery works on all macOS versions, including Big Sur and newer. The Photos app replaced iPhoto but maintains compatibility with old libraries. Your original iPhoto libraries often remain intact during system upgrades. They're typically stored in ~/Pictures/iPhoto Library locations. Use Finder search to locate these hidden libraries after upgrades. Professional recovery software also works on all macOS versions. The process may require converting old iPhoto formats to newer Photos formats. -
Q3: What's the difference between recovering individual photos vs entire iPhoto libraries?
Individual photo recovery targets specific image files within libraries. This approach works well for recently deleted items or selective restoration. It's faster and requires less storage space. Entire library recovery restores complete databases, including metadata, albums, and organization. This method preserves your original photo management structure. Library recovery is better for major data loss or system corruption. Individual recovery suits accidental deletions or specific photo retrieval needs.


