
Quick Fix: How to Delete Lorex Security Footage
On Mobile: Use the FLIR FX or Lorex Home/Cloud app. Navigate to Playback, select the recording date, and tap the Delete/Trash icon.
On DVR/NVR Monitor: Right-click to open the Main Menu, go to Storage > Manager, select your HDD, and click Format to wipe all data (Lorex systems rarely allow deleting single files on a DVR for security integrity).
Via PC/SD Card: Insert the SD card into a computer. Open the drive, select the files in the Record folder, and press Delete.
Accidental Deletion? If footage was deleted or formatted, stop using the drive immediately. Use Wondershare Recoverit Enhanced Recovery to reconstruct fragmented CCTV files before they are overwritten.
Lorex is one of the world’s biggest security camera providers and producers. With their advanced systems and technology, you will have an insight into what surrounds your home/office/company and will be worry-free regarding your security.
If you own a Lorex security camera, you probably store your videos on a DVR or an NVR and may want to free up space for new, fresh recordings. In today’s guide, we will discuss how to delete your Lorex recordings using different strategies and why you may want to take this step.
Dahua vs. Lorex Storage: Which Method Should You Use?
Your Device / Setup |
Recommended Method |
Best For... |
| Lorex Wi-Fi Camera | FLIR FX / Lorex Home App | Quick mobile management |
| Lorex DVR/NVR (Hard Drive) | Monitor GUI (HDMI/VGA) | Complete storage wipe |
| Standalone SD Card | PC Card Reader | Bulk file management |
| Lorex Ping (Legacy) | iOS / Android App | Older Lorex models |
How To Delete Lorex Recordings Using FLIR FX App
FLIR FX app was designed for easy security camera control. This software is versatile and compatible with various camera devices, including Lorex. If you want to delete your videos in a few easy steps, you can download this app, connect your Lorex camera, and enjoy the app’s features, such as customization, playback, and deletion.
To remove your old Lorex recordings and free up space, follow this guide:
- Step 1: Open the FLIR FX app;
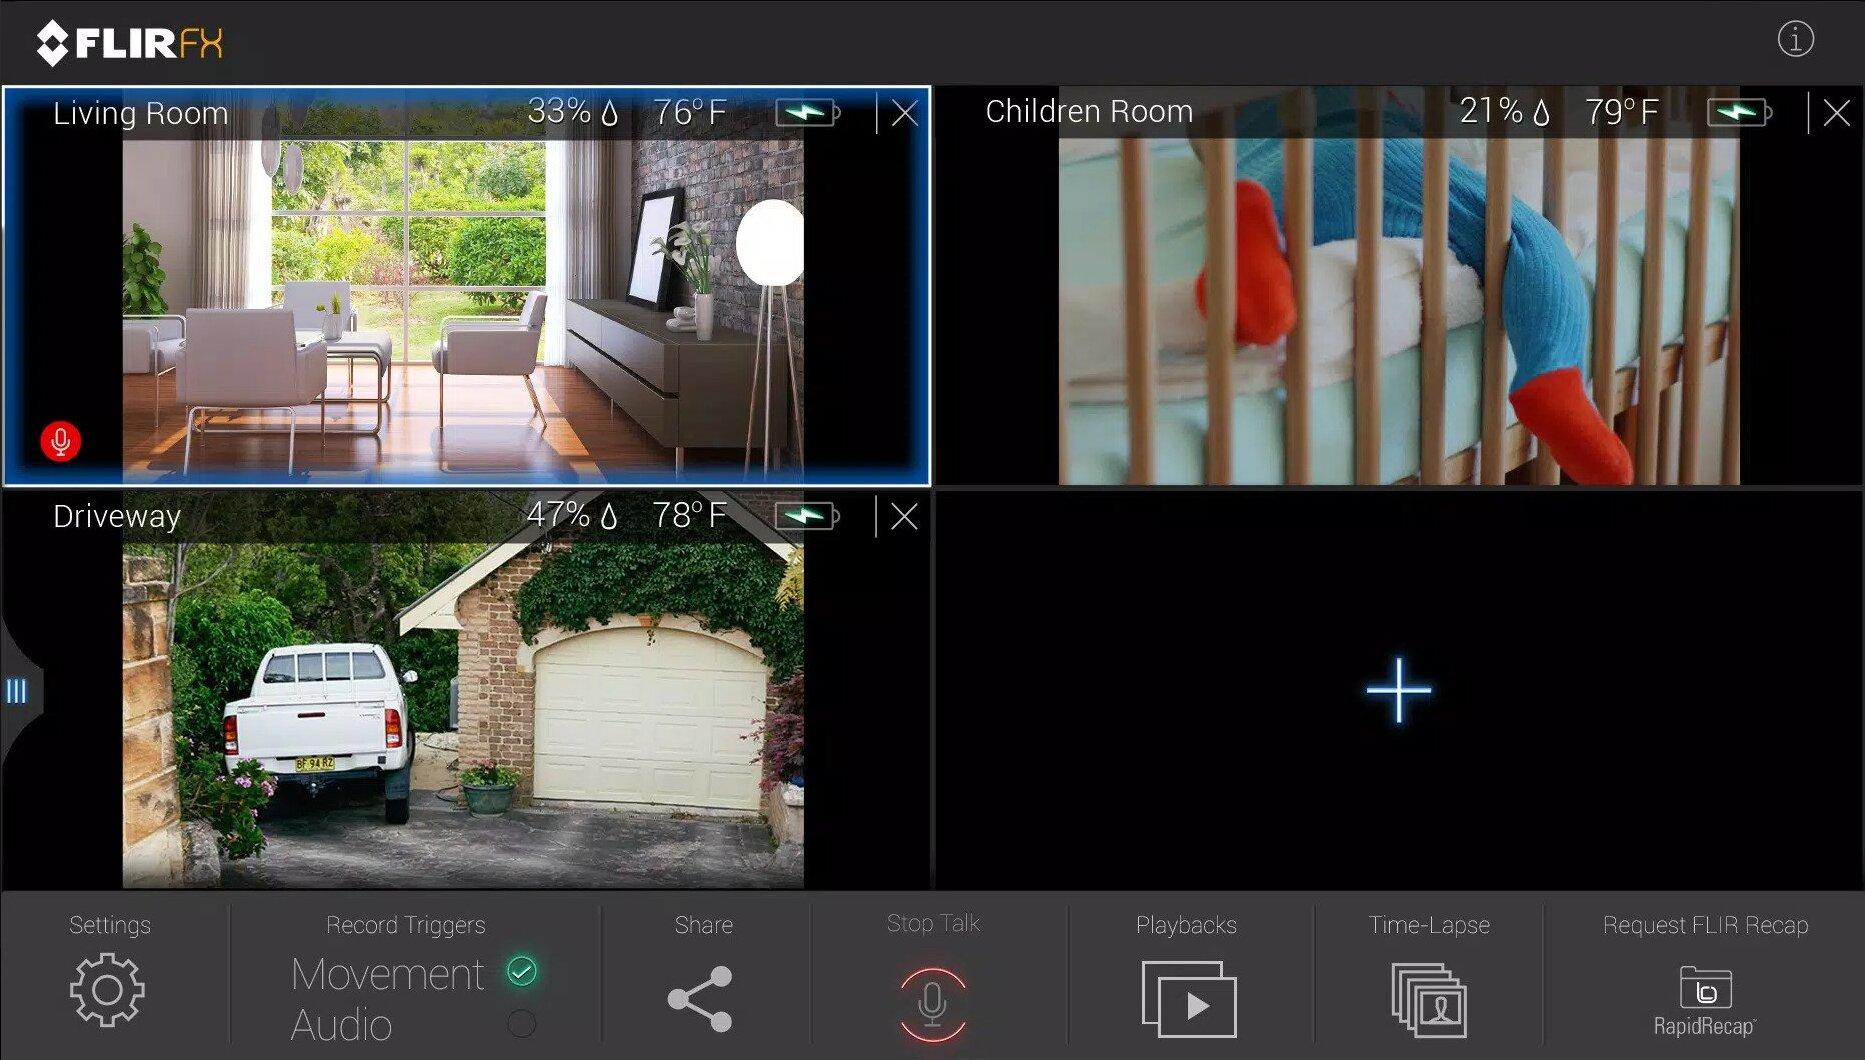
- Step 2: Click on the Play/Recordings icon;

- Step 3: Click on Recordings and select which type of content you want to view/delete;
- Step 4: Select the recording you want to delete, or tap the Pen icon and select multiple recordings;
- Step 5: Once selected, tap the Delete icon to finish the process.
After you complete all the steps, you will permanently delete the selected items and make room for new, high-quality Lorex videos.
How To Delete Lorex Recordings From the SD Card
Some Lorex cameras include SD cards that enable you to save more videos on your device and access them when needed. If your SD card starts to fill up, you can free up space by deleting old, unnecessary recordings. Here’s how to do it:
- Step 1: Connect your Lorex camera to your PC via a USB cable, or insert the SD card into your device with a card reader;
- Step 2: Once connected, find the file with the items you want to delete from the card;
- Step 3: Open the file and select the recording(s) you want to delete;
- Step 4: Right-click on the recordings and select Delete to finish the process.
This method may be more time-efficient if you want to delete multiple files or manage your Lorex camera recordings.
How To Delete Storage on Lorex Camera SD Card via iOS
If your Lorex camera doesn’t come with an included SD card, you can store your recordings on your phone/tablet using a micro SD card. Doing this allows you to manage your videos without taking down your camera. However, to successfully delete Lorex files from your iPhone/iPad device, you need an official Lorex Ping app.
Once you delete it, here’s what you need to do to free up your micro SD storage:
- Step 1: Open your Lorex Ping app;
- Step 2: Click on Camera List>Playback;

- Step 3: Select your camera;
- Step 4: Find the date of the recording you want to delete;
- Step 5: Select Edit, then click on the Delete icon and tap Delete;
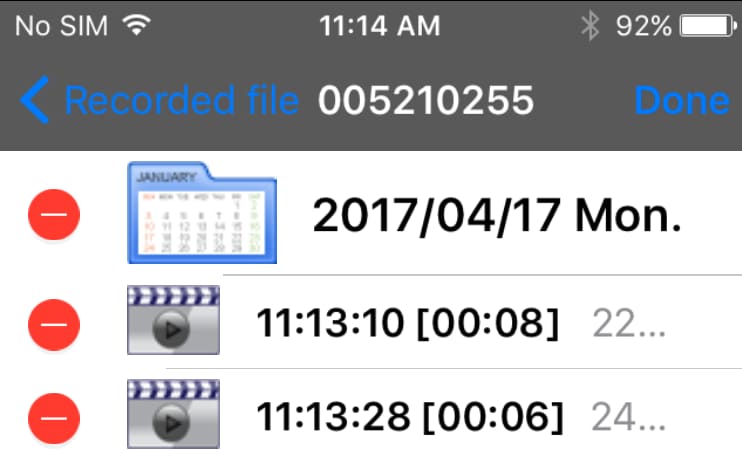
- Step 6: Click on the Ok button to finish the deletion process.
Managing your recordings from your phone or tablet is an excellent idea since you will always have insight into your camera’s footage and can quickly delete all unwanted content.
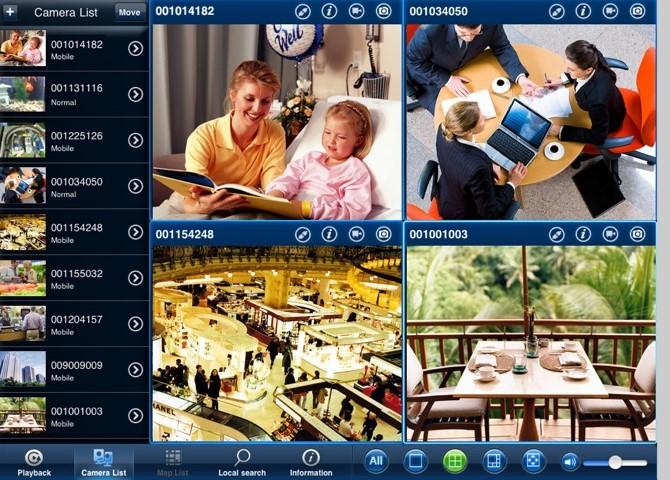
How To Delete Lorex Recording on SD Card via Android
If you own an Android device, the process of deleting recordings differs from the process on iOS devices. But you should also have a Lorex Ping app to remove unwanted recordings from your micro SD card successfully. You can find the app in the PlayStore or the Lorex official website. When you download and install the app, follow this guide to remove Lorex camera recordings permanently:
- Step 1: Open the Lorex Ping app on your smartphone or tablet;
- Step 2: Select Camera List and tap the Arrow icon;

- Step 3: Click on SD Card Playback to access your Lorex videos;
- Step 4: Tap the Edit button in the top left corner;
- Step 5: Select the Circle icon next to the recording you want to delete;
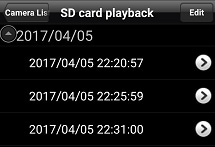
- Step 6: Tap Ok to delete your files.
Your microSD card now has more space to store your favorite Lorex camera memories, but sometimes, things may go sideways.
Why Delete Lorex Recordings
Since Lorex cameras are used for security and monitoring, you may want to delete your recordings to protect your privacy. If you store your recordings on a device with internet access, your sensitive data and identity may be revealed to other parties, and you may put yourself in danger. To provide maximum security, you should frequently delete your recordings.
You may also doubt that someone has accessed your camera and can view your recordings. In this scenario, the best thing you could do is delete all existing videos and ensure that, even if someone entered your camera, they couldn’t view the camera’s content.
Moreover, if you use a Lorex camera in your office/company, you may be obliged to delete videos after a certain period. Some countries have regulations where the owner must delete their surveillance recordings to protect others’ privacy and create a safe environment for both the workers and the customers.
You may have noticed that some of your recordings lag and cannot load properly on your Lorex camera. Although it’s mostly the case with older cameras, new ones may sometimes act up and give you low-quality video. Delete the videos that may affect your camera’s performance and quality to prevent or fix this issue.
Various other scenarios may lead to you deleting your Lorex recordings, but let’s see how you can do this using different tools.
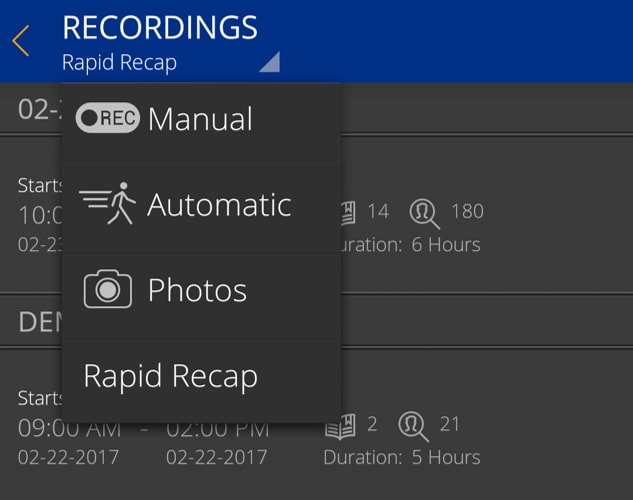
Pro Tip 2026: Why Single-File Deletion is Rare on DVRs
In 2026, most professional security systems like Lorex and Dahua prioritize Data Integrity. To prevent evidence tampering, these systems often do not allow the deletion of individual clips on a hard drive. If you need to hide a specific event, you typically have to format the entire HDD or wait for the system to Auto-Overwrite old footage. If privacy is your concern, use the "Privacy Masking" feature in settings to prevent recording sensitive areas entirely.
Lorex Camera Video Loss: Things You Can Do
If you use the Lorex camera for your office, you may have recorded important events that will act as proof in court. For example, if you have been robbed, you can use the records you have to find the criminal.
What if you accidentally delete your memories and evidence while cleaning up your storage? You may think that everything is lost and you can never retrieve these important moments. Luckily, Recoverit Video Recovery is here to help.
The tool covers hundreds of loss scenarios and can effectively recover over 1000 file formats. With a 95% recovery rate, you won’t have to worry about your Lorex recordings.
Why CCTV Recovery Requires Specialized Software
Standard recovery tools often find "ghost" files that won't play. This is because CCTV systems save data in fragments to optimize 24/7 writing.
Scenario |
Standard Recovery |
Recoverit Enhanced Recovery |
| Accidental Deletion | Partial / Broken files | Full Reconstruction |
| Formatted HDD/SD | Fails to read metadata | Deep Scans proprietary FS |
| Power Surge Corruption | Files appear 0KB | Repairs Video Headers |
| 4K/8K High-Res | Laggy / Corrupt | Native Support for Ultra HD |
Wondershare Recoverit - Your Safe and Reliable Video Recovery Software
5,481,435 people have downloaded it.
Recover all of your videos from storage devices empty due to various reasons like malware attacks, corruption, accidental deletes, damage, etc.
Restore data from all kinds of storage drives like digital cameras, security cameras, drones, USB drives, SD cards, SSDs, HDDs, etc.
Recover Full HD, Ultra HD, 4K, and 8K videos without corruption.
Preview the files before recovery. No payment is required if the files are unrecoverable.
To successfully retrieve your lost files, you should first download the program from Wondershare’s official website and launch it on your PC. However, before you take the next step, you should connect your Lorex camera to the PC where you will launch Recoverit.
After completing all these tasks, follow this guide to get your valuable videos back:
- Step 1: Open Recoverit on your PC and select Enhanced Recovery;
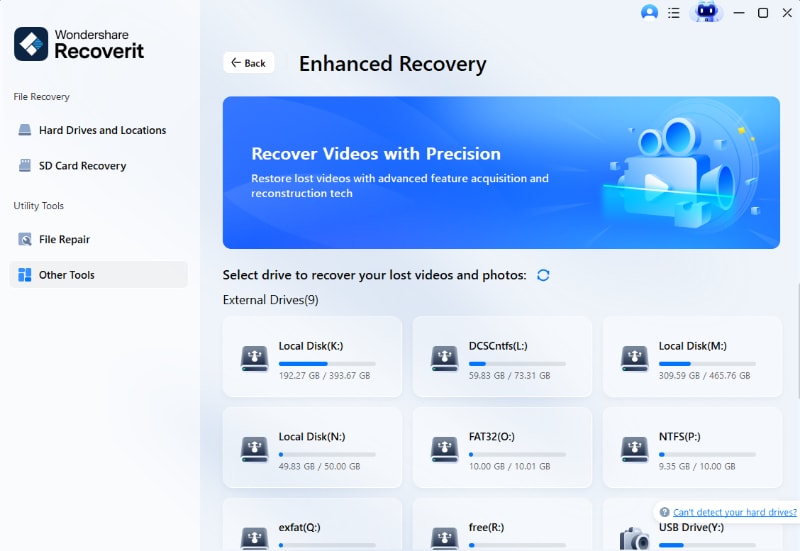
- Step 2: From the list of external hard drives, select your Lorex camera;
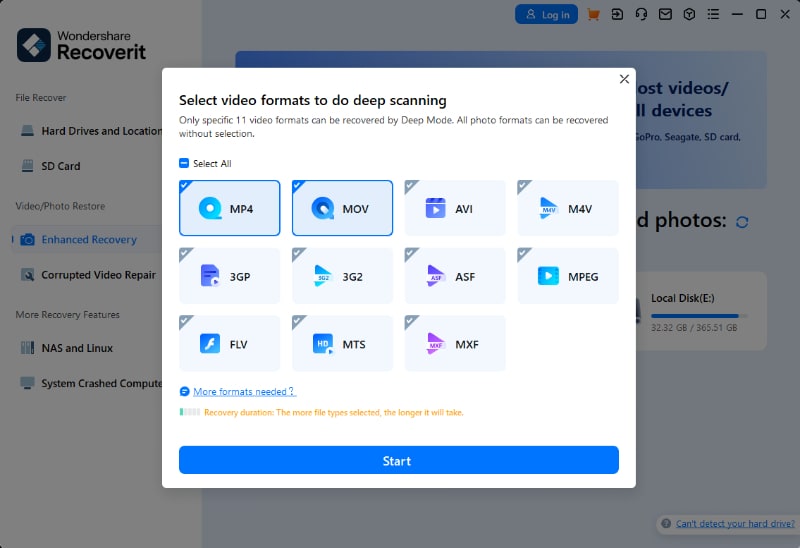
- Step 3: Select the video format of your Lorex recordings for deep scan and click the Start button;
- Step 4: The program will do a thorough search through your camera to find the lost videos;
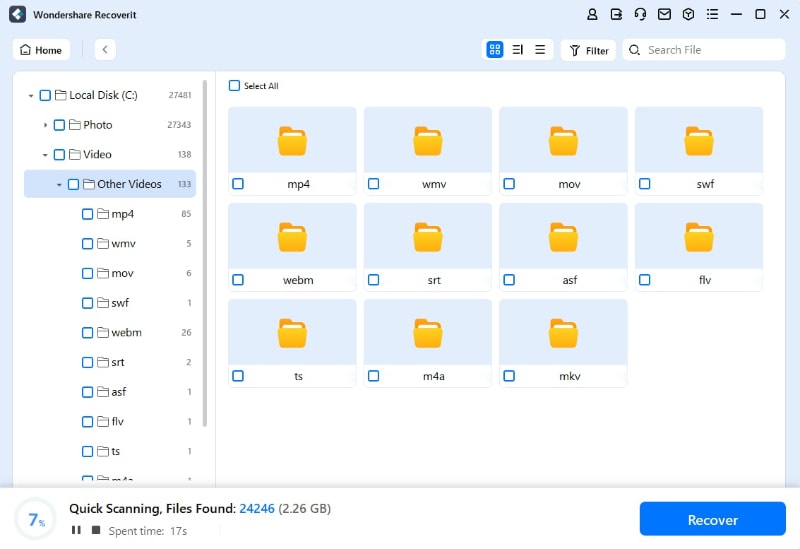
- Step 5: After scanning, you can click Preview to check if the scanned video files are the ones you want to recover;

- Step 6: When you find the Lorex recordings you want to restore, click the Recover button to save them to a safe location.
After this, you will retrieve your lost Lorex memories.
For Windows 7 or later
For macOS 10.10 or later
Final Checklist: Managing Your Lorex Storage
- Check Overwrite Settings: Ensure "Overwrite" is ON so the system doesn't stop recording when full.
- Secure Admin Access: You cannot delete or format storage without the system's Admin password.
- Backup Evidence: Always export critical clips to a USB flash drive before attempting any deletion or formatting.
- Stop Overwriting: If you lose a video, power down the DVR immediately to prevent the system from writing new data over the lost footage.
Conclusion
Lorex cameras are one of the best surveillance and security options. With their devices, you can always keep track of the activities around your home or office. However, the videos Lorex cameras capture may take up too much space and affect the quality and performance of fresh recordings. You should frequently delete your videos to fix this issue and protect your privacy.
We have presented several ways to delete unnecessary files and free up space. However, if you often clean your recordings, you may accidentally remove something valuable, such as a fond memory or evidence. Luckily, you can use Recoverit to retrieve lost data.
Related Topic: How to Recover Deleted Screen Recording Video Files


