Hard Drive Recovery
- Recovers deleted or lost files from hard drive effectively, safely and completely.
- Supports data recovery from 500+ data loss scenarios, including computer crash, partition loss, accidental human error, etc.
- Supports 1000+ file formats recovery with a high success rate and without any quality loss.

How to fix pixelated videos from android

Jun 03, 2026 • Filed to: Photo/Video/Audio Solutions • Proven solutions
 TL;DR:
To fix pixelated or blurry Android videos caused by low resolution or compression, transfer the files to a computer and use dedicated desktop repair software like Wondershare Repairit, or reduce the playback window size to increase perceived pixel density.
● Connect your Android phone to a PC or Mac to use Wondershare Repairit, which provides a standard repair option and an advanced mode that requires a working sample video to fix severely corrupted .mov, .m4v, or .3gp files.
● Alternative desktop tools include VLC media player, DivXRepair, Remo Repair AVI, and Adobe After Effects, but always create a backup copy of your original video before applying trial-and-error filters to ensure you can try other programs if the first attempt fails, noting that Adobe requires significant prior editing experience to use effectively.
● Prevent future pixelation by recording at standard high-definition resolutions like 720p or 1080p to balance clarity and storage without unnecessarily using 4k, and verify that your media player fully supports your .avi, .mkv, .wmv, or .mp4 format to avoid playback rendering errors.
Ask AI for a summary
 ChatGPT
 Perplexity
 Gemini
 Claude
 Grok
Grok
![]()
In some cases, you may find the video on Android phones is pixelated or blurry. But what causes this issue, and how can I fix it? These problems can result from several factors, including a subject of focus with the camera lens, compression, or low resolution. Sometimes, shooting high-speed moving objects, it could cause the video to be blurred or smeared. No matter what causes the video's error, you can restore at least part of the files' quality using one of the video repair programs found online.
Why Do My Videos Become Blurry or Pixelated?
The basic principle regarding the clarity of images and videos is that the more pixels, the clearer the image or the video will be. However, when the pixel rate (not frame rate) is less, the video becomes unclear or not up to standard quality. This causes pixelation of the video. Another cause of pixelation is using a defective camera. If the camera lens becomes dusty or gets damaged, it can also affect the videos' quality.
Right now, the highest video resolution would be 4k resolution having 3840 x 2160 pixels. The standard one would be 854 x 480 resolution or 480p resolution. All the frames would have the same resolution to provide a clear video. If some frames get a lesser resolution, it can affect the quality of the video. If the frame rate drops from 25 fps to below 20, it will affect the video.
Generally, for any resolution lower than 480p, the video viewing experience would be bad. Bad as in, the pixels will be less, making the image and the video unclear. This is what makes a pixelated or blurry video. Be it a video taken on your Android phone or watching a video on Youtube, Netflix, and other apps.
How to Avoid Pixelated Videos?
In taking videos with your Android phone, the pixel problem can be fixed by selecting the video mode with a higher resolution. It will be given as an option in the camera app. Go for 480p and higher for a crisp video. In other video apps like Youtube and Netflix, you will have the option to select the video's resolution.
480p provides a good viewing experience on mobile phones and other handheld devices. However, as the screen size increases, the resolution should also be increased. That is because, for a tiny screen, the pixel density of 480p is enough. However, as the screen gets bigger, more pixel density is required for clearer images. So, in a 32" TV, 480p video will be blurry, and 720p would be the best choice of video watching.
Therefore, always choose the highest mode of video capture. It can also prove to be useful if you want to resize the video. Resizing from a higher resolution allows the video file to keep its clarity.
So, what to do if you already have a video that's lacking in clarity?
Solutions to Fix Pixelated Videos on Android
To fix Pixelated Videos from Android, you need to connect Android phones to computers. So that you can upload pixelated videos to Wondershare Repair.
"How to fix pixelated videos?", "The video I downloaded is blurry and pixelated. What can I do?". These are questions a lot of people ask on Q&A forums. Those who are trying to copy old videos from tapes or those who had trouble after downloading a video.
The first thing is you need to know more about the format of the video. The video format is the package in which the video file is stored and can be played. These packages also contain information like the title of the video, the date created, subtitles associated with the video, and so on. Some of the prominent formats are .avi, .mkv, .wmv, and .mp4.
Some file formats allow storing the video file in a smaller file size retaining its video and audio qualities.
To play a video, a video player is necessary, and it should be noted that all video players do not support all the file formats. Some file formats can only be played in a specific player. Even if some files are played, the file may not be played correctly and can cause a blurry or pixelated effect. Make sure you are using the right player for the format.
If the problem persists, we have provided some tips to make your video much clearer and smoother.
TIP 1: Professional Video Repair Tool
Pixelated videos can be a major concern if your videos are old and captured from low-resolution cameras. However, there are some professional tools available on Android that can be used to repair these pixelated problems. These apps strengthen the videos to a certain extent.
A good tool for the job is the Wondershare Repairit Video Repair tool. It can be used to repair all corrupt, blurry, or pixelated videos in any formats ranging from .mov, .m4v, .3gp, etc. The source of capturing the video is also of no problem. It can repair video captured on a mobile phone or a digital camera. The camera's brand is of no issue as Canon, Sony, Fuji, Samsung, and all other brands are supported on this tool.
It provides two correction methods. The first one is 'quick repair,' which can repair less serious video issues. The second one is 'advance repair,' which can be used to repair videos with serious issues involving corrupted data, blurriness, etc. Normally, the application uses the first option of repair. However, if the video is severely corrupted, you can opt for the advanced mode.
Step 1: Install the application and launch it. In the application, you will find an option to add your videos that are to be repaired. Click here to add your blurry/corrupted/pixelated video to the tool. Another way to add your video is to drag the video file into the 'add video and start repairing' area of the tool. The software will automatically detect it and add the video to its list to repair.

Step 2: After adding all the videos that need to be repaired, click the 'Repair' option. The tool will start to analyze the video you have selected.

Step 3: After the tool has analyzed your video, it will start with possible repairs that can be done on the selected videos. This step is the most important part and takes a good amount of time to complete. Please sit back and wait for the tool to do its job. You will be alerted by the tool on the completion of the task. Then, you will have options to check the repaired videos.

Step 4: In case of severe corruption issues, the video might not get repaired by the above process. In this case, choose the advanced mode. Just click the Advanced Repair button.
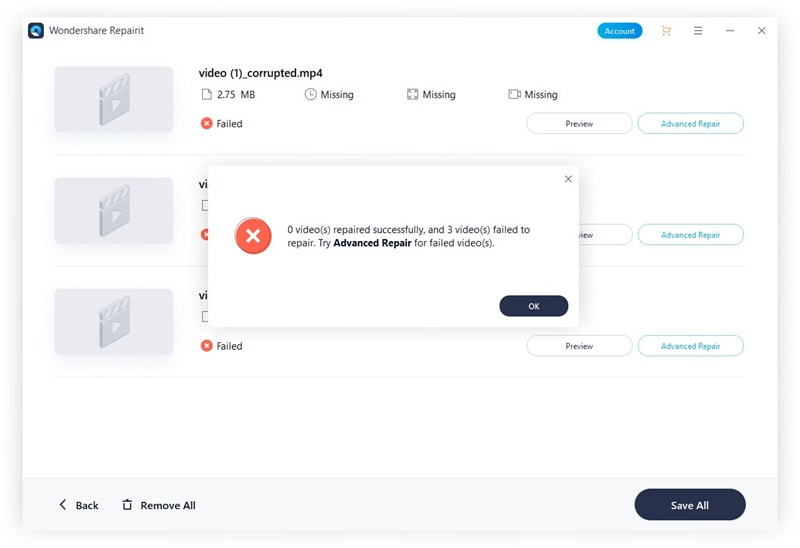
Step 5: Add a sample video for advanced repair and click the Repair button to start it.

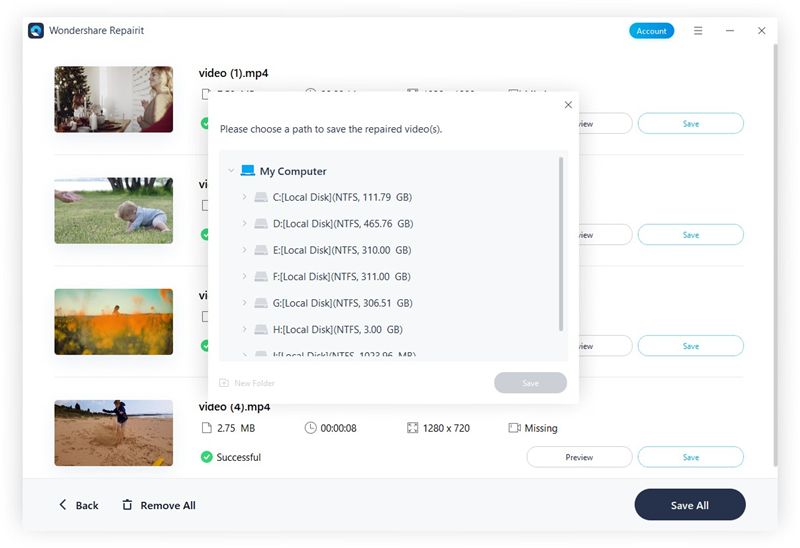
Step 6: After the files are repaired, you will be provided with the option to save the video. Click on the Save button to complete the repairing process and save your video. Recheck it to see if you are satisfied with the final result and enjoy watching non-blurry videos.
TIP 2: Video Editing Software
There is a lot of video editing software available that can successfully fix pixelation issues. Even though Android applications are available, a PC application would work more efficiently. If you are using a PC to repair, transfer the videos to your PC and use your preferred software. The working method of PC and Android applications is the same.
Add the file to the software. It will have the option of cleaning pixelation. Unfortunately, it's a trial and error method depending upon the video's quality to be repaired. If the pixelation is not bad, a few changes in these filters will yield a better outcome. In worst-case scenarios, you will have to take some time to apply these filters, check the video, and repeat until you are satisfied with the result.
Sometimes, the software you use may not be up to the mark as well. Then, you will have to install another one and go over the process all over again. Find the best one from reviews and ratings. Also, select the applications that are easier to use, or it will take up a lot of your time.
Always remember to keep a copy of the original video to be repaired. It will come in handy if one program doesn't yield successful results. You can use the saved video when you have to use another software. If you haven't made a copy and have used the file in one software, you might not get the desired result in the next one.
Some of the good software out there is a VLC media player who is a media player with built-in repairing functionalities, DivXRepair, Remo Repair AVI, etc.
TIP 3: Using Adobe After Effects
Using Adobe After Effects can be beneficial in fixing pixelation. It provides an array of video editing options. However, the only downside to it is that it can take a lot of effort and time. Once again, you can only use the trial and error method to choose the options for cleaning your videos. Some of the after-effects for cleaning pixelation are the 'Remove Grain' option under Effects, 'Unsharp,' 'Timewarp,' etc.
Using Adobe can be very time-consuming. If you don't have the relevant Adobe experience, it will be tough to use the software. It will be helpful only if you have the knowledge and time to invest.
TIP 4: Reduce the Size of the Playback Window
As mentioned above, a video can get blurry if it is stretched to a higher screen ratio. Lowering the screen size in which the video is playing can help watch the video somewhat clearly. Resizing the video player's window is another option to consider. Even though it won't affect the video and the pixels remain the same, it will help you see the contents much more clearly.
However, very low-resolution videos cannot be played clearly in a reduced window. Then, the reduced window would be too small even to watch the video properly. Videos of such a low resolution cannot be salvaged using the above-mentioned applications either.
Conclusion
Always remember to avoid pixelation by capturing videos in higher resolution. In mobiles or digital cameras, options are available to choose the resolution. Do not go for 4k resolutions unless needed. It will take a lot of battery and storage space. Go for normal high-definition resolution like 720p and 1080p. That will do the job perfectly for an average consumer.
In the case of pixelated videos, now you have multiple options to clarify them. Use specific tools and software mainly for this purpose. If you have good knowledge of editing techniques and video formats, go with Adobe After Effects. If you cannot get your hands on any tools, choose a smaller screen to play your video or resize the playback window till the pixelation is reduced.
It's also good practice to save your video files in the highest resolution possible without compromising storage. It will save you time repairing resized videos in the future.
Solve Media File Problems
- Recover & Repair Photos
- What's picture recovery?
- SD card pictures are lost?
- Top 5 free photo recovery software.
- Restore photos from recycle bin.
- Recover & Repair Videos
- Recover SD card videos.
- Repair MOV/M4V/MP4 videos.
- Repair MKV videos.
- Solve video black screen.
- Repair restored videos.
- Recover & Repair Audio
- Repair video without sound.
- Fix audio sync problems.
- MP4 No Sound?
- Repair corrupt WAV files.
- Corrupted video repair guide.
- Recover & Repair Cameras


Eleanor Reed
staff Editor