

 TL;DR:
You can upgrade your motherboard and CPU without reinstalling Windows by linking your activation license to a Microsoft account and modifying specific storage controller registry values to prevent boot failures.
● Open Registry Editor before the hardware swap and change the Start value data to zero within the storahci (or msahci for older Windows versions) and pciide folders under HKEY_LOCAL_MACHINE\SYSTEM\CurrentControlSet\services.
● If the system fails to boot after replacing components, use a Windows installation disk to access the Command Prompt, open regedit, load the system hive from C:\Windows\system32\config\system, and modify the same msahci and pciide Start values to zero within ControlSet001.
Ask AI for a summary
 ChatGPT
 Perplexity
 Gemini
 Claude
 Grok
Grok
When you seek a way to improve the computer’s performance, you may need to change your motherboard and CPU. This change is also required when any hardware issue causes your motherboard to die. However, many users worry that changing these components will require reinstalling their operating system. It occurs because Windows is tied to the hardware it was installed on, and major changes can cause activation or boot issues.
So, this guide will explain how to upgrade the motherboard and CPU without reinstalling Windows. We will provide detailed guidance about preparing for the upgrade and how to modify settings to avoid issues. You will also learn about an advanced recovery tool to ensure your important data remains secure during the replacement process.
Try Recoverit to Perform Windows Computer Data Recovery
 Security Verified. 3,591,664 people have downloaded it.
In this article

Part 1. Is It Possible to Upgrade Motherboard and CPU Without Reinstalling Windows?
To answer the question in simple words, you can replace the motherboard without reinstalling Windows. The operating system automatically detects new additions and adjusts its settings to support it. However, your system may fail to boot due to driver differences or security settings. That's why you may need to update your drivers or modify registry settings after the upgrade to avoid these problems.
Similarly, the success of this process depends on what OS version you’re using, as they handle hardware changes differently. Other than that, reactivating Windows after the upgrade becomes much easier if your installation is linked to a Microsoft account. In some cases, using safe mode or an offline registry editor may be required to fix boot problems.
Part 2. How to Replace Motherboard Without Re-installing Windows by Changing Registry?
Before upgrading your motherboard, changing the registry settings can help avoid boot errors. Since the registry contains important system settings, adjusting it can make Windows more flexible when detecting new hardware. We have explained both these methods to upgrade the motherboard without reinstalling Windows below:
Case 1. Modify Registry Before Replacing the Motherboard
As said above, you can avoid booting issues using registry settings before upgrading the motherboard. Changing mobo without reinstalling Windows using this method is relatively simple with the following steps:
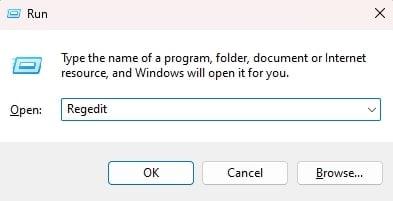
Step 1. Upon starting, make sure to connect your Microsoft and Windows accounts to ensure the activation key remains safe. Afterward, open the “Run” dialogue box by pressing the "Windows + R" buttons simultaneously and enter "regedit" in it. After pressing the "OK" button, the "Registry Editor" will open.
Step 2. After accessing the Registry Editor, go to the path as shown in the given image.

Step 3. Afterward, go to the "storahci" folder under the "Services" tab in the Registry Editor. If you're on older versions of Windows, find the "msahci" folder instead of "storahci" in the services tab. Next, double-click on "Start," change the "Value Data" to zero from the pop-up, and press "OK."
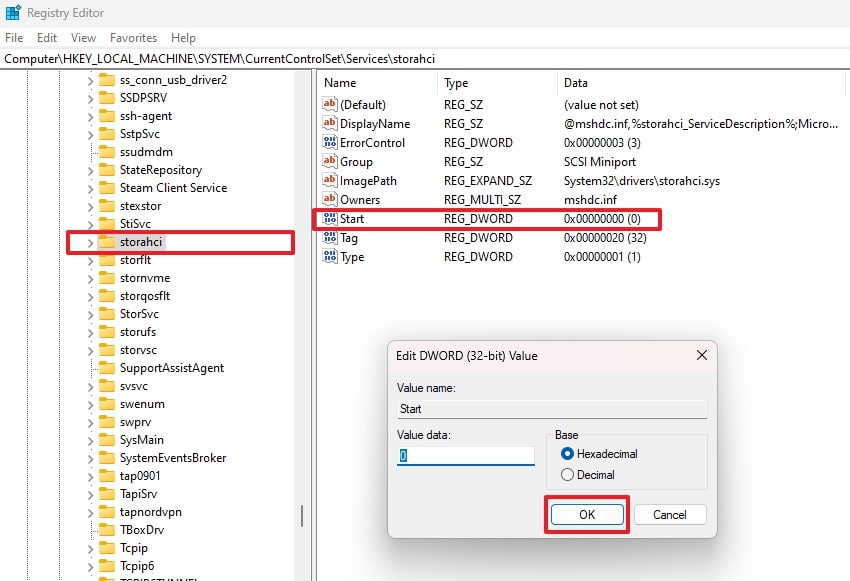
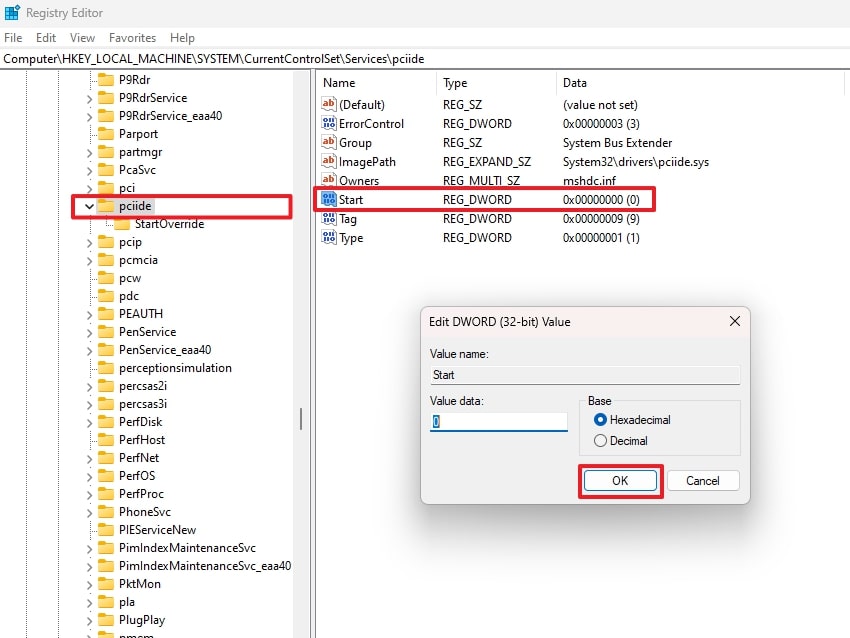
Step 4. Now, follow the given directory and repeat the process to set the "Value Data" to zero.
“HKEY_LOCAL_MACHINE\SYSTEM\CurrentControlSet\services\pciide”
Step 5. Once you’re done changing these settings, safely shut down your computer to start replacing the motherboard. After installing the new one, turn on your PC to find your operating system still running smoothly.
Case 2. Modify Registry Editor after Motherboard Update
Although the above method is recommended, many users don’t know about it. As a result, their system fails to boot after they upgrade motherboard and CPU without reinstalling Windows. When you face this problem, use the given steps to get back to your computer:
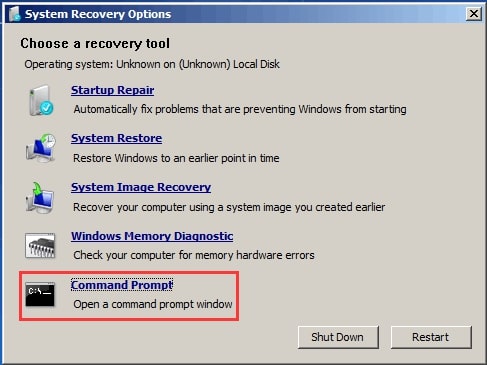
Step 1. For successfully executing this method, use a Windows 7 installation disk for booting the PC by pressing the “F2/Del” buttons. Select the disk as the first option and press “F10” to restart the PC. On getting the basic settings, choose “Repair Your Computer” and continue to “Command Prompt” from the next screen.
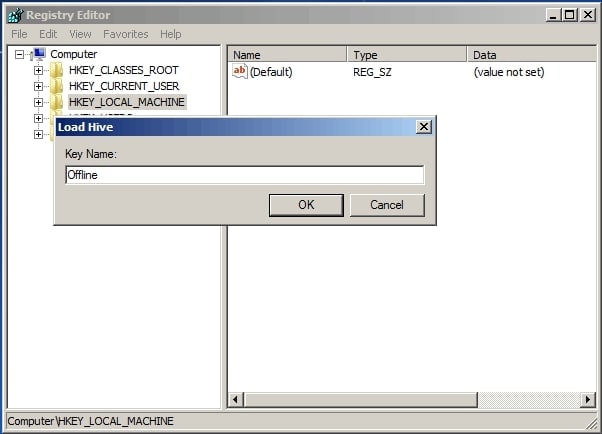
Step 2. Upon accessing the CMD, enter “regedit” and press “Enter” on your keyboard to launch “Registry Editor.”

Step 3. Next, access the "HKEY_LOCAL_MACHINE" folder, press the "File" button and select "Load Hive" from the options. Then follow this path: "C:\Windows\system32\config\system" and open the "System" file. From the small pop-up, enter "Offline" and press the "OK" button on the screen.
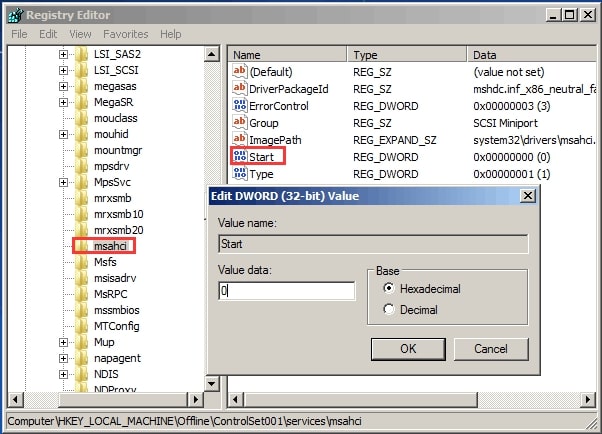
Step 4. In this step, go to the "ControlSet001" folder, and, from there, access the "services" subfolder. Finally, navigate to the "msahci" and double-click the "Start" to enter zero in the small pop-up screen. Repeat the same process by going to the "pciide" subfolder under the "services" tab.
Step 5. Complete the whole process by pressing the "File" button and selecting the "Upload Hive" option. Finally, restart your computer and remove the installation disk to complete the whole process.
Important Tip. Save Your System Files To Avoid Windows Corruption
While the above methods ensure you can get back to your computer after changing the components, you may lose your data in the process. Therefore, you need to ensure you have a reliable recovery tool available to get back your data. For this purpose, we highly recommend using Wondershare Recoverit, as it supports data recovery in over 2000 storage devices.
In addition to storage devices, Recoverit also supports the recovery of over 1000 different file formats. Hence, you can use it to recover your lost data after you replace the motherboard without reinstalling Windows. With its accurate data retrieval technology, the tool boasts a 99.5% success ratio in recovering your lost files.
Key Features
- Restore Game Data: You can recover your game progress after your data is lost using this tool.
- Server Data Recovery: Recoverit can retrieve data from network drives and Linux systems.
- Advanced Recovery Options: The tool goes deep with its recovery mode and recovers your lost mail and other files.
- Crash System Recovery: Users can recover their files from crashed computer drives by creating a bootable USB drive.
Steps to Recover Your Data Using Recoverit
As we can see from the above features, Recoverit really helps ensure your data remains safe after you upgrade replace motherboard and CPU without reinstalling Windows. So, let's see how this tool works by going through the detailed steps of data recovery:
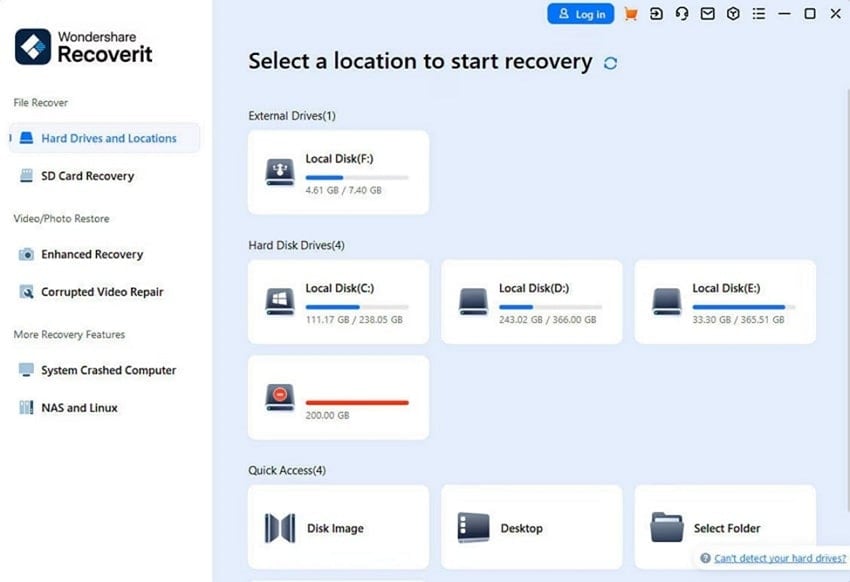
Step 1. Choose the Storage Device to Recover the Data
Upon launching the software, choose the targeted storage device from the “Hard Drives and Locations” tab. Once the storage device is selected, click on the “Start” button to start the recovery process.
Step 2. Initiate the Disk Scan to Recover Files
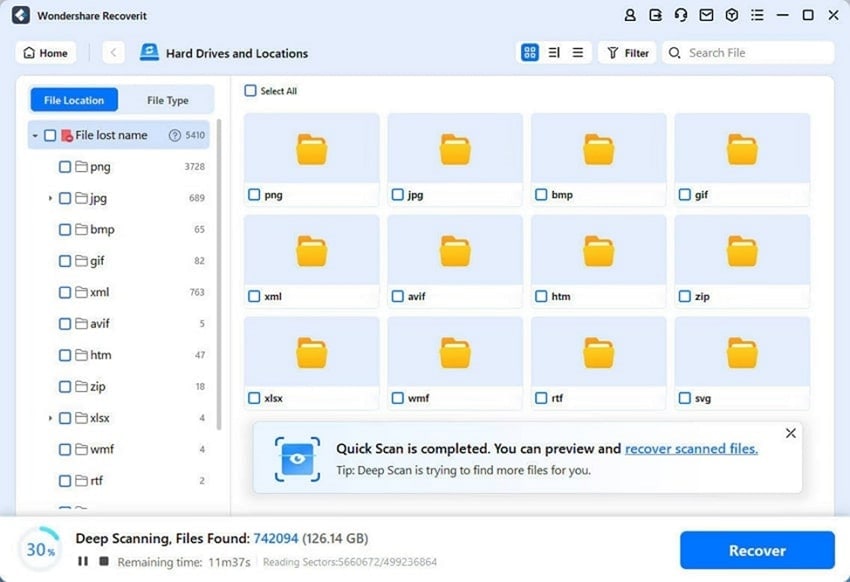
Now, the tool will start scanning for lost files, and you will be able to see them on your screen. Since the scan can take some time, you can preview the recovered files on the spot.
Step 3. Preview Files and Save Them on Your PC
Upon finding your desired file, "Preview" to check its integrity. When you're satisfied, utilize the “Recover” button to save the recovered file in your storage device.

Conclusion
To conclude, you can learn how to upgrade motherboard and CPU without reinstalling Windows by changing the Registry Editor's settings. While you can follow this method after changing the motherboard, it is recommended to use it beforehand. That is because the system can load normally before changing the CPU, and the Registry Editor is accessible normally.
On the other hand, you will have to use an installation disc to make these changes after upgrading the motherboard. Since it is a risky process and you can lose your data, we recommend using Recoverit to retrieve your lost files. The advanced tool has a minimal failure ratio and uses superior technology to recover your data.
FAQ
1. Can I upgrade my CPU without changing the motherboard?
While you can do so, it usually depends on your motherboard's compatibility with the new CPU. Since each motherboard supports specific processor models, you must check its specifications before upgrading. In the end, you may need to upgrade your motherboard as well if the new CPU is not supported.2. Will I need to reactivate Windows after upgrading my motherboard?
Since Windows activation is connected to the motherboard, you will be required to reactivate your license. However, you can reactivate it easily if your license is linked to a Microsoft account. Otherwise, enter your product key again or contact the official support.3. What happens if Windows doesn’t boot after the upgrade?
When you face these errors, it may be due to driver problems or the security settings of your computer. You can try entering Safe Mode or modifying the registry to fix boot issues after the upgrade. However, if the problem persists, using an offline registry editor or a Windows recovery tool may be necessary.


