

 TL;DR:
Resolve the "Not Enough Space Available on the Disk" error in Windows 11 by targeting hidden storage consumers like the update cache, shadow copies, and oversized virtual memory pagefiles.
● Clear out old or corrupted update packages by stopping the Windows Update service via services.msc and deleting all files inside the C:\Windows\SoftwareDistribution\ directory.
● Recover hidden gigabytes by deleting previous system restore points in System Properties and adjusting the virtual memory pagefile.sys limit under the advanced performance settings.
● Utilize Wondershare Recoverit to restore any files accidentally deleted during manual cleanup, which offers up to 500MB of free data recovery across 1000+ formats without requiring a subscription.
Ask AI for a summary
 ChatGPT
 Perplexity
 Gemini
 Claude
 Grok
Grok
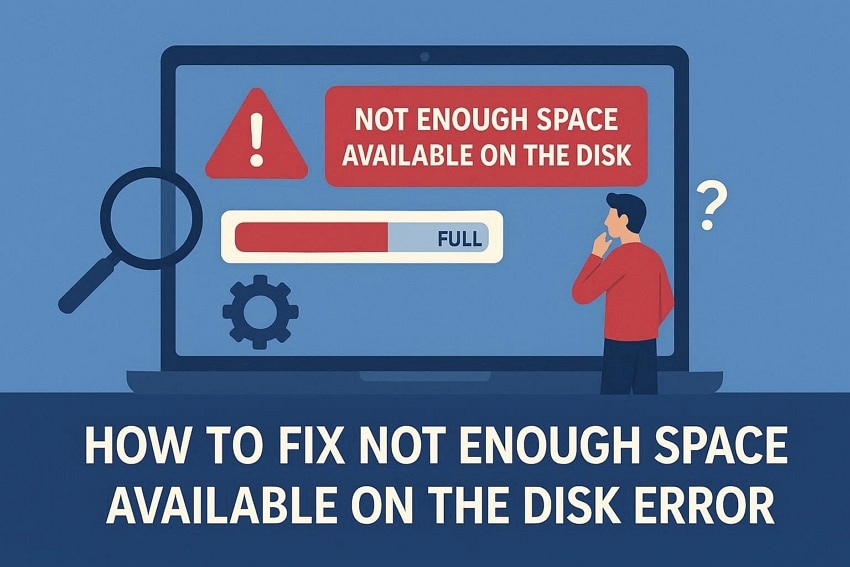
Some users complain that “there is not enough space available on the disk” in Windows 11. It becomes an issue for users who are trying to install updates, save files, or download software. This issue occurs when your system storage is nearly full or when temporary and cache files take up too much space.
In this guide, we’ll share some simple yet effective fixes to clear storage and optimize disk usage. Moreover, we’ll introduce a reliable method to recover important files lost due to this issue.
Try Recoverit to Perform Data Recovery
 Security Verified. 3,591,664 people have downloaded it.
In this article
-
- Fix 1: Restart Your Computer to Refresh Disk Usage
- Fix 2: Delete Temporary and Junk Files
- Fix 3: Clear Windows Update Cache
- Fix 4: Empty the Recycle Bin and Downloads Folder
- Fix 5: Run Disk Cleanup Utility
- Fix 6: Check for Shadow Copies and Reduce Restore Points
- Fix 7: Resize or Increase Virtual Memory
- Fix 8: Check Disk Quotas and Adjust if Needed
- Fix 9: Scan and Repair Disk Errors Using CHKDSK
- Fix 10: Move Large Files to Another Drive
- Fix 11. Uninstall Unnecessary Applications
- Fix 12: Use Storage Sense in Windows 11
- Fix 13: Delete Hidden Files Safely
- Fix 14: Compress Files to Free Up Space

Part 1. Common Causes of Disk Space Error in Windows 11
Many users complain about “Windows disk full but nothing to delete” situations quite frequently. This happens when Windows cannot find enough usable free space for a certain task, even though it seems to have room. To understand this issue better, go through the various causes below:
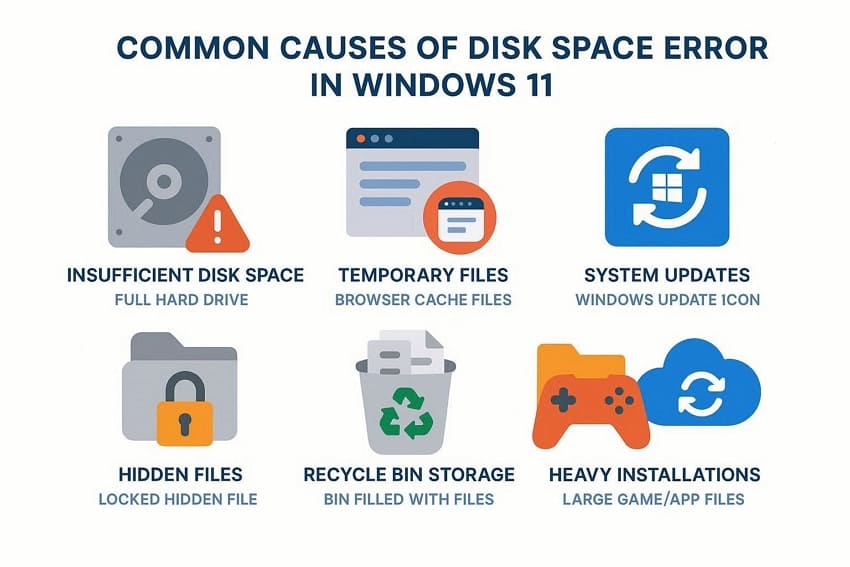
- Insufficient Disk Space: At times, there is genuinely no space on the system drive to save new files. So, Windows 11 displays this error to prevent system instability. This is caused by installing heavy software or downloading high-resolution images.
- Temporary Files: Web browsers like Google Chrome or Microsoft Edge typically store cache files to improve loading speed. However, if they are not cleared regularly, they take up a lot of storage space.
- System Updates: Windows 11 temporarily stores backup files to make sure that the system recovers if an update fails. If the drive does not have enough free space, the updates stop.
- Hidden Files: Files used for virtual memory management and system hibernation are stored and hidden. In case these files become too large, they can reduce the available disk space and lead to storage-related issues.
- Recycle Bin Storage: The computer’s deleted files are moved to the Recycle Bin. This allows users to recover if they are needed again. However, they still consume storage space until one empties the Recycle Bin.
- Heavy Installations: Games like Fortnite or video-editing software take up a lot of space. If multiple programs are installed on the same drive, they quickly add up and result in disk space issues.
Part 2. 14 Fixes for “There is Not Enough Space Available on the Disk”
After learning what could potentially cause this error, go through our guide for all possible fixes to resolve it:
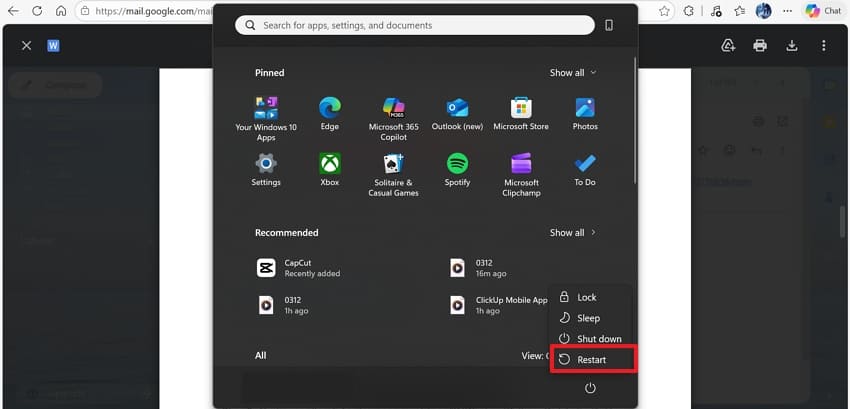
Fix 1: Restart Your Computer to Refresh Disk Usage
To clear temporary data and reset any stuck background processes, one needs to simply restart the computer. This also refreshes how Windows 11 tracks and manages available disk space. To fix the issue of not having enough space, go through the following instructions:
Instructions. Press the “Windows” key and click on the power button icon. From the drop-down menu, choose the “Restart” option. Afterwards, try completing your task and see if the error comes again.
Fix 2: Delete Temporary and Junk Files
When you get a “disk space error even though space is available” situation, you can remove temporary or junk files to create more space. Removing these files lets Windows recalculate available storage correctly and makes the disk space error disappear. To use this fix, go through the steps mentioned in the following part:
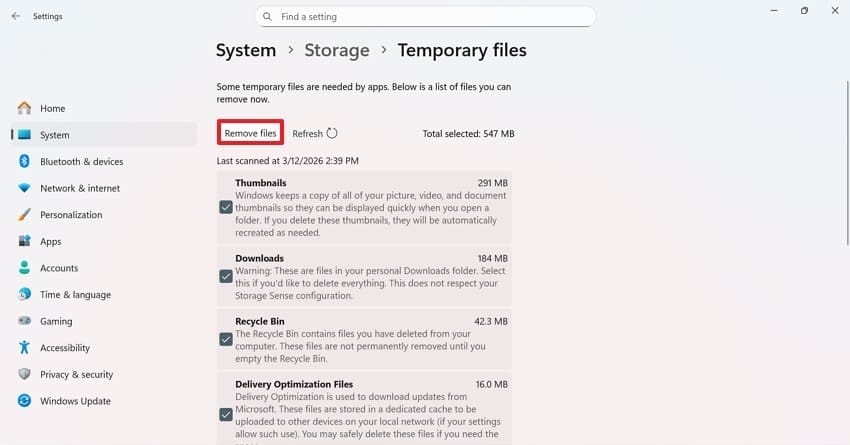
- First, press the “Windows” key and go to “Settings.” Then, click on the “System” option and press the “Storage” section.
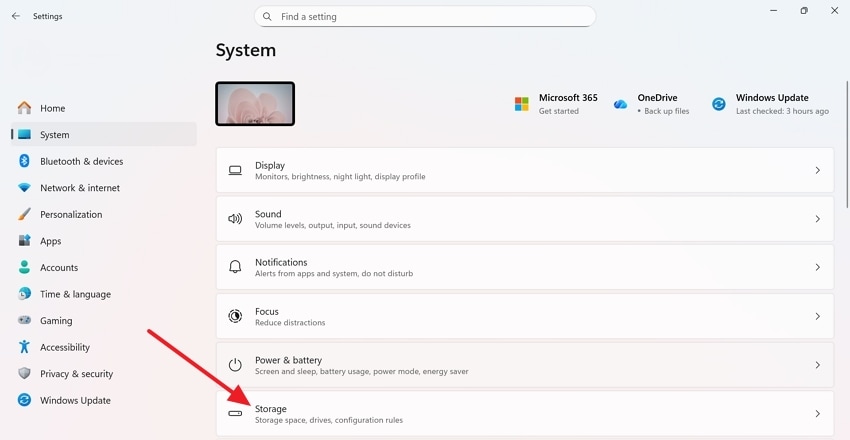
- Next, click on “Temporary Files” under your system drive and select the “Remove files” option.
Fix 3: Clear Windows Update Cache
Downloaded update files are saved in a cache folder by Windows Update. These files can become huge or corrupted, leading to disk space insufficiency. Clearing this cache removes any old or broken update packages, frees disk space, and forces the system to only download when needed. Follow the steps below to clear the cache and free up space:
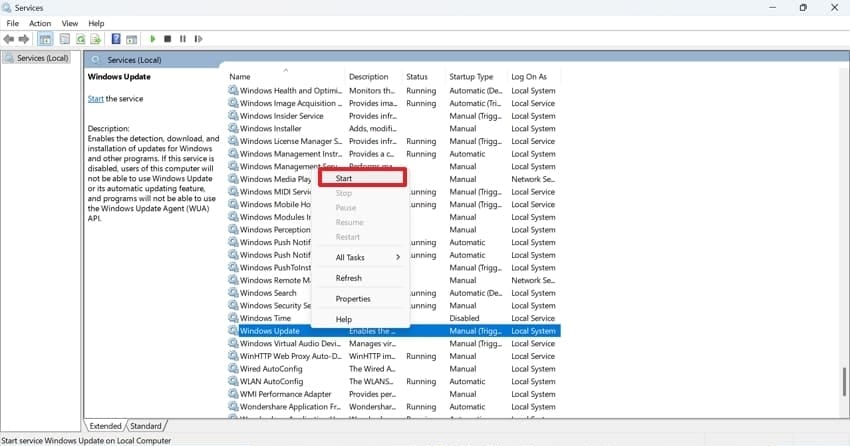
- Initially, press “Windows + R” to open the Run dialog box. In the box, type “services.msc” and then press the “Enter” button.
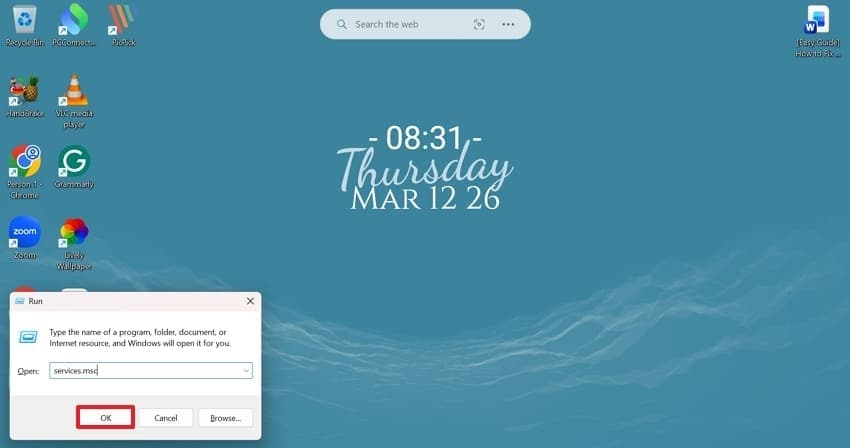
- Then, in the next window, find “Windows Update” and right-click on it and choose the “Stop” option.

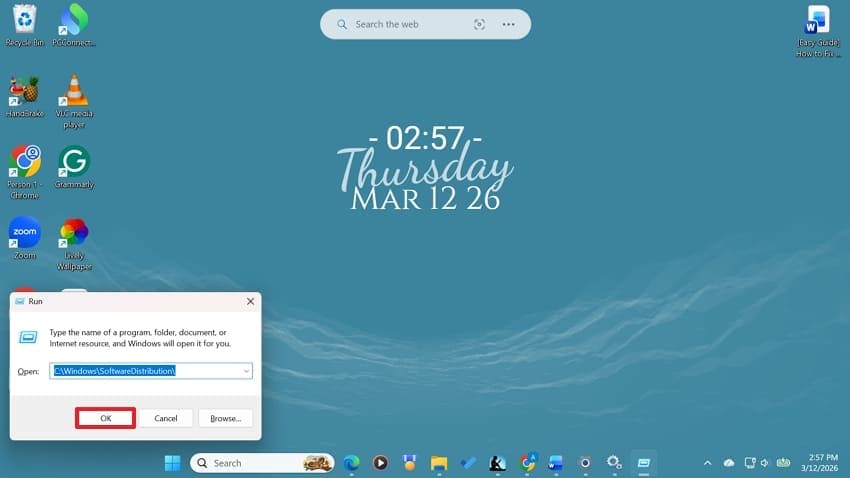
- Next, open the dialog box again and type “C:\Windows\SoftwareDistribution\”.
- Afterwards, another window will open, and here you just press “Ctrl + A” to select all files and click on the “Delete” icon to remove them.
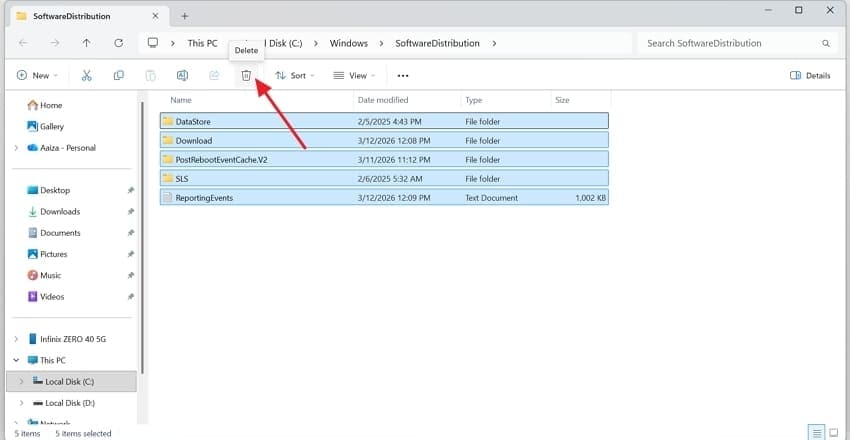
- Return to the "Services" window, right-click on "Windows Update," and choose the "Start” option. Now, your PC will look for the latest updates.
Fix 4: Empty the Recycle Bin and Downloads Folder
Deleting files does not mean permanent deletion, as they are moved to the recycle bin. Furthermore, after you have watched downloaded files, you can also delete them to free up space. Clearing both folders is a good and easy fix to resolve the “Windows disk full but nothing to delete” error. Follow the next steps carefully to clear out both folders:
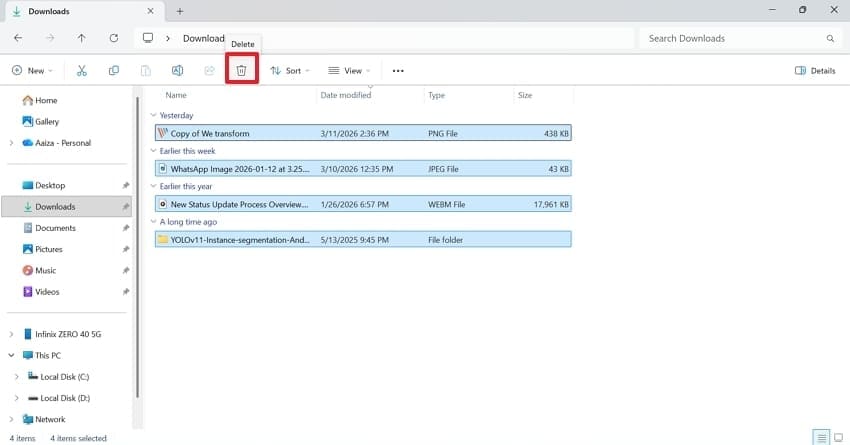
For Download Folder
Instructions. To begin, press the “Windows + E” key to open File Explorer and locate “Downloads” from the left side panel. Now, press the “Ctrl + A” keys and click on the “Delete” icon.
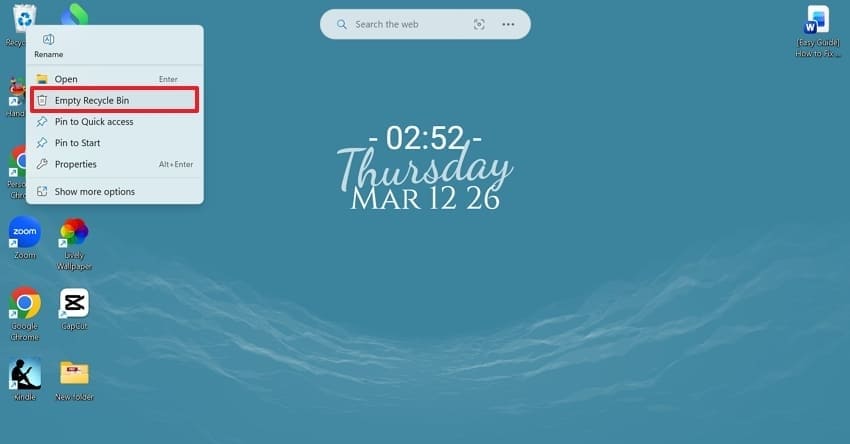
For the Recycle Bin
Instructions. Next, right-click on the desktop and choose “Recycle Bin” and then select “Empty Recycle Bin”. Doing this will permanently delete all files in the recycle bin.
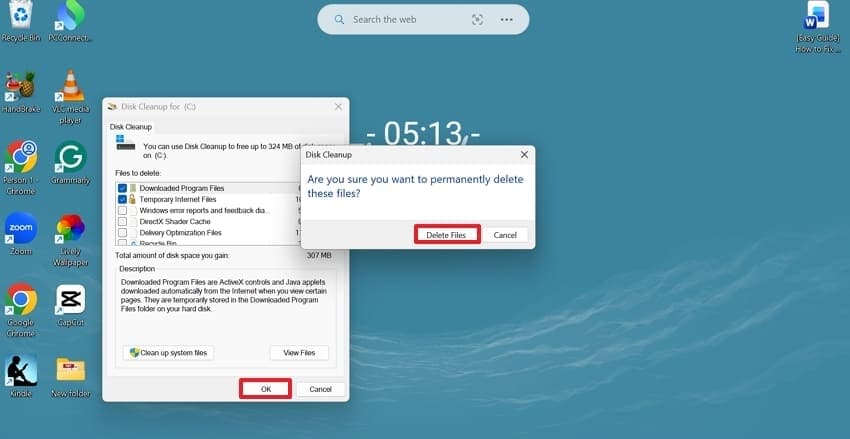
Fix 5: Run Disk Cleanup Utility
Your system has a built-in Disk Cleanup Utility that shows thumbnail caches and temporary files that are safe to delete. Using this is very useful as it targets hidden junk files and can quickly recover space on the C: drive. The next section offers a step-by-step guide on using this fix:
- First of all, press the “Windows + S” key and type “Disk Cleanup” in the search box.
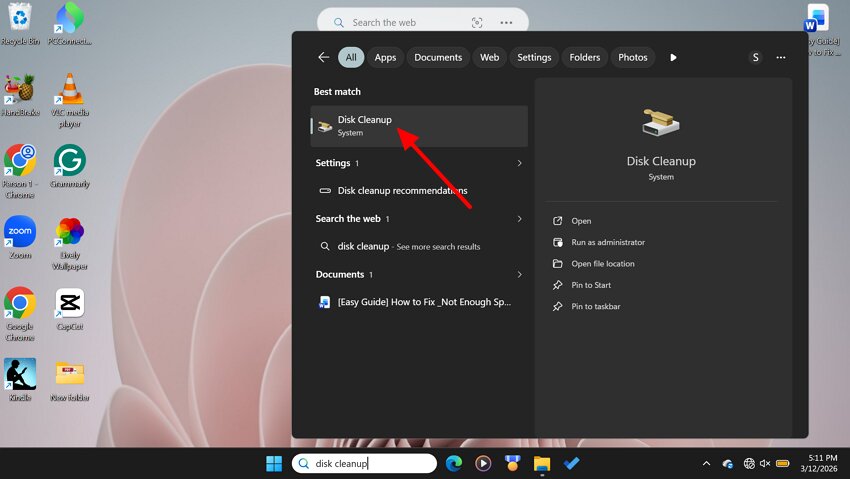
- A small window will pop up, and after ensuring drive C is selected, press the “Ok” button.

- Select all files you do not need from the list, i.e., “Temporary Files,” “Temporary Internet Files,” and “Recycle Bin.” Continuing, select the “OK” option and in the next dialogue box, click on the “Delete Files” option.
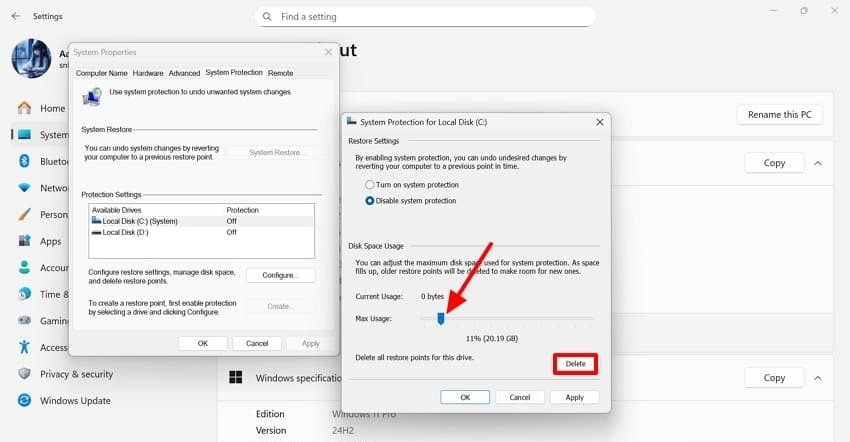
Fix 6: Check for Shadow Copies and Reduce Restore Points
If multiple restore points or shadow copies are gathered, you may notice there is not enough space available on the disk. This is because the hidden recovery data is using a big portion of your drive. You can easily free up several gigabytes by going through the steps below:
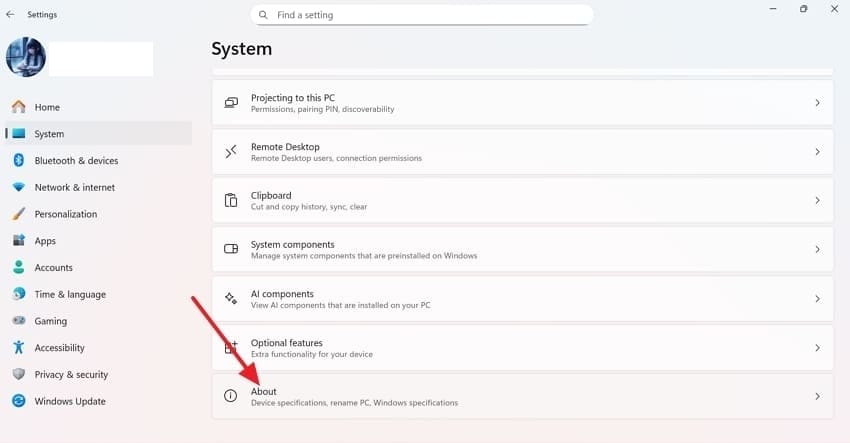
- Click on the “Windows” icon in the taskbar and navigate to “System.” From there, scroll down and click on the “About” section.
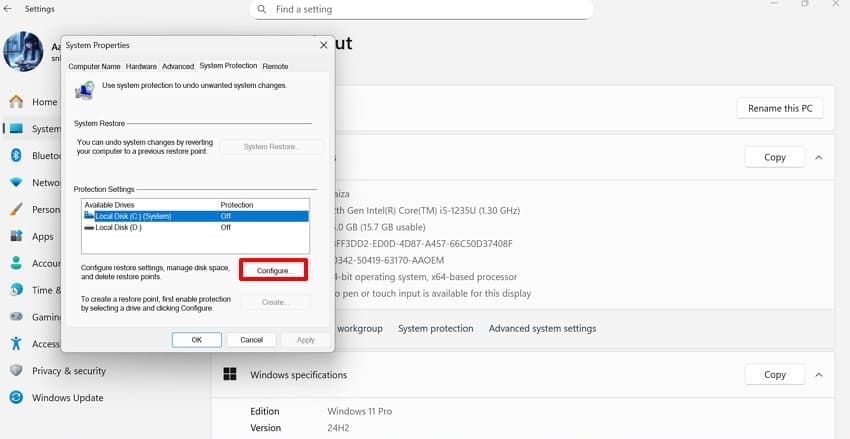
- Next, click on System Protection, and the “System Properties” window opens. Now, here select “C drive” and click on the “Configure” button.
- Finally, to delete all system restore points, click the “Delete” option. However, if you want to reduce future restore points, just adjust the slider for “Max Usage” and click the “Apply” button.
Fix 7: Resize or Increase Virtual Memory
In Windows 11, Virtual Memory uses part of your hard drive when RAM is full. It is saved in a hidden system file, pagefile.sys, which can become very large. By adjusting it, you can either reduce the size to free up storage. Otherwise, you can increase the size to prevent crashes or shutdowns during high RAM usage. Here, follow the steps below to see how to fix it:
- To start, press the “Windows” key and type “View advanced system settings”. After opening that, select the “Settings” option under the “Performance” tab.
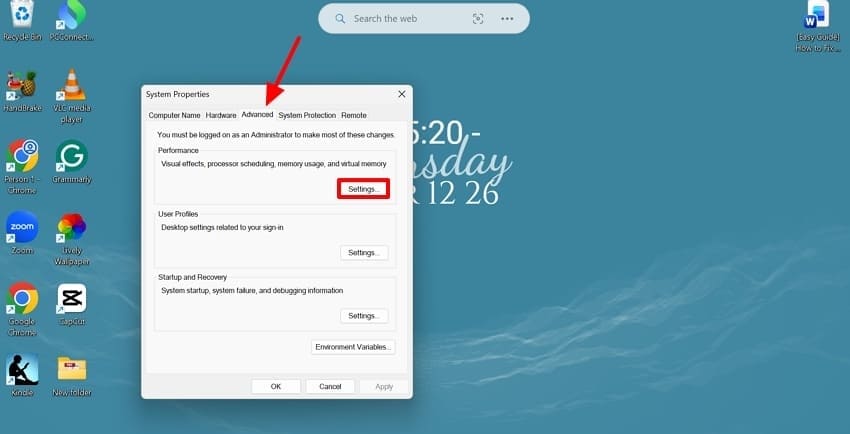
- Next, choose the “Advanced” tab in the “Performance Options” window and click on the “Change” option under the “Virtual Memory” section.
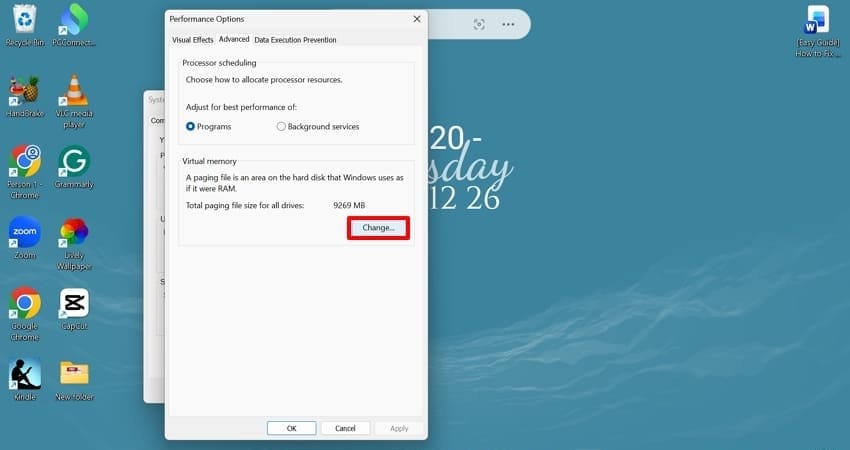
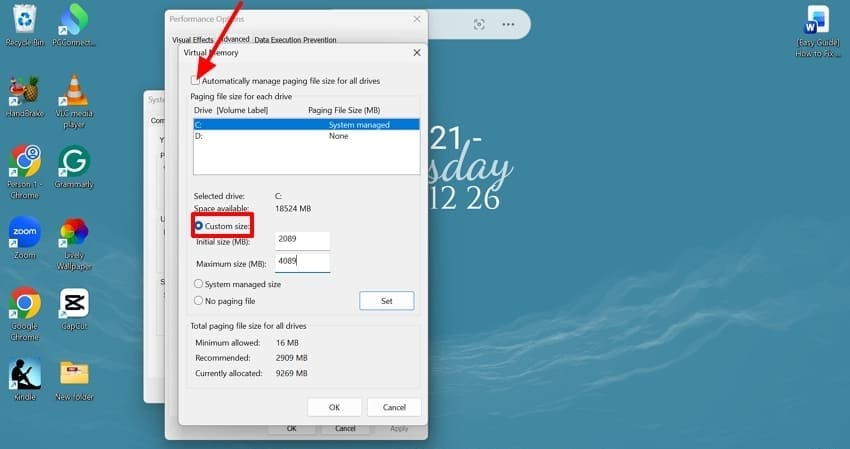
- After, uncheck the box next to “Automatically manage page file size for all drives.” Next, enable the “Custom size” option and set both initial and maximum sizes. Then, click “Set” and “OK” before leaving the dialogue box.
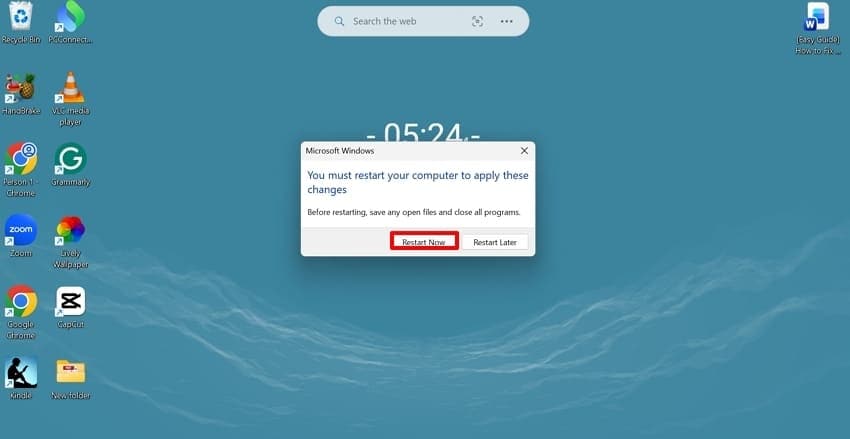
- Finally, restart your computer to apply the settings by clicking the “Restart Now” option.
Fix 8: Check Disk Quotas and Adjust if Needed
On shared or work computers, disk quotas restrict each user’s limit on an NTFS drive. If the user reaches that limit, Windows does not allow them to use any more space. Adjusting disk quotas is an easy fix for getting rid of storage-related problems. Follow the simple steps outlined below to fix the disk space error even though space is available:
- Firstly, open the file explorer and right-click on the system drive and choose the “Properties” option. Then, go to the “Quota” tab and click on “Show Quota Settings”.
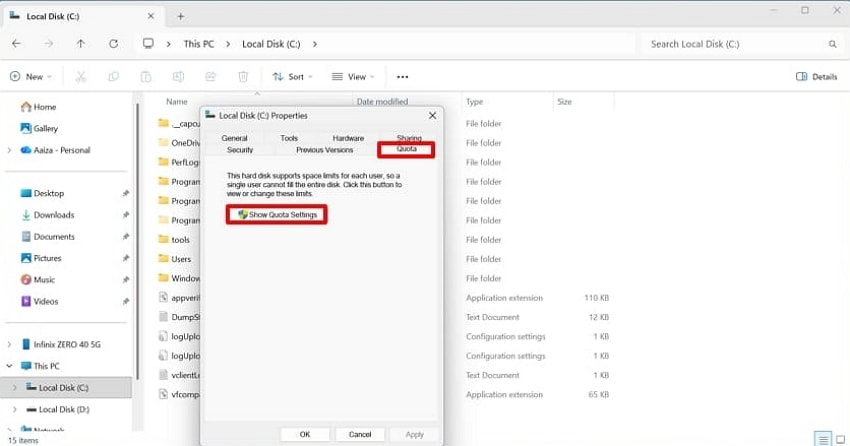
- Check “Quota management” and “Deny disk space to users exceeding quota limit” or select “Limit disk space to” and increase the limit for the user.
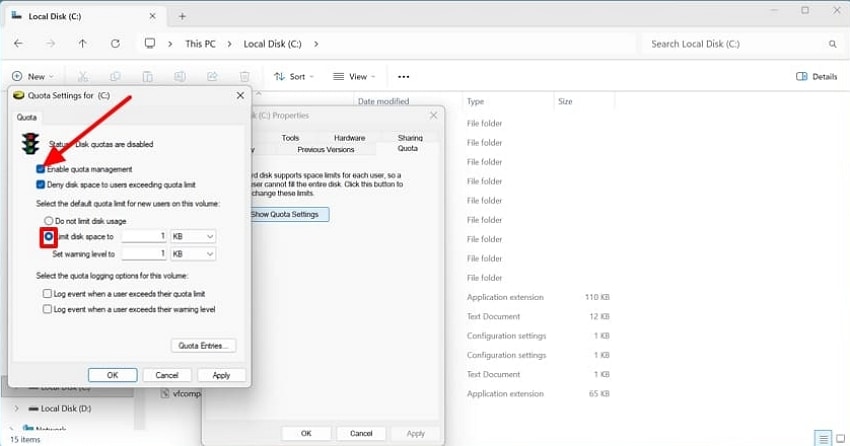
- Finally, click “Apply” and “OK,” then restart Windows for the process to take effect.

Fix 9: Scan and Repair Disk Errors Using CHKDSK
File system errors can incorrectly tell Windows that space is full. This happens because of bad sectors on the drive, improper shutdowns, and crashes. Running CHKDSK recovers damaged files and also frees up space occupied by these files. To ensure you follow this method properly, go through the following steps:
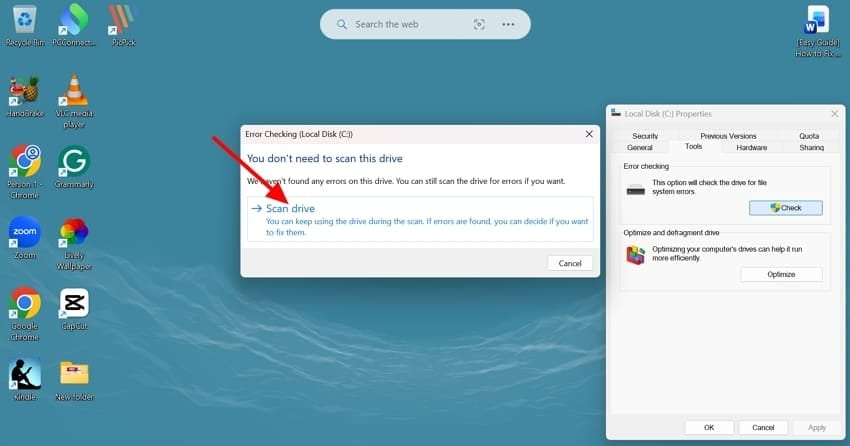
- To start, access the File Explorer and click on “Properties” after right-clicking the “C drive”. In the tools tab, select the “Check” option under the “Error Checking” section.
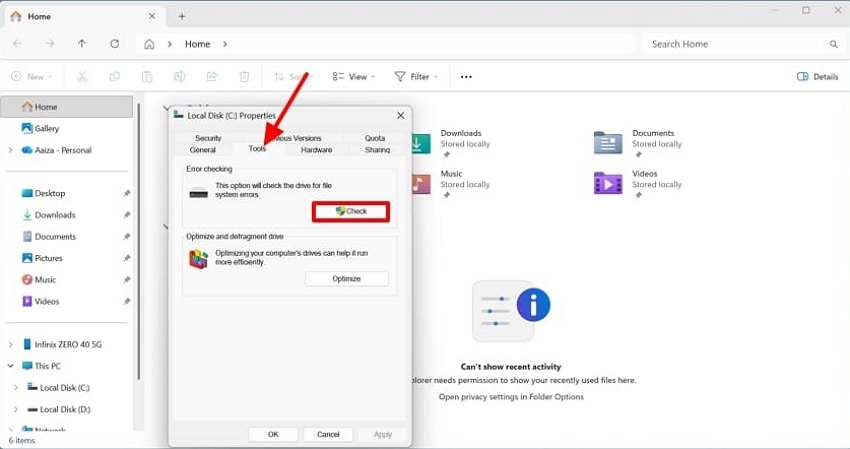
- Next, click on “Scan drive,” and after some time, Windows informs you of any errors. After repairing the errors, click “Close” and then “OK” to complete this method.
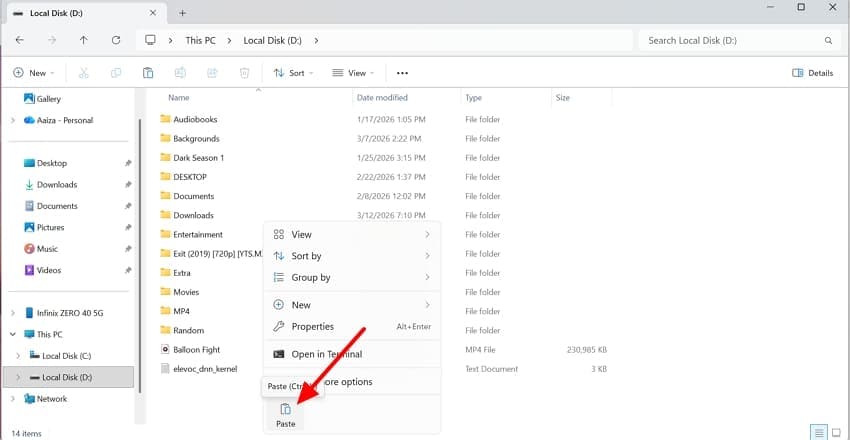
Fix 10: Move Large Files to Another Drive
Moving any personal files from the C: drive to another or an external drive frees up space. This is one of the most effective ways to use “C drive full but no files Windows 11 fix”. Furthermore, this method allows Windows and other apps to run more smoothly. Go through the following steps to move large files from C to another drive:
- Initially, open the File Explorer and right-click on the folder you want to move from disk C. Choose the “Cut” option.

- Subsequently, open your other drive (D), right-click inside it, and choose the “Paste” option.
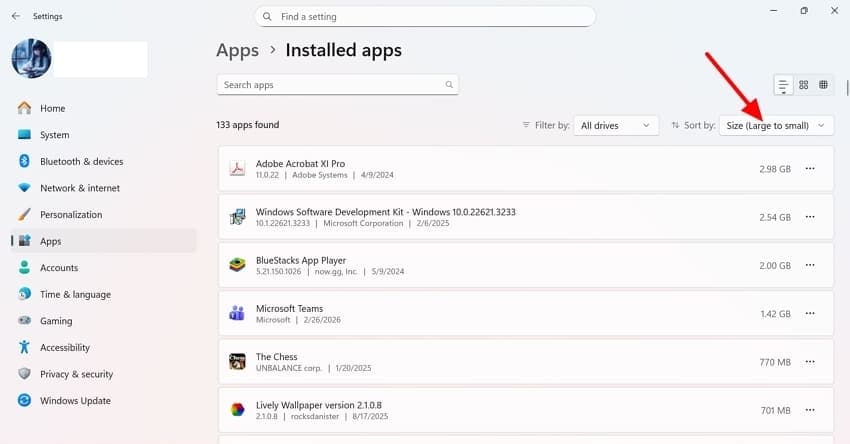
Fix 11. Uninstall Unnecessary Applications
Large software and games can take up a lot of space on the system drive, which is a common reason you see a disk space error even though the drive is not full. Removing apps you no longer need or use frees that space and also reduces background updates and cache growth. To perform the procedure for uninstalling unnecessary applications, follow the next steps carefully:
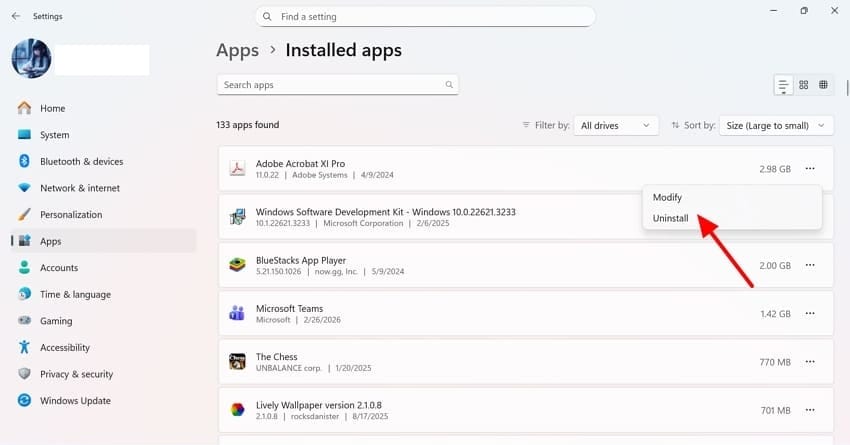
- Press “Windows + I” to open “Settings” and then navigate to “Installed Apps.” From there, sort the list by size to see the heaviest programs.
- Next, click the three dots next to the app you want to uninstall. Then, click the “Uninstall” option and repeat this procedure for all heavy apps that you no longer need.
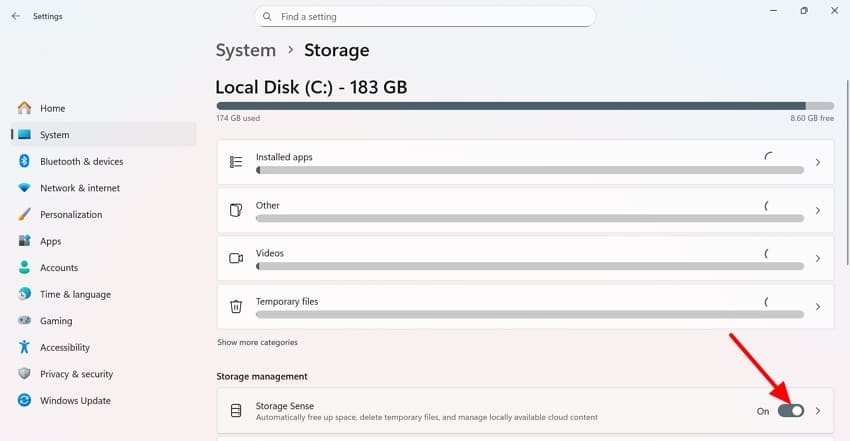
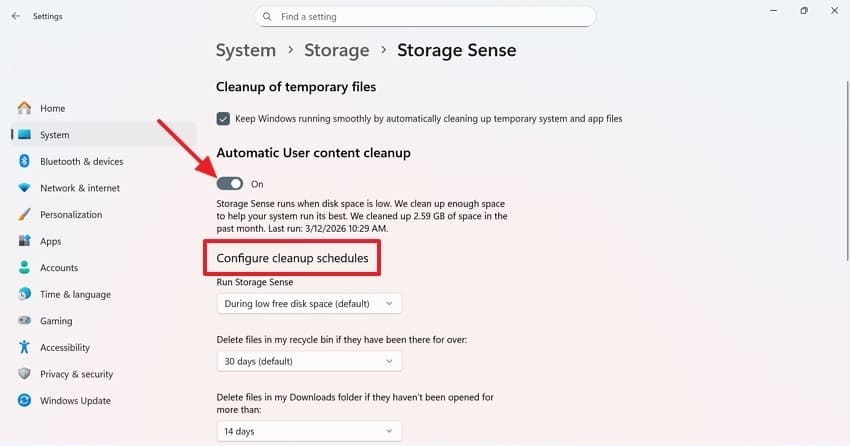
Fix 12: Use Storage Sense in Windows 11
A unique feature that is not in Windows 10 is Storage Sense, which automatically deletes temporary files, old Recycle Bin items, and ancient downloads. All of this is done to ensure that your computer frees up space continuously. Storage space is very useful when “Windows disk is full but nothing to delete.” Follow the next series of steps carefully to use Storage Sense:
- Initially, press “Windows + I” and locate “Storage”. Next, under “Storage Management," turn “Storage sense” on.
- Subsequently, enable the “Automatic User Content Cleanup” option, and under “Configure Cleanup Schedule,” choose when to run Storage Sense. Also, set how long files stay in both the Recycle Bin and Downloads folder.
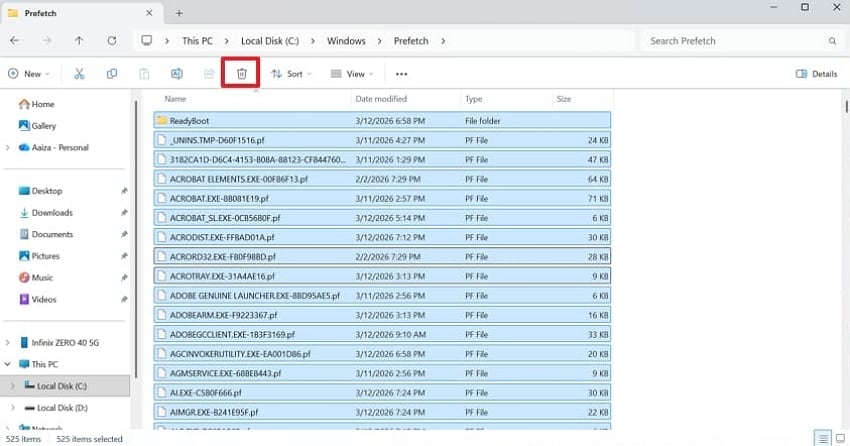
Fix 13: Delete Hidden Files Safely
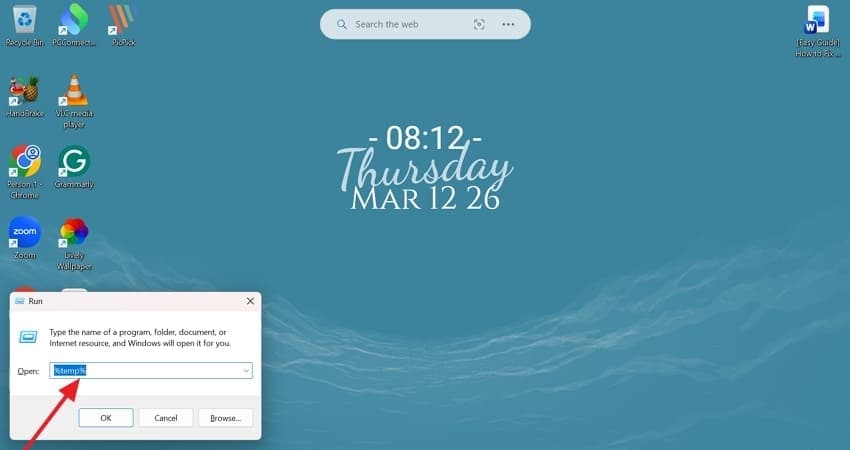
Another efficient way to clear up storage space is by deleting hidden files. These hidden files mainly consist of temp data, old logs, crash dumps, and leftover update files. Users can remove specific locations that Microsoft and experts deem safe to clean up so that no disk space error shows up. To carefully delete hidden files using Windows 11, follow the steps below:
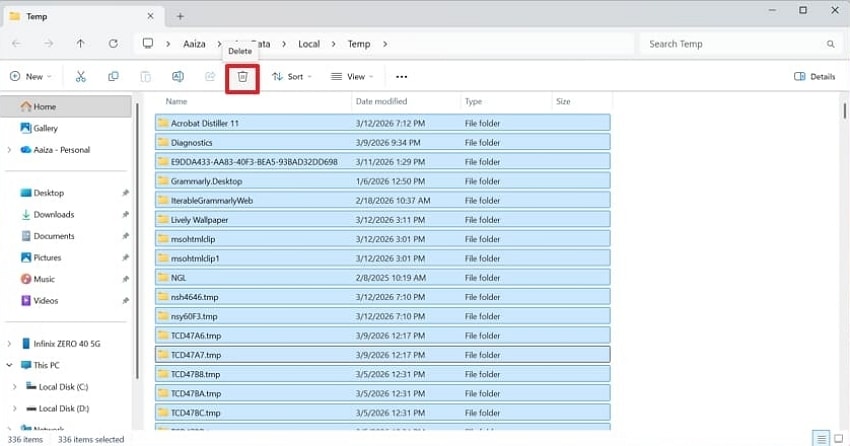
- To begin, press the “Windows + R” key, type %temp%, and press the “Enter” key.
- In the next window, press the “Ctrl + A” keys to select all files and then select the “Delete” option to remove them.
- Subsequently, press “Windows + R” again, type “temp”, and press Enter. Again, select all files and click on the “Bin” icon.
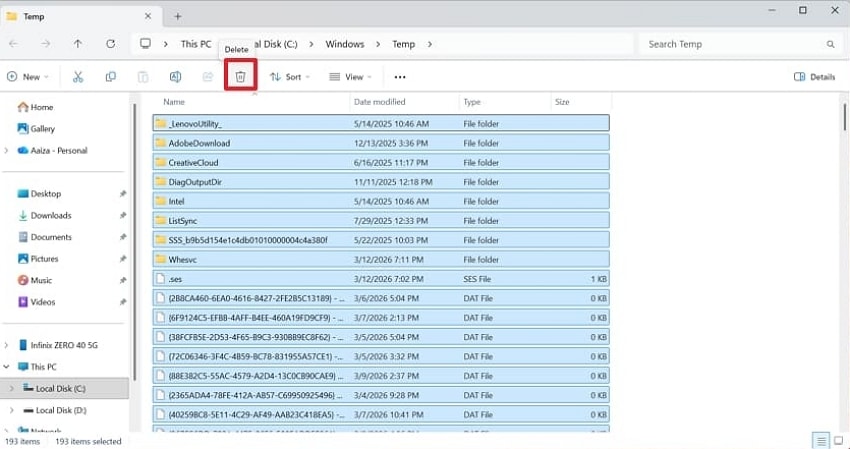
- Moreover, in case you still need more space, you can go to” C:\Windows\Prefetch” and “C:\Windows\Logs” and delete only the cache/log contents. However, this is a bit risky, so take care while performing this step, as accidentally deleting important files can cause system problems.
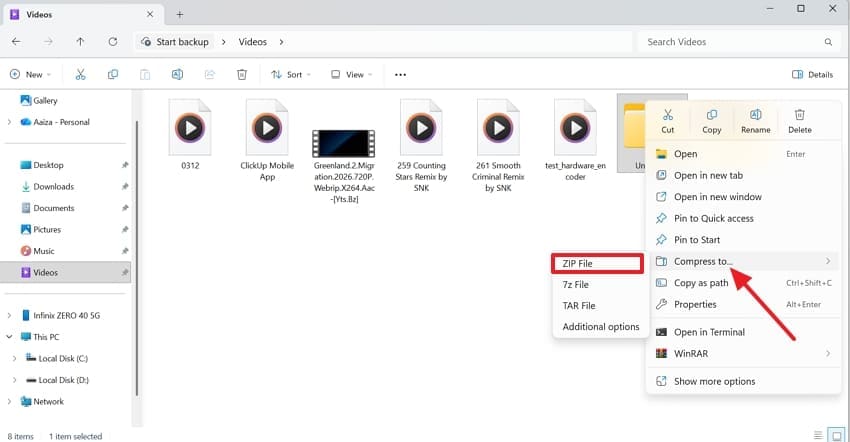
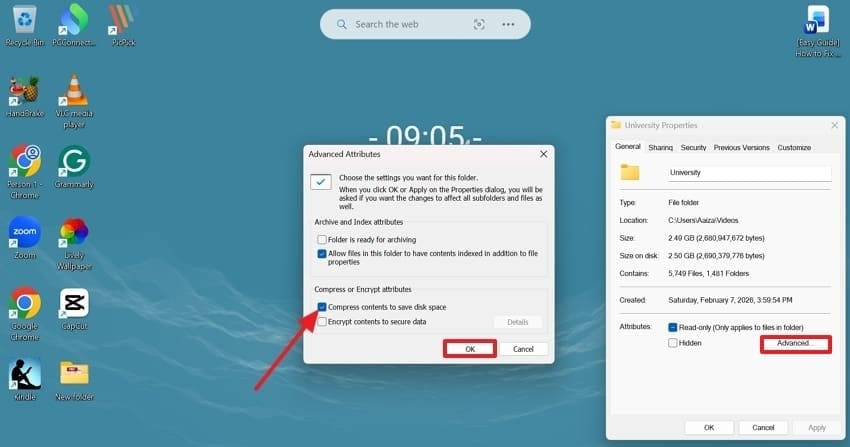
Fix 14: Compress Files to Free Up Space
The last method for freeing up space on the disk is compressing files. This is beneficial when you hit a disk space error, even though space is available, but you do not want to delete anything. For this fix, ZIP archives work best for documents or project assets, letting you still keep the files but reduce their size. To apply this fix and compress files, go through the steps mentioned next:
- To start, open File Explorer and right-click on a folder you want to compress. Next, select the “Compress to…” option and click the “ZIP File” or any other option.
- Step 2. Alternatively, for in‑place NTFS compression, right-click a folder, choose the “Properties” option, and press the “Advanced” button. Then, check “Compress Contents to Save Disk Space” and click the “OK” option to apply the settings.
Pro Tip: Recover Important Files When Windows Shows Disk Space Error
With the above fixes, you can successfully get rid of “Windows disk full but nothing to delete” errors. However, in case you lose an important file due to accidental deletion or corruption issues, you should not panic. We have the perfect solution for this situation, and Recoverit is the answer. This tool works with all major storage devices, including USB drives and SD cards.
It supports over 1000 file formats, including multiple video formats. The program claims an astounding 99.5% success rate for recovery while being compatible with Linux and NAS devices. You also get complete security for your recovered data, which may have been lost due to accidental deletion or corruption issues. Not only this, but you also receive 500MB of free data recovery without any subscription.
Key Features
- Built-in Deep Scanning: The tool performs a comprehensive scan of the entire system, ensuring no corner is missed during file retrieval.
- Preview Options: You can check your files after they are restored to ensure satisfaction before downloading them.
- Filter Search Availability: There are several options to narrow the search for lost files and speed up recovery.
A Comprehensive Guide on Recovering Files with Recoverit
Follow the next steps so you can learn how to recover files from your hard drive using Recoverit easily:
- Select Drive for Data Recovery
Initially, on the main interface, click “Hard Drives and Locations” under the “File Recovery” tab. Then, select the hard drive where you lost your file.
- Start Deep Scanning for Recovered Files
Next, Recoverit initiates a deep scan using AI to scan for any recoverable files. Also, you can preview all the recovered files in the results window.
- Pick Files and Restore to a New Location
Finally, select all the files that you previewed and want to recover. Then, just press the “Recover” button and save the new files to a new location.
Conclusion
In conclusion, “there is not enough space available on the disk” error is caused by hidden files, restore points, temporary cache, and misreported disk space. After trying the effective fixes mentioned above, you should regain enough free space for smooth performance. Also, if you accidentally delete something important during cleanup, consider using Recoverit to safely scan your drive and restore lost files.
FAQ
-
1. Why do I still get a “Windows disk full but nothing to delete” message after cleaning?
This is probably because hidden files like system restore points, Windows Update cache, or virtual memory files are still using space, even if space is available. -
2. Is it safe to use third‑party cleaners for accidentally deleted files?
Yes, you can use such third-party apps, but we recommend using reputable tools only that avoid deleting unknown system components. Consider Recoverit as an ideal solution for your deleted files. -
3. Can malware cause a low disk space issue error?
Yes, malware can trigger low disk space errors by creating hidden, harmful files. It may also download unwanted data, causing sudden storage loss unexpectedly.


