

 TL;DR:
The "CHKDSK cannot continue in read-only mode" error indicates the disk check tool lacks the administrative permissions or exclusive access required to apply repairs, which must be resolved by elevating system privileges or removing disk locks.
● Grant repair access by executing chkdsk C: /f /r in an elevated Command Prompt, or use chkdsk C: /f /r /x to schedule the scan for the next system restart if the target drive is actively used by Windows.
● Clear specific read-only restrictions by disabling physical hardware switches on external drives, changing the WriteProtect Registry value to 0, or running the attributes disk clear read-only command via the diskpart utility.
● Formatting the drive serves as a last-resort solution that will erase all existing data, requiring prior backups or the use of data recovery software like Recoverit if severe corruption prevents standard CHKDSK repairs.
Ask AI for a summary
 ChatGPT
 Perplexity
 Gemini
 Claude
 Grok
Grok
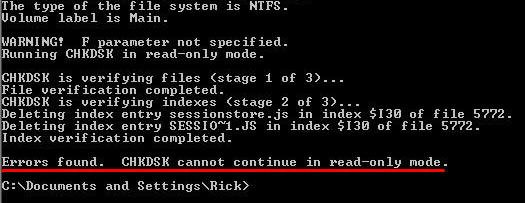
When your computer displays "CHKDSK cannot continue in read-only mode," it indicates that the disk check tool can identify problems but is unable to fix them in this mode. This error prevents CHKDSK from completing its repair function and often points to underlying disk issues that need attention.
Common across Windows 10 and other versions, the "CHKDSK errors found cannot continue in read-only mode" message can be frustrating for users looking for a reliable disk check solution.
Addressing the "check disk cannot continue in read-only mode" error is essential. This guide offers a clear explanation of the error, its causes, and eight effective fixes to help restore CHKDSK’s functionality and resolve the problem efficiently.
Try Recoverit to Perform Data Recovery
 Security Verified. 3,591,664 people have downloaded it.
In this article

Part 1: What is the Meaning of the "CHKDSK cannot continue in read-only mode" Error?
"CHKDSK cannot continue in read-only mode" means your disk checker can't fix any disk problems. It can only view issues but can't make changes. This happens when CHKDSK runs without proper permissions or when the disk has write protection.
The error "CHKDSK in read-only mode" often appears in the command prompt. You might see text saying "errors found" but CHKDSK can't fix them. This happens with external drives, USB sticks, or your main hard drive too.
When "CHKDSK errors found cannot continue in read only" appears, your system knows something is wrong. But the tool can't make fixes. This common issue in Windows 10 needs manual fixing. Without fixing it, disk errors may cause data loss or system crashes.
Part 2: Common Causes: CHKDSK cannot continue in read-only mode
The "Check disk cannot continue in read-only mode" error happens for many reasons. Understanding these causes helps you pick the right fix:
- Lack of admin rights when running CHKDSK
- Disk has write protection enabled
- Programs are using the disk, blocking changes
- Corrupted file system on the drive
- Bad sectors on the physical disk
- The disk or drive has hardware issues
Part 3: How to Fix CHKDSK Cannot Continue in Read-Only Mode in Windows?
Now, let's fix the "CHKDSK cannot continue in read-only mode" error. Try these methods one by one. Start with the easiest ones first.
Fix 1: Run CHKDSK with elevated permissions
The error "CHKDSK cannot continue in read-only mode" on Windows 10 typically occurs when the tool is run without administrative privileges. Since CHKDSK requires full system access to resolve disk issues, running it as an administrator is essential to fixing the problem.
Running the Command Prompt as an administrator gives CHKDSK the power it needs. This simple fix works in many cases when "check disk cannot continue in read only mode" appears.
Steps:
- Click Start and type "Command Prompt". Right-click on Command Prompt. Select "Run as administrator"
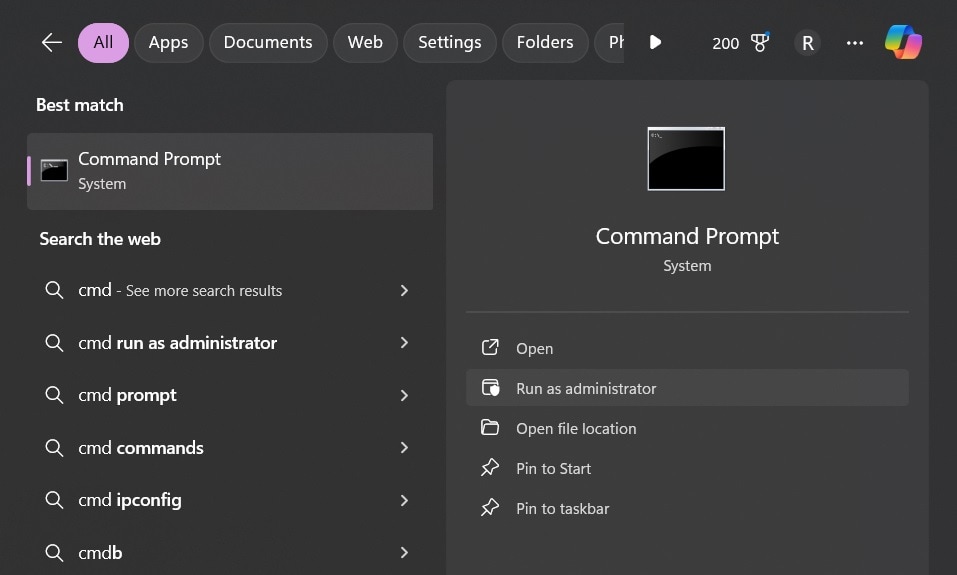
- Type "chkdsk C: /f /r" (replace C: with your drive letter). Press Enter. Wait for the scan to complete
Fix 2: Schedule a Disk Check Upon Restart
Some disks can't be checked while Windows is running. The system drive (C:) is often locked during use. This causes "CHKDSK errors found cannot continue in read-only" messages.
Scheduling a check before Windows loads avoids the "CHKDSK in read-only mode" error. This lets CHKDSK work on locked drives before programs start using them.
Steps:
- Open the Command Prompt as admin. Now, type "chkdsk C: /f /r /x" (Don’t forget to replace C: with your drive). Type "Y" when asked. This will schedule a disk check.
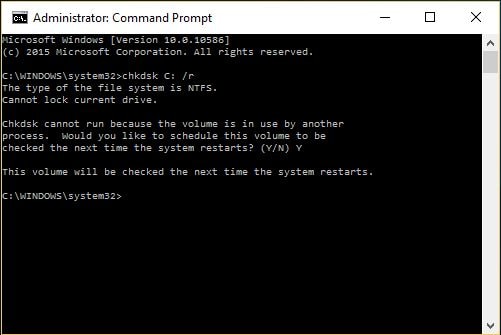
- Restart your computer. Windows will run CHKDSK before loading. Wait for the scan to finish
Fix 3: Change the Read-Only Mode
Sometimes drives get stuck in read-only mode. This directly causes the "check disk cannot continue in read-only mode" error. Using the diskpart tool can fix this setting.
Changing the read-only flag allows CHKDSK to make changes. This helps when "CHKDSK cannot continue in read-only mode" appears for no clear reason.
Steps:
- Open the Command Prompt as admin. Type "diskpart" and press Enter. Type "list disk" and press Enter. Type "select disk X" (X here is your disk number).

- Type "attributes disk clear read-only". Exit diskpart by typing "exit". Try running CHKDSK again
Fix 4: Disable Write Protection
The "CHKDSK cannot continue in read-only mode" error on Windows 10 can result from physical write protection.
Many USB drives feature a small switch that prevents modifications. To resolve this issue on external media, inspect your drive for a physical switch or use software tools to disable write protection.
Steps:
- Open Registry Editor (type regedit in Start). Go to HKEY_LOCAL_MACHINE\SYSTEM\CurrentControlSet\Control\StorageDevicePolicies
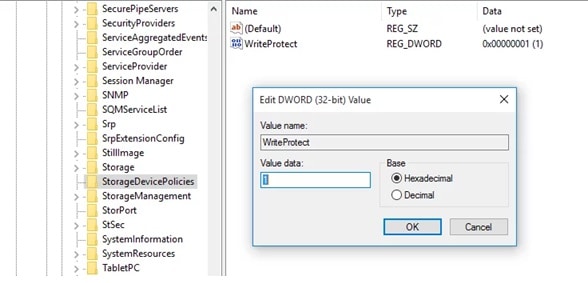
- Find "WriteProtect" and set value to 0. Now create this key with value 0. Restart your computer. Try CHKDSK again
Fix 5: Close Active Programs
Running programs can lock files and cause "check disk cannot continue in read-only mode" errors. CHKDSK needs full access to the drive to work properly.
Closing programs that use your drive helps fix "CHKDSK errors found cannot continue in read only" problems. Even background apps can block CHKDSK from working.
Steps:
- Save all your work in open programs. Close all applications. Open Task Manager (Ctrl+Shift+Esc). Look for programs using the problem drive. End those tasks.
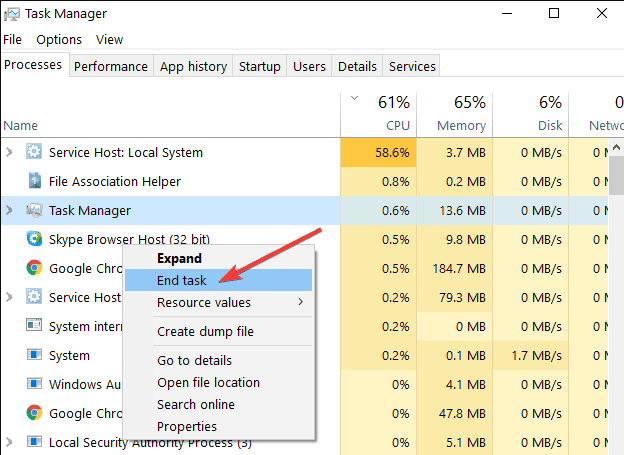
- Try running CHKDSK again. If needed, try in Safe Mode (next fix)
Fix 6: Run CHKDSK in Safe Mode
Safe Mode turns off most background programs. This helps fix "CHKDSK cannot continue in read-only mode" by giving the tool full access to drives.
In Safe Mode, fewer processes run, so disks aren't locked. This helps when "check disk cannot continue in read only mode" keeps appearing.
Steps:
- Restart your computer. As Windows starts, press F8 repeatedly. Select "Safe Mode" from the boot options. Once in Safe Mode, open Command Prompt as admin.
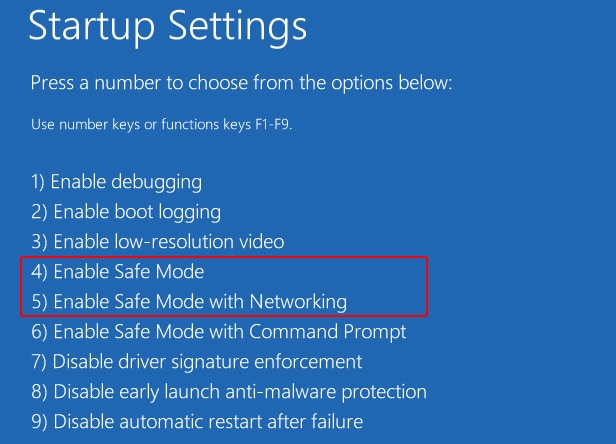
- Run "chkdsk C: /f /r" (change drive letter if needed). Wait for the scan to complete. Restart normally
Fix 7: Perform an SFC scan
System File Checker (SFC) fixes Windows files that might cause "CHKDSK cannot continue in read only mode Windows 10" errors. Corrupt system files can prevent CHKDSK from working right.
Running SFC helps fix system problems behind "CHKDSK in read-only mode" errors. It restores proper disk management functions.
Steps:
- Open Command Prompt as admin. Type sfc /scannow and press Enter.
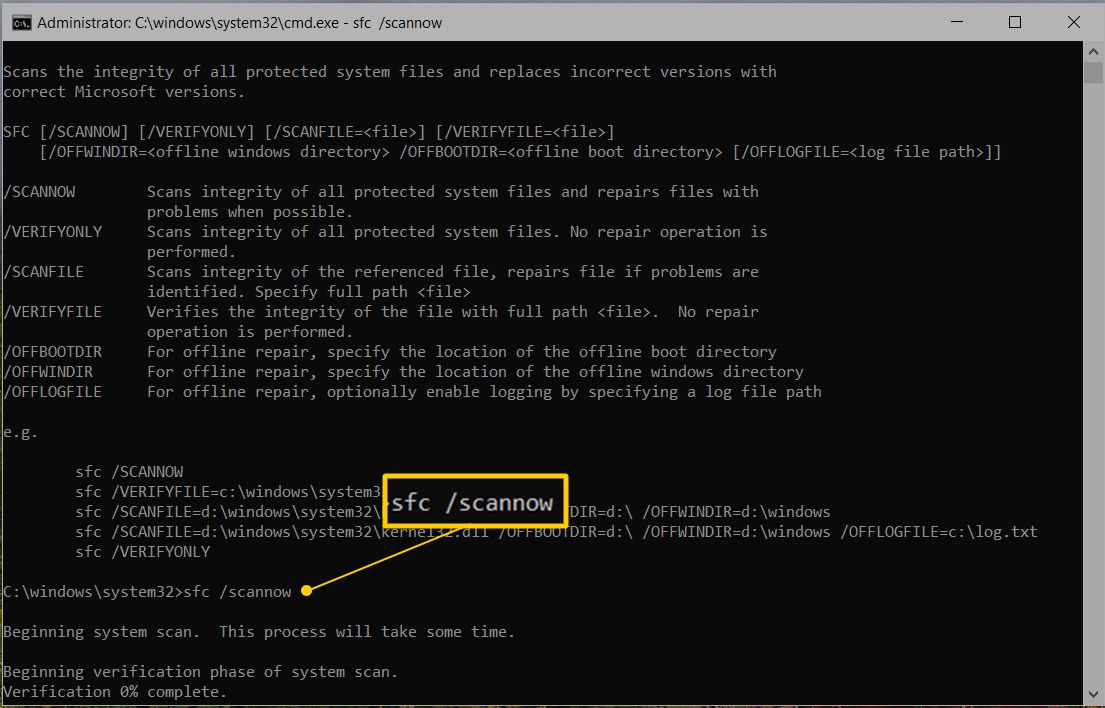
- Wait for the scan to complete (might take a while). Restart your computer. Try running CHKDSK again
Fix 8: Format the Disk
As a last resort, formatting fixes stubborn "check disk cannot continue in read-only mode" errors. This erases all data but fixes most disk issues.
Before formatting, back up important files if possible. This radical fix works when nothing else helps with "CHKDSK errors found cannot continue in read only" problems.
Steps:
- Open File Explorer. Right-click the problem drive. Select Format.
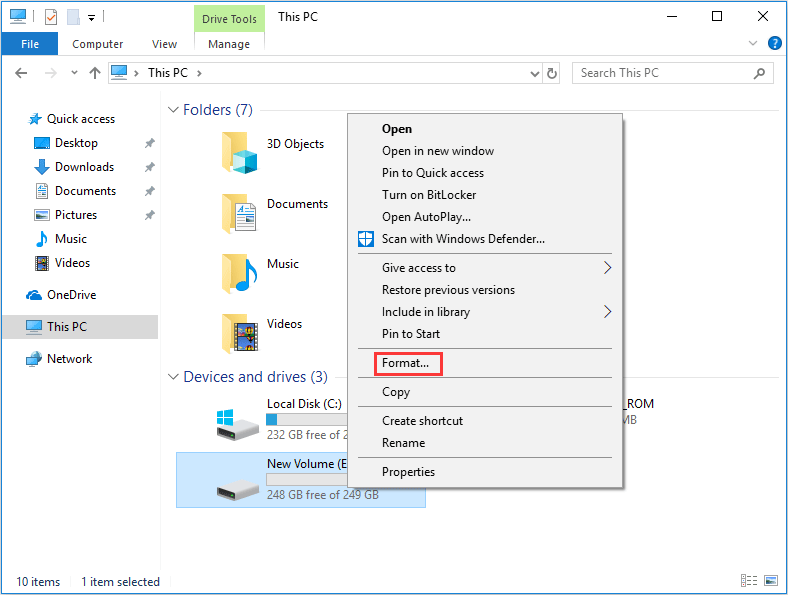
- Uncheck Quick Format for better results. Click Start. Wait for the formatting to complete. Your drive should work normally now
Part 4: Lost Data Due to Formatting? Use Recoverit Data Recovery Tool
If you're facing the error message "CHKDSK cannot continue in read-only mode," formatting the drive is often seen as a solution, but it comes with a significant risk of data loss. Instead of taking that drastic step right away, tools like Recoverit Data Recovery can step in as lifesavers.
Here's how Recoverit can help:
- Recover After Formatting: If you’ve already formatted a drive in hopes of fixing the error, Recoverit can work to retrieve your lost files from that formatted disk.
- Rescue Data from Damaged Drives: When CHKDSK can't repair a severely corrupted or damaged drive, Recoverit can scan and recover files from it.
- Read-Only Mode Issues: For drives stuck in "read-only mode" where CHKDSK can't proceed, Recoverit specializes in accessing such drives and recovering data without requiring you to format.
Do keep in mind that while recovery tools are powerful, success can depend on the extent of drive damage and whether data has been overwritten. It’s always a good practice to create backups before formatting or attempting major repairs.
Steps to recover data:
- Download and install Recoverit. Select the drive that had "CHKDSK in read-only mode" errors. Click Start.

- Wait for the scan to complete. Preview found files.

- Select files to recover. Click Recover. Save to a different drive.

Part 5: Tips to Avoid the check disk cannot continue in read-only mode Error
Preventing "CHKDSK cannot continue in read-only mode" is better than fixing it. Follow these tips to avoid future problems:
- Always run disk tools as an administrator
- Don't unplug drives without using "Safely Remove Hardware"
- Keep your Windows updated with the latest fixes
- Run regular disk checks before problems appear
- Don't turn off your computer suddenly by holding the power button
- Use quality USB drives and cables
- Keep your antivirus program updated to prevent disk infections
- Back up important data regularly in case of disk failures
Conclusion
"CHKDSK cannot continue in read-only mode" is frustrating but fixable. We've shown eight ways to solve this problem. Start with admin rights and work through the other fixes if needed.
Most fixes take just a few minutes. Even if you need to format, Recoverit can help save your data. The key is acting quickly when you see "check disk cannot continue in read-only mode" errors.
Remember to follow our prevention tips to avoid "CHKDSK in read-only mode" problems in the future. Regular maintenance prevents most disk issues. With these solutions, you can keep your Windows 10 system running smoothly without disk check errors.
FAQ
Can "CHKDSK cannot continue in read-only mode" cause data loss?
The error "CHKDSK cannot continue in read-only mode" doesn't directly cause data loss, but it signals potential disk problems that might. To protect your data, back up important files immediately and address the issue by diagnosing and repairing the drive to prevent further damage. Acting quickly can safeguard your data and resolve the underlying problem.Why does "check disk cannot continue in read-only mode" happen on new drives?
New drives can have write protection enabled by default. Some USB drives come with physical locks turned on. Check for switches on the drive. Also try the diskpart method to clear read-only attributes when "CHKDSK in read only mode" appears.Is it safe to format a drive that shows "CHKDSK errors found cannot continue in read only"?
Formatting is safe but erases all data. Try other fixes first. Always back up important files before formatting. If you format without backing up, use data recovery software like Recoverit to get your files back.


