

 TL;DR:
You can create a full-volume Windows 10 system image using the legacy Backup and Restore (Windows 7) control panel, but Microsoft deprecated this feature starting with Windows 10 version 1709 and recommends migrating to supported third-party alternatives before standard Windows 10 support ends on October 14, 2025.
● Creating a system image requires an NTFS-formatted external drive large enough to hold all selected system partitions, but it does not make the destination drive bootable, requiring you to create a separate Recovery Drive or System Repair Disc to access the Windows Recovery Environment.
● Restoring an image is a destructive process that completely overwrites the target disk partitions, permanently erasing any newer personal files saved after the backup date and requiring a valid 48-digit BitLocker recovery key if the drives are encrypted.
● If a system image is missing or unrestorable, you cannot use file-recovery software like Wondershare Recoverit to reinstall the Windows operating system; you must instead rely on File History, OneDrive, or recovery software specifically to extract readable individual files from detectable storage.
Ask AI for a summary
 ChatGPT
 Perplexity
 Gemini
 Claude
 Grok
Grok
A disk image for Windows 10 usually means a backup of the Windows system and its required partitions, not a downloadable Windows installation ISO. If the legacy Backup and Restore (Windows 7) interface is still present on your computer, you can use Create a system image to back up the selected volumes to separate storage. That image can later be restored through Windows Recovery Environment if the PC suffers a serious failure.
This is a legacy method, not Microsoft's current recommendation for future full-system backups. Windows 10 standard support ended on October 14, 2025, and the built-in image feature was deprecated long before that. This guide explains the remaining Windows 10 wizard, what its backup actually contains, how to restore it safely, and what to do when no usable image exists.
Before you begin: A system image is not the same as a Recovery Drive, File History backup, System Restore point or ISO. If you already lost personal files, check existing backups or recover readable files before running destructive restoration or reinstallation steps.
In This Article
Part 1. Is Windows 10 System Image Backup Still Available?
Yes, on Windows 10 installations that still expose the legacy wizard, you can use Backup and Restore (Windows 7) > Create a system image. This is not a current, actively developed backup platform. Check that the link exists on your particular PC before following the workflow below. If it is missing, use a supported third-party imaging solution rather than trying to force the old feature back into Windows.
Backup and Restore (Windows 7) Is a Deprecated Feature
Microsoft lists System Image Backup (SIB) as deprecated starting with Windows 10 version 1709. In the Windows deprecated-features reference, Microsoft identifies it as the legacy Backup and Restore (Windows 7) Control Panel feature and points users to third-party products for full-disk backups. Deprecated does not mean that every Windows 10 PC has had the wizard removed.
To check, open Control Panel > System and Security > Backup and Restore (Windows 7). Look for Create a system image on the left. If it is visible and the PC is otherwise healthy, the procedure in Part 3 describes that specific workflow. Availability, permissions and success may vary by installation.
Windows 10 Support Ended on October 14, 2025
Microsoft confirms standard Windows 10 support ended on October 14, 2025. The OS and existing local recovery utilities can continue to operate; end of support does not erase system images already made. However, ordinary Windows 10 support and free security fixes have ended.
Microsoft also announced an extension of eligible consumer Extended Security Updates (ESU) coverage through October 12, 2027, subject to eligibility and enrollment; see its updated Windows ESU announcement. ESU provides security updates, not new features or maintenance for System Image Backup. A long-term backup plan should account for migration to a supported Windows release.
When the Wizard Is Missing or Blocked
If Create a system image is absent or blocked by organizational policy, do not assume a Windows 11 guide applies to your Windows 10 build. On a work-managed PC, ask the administrator what backup product is approved. Microsoft documents the advanced wbadmin backup command, but it requires elevated permissions, correct destination selection and technical care.
For the command syntax, consult Microsoft's wbadmin documentation; for a separate walkthrough, see Recoverit's Windows 10 wbadmin guide. This page remains focused on the Control Panel wizard to avoid mixing two different backup procedures.
Part 2. What a Windows 10 System Image Includes
A Windows 10 system image captures the selected disk volumes as they existed at the backup date, including the Windows installation and applications stored on those volumes. It normally includes the critical partitions needed for startup. Additional data volumes are included only if selected and supported. It is not a continuously updated copy of your PC.
System Image vs. Windows Backup, File History, Restore Point, Recovery Drive, and ISO
These names describe different recovery jobs. A Windows 10 ISO is installation media, not a copy of your current computer. Windows Backup with OneDrive does not replace a complete disk image. The distinction is important when planning for a failed system drive.
| Option | What Is Saved | Best Use | Does It Recreate the Old Windows Installation? |
| System image | Windows and the selected backed-up volumes, including apps/settings on them | Return a computer to the image date after major failure | Yes, for the volumes represented in a restorable image |
| Windows Backup / OneDrive | Supported personal folders and selected settings/preferences | Cloud protection and moving to another PC | No |
| File History | Versions of files in protected folders | Undo accidental changes or deletion | No |
| System Restore | System configuration and restore-point changes | Roll back drivers, settings and system problems | No |
| Recovery Drive | Windows recovery utilities and optionally system files | Boot recovery tools or reinstall Windows | No; it does not contain your original files |
| Windows installation ISO / USB | Windows setup files and repair environment | Install or reinstall Windows | No; it is not your personalized system image |
For the tools included in the current Windows interface, see Microsoft's backup and recovery overview. The Windows Backup guide explains OneDrive-backed folders and settings, while File History saves file versions.
System-Level Snapshot vs. Individual-File Backup
If a 128GB laptop SSD is being replaced by a 2TB SSD, for example, a suitable system image may provide a route back to the installed Windows environment. But it is still necessary to confirm that the backup includes all required boot partitions, that the replacement disk is compatible with the restoration process, and that you have recovery media. Restoring an image can replace newer files written since the image was created.
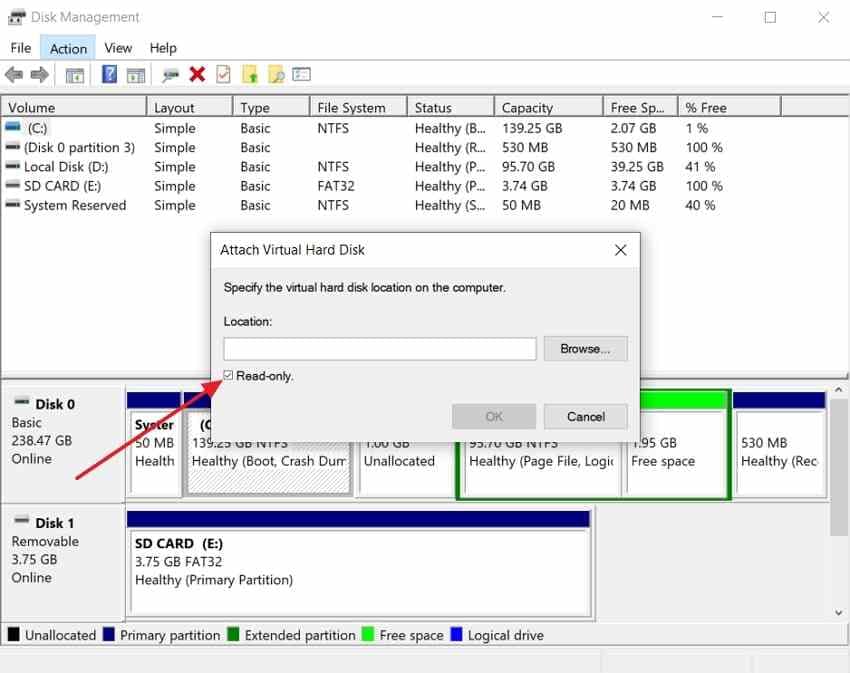
If you only need one document from an existing image, avoid a full-machine restore when a supported virtual-disk file can be read separately. Windows Disk Management can attach existing VHD/VHDX files; see Microsoft's VHD instructions. Preserve the original backup and use the Read-only option if you mount an image to inspect or copy files. A backup set is not guaranteed to contain a directly mountable VHD.
Why a Recovery Drive Does Not Replace a Personal-File Backup
A Recovery Drive is bootable troubleshooting or reinstallation media; it does not save your personal documents or an existing system image. Microsoft's Recovery Drive instructions also warn that creating one erases the USB drive selected for recovery media. Use a separate empty USB for recovery media, and keep the actual image backup on its own drive.
Part 3. Create a Windows 10 System Image With the Legacy Wizard
Use these steps only if the Create a system image link is present and the PC can read its disks reliably. If the source disk is failing, stop unnecessary activity and protect irreplaceable files before running a long backup. A system image is not a substitute for recovering files from a physically deteriorating drive.
Prepare a Separate Destination With Enough Space
Connect a healthy external HDD or SSD with enough free space for all volumes shown in the wizard. Prefer a separate physical device that will not be restored over later. An NTFS-formatted external drive is a practical choice for Windows system images. Check the wizard's estimated backup size against the destination's available free space; do not assume a tiny USB stick or SD card is sufficient.
| Destination | Practical Use | Important Limitation |
| External HDD/SSD | Convenient offline copy; disconnect after backup completes | Needs enough space and a supported filesystem |
| Second internal physical disk | Can work where permitted by the wizard | Still exposed to PC theft, malware or power problems |
| Network location | Useful for a managed, accessible backup share | Permissions, connectivity and backup retention need verification |
| Writable DVDs | Legacy optical-media option when offered | Often impractical for large images; multiple discs may be required |
Do not back up to a partition that belongs to the same physical disk being protected when you need resilience against drive failure. Keep at least one separate copy of irreplaceable personal files as well.
Open Control Panel and Select Create a System Image
Step 1. Open Backup and Restore
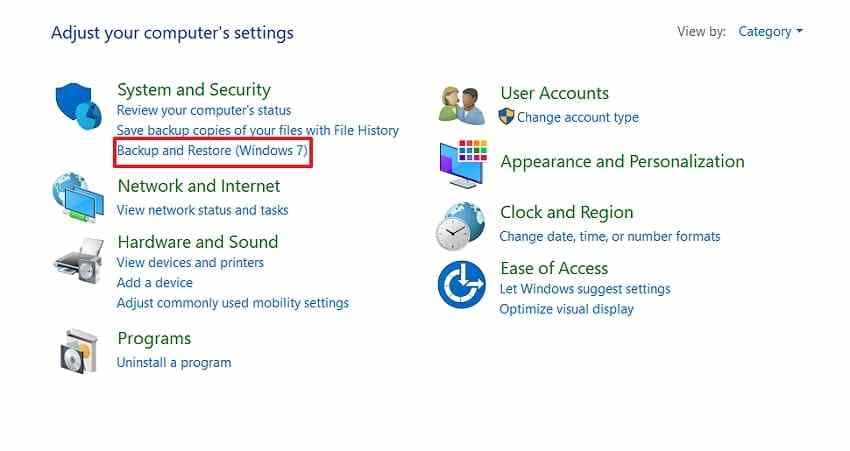
On Windows 10, open Control Panel, choose System and Security, and select Backup and Restore (Windows 7). If Control Panel is showing icons instead of categories, search for Backup and Restore.
Step 2. Start the Legacy Wizard
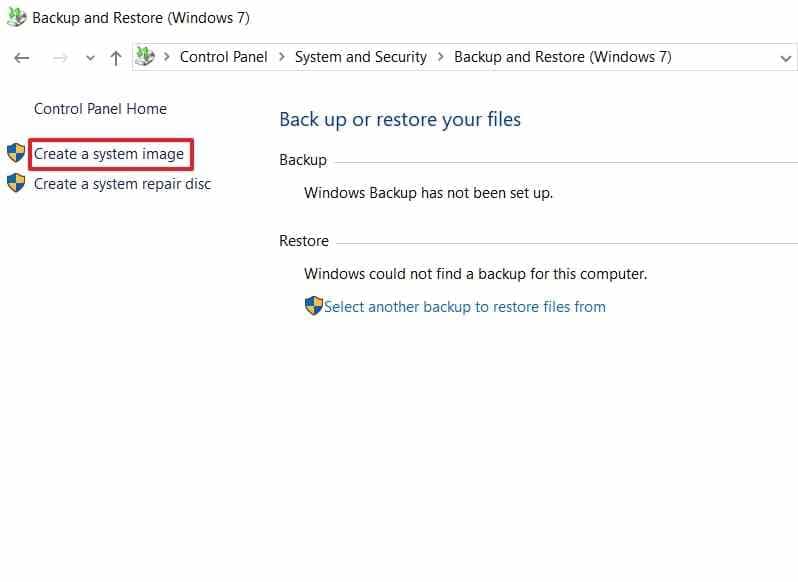
Select Create a system image from the left panel. If it is not shown, stop here and use a current full-system imaging solution.
Choose a Destination, Review Volumes, and Start Backup
Step 3. Select a Healthy Backup Destination
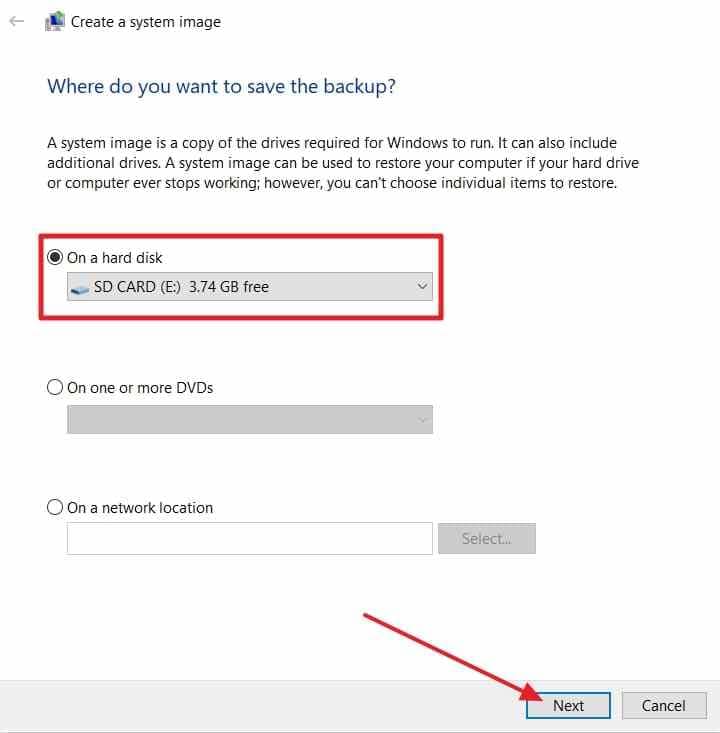
Choose On a hard disk if using a dedicated external HDD or SSD, select the correct device from the menu, then click Next. The available choices may also include DVDs or a network location.
Important: The inherited screenshot below shows an illustrative 3.74GB SD card as a candidate destination, not a recommended backup drive. Do not select it if the estimated system image exceeds that capacity. Use an appropriately sized drive instead.
Step 4. Confirm Included Volumes
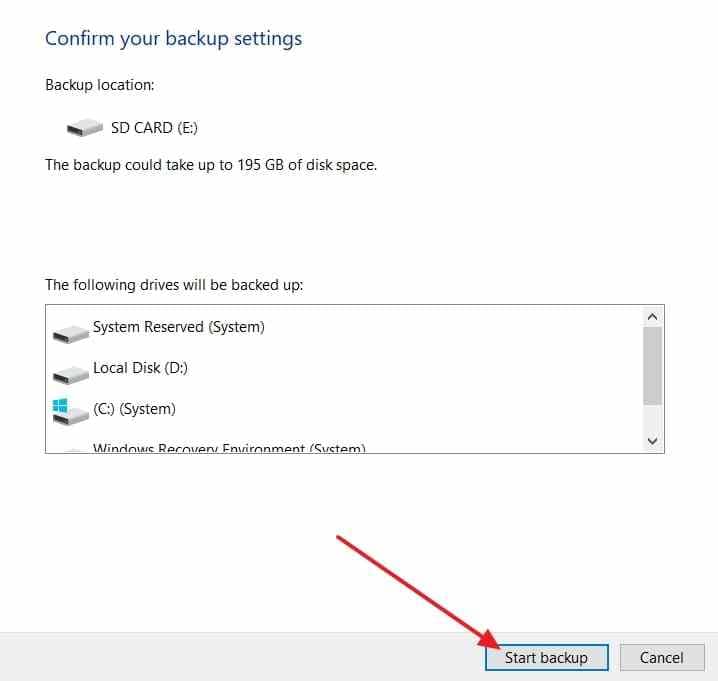
Review the Windows and boot-related partitions that the wizard requires. Add other eligible data volumes only when needed, and check the estimated space required. Click Start backup only after confirming the target drive and sufficient space.
The original example below estimates a much larger backup than the small SD-card destination shown in its interface. Treat it as a reference for the location of the Start backup control, not as a valid disk-capacity configuration.
Verify Completion and Keep the Backup Accessible
Step 5. Check the Finished Backup
Wait for Windows to report that the backup has completed. Open the destination drive and check for the WindowsImageBackup folder and the expected backup contents. Record the backup date and destination.
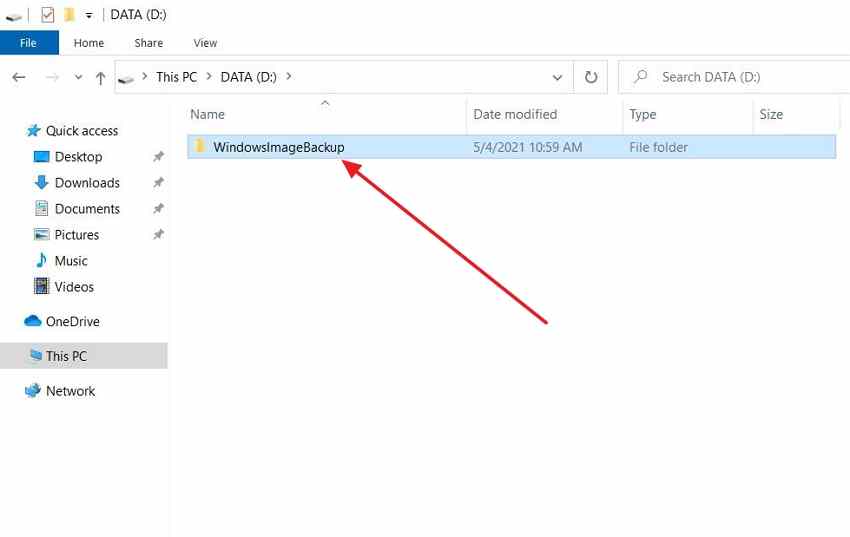
A folder existing is not enough to prove that an entire computer can be restored. Where practical, verify selected copied files using supported read-only methods and test that your recovery environment can find the image before you depend on it. Do not rename or edit pieces of the WindowsImageBackup set casually.
Create Recovery Media Separately
The image backup itself does not automatically make its destination drive bootable. A System Repair Disc is a CD/DVD containing Windows recovery utilities; a Recovery Drive is a bootable USB for recovery tools; and Windows installation media can reach Repair your computer. None should be mistaken for the image containing your apps and files.
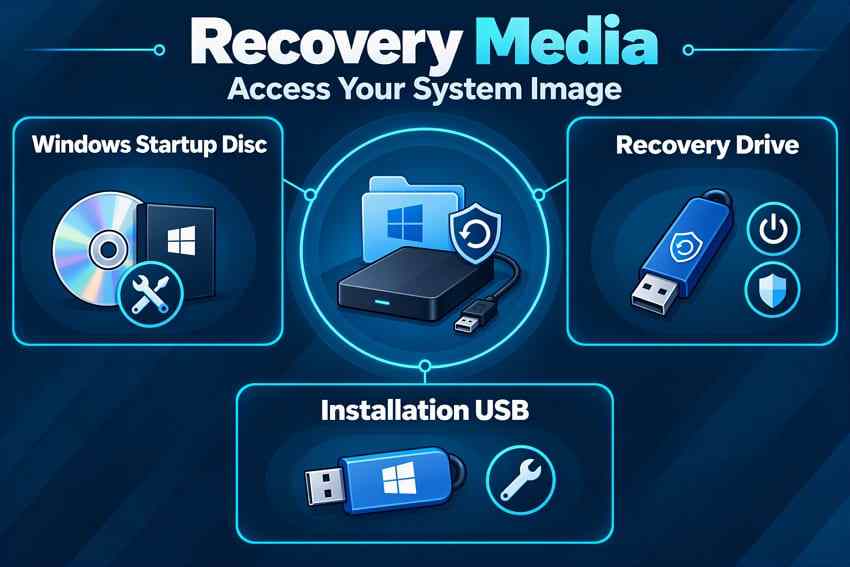
Microsoft describes creating a Recovery Drive and the available tools in Windows Recovery Environment. Prepare appropriate recovery media before your Windows system becomes unbootable.
Part 4. Restore an Existing Windows 10 System Image
Warning: A full image restore can replace the target system partitions and overwrite newer personal files. Before restoring, copy any important files created since the image date to another drive. Do not restore onto a disk containing data you have not protected.
Enter Windows Recovery Environment and Find System Image Recovery
Step 1. Connect the Backup and Open Advanced Startup
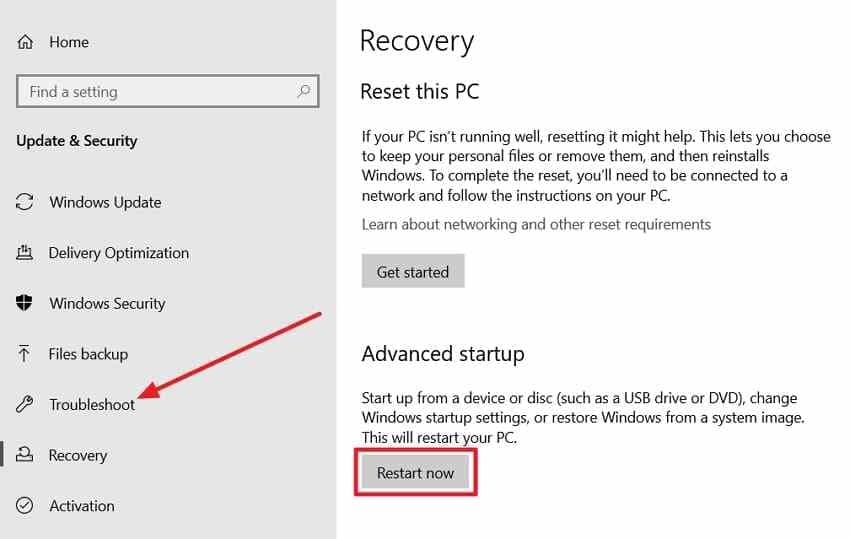
Connect the storage device containing the existing image. If Windows 10 still runs, open Settings > Update & Security > Recovery, then choose Restart now under Advanced startup.
Step 2. Open System Image Recovery
After Windows restarts into the recovery environment, choose Troubleshoot > Advanced options > System Image Recovery where that option is provided. You may have to choose the target Windows installation.
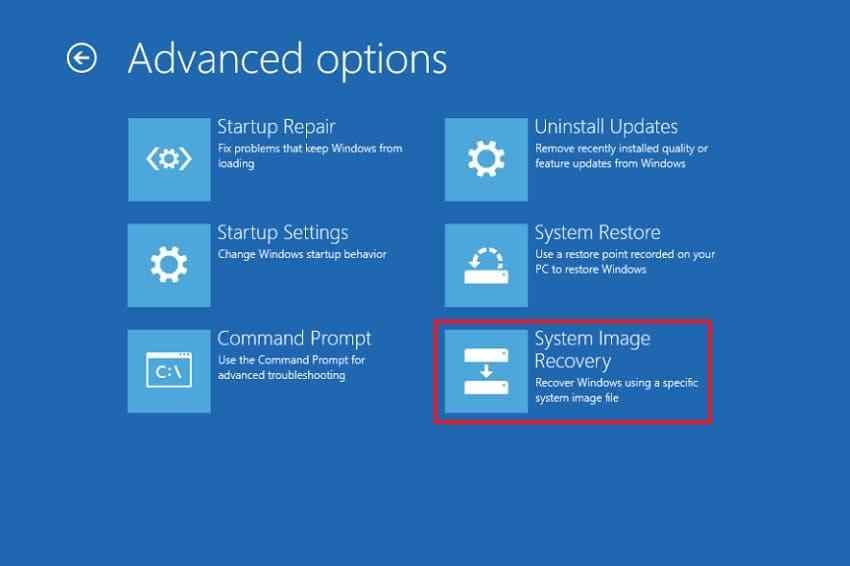
Microsoft lists System Image Recovery within Windows RE. If the computer cannot boot normally, use suitable system repair or installation media to enter recovery instead. Available screens and menu order can differ between machines.
Select the Right Image Date and Inspect the Restore Target
Step 3. Select the Intended Backup
The recovery wizard may suggest the most recent accessible image. If you need another restore point in time, select Select a system image, locate the correct backup and confirm its date and computer identity.
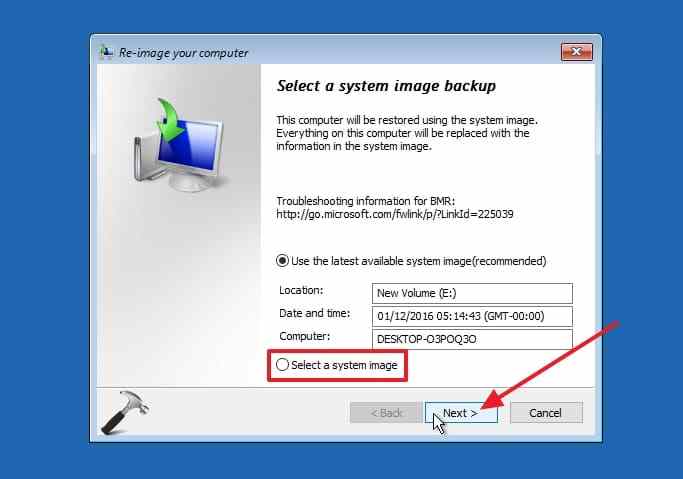
Do not automatically choose the newest image if it was created after the problem began. Restoring an older image rolls the backed-up volumes back to that image date. A file created after that date may disappear from the restored system unless you copied it separately.
Handle BitLocker and Destructive Restore Options
If the device or backup disk is encrypted, keep the legitimate 48-digit BitLocker recovery key available. Microsoft explains how to locate it in Find your BitLocker recovery key; neither Windows support nor Recoverit can manufacture a missing key.
- Target disk: Confirm which physical disk will be overwritten; Format and repartition disks can replace its partitions.
- Other drives: Disconnect unnecessary storage devices, and use any supported Exclude disks option only after checking which disk it refers to.
- Replacement SSD: Make sure the replacement disk is large enough for the required backed-up partitions; a larger listed capacity does not by itself guarantee cross-hardware restore compatibility.
- Newer files: Protect data added since the backup and check that any needed OneDrive versions are actually available before confirming restore.
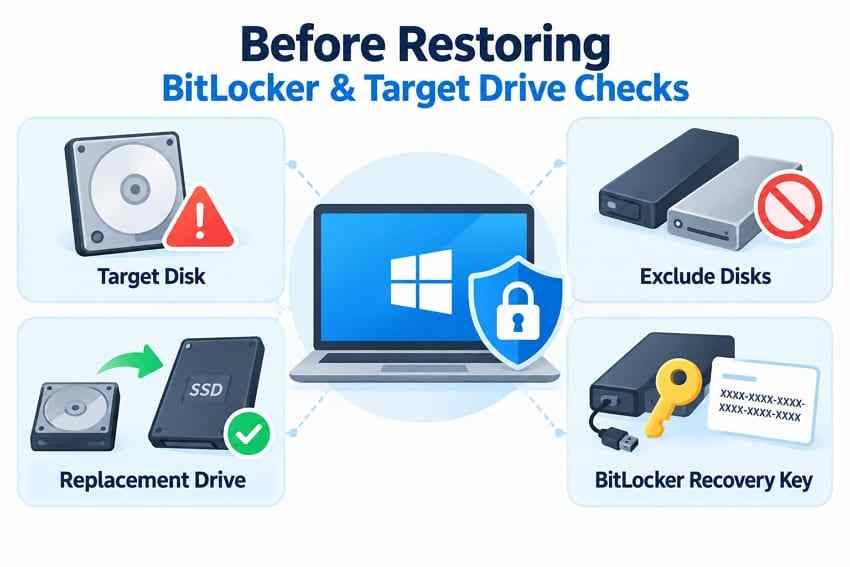
Complete the restore only when the image, target disk and destructive consequences are clear. Do not confuse a successful boot into Windows RE with a guarantee that a particular image can be restored.
Part 5. What If the Image Is Missing, Outdated, or Cannot Be Restored?
A new system image cannot recreate personal files that were already deleted or overwritten before you made it. First look for a separate file-level copy; only then consider recovery software for files still present on readable storage. If the drive is clicking, vanishing from BIOS, or repeatedly disconnecting, a specialist assessment may be safer than repeated scans.
Check File History, OneDrive, and Existing File Backups
If File History was enabled before the files went missing, start with the original backup drive connected. Microsoft's File History help covers restoring earlier versions and avoiding unintended overwrites. Recoverit also has a separate File History recovery guide if you need deeper background.
Step 1. Open File History
Open Control Panel > System and Security > File History, then choose Restore personal files, if it is available for the configured backup.
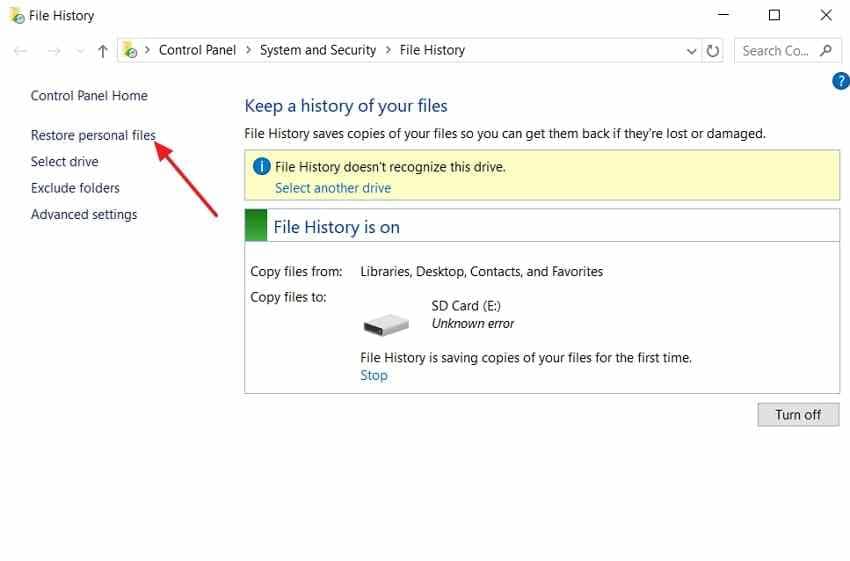
Note: In the inherited example, File History reports that its backup drive is not recognized. If your PC shows this warning, reconnect the correct backup device or network location before attempting to restore anything.
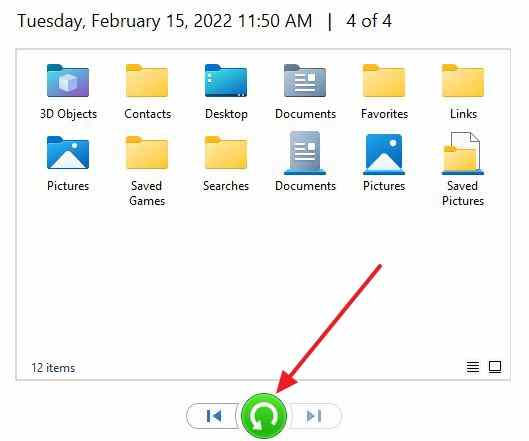
Step 2. Choose a Backup Date and a Safe Restore Location
Browse the available versions and select the needed file or folder. Use the restore options to avoid overwriting a newer file that you still need. Check the restored copy opens correctly.
Also check OneDrive and other independent backups. Windows Backup may have synchronized selected user folders and settings, but it does not provide a full image of your old Windows installation.
Recover Personal Files From a Readable Drive With Recoverit
When no suitable file backup exists, Wondershare Recoverit for Windows can scan supported detectable and readable HDDs, SSDs or connected storage for deleted or inaccessible personal files. Stop writing to the affected source drive. Install the software onto a healthy location, not the drive from which you are trying to recover lost files.
Step 1. Choose the Source Drive
Open Recoverit and select the disk or location containing the lost files under Hard Drives and Locations. On an unbootable PC, consider the documented bootable file-recovery workflow or moving a healthy detectable drive to another machine.

Step 2. Allow the Scan to Find Files
Scan the selected device. Use path, file type or search filters to narrow the results rather than selecting every item found in the scan.

Step 3. Preview and Recover Elsewhere
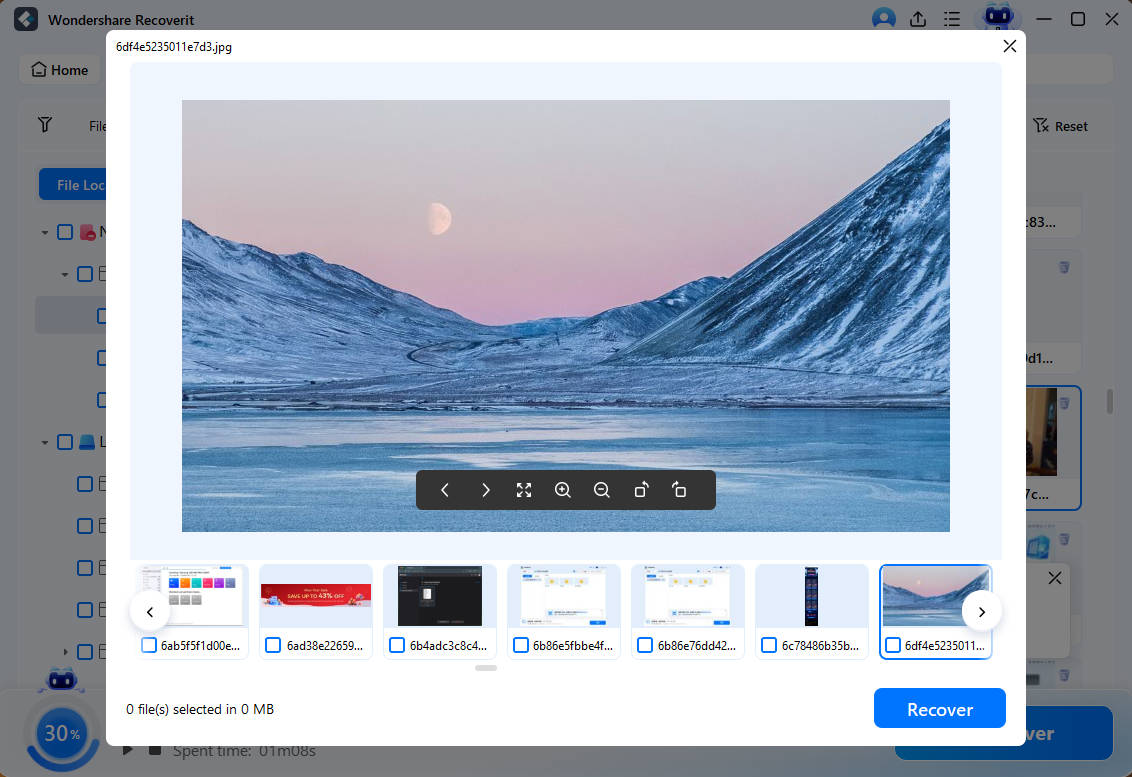
Preview supported files where available, select what matters and click Recover. Save them to a different healthy physical drive, then open some of the recovered files to confirm they are usable.

Recoverit Is File Recovery, Not Windows System Image Restoration
Recoverit is relevant here for files, not for replacing Windows imaging software. It is not the Control Panel Create a system image wizard, and it does not reimage an entire Windows installation from a WindowsImageBackup set. Its documented disk-image recovery features serve file recovery workflows, which are different from performing Windows bare-metal system restoration.
For the boundaries of hard-drive file recovery, see the Recoverit hard drive recovery guide. Recovery depends on whether the device is detectable, whether file data remains readable, how much has been overwritten and whether required encryption credentials are available. Data already cleared through SSD TRIM cannot be reconstructed by software.
Use a Supported Backup Plan Going Forward
For future protection, use a currently maintained full-system imaging application on a supported operating system and regularly test that its recovery media can detect your backups. Pair imaging with independent file version backups so that restoring a system image does not force you to lose newer documents.
| Layer | Protects | Practical Habit |
| Supported system imaging | OS, apps, settings and backed-up partitions | Image before major changes and test recovery access |
| File History or equivalent | Previous personal-file versions | Use a separate device and check backups complete |
| Cloud folder copies | Supported synced user folders | Verify file versions and current sync status |
| Recovery media | Access to repair/restore environment | Keep a bootable USB separate from the image disk |
If you are comparing these different recovery media types, see the Recoverit comparison of recovery disks and system images. For a new deployment, prioritize a supported Windows release rather than relying on a deprecated imaging tool indefinitely.
Conclusion
A Windows 10 system image can return backed-up volumes to their earlier state when the legacy wizard works and a compatible restoration path remains available. Create it on separate, adequately sized storage; check the image is readable and prepare recovery media independently. Before restoring, copy newer files and verify the destination disk and BitLocker requirements. For long-term protection, use supported imaging and file-version backups. If no image exists, Recoverit may help retrieve personal files from a readable device, but it is not a full-system image creator or Windows reimaging tool.
FAQ
-
How Do I Create a Disk Image in Windows 10?
On a Windows 10 PC where the legacy wizard is available, open Control Panel, choose System and Security, open Backup and Restore (Windows 7), and select Create a system image. Connect an adequately sized separate drive, choose it as the destination, review the volumes and start the backup. Confirm that the backup finishes before relying on it. -
Where Is "Create a System Image" in Windows 10?
It is normally on the left side of Control Panel > System and Security > Backup and Restore (Windows 7). Microsoft deprecated the underlying System Image Backup feature, so the option may be unavailable or restricted on some installations. If missing, use supported backup software rather than assuming Windows Backup or OneDrive creates a system image. -
What Is the Difference Between a Windows 10 Disk Image and a Recovery Drive?
A system image preserves the backed-up volumes, including Windows, apps, settings and files on those volumes as of the backup date. A Recovery Drive is bootable USB recovery or reinstallation media. It does not contain your personal files or the system image itself, and creating it erases the USB used as recovery media. -
Can I Recover Windows 10 Files if I Never Created a System Image?
Yes, sometimes. First check File History, OneDrive and other file backups. If the files are not backed up, file recovery software such as Recoverit may scan a detectable, readable disk for data that has not been overwritten. It cannot recreate your old Windows installation, unlock BitLocker without the valid key or recover blocks already cleared by SSD TRIM.


