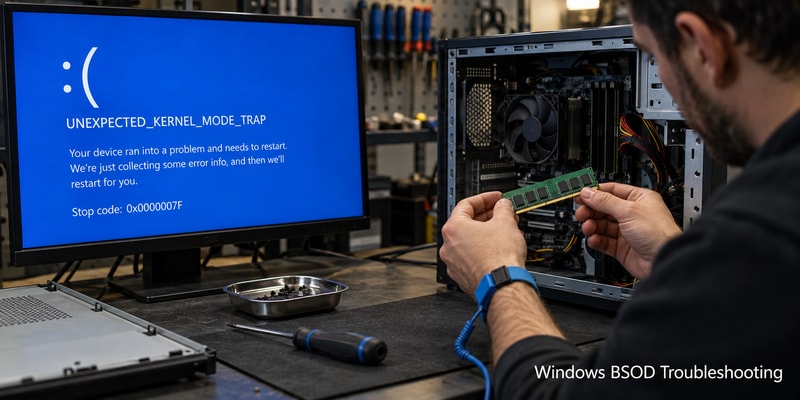
 TL;DR:
Fix the UNEXPECTED_KERNEL_MODE_TRAP (0x0000007F) error on Windows 11 and 10 by first securing your files, then isolating the cause through driver rollbacks, the Windows Memory Diagnostic tool, or online DISM and SFC commands.
● If Windows cannot boot, use a separate working PC and Wondershare Recoverit to create a bootable USB for file extraction; this process requires a blank USB drive, a separate healthy destination drive, and the BitLocker recovery key if the source drive is encrypted.
● Do not manually delete or replace the ntoskrnl.exe file mentioned in crash reports, as the stop code merely indicates an unhandled processor trap that software repair commands cannot fix if the underlying physical memory module is defective.
● Access Safe Mode or System Restore through the Windows Recovery Environment by holding Shift while selecting Restart, noting that System Restore requires a pre-existing restore point and reverts system configurations without backing up or recovering personal files.
Ask AI for a summary
 ChatGPT
 Perplexity
 Gemini
 Claude
 Grok
UNEXPECTED_KERNEL_MODE_TRAP is a Windows stop error, often called a blue screen of death (BSOD), associated with bug check 0x0000007F. It means the processor raised a trap that Windows could not handle. Faulty or mismatched memory, unstable hardware settings, and driver problems are possible causes; the code alone does not identify the faulty component.
To fix an unexpected kernel mode trap on Windows 11 or Windows 10, first protect accessible files and note what changed before the crashes began. Then use the matching route below: Safe Mode for access, driver rollback for a recent driver change, memory testing for hardware clues, or Windows component repair. If Windows cannot start and your files are not backed up, use the file-access section before resetting or reinstalling the system.
In This Article
Part 1. What the Stop Code Means and Where to Start
According to Microsoft's 0x7F documentation, the first bug-check parameter identifies the trap type. A value of 0x8 indicates a double fault; not every unexpected kernel mode trap is that specific case. A dump file and the circumstances of the crash help distinguish a driver problem from a hardware fault.
Photograph the stop code, record when it appears, and note recent driver, software, RAM, or overclocking changes. If Windows opens, copy important files to a healthy external drive and open a few copies to check them. Choose your starting point from this table.
| Your situation | Start here | What the result tells you |
| Windows opens and the crash followed a driver or software change | Back up files, then use Method 2 | A successful rollback supports a connection to that change |
| Normal startup crashes, but recovery options are available | Try Safe Mode in Method 1 | Stability with fewer drivers narrows the investigation |
| Crashes began after new RAM or changed performance settings | Use Method 3 and the PC manufacturer's diagnostics | Memory errors need hardware investigation |
| Windows stays usable but no recent change explains the error | Check memory, then try Method 4 | System-file repair addresses Windows corruption, not every cause of 0x7F |
| Windows will not start and important files are inaccessible | Protect files using Part 3 before system recovery | File access and repair of the crashing PC are separate tasks |
Before recovery tools: Have your BitLocker recovery key available if the drive is encrypted. If it is missing, check Microsoft's recovery-key locations or contact your organization's IT team. Do not reset an encrypted PC just to get past the key prompt when you still need its files.
Windows version: These steps cover Windows 11 and Windows 10. Standard Windows 10 support ended on October 14, 2025; restoring a stable system does not change its support status.
Part 2. Five Ways to Troubleshoot Unexpected Kernel Mode Trap
Use the method that matches your symptoms instead of changing several things at once. After each change, restart normally and repeat the activity that previously triggered the crash; keep a note of whether the same stop code returns.
1. Enter Safe Mode and Protect Important Files
Use this when: Normal startup fails or crashes too quickly to investigate. Safe Mode starts Windows with a limited set of drivers and services; a stable session is a diagnostic clue, not proof that the hardware is healthy.
Step 1. If the desktop or sign-in screen is available, hold Shift while choosing "Power > Restart". If the PC already shows Windows Recovery Environment, use that screen. If neither is accessible, follow Microsoft's Windows RE guidance to create installation media on a working PC and choose "Repair my PC" when starting from it.
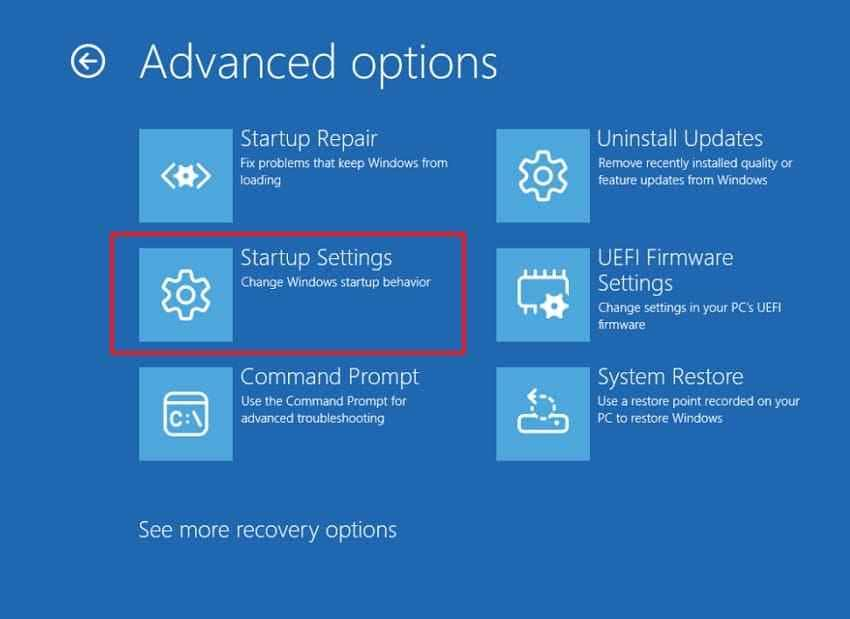
Step 2. In Windows RE, choose "Troubleshoot > Advanced options > Startup Settings", then "Restart". Supply the BitLocker recovery key if prompted.
Step 3. On the startup options screen, press 4 or F4 for "Enable Safe Mode", as shown in Microsoft's Startup Settings instructions.
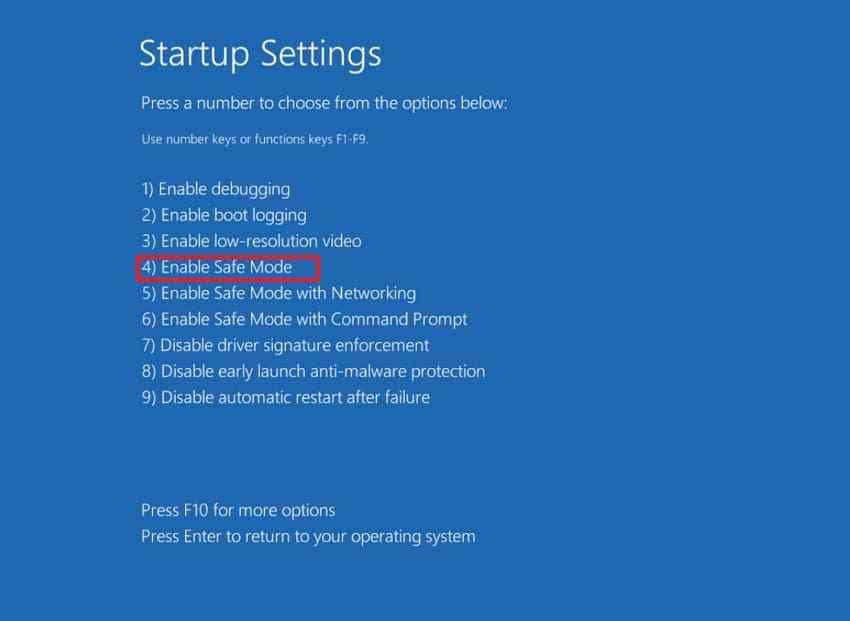
Check the result: If Safe Mode works, copy accessible files to another drive before changing drivers or restoring Windows. If Safe Mode also crashes, do not keep repeating the same boot attempt. Follow hardware clues in Method 3 or the file-access conditions in Part 3.
2. Undo a Recent Driver or Software Change
Use this when: The error began immediately after a specific update or installation. Work from a stable Windows or Safe Mode session with administrator permissions, after protecting your files.
Step 1. Right-click "Start" and open "Device Manager". Expand the category for the recently changed device, open its "Properties", and select the "Driver" tab. Check whether "Roll Back Driver" is available. It is gray in this example; the pictured graphics device is not necessarily the cause on your PC.
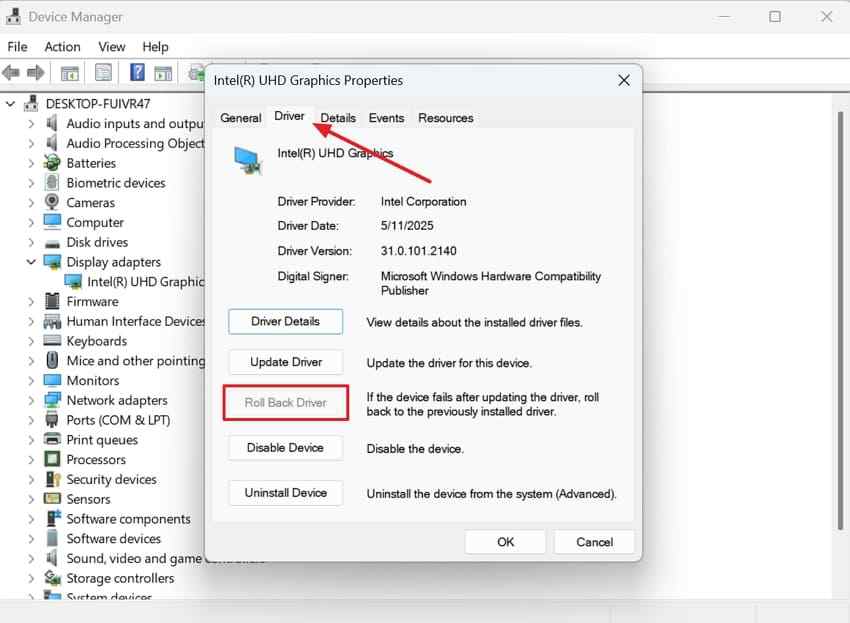
Step 2. If rollback is available, select it, choose a reason, and confirm. If it is unavailable, use the device manufacturer's instructions for a compatible previous driver or contact its support team. Microsoft's driver guidance explains rollback and manufacturer-sourced updates. Avoid installing random driver packages.
Step 3. If the timing instead points to a newly installed security, VPN, backup, or other system-level application, check that publisher's update or removal instructions. On a managed PC, involve IT. Keep security protection enabled; a blanket instruction to turn off Microsoft Defender does not diagnose this stop code.
Check the result: Restart and reproduce the previous workload. If there was no recent driver change, check Windows Update and your PC manufacturer's compatible drivers rather than rolling back unrelated devices. If the crash continues, move to memory diagnostics or seek dump analysis.
3. Test System Memory
Use this when: The crashes recur without a clear software trigger, began after adding RAM, or continue across different tasks. A memory test can reveal a fault; it cannot repair a defective memory module.
Step 1. Save open work and close your applications. Press Windows + R, enter mdsched.exe, and select "OK" to open Windows Memory Diagnostic.

Step 2. Choose "Restart now and check for problems (recommended)". Let the diagnostic finish; Windows restarts afterward.
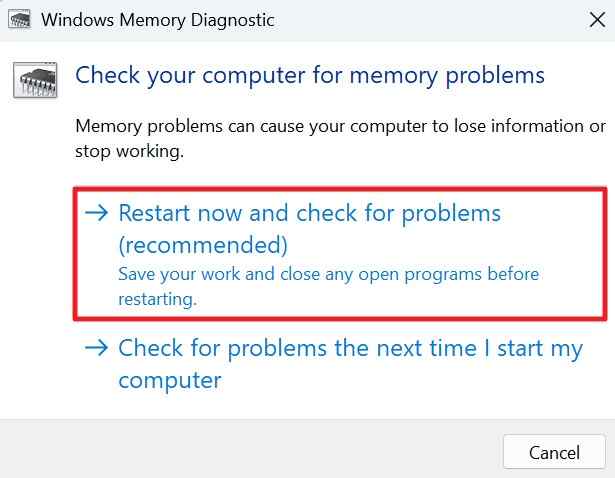
Check the result: If errors appear, record them and use the PC or memory manufacturer's diagnostics and service guidance. A clean result does not rule out every intermittent hardware problem. If Windows cannot stay running long enough to launch the test, ask the manufacturer about its diagnostics outside Windows.
If you recently changed RAM or enabled overclocking, ask the manufacturer how to return to a known-compatible configuration. Do not treat system-file repair or recovery software as a fix for faulty RAM. Avoid opening hardware you are not equipped to service.
4. Repair Windows Components with DISM and SFC
Use this when: Windows remains stable enough to run commands and you have protected important files. Follow Microsoft's DISM-then-SFC sequence to repair Windows components and check protected system files.
Step 1. In the installed Windows system, search for "Command Prompt" and choose "Run as administrator". Enter DISM.exe /Online /Cleanup-Image /RestoreHealth and wait for it to finish successfully. The command example below is from Windows 10; this sequence also applies to Windows 11.
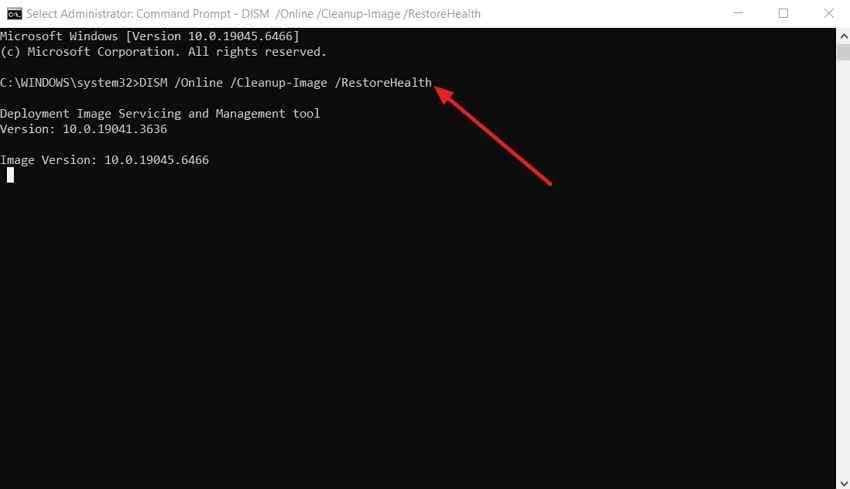
Step 2. After DISM completes, run sfc /scannow. Keep the space after sfc and wait until verification reaches 100%. The example below shows a scan in progress.
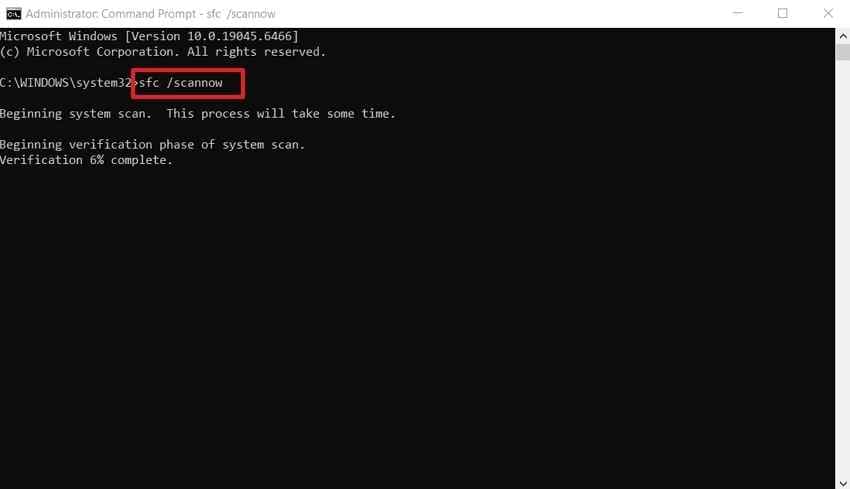
Check the result: Read the final message, restart, and test again. If DISM cannot find repair files or SFC cannot repair some files, record the exact message and follow Microsoft's guidance. A clean scan does not prove that RAM or third-party drivers are healthy.
Note: These are online commands for the running Windows installation. Do not paste them into a Windows RE command prompt expecting them to repair the installed Windows system; offline servicing uses a different target and procedure.
5. Use an Existing System Restore Point
Use this when: The problem followed a system change, a suitable earlier restore point exists, and important files are already protected. System Restore reverts system files, settings, and installed programs without targeting personal files. It does not replace a backup or repair damaged hardware.
Step 1. Open Windows RE as described in Method 1. Select "Troubleshoot > Advanced options > System Restore". Provide the BitLocker recovery key if requested.
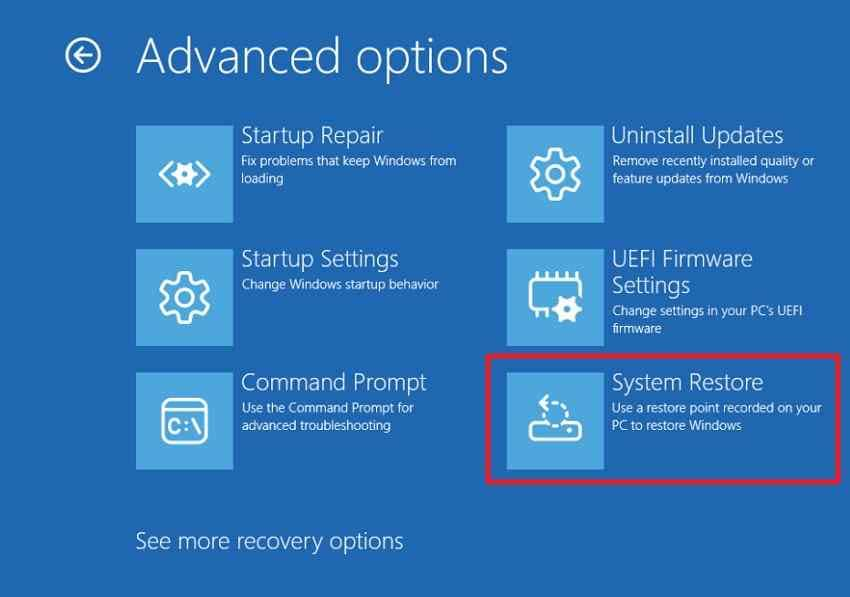
Step 2. Choose a restore point from before the crashes began. Review "Scan for affected programs", then proceed through "Next" and "Finish" when ready. The older example below illustrates the confirmation controls; choose a relevant date from your own PC.

Check the result: Allow restoration to finish, restart, and retest. If no suitable restore point exists, skip this method. If crashes persist, collect diagnostic information for your PC manufacturer or IT support before considering a reset or reinstall.
Choose the exact tool: System Restore is different from "Point-in-time restore" on Windows versions that offer it. That other feature can also roll back personal files.
Part 3. Recover Files When Windows Will Not Start
If your files open normally, copy them to a backup drive. If they are inaccessible because Windows will not boot, Recoverit's crashed-PC file recovery provides a bootable-media workflow. It requires hardware capable of running the recovery environment and a detectable, readable source drive. It retrieves files; it does not repair the kernel error or faulty RAM.
Prepare: Another working Windows PC, a blank USB drive for bootable media, and a separate healthy drive with space for the recovered files. Creating the bootable USB erases that USB. Check that your Recoverit plan includes the required feature; downloading the installer does not mean all recovery functions are free. If you are reading on a phone, perform these steps on the working Windows PC.

UNEXPECTED_KERNEL_MODE_TRAP? Save Your Files Before Resetting
Stuck in an UNEXPECTED_KERNEL_MODE_TRAP boot loop? Recoverit's Crashed Computer Recovery lets you create a bootable USB on another Windows PC, then copy or recover important files from detectable, readable storage before resetting or reinstalling Windows.
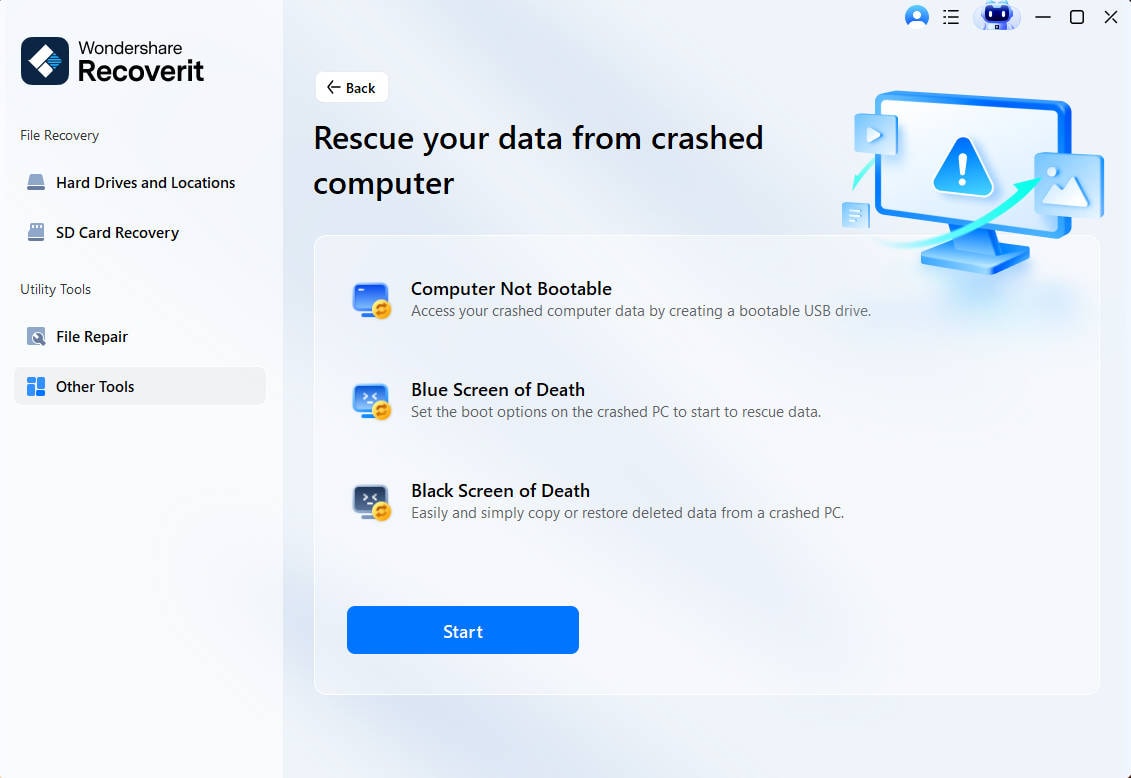
Step 1. Start crashed-computer recovery. Install Recoverit on the working PC. Under "Other Tools", open "System Crashed Computer" and select "Start". The official Recoverit Windows guide covers this workflow.
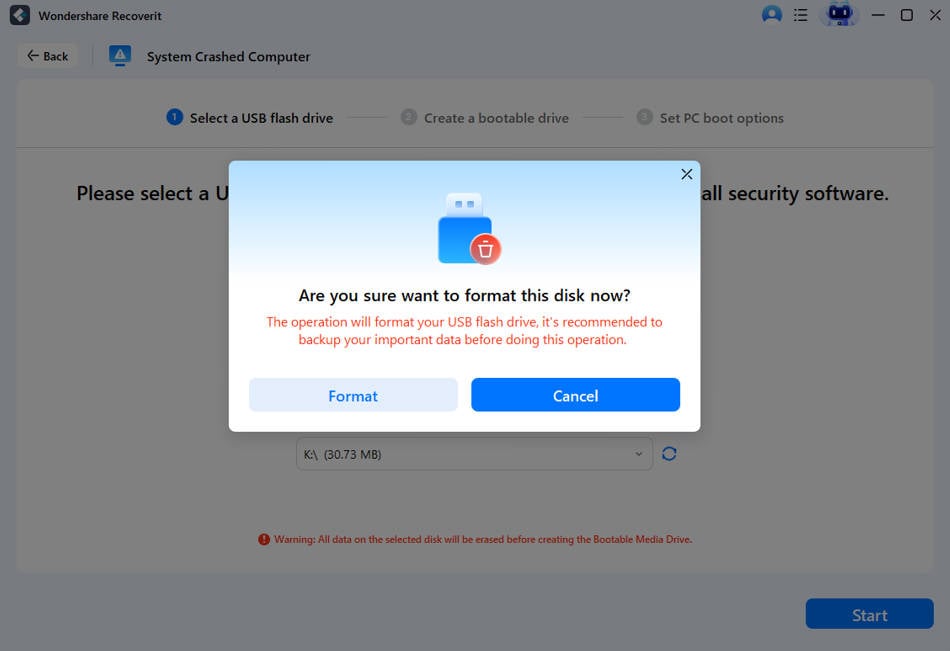
Step 2. Create the bootable USB. Connect the blank USB, select the correct drive, and start media creation. Confirm "Format" only after checking that the selected USB contains nothing you need. This warning concerns the bootable USB, not permission to format the source drive holding your files.
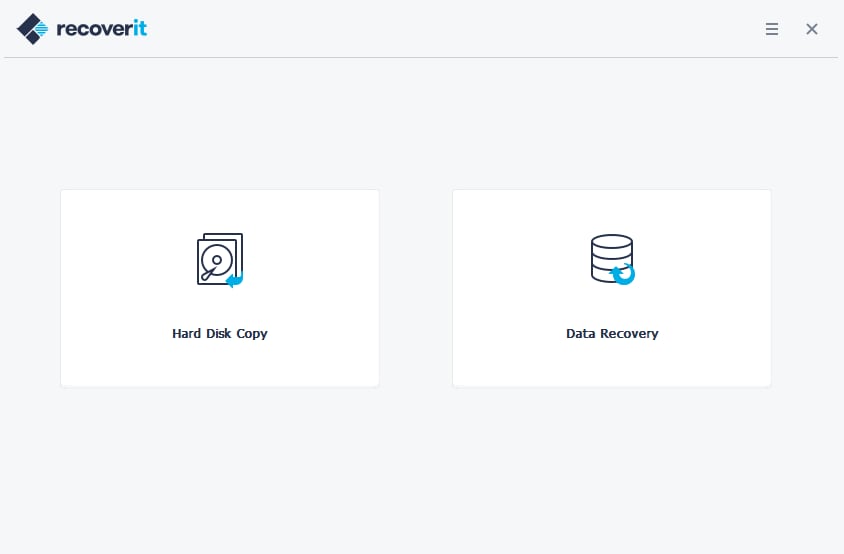
Step 3. Boot the affected PC and choose a recovery mode. After media creation finishes, connect the USB to the affected PC and follow its manufacturer's instructions to boot from that device. The required boot-menu key varies. In the recovery environment, choose "Hard Disk Copy" to copy accessible content or "Data Recovery" to scan for files you need to recover.
Step 4. Save elsewhere and verify. Connect the separate healthy destination drive, select the source and needed files, and copy or recover them to that destination. Open important recovered files on the working PC before continuing with system repair. Avoid saving anything back to the source; overwritten data may be unrecoverable.
Stop if the prerequisites fail: Recoverit does not bypass BitLocker. An encrypted drive must be unlocked through a supported process with the required key. If the PC cannot run the bootable environment, or the drive is undetectable, repeatedly disconnects, or makes unusual noises, seek qualified hardware or data-recovery help instead of repeated scans.
Conclusion
The best next step for unexpected kernel mode trap depends on boot access, recent changes, and diagnostic results. Protect files first, undo a relevant driver change, test memory, and repair Windows components only where appropriate. Use System Restore only with a suitable restore point. If Windows cannot start, handle file access separately before reset or reinstall decisions.
FAQ
-
What does unexpected_kernel_mode_trap with ntoskrnl.exe mean?
The kernel filename in a crash report is a clue to where the failure was recorded, not proof that this file itself caused it. Do not delete or replace ntoskrnl.exe manually. The bug-check parameters, driver stack, hardware history, and dump analysis are more useful for identifying the cause. -
Does unexpected kernel mode trap mean my RAM is bad?
No. Faulty or mismatched RAM is one possible cause, but drivers and other hardware problems can also trigger 0x7F. A memory-test error supports further hardware investigation; the stop code alone does not justify replacing RAM. -
Can this stop code appear on a black screen instead of a blue screen?
Yes. The appearance of the Windows stop-code screen varies by version; newer Windows 11 versions can use a black background. Confirm the actual UNEXPECTED_KERNEL_MODE_TRAP text. A blank black screen without this code is a different symptom and should not automatically be diagnosed as 0x7F. -
What should I send support if the crash keeps returning?
Provide the exact stop code, Windows version, PC model, recent hardware or driver changes, when the crash occurs, and memory-test results. If Windows has created crash dumps, share them through the support team's private process. Dumps can contain system or memory information; do not post them publicly by default.


