

 TL;DR:
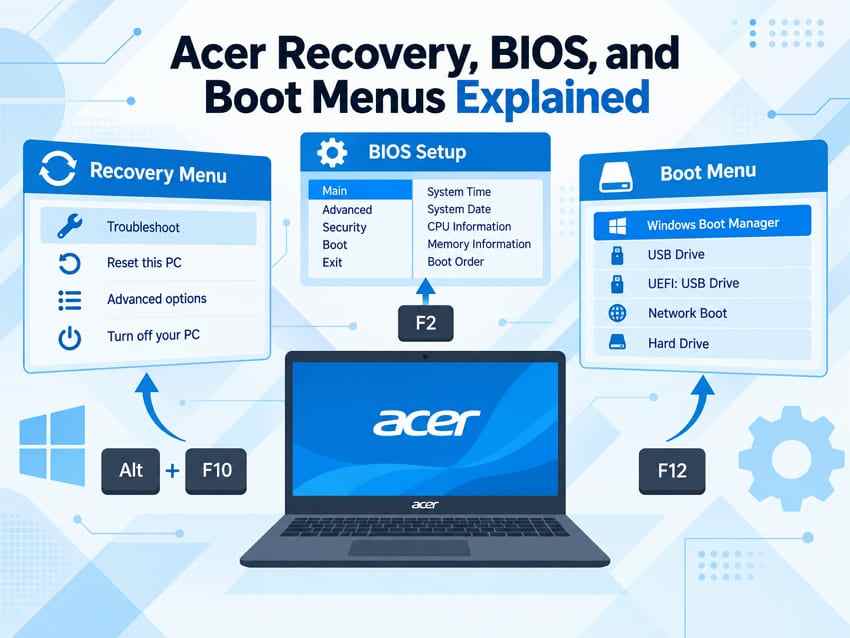
To configure an Acer computer's startup, press F2 on notebooks or Delete on desktops to alter BIOS/UEFI firmware, press F12 to select a one-time boot device, and use Alt + F10 or Windows Advanced Startup to reach repair and reset tools.
● The F12 menu temporarily changes the boot target for a single startup, but it is not supported on all Acer models and often must be manually enabled under the BIOS Main tab before it will function.
● The Alt + F10 shortcut only launches Acer factory recovery if the original OEM partition is intact and the "D2D Recovery" BIOS setting is enabled; if this data is missing, use Shift + Restart in Windows 11 to access non-destructive Windows Recovery Environment (WinRE) tools instead.
● Pressing Ctrl + S on the BIOS Main tab unhides SATA Mode or VMD Controller options on supported configurations, but changing these storage modes or altering Secure Boot will trigger BitLocker recovery and can immediately make an existing Windows installation unbootable.
Ask AI for a summary
 ChatGPT
 Perplexity
 Gemini
 Claude
 Grok
Grok
An Acer recovery menu, the BIOS or UEFI setup screen, and the F12 Boot Menu are different startup tools. On many Acer notebooks, F2 opens BIOS/UEFI Setup; on Acer desktops, Delete is commonly used. On supported models, F12 opens a one-time boot-device menu. Alt + F10 can open Acer's factory recovery path only when the model and its recovery configuration support it.
The correct menu depends on the task. Use BIOS/UEFI for firmware settings, F12 to choose a boot device for one startup, and Windows Recovery Environment for Windows repair, update rollback, startup options, or reset. Do not assume every Acer advanced BIOS option or hidden shortcut exists on every model because the available settings vary by platform, firmware version, and Acer product line.
Start with reversible options before factory recovery, reset, formatting, or firmware changes. Back up accessible files first. If files are already deleted, missing, or inaccessible, data recovery belongs before destructive recovery steps, not after them.
In This Article
Part 1. Choose the Right Acer Startup Menu
The fastest way to avoid unnecessary firmware changes is to choose the menu that matches the task. A recovery menu repairs or resets Windows, BIOS/UEFI Setup changes firmware-level settings, and the F12 menu selects a boot entry for one startup.
Acer Menu, Key, Purpose, and Availability Comparison
| Menu | Typical Access | Best Use | Availability |
| Acer Recovery | Alt + F10 | Open Acer factory recovery on supported configurations | Depends on the model and available factory recovery data |
| BIOS or UEFI Setup | F2 on notebooks; Delete on most desktops | Change firmware, security, boot, and hardware settings | Standard on Acer PCs; options vary by model |
| F12 Boot Menu | F12 | Select a USB drive, Windows Boot Manager, or another detected boot entry for one startup | May be disabled or unavailable on some models |
| Windows Recovery Environment | Advanced startup, Shift + Restart, or automatic recovery after startup failures | Use Startup Repair, Startup Settings, Uninstall Updates, System Restore, reset, and other Windows recovery tools | Part of Windows recovery; exact options depend on the Windows version and device state |
What Each Menu Can and Cannot Change
The BIOS menu Acer systems provide works below Windows. It can affect boot order, Secure Boot, storage-controller behavior, and other hardware settings. Incorrect firmware changes can prevent Windows from starting until the original or correct values are restored.
The F12 menu is safer for a one-time boot choice because it does not normally rewrite the permanent boot priority. Windows Recovery Environment, by contrast, provides software recovery tools without requiring firmware changes.
A factory reset or recovery can be destructive. Microsoft currently recommends trying less disruptive recovery options first and backing up important files before reset or reinstall operations.
Part 2. Open the Acer Recovery Menu
The phrase Acer recovery menu can refer to Acer's OEM factory recovery path or to the Windows Recovery Environment. They overlap in purpose, but they are not the same thing. On current Windows 11 systems, WinRE is the more broadly applicable route for repair and reset tools.
Use Alt + F10 on Supported Factory-Configured Systems
Acer still documents Alt + F10 recovery, but the shortcut depends on a compatible Acer recovery configuration. If the factory recovery data is missing, damaged, or unsupported on the model, the shortcut may not open the expected recovery environment.
Some Acer firmware includes a D2D Recovery option that controls access to the factory recovery path.
Step 1. Restart the computer and press "F2" as the Acer logo appears. Open the "Main" tab and set "D2D Recovery" to Enabled if that option exists.
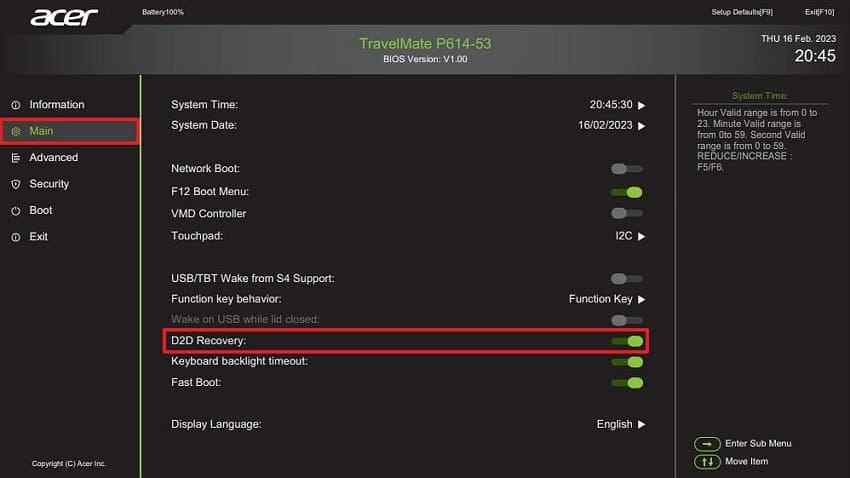
Step 2. Press "F10" to save and exit. Restart the computer and press "Alt + F10" when the Acer logo appears.
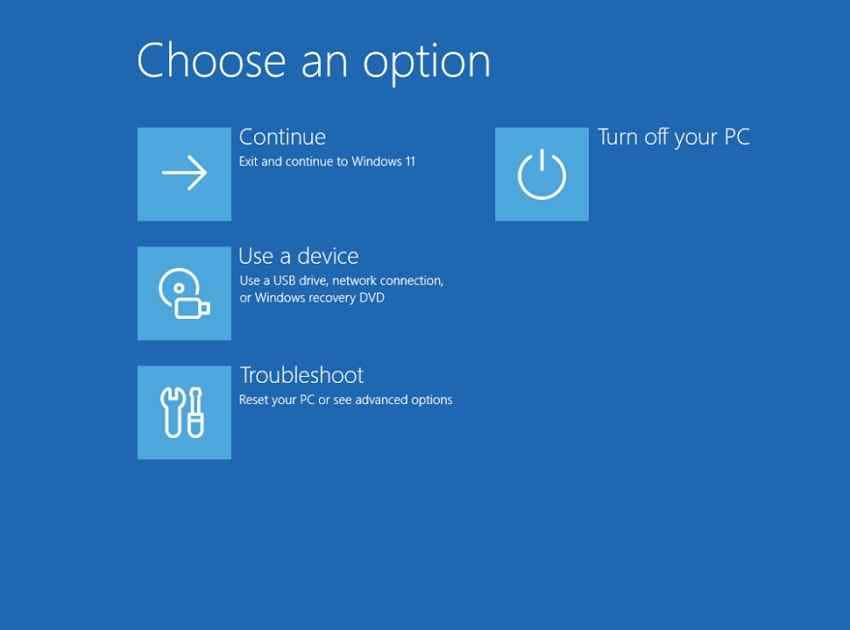
Note: Acer's current Windows 11 factory-reset guidance uses "Settings > System > Recovery > Reset PC" as the normal in-Windows route. Treat Alt + F10 as model and factory-recovery dependent, not as a universal Windows 11 shortcut.
Open Windows Recovery From Windows 11 or Shift + Restart
If Windows still opens, use the current Windows Recovery options rather than changing BIOS settings just to reach repair tools.
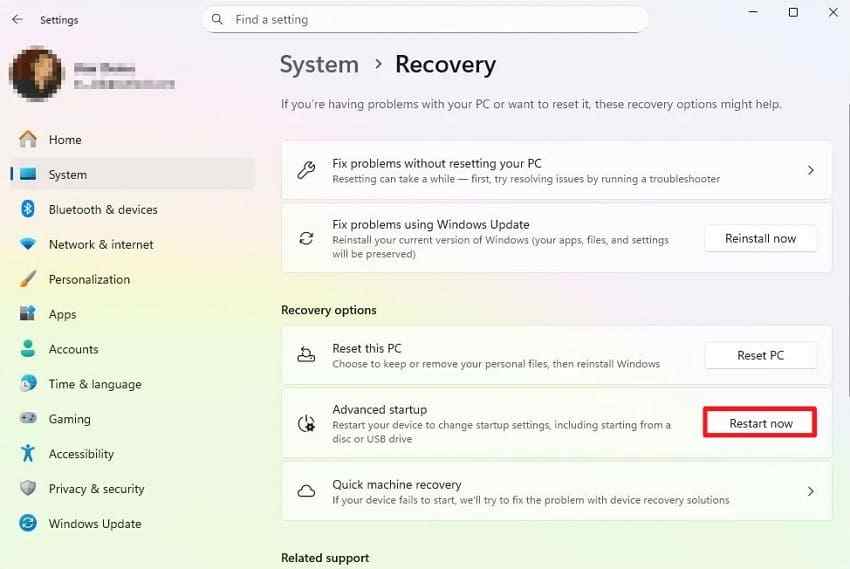
Step 1. Open "Settings > System > Recovery". Under Advanced startup, select "Restart now". You can also hold "Shift" while selecting "Restart" from the power menu.
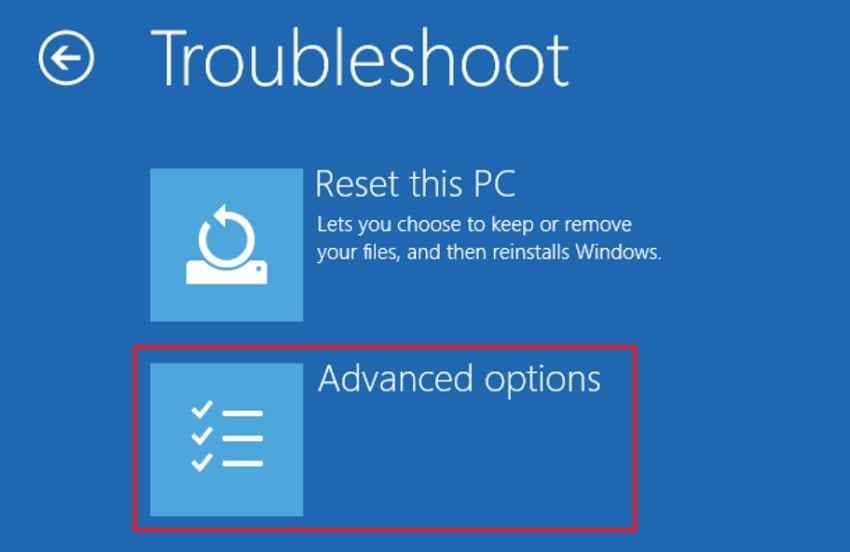
Step 2. In WinRE, select "Troubleshoot > Advanced options".
Choose Repair Tools Before Reset This PC
Use the least disruptive recovery option that matches the problem. Depending on the Windows version and situation, available tools can include Startup Repair, Startup Settings, Uninstall Updates, System Restore, and other current WinRE options. On supported Windows 11 version 24H2 or later systems, WinRE may also offer newer recovery paths such as Quick Machine Recovery or Point-in-time restore; use them only when they are available and appropriate for the failure.
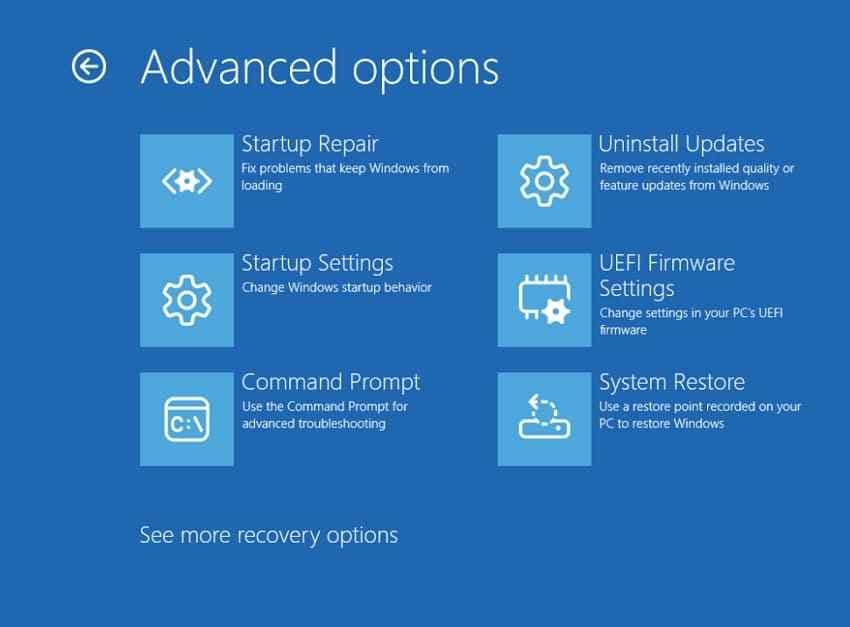
Use "Reset this PC" later in the sequence. "Keep my files" reinstalls Windows while preserving personal files, but it removes apps and resets settings. "Remove everything" removes personal files as well. Back up important data first whenever it is still accessible.
Part 3. Open Acer BIOS or UEFI Setup
BIOS and UEFI are different firmware technologies, but users commonly call the firmware settings screen the BIOS menu. Newer Acer systems generally use UEFI while retaining familiar BIOS-style terminology and hotkeys.
Use F2 on Notebooks or Delete on Desktops
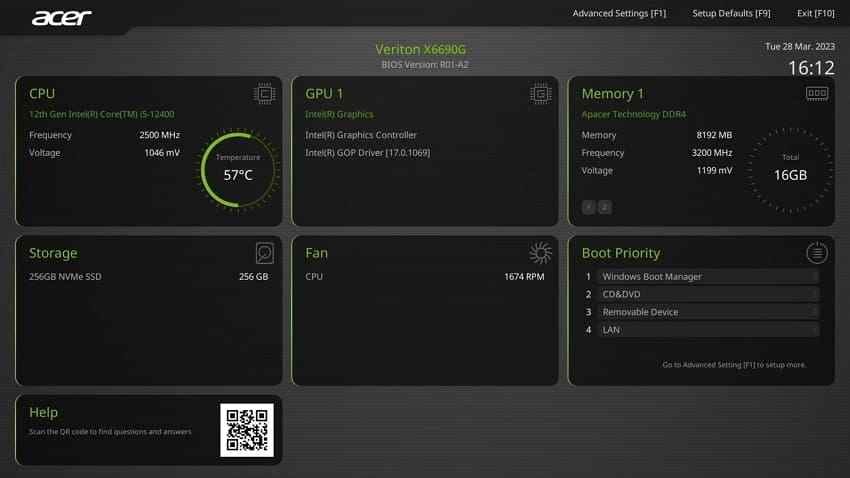
Acer's current BIOS/UEFI Setup instructions specify F2 for notebooks and Delete for desktops.
Instructions. Shut the Acer computer down completely. Power it on, then immediately press "F2" on a notebook or "Delete" on a desktop until BIOS/UEFI Setup appears. If the key does not work, verify the exact model's documentation because startup behavior can differ.
Enter UEFI Firmware Settings From Windows 11
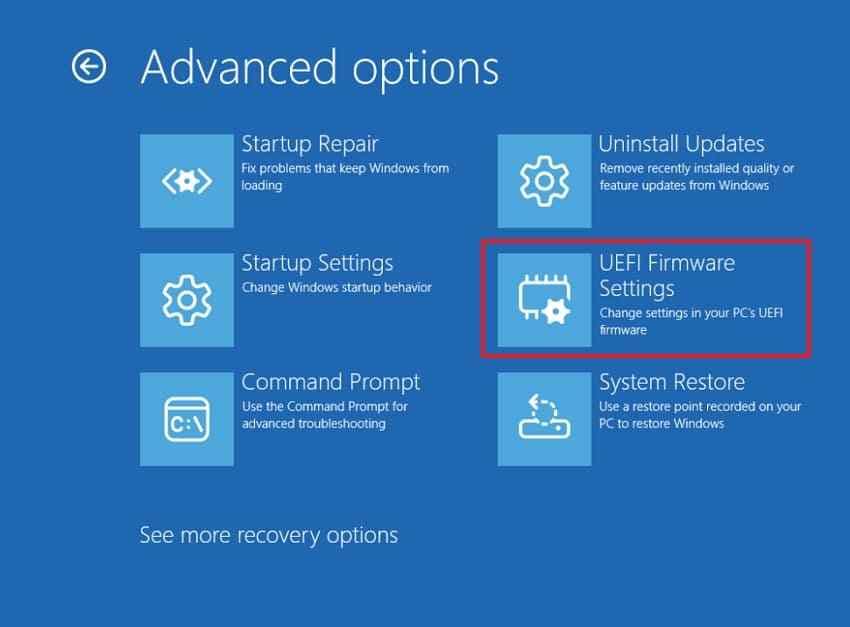
On supported UEFI systems, Windows can restart directly into firmware settings without requiring precise key timing. Microsoft documents this route in its UEFI firmware settings guidance.
Instructions. Open Windows Advanced startup, select "Troubleshoot > Advanced options > UEFI Firmware Settings", then select "Restart".
Load Defaults and Save Changes Safely
On many Acer systems, F9 loads BIOS defaults and F10 saves changes and exits. Do not press F10 simply to leave if you are unsure what changed. Use the firmware's discard or exit-without-saving option when you want to abandon changes.
Note: Acer documents F9 and F10 for its standard BIOS procedure, but the exact on-screen labels can vary by model and firmware revision.
Part 4. Use the Acer F12 Boot Menu
The Acer BIOS boot menu is a one-time device selector. It is useful when you need to boot from a USB recovery drive, installation media, another internal drive, or Windows Boot Manager without permanently changing the BIOS boot order.
Enable F12 Boot Menu When the Option Exists
Some Acer notebooks ship with the F12 Boot Menu disabled. The source article's original F12 Boot Menu guidance remains accessible, and Acer also maintains a current English F12 Boot Menu guide.
Step 1. Enter BIOS/UEFI Setup with "F2". Open the "Main" tab, set "F12 Boot Menu" to Enabled if present, then press "F10" to save and exit.
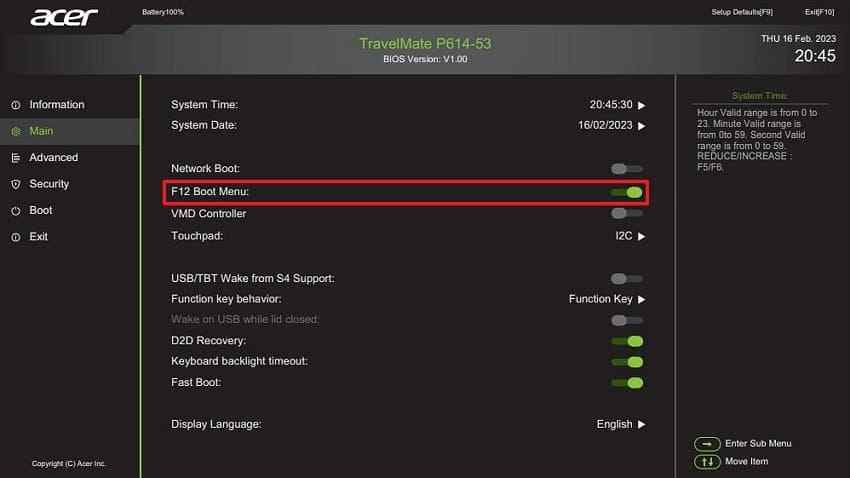
Note: Acer states that not every notebook or netbook supports this feature. If the setting is missing, verify the exact model rather than assuming the firmware is damaged.
Select a USB Drive or Windows Boot Manager for One Startup
Instructions. Connect the bootable device before startup, press "F12" at the Acer logo, highlight the required "USB drive", "internal drive", or "Windows Boot Manager", and press "Enter".
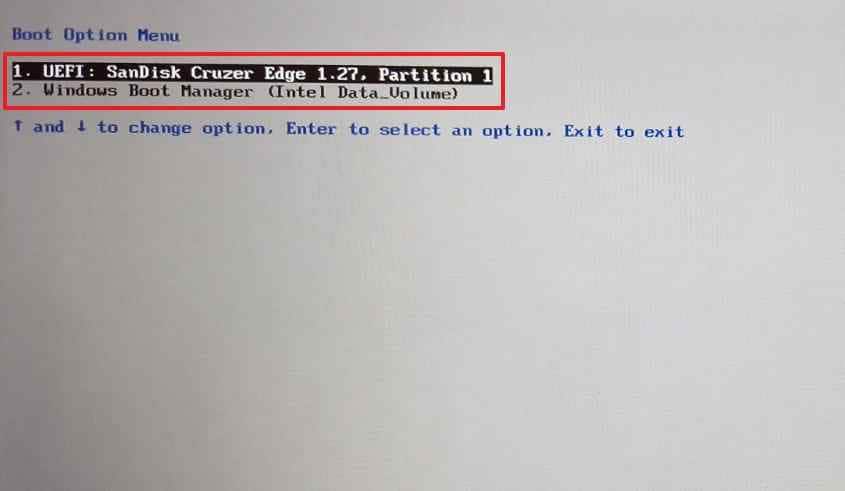
For a detailed Windows 11 USB workflow, see the current Recoverit guide to boot an Acer computer from USB. Use that process only with trusted boot media created for the task you are performing.
One-Time Boot Selection vs Permanent Boot Priority
F12 changes the boot target for the current startup only. Permanent BIOS boot priority affects future startups until you change it again. Use permanent priority only when you intentionally need a different device to remain first in the boot sequence.
If Windows Boot Manager disappears or moves below another entry after a firmware update, verify the detected drive and boot mode before making multiple unrelated BIOS changes.
Part 5. Access Acer Advanced BIOS Options Safely
Acer advanced BIOS settings are model-specific. A setting visible on one Aspire, Swift, TravelMate, Nitro, or Predator model may be absent on another. Missing options are often a firmware-design difference, not a fault.
Check the Standard Advanced Tab First
Enter BIOS/UEFI Setup and open the standard "Advanced" tab if your firmware provides it. Review only the options that are relevant to the documented task and record the original values before changing anything.
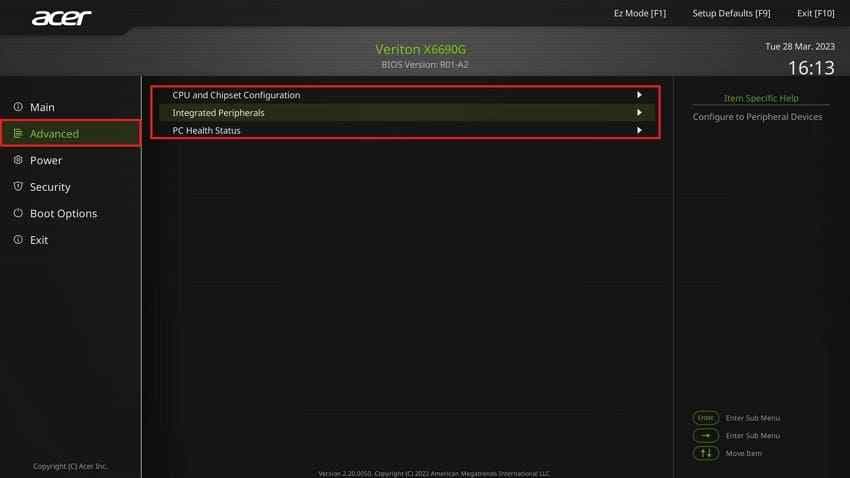
The available submenus can differ by CPU platform, storage controller, graphics configuration, product family, and BIOS version.
Use Ctrl + S Only for Documented Storage Options
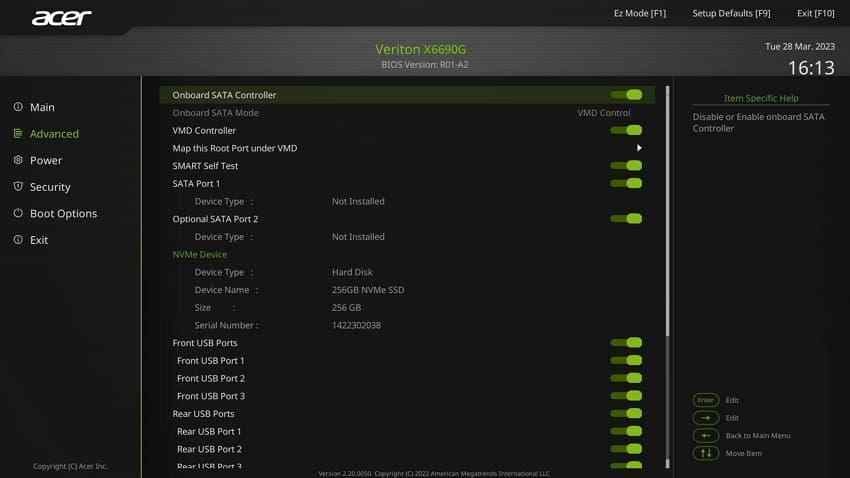
Acer's current No Bootable Device troubleshooting states that pressing Ctrl + S on the Main tab can reveal SATA Mode or VMD Controller settings on many Acer models. Acer also documents Ctrl + S in its SATA mode guidance.
That does not make Ctrl + S a universal hidden advanced-BIOS unlock. Use it only when Acer documentation for the model, platform, or troubleshooting path supports it.
Avoid Undocumented BIOS Unlockers and Modified Firmware
Do not use unofficial BIOS-unlocking utilities, modified firmware, undocumented flashing methods, or settings copied from a different Acer model. A failed firmware modification can create a no-POST condition that Windows recovery tools cannot repair.
Before changing a supported setting, photograph or write down the original value. Change one setting at a time so you can identify what affected startup behavior.
Part 6. Avoid Boot Problems From Firmware Changes
Firmware settings can change how Windows validates the boot environment and communicates with storage. Secure Boot, storage-controller mode, BitLocker, and boot priority deserve extra care because an incorrect change can block normal startup.
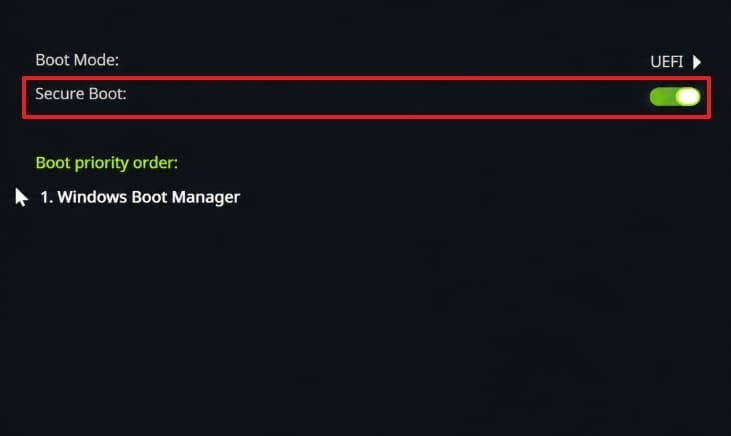
Keep Secure Boot Enabled Unless the Task Requires a Change
Secure Boot helps prevent untrusted boot software from loading. Windows 11 systems are expected to be Secure Boot capable, and Microsoft recommends enabling it for stronger startup security.
Temporarily disable Secure Boot only when a documented task requires it. Record the original state and re-enable it after the task is complete.
Do Not Switch SATA, VMD, RAID, or AHCI Casually
Storage-controller mode changes can make an existing Windows installation unbootable because the expected storage driver may not match the mode presented by firmware. This is why a system installed under VMD, RAID/RST, or AHCI can fail after a mode change even though the drive itself is healthy.
If a BIOS update changed the storage mode, follow Acer's documented procedure for the exact model or platform. Do not cycle randomly between modes as a general boot fix.
Keep the BitLocker Recovery Key Available
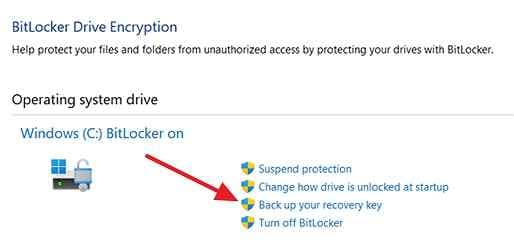
Firmware or boot changes can trigger BitLocker recovery because platform measurements have changed. Microsoft's BitLocker FAQ and BitLocker recovery overview explain why recovery keys may be required after certain hardware or firmware changes.
Step 1. Search for "Manage BitLocker" in Windows, open it, and select "Back up your recovery key" for the system drive.
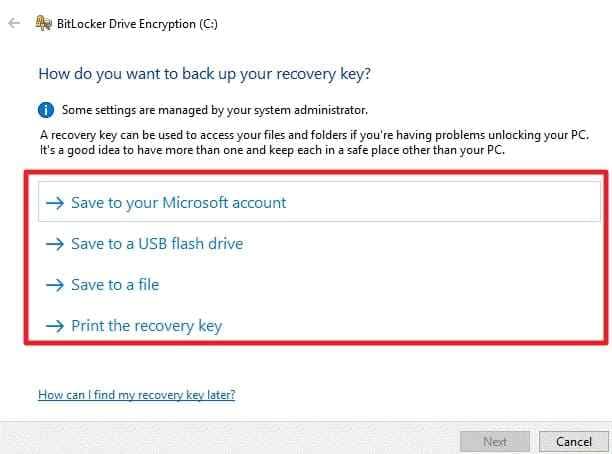
Step 2. Store the recovery key in a secure location that remains accessible if Windows will not boot. Available Windows options can include saving it to a Microsoft account, USB drive, file, or printing it.
Note: Data-recovery software cannot bypass BitLocker encryption. Keep the legitimate recovery key available before making firmware or recovery changes on an encrypted system.
Restore BIOS Defaults Carefully
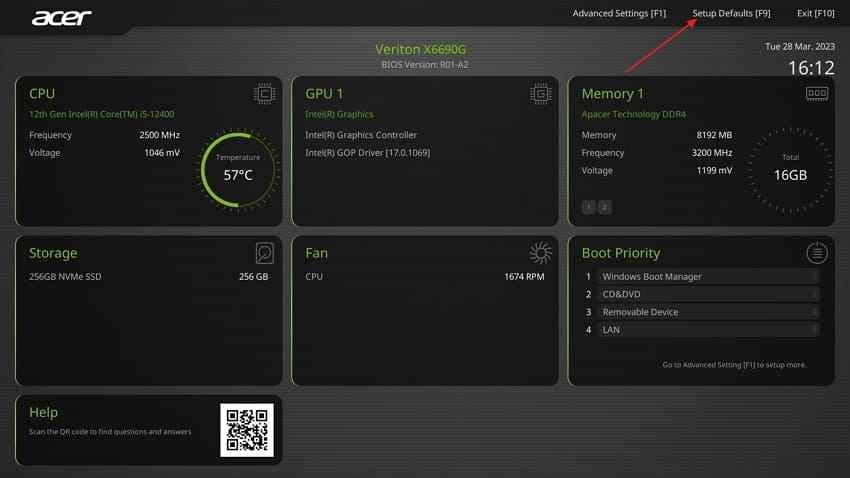
If a recent supported firmware change caused the problem, restoring BIOS defaults can undo that change. However, defaults can also alter boot order, storage-controller mode, or security settings, so do not reset blindly on a system that depends on custom values.
Instructions. Enter BIOS/UEFI Setup. Press "F9" to load defaults when supported, review the resulting settings, then press "F10" only when you are ready to save and exit.
Escalate Failed BIOS Updates or No-POST Problems
If a BIOS update fails, the PC no longer reaches the Acer logo, or the firmware cannot detect known-good hardware, stop making repeated firmware changes. Use Acer's model-specific BIOS recovery or service instructions, or contact Acer support. Windows recovery tools cannot repair a physically failed component or a firmware state that prevents POST.
Part 7. Fix an Acer Menu That Will Not Open
A menu that does not appear is often caused by timing, disabled firmware options, unsupported features, or missing recovery data rather than by a broken keyboard shortcut.
Use a Complete Shutdown and Retry the Startup Key
Shut the Acer computer down completely, power it on, and begin pressing the required key as soon as the Acer logo appears. Use "F2" for notebook BIOS/UEFI, "Delete" for most desktop BIOS/UEFI, or "F12" for the one-time boot menu on supported systems.
If the system starts too quickly, use Windows Advanced startup to reach UEFI Firmware Settings when Windows still works.
Check Whether the F12 Boot Menu Is Disabled or Unsupported
If F12 does nothing, first check the "F12 Boot Menu" option in BIOS/UEFI. If the option does not exist, consult the exact model documentation. Acer explicitly notes that the feature is not available on every notebook or netbook.
Use WinRE When Alt + F10 or OEM Recovery Is Unavailable
If Alt + F10 does not open Acer recovery, use the Windows Recovery Environment for available startup repair, update removal, restore, reset, and other recovery paths.
When Windows itself no longer starts, the Recoverit guide for a computer that will not boot can help you separate data-protection steps from Windows repair steps.
Do Not Assume D2D Recovery Can Recreate Missing Factory Data
Enabling D2D Recovery can expose the Acer recovery route only when the required recovery environment and factory data are still available. It cannot recreate a deleted recovery partition or restore missing OEM recovery files by itself.
If factory recovery data is gone, use Acer-provided recovery media when available or use current Windows recovery/reinstallation methods. Protect important files before any reinstall, partitioning, or formatting step.
Part 8. Protect Files Before Acer Recovery or Factory Reset
Data protection should come before "Remove everything", factory restore, disk formatting, or other destructive recovery operations. If Windows and the files are still accessible, a normal backup is safer and simpler than recovery software.
Back Up Normally When Windows and Files Are Accessible
Copy important documents, photos, videos, project folders, browser exports, and other local data to separate storage. Open a sample of the backup files to confirm they are usable before you start recovery or reset.
Also keep the BitLocker recovery key available if the system drive is encrypted.
Stop Before Remove Everything, Factory Restore, or Formatting
Microsoft's current recovery guidance treats reset and reinstallation as more disruptive options than repair, update rollback, or restore. If important files are not backed up, protect them before continuing.
For an unbootable Windows system with a still-detectable drive, the Recoverit Windows system recovery data workflow explains how file recovery can be separated from the Windows repair or reinstall process.
Recover Missing or Inaccessible Files With Recoverit
If files are already deleted, missing, or inaccessible on a detectable HDD, SSD, partition, or other supported storage device, Wondershare Recoverit for Windows can scan the storage and let you preview recoverable files when preview is supported.
Recoverit is a file-recovery tool. It does not repair Acer BIOS settings, recreate missing firmware, bypass BitLocker, fix a physically failed drive, or guarantee that every missing file can be recovered.
- Use it only after actual data loss: If the files are still readable, back them up normally instead.
- Scan a detectable source: If the drive repeatedly disappears, reports the wrong capacity, or shows physical failure symptoms, stop DIY scanning.
- Recover to another drive: Do not write recovered data back to the source location when avoidable.
Step 1. Choose the Drive Containing Lost Files
Open Recoverit, go to "Hard Drives and Locations", and select the detectable drive or location where the missing files were stored.

Step 2. Scan and Narrow the Results
Start the scan. Use file type, path, size, date, or available search and filtering controls to narrow the results rather than recovering everything blindly.

Step 3. Preview and Recover to Another Drive
Preview the files you need when preview is available, select the required items, choose "Recover", and save the recovered data to a different drive.


Use Professional Recovery for Physical Storage Failure
Stop software recovery if the drive is making abnormal mechanical noises, repeatedly disconnecting, not reporting its normal capacity, or no longer being detected reliably. Continued DIY scanning can increase stress on failing hardware. For important data on a physically failing device, use a professional data-recovery service.
Conclusion
Use the Acer startup menu that matches the task. On many Acer notebooks, F2 opens BIOS/UEFI; on desktops, Delete is common. F12 selects a one-time boot device when the model supports and enables that menu. Alt + F10 can open Acer recovery only on compatible factory-recovery configurations, while WinRE provides the current Windows repair and reset tools.
For firmware changes, verify the exact Acer model, record original settings, avoid undocumented BIOS modifications, and keep the BitLocker recovery key available. Before factory restore, Remove everything, formatting, or reinstalling Windows, back up accessible files and recover already-missing data first.
FAQ
-
What Key Opens the Acer Recovery Menu?
Alt + F10 can open Acer's recovery environment on supported factory-configured systems when the required recovery data is still available. On current Windows 11 systems, you can also use Advanced startup or Shift + Restart to open Windows Recovery Environment. -
How Do I Open the BIOS Menu on an Acer Laptop?
Shut the Acer laptop down completely, power it on, and press F2 when the Acer logo appears. Most Acer desktops use Delete instead. On supported UEFI systems, Windows Advanced startup also provides UEFI Firmware Settings. -
How Do I Enable the Acer F12 Boot Menu?
Enter BIOS/UEFI Setup with F2, open the Main tab, and set F12 Boot Menu to Enabled when that option exists. Press F10 to save and exit, then press F12 at startup. Acer notes that not every model includes this feature. -
How Do I Access Advanced BIOS Settings on an Acer Computer?
Open the standard Advanced tab first and use only settings documented for your model. Acer documents Ctrl + S on the Main tab for revealing SATA Mode or VMD Controller settings on many models in specific troubleshooting procedures, but it is not a universal hidden advanced-BIOS unlock.


