


 TL;DR:
To boot an Acer laptop from a USB drive, you must prepare a bootable USB, access the BIOS/Boot Menu to enable USB booting, and change the boot order so the laptop prioritizes the USB over its internal drive.
● Choose a USB flash drive with capacity equal to or larger than the OS drive, formatted as FAT32 or NTFS, and use the Windows `DiskPart` command-line utility to clean, partition, format, and make it an active bootable drive.
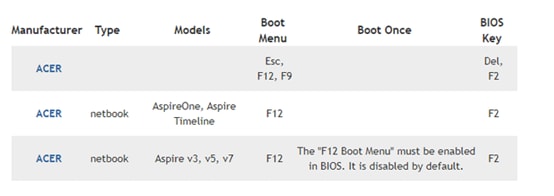
● Power on the Acer laptop and immediately press **F2** or **Del** to access the BIOS, or **F12** to access the Boot Menu; if F12 is disabled, enable the "F12 Boot Menu" option under the Main tab in the BIOS.
● In the BIOS Boot Menu tab, use the arrow keys to move the USB drive to the top of the boot priority list, then save the changes and exit to force the laptop to boot from the connected external USB media.
Ask AI for a summary
 ChatGPT
 Perplexity
 Gemini
 Claude
 Grok
Grok
If you own an Acer laptop and find yourself looking at a screen with cryptic system messages, with the system not gearing up, you are at the right place. It is likely that the operating system has been corrupted. But no worries! You can still manage to turn on your PC with a bootable hard drive.
Bootable USB is your secret weapon to kick-start your Acer Laptop. In this article, learn how to get an Acer Laptop Boot from a USB Flash drive. You can apply this guide to different models of Acer, for example, you can let Acer Aspire 3, Acer Aspire 5 and Acer Swift 3 boot from USB. So, without further ado, grab your trusty flash drive and let's get going!
In this article
Step 1: Prepare a Bootable USB to Boot an Acer Laptop from USB
Before booting the device, it is necessary to do some preparation. The first and foremost step is to get a bootable USB flash drive. Here is what needs to be done:
Choose an Appropriate Flash Drive.
It is crucial to select a drive that is compatible with the procedure. Here are some requirements:
- ✅The USB flash drive should have space larger or equivalent to the original storage capacity on the OS drive of the PC.
- ✅The drive should support FAT32 or NTFS file formats.
Make sure the drive meets all the requirements. Otherwise, it may not boot the Acer laptop.
Create a Bootable USB Drive
After finding a flash compatible with all requirements, get it ready for booting with DiskPart. DiskPart is a command-line Windows utility with which users can manage disks, partitions, and volumes. Here's how to do it:
- Connect the USB Flash Drive to your PC.
- Open the Command Prompt window and type in DiskPart.
- A new window will open. To find the USB drive's number or letter, type list disk and run the command by press Enter. This will list all the drives on the computer.

- Next, type Select Disk X, where X shows the letter or number of the flash drive.
- Type clean and press Enter to erase all the data from the USB drive.
- Type create partition primary and press Enter to create a primary partition.
- Type format fs=nfts quick and Enter to format the partition.
- Type Active to make the partition active, and Press Enter.
- Type Exit and Press Enter.
A few commands, and there you have it, a bootable USB ready. To revive your laptop, this is your starting point!
You are now equipped to move to the next step: Acer Laptop Boot.
Step 2: Access the Acer Boot Menu and BIOS
Once you are geared up for the process, it's time to begin boosting Acer Laptop. But first thing first, what is the Boot Menu and BIOS?
What is Acer Boot Menu?
Explained in the simplest terms, it is the startup menu for the PC. It doesn't open by default but can be accessed by specific keys as on the Command prompt.
The Acer Boot menu contains the system information, BIOS setup, device boot, complete scan, and much more. This is especially very handy when you need to fix system errors, change settings, or boot via USB/CD. With the Boot menu, you can quickly repair bugs causing device malfunction.
What is Acer BIOS?
The BIOS (Basic Input/Output System) is a feature of the Boot Menu that lets you select the boot order for the device. You can also manipulate other booting features in the BIOS menu. Turn on your laptop and press the F2 key/Del key to open the BIOS menu.
Here is how to open and access the boot menu on Acer:
Open Acer Boot Menu
- Turn on your laptop. As it starts and the Acer logo appears, press the F12 key.
Note: Press it from the beginning so you don't miss the logo.
- Using the four arrow keys, navigate your way through the system options. Make sure to save your changes when exiting the boot menu.
You can also use the Esc and F9 keys as an alternative to access the Boot Menu.
Enable Acer Boot Menu
- Open the Boot Menu by pressing F12 while starting.
- Press the right arrow button to open the Main Menu.
- With the Down arrow , navigate your way to the F12 Boot Menu.

- Press Enter to enable the Boot Menu.

Now that you have enabled the Boot menu, it's time to head to the final step: Device Booting.
Step 3: Boot Acer Laptop From USB
As the default settings, Acer Laptop Boots with the hard drive. However, in the BIOS menu, you can change the boot settings to make it boot from USB.
Change Booting Order in BIOS
If you want an Acer Aspire Boot from USB, you need to change the boot device in BIOS first:
- Shut down your PC, and press F12 or Del key to access the BIOS menu.
- Use the right arrow key to navigate your way and select the Boot Menu tab.
- Change the booting order with arrow keys by placing USB on the top.

- Next, press Shift to Exit the menu.
Booting Acer Laptop From USB Drive:
Now, it's time to get the Acer laptop boot from USB. Here's how to do it:
- Connect your flash drive with your Acer laptop.
- Start your PC and press F12 to open the BIOS menu.
- Change the booting order and keep the USB on the top. Save changes and exit the BIOS menu.
If everything is working perfectly, the PC will start again after booting.
Bonus: How to Recover Data From a Bootable USB
While booting, the partition on the USB drive was lost?
If you want to retrieve lost data from the USB drive after booting, here is a bonus tip for you! Recover your data with Wondershare Recoverit! The application can restore lost and deleted files safely. With support for over 1000 file formats, Recoverit can effectively protect and retrieve files without any quality loss.
- Manages over 500 data loss situations, such as deletion, formatting, and disk corruption.
- The user-friendly interface allows you to recover data in just a few clicks.

Here is how to do it:
- Download Wondershare Recoverit for free. Launch the application on your PC.
- From the right side menu, select Hard Drives and Location. In the Select a location to Start Recovery, choose your USB.

- Click Start to scan the drive and find recoverable data.
- Preview the recoverable data. Select files and click Recover to restore them.

Conclusion
With enough global recognition for Acer laptops, it is significant to know about its features. Acer boot menu and BIOS are two very important control systems to manage the device booting. This guide thoroughly explained the Acer Aspire boot from USB. Just connect your USB and use the DiskPart command prompt to boot it in a snap!
However, at times, the boot failure results in data loss of the USB. But no worries, Wondershare Recoverit has got you covered! It will take care of all the lost data and retrieve it back with no quality change.
FAQ
-
Q1: Why is Acer not booting from USB?
Even after creating a bootable USB, many people have complained about the failure of the booting Acer laptop. This is a booting error where the system is incapable of recognizing USB as the top order. -
Q2: Why is Acer laptop not detecting bootable USB?
Users have often complained of Acer Laptop not detecting bootable USB. There can be multiple reasons for it, including incompatible storage space, incorrect file format, or wrong booting order. Fix these to boot the Acer laptop from USB. -
Q3: Do the instructions above apply to all models of Acer?
Yes. These booting instructions apply to all models of Acer, which means Acer Aspire 3, Acer Swift 3, and Acer Aspire 5 can all boot from USB through Acer Boot Menu.


