

 TL;DR:
Determine whether the flickering horizontal lines on your Lenovo laptop are a hardware or software issue by checking if they appear in the BIOS, during preboot diagnostics, or on an external monitor before attempting software changes.
● If the lines are visible at the Lenovo startup logo, remain during a supported Lenovo LCD Self-Test, or change when adjusting the lid angle, the issue is likely physical damage to the internal display cable or LCD panel.
● If the flickering begins only after Windows loads, press Ctrl + Shift + Esc; if Task Manager remains stable while the rest of the screen flickers, an incompatible app is the probable cause rather than the display driver.
● Back up critical files immediately while the screen is usable, and use bootable media tools like Recoverit only if Windows becomes completely inaccessible, as data recovery software cannot repair physical hardware faults.
Ask AI for a summary
 ChatGPT
 Perplexity
 Gemini
 Claude
 Grok
Grok
"Flickering horizontal lines just appeared on my new Lenovo Legion 5 Pro..."
A similar Lenovo horizontal-lines report from Reddit shows why the first question should be where the lines appear, not which driver to reinstall.
Lenovo laptop screen flickering horizontal lines can come from Windows, a graphics driver, an incompatible app, display settings, the LCD panel, the display cable, or graphics hardware. The fastest way to narrow the cause is to compare the symptom in BIOS or preboot diagnostics, on an external monitor, in a screenshot, and while moving the lid.
If the lines appear before Windows starts, software is less likely to be the root cause. If they appear only after Windows loads, start with reversible Windows and driver checks. Back up important files before service, reset, reinstallation, or internal display repair.
In this article
Part 1. Identify Whether the Horizontal Lines Are Hardware or Software
Do not begin by reinstalling Windows or opening the laptop. First compare when the lines appear and which display paths show them. These observations are more useful than the line color or thickness alone.
| What You Notice | What It Suggests | What Becomes Less Likely |
| Lines at the Lenovo logo or inside BIOS | LCD panel, display cable, connector, graphics hardware, or system board | Windows settings, apps, and most Windows-only driver causes |
| Lines only after Windows loads | Display driver, Windows setting, app conflict, or software layer | A fault that is clearly visible before Windows starts |
| External monitor is clear but laptop screen has lines | Internal panel, eDP/display cable, connector, or internal display path | A graphics problem affecting every output |
| Internal and external screens show the same artifacts | Driver, GPU, shared graphics path, or mainboard issue | The internal panel or cable as the only cause |
| Lines change when the lid moves | Display cable, connector, or hinge-area routing | Windows software as the main cause |
| Screenshot looks clean but the physical panel shows lines | Panel, connector, or display cable after the rendered frame leaves Windows | Artifacts that are actually present in the rendered screenshot |
BIOS test: Restart the laptop and enter its UEFI/BIOS setup using the model-specific key or Novo method. If the horizontal lines are already visible there, Windows is not creating them.
External-monitor test: Connect a known-good monitor or TV and use Windows + P to duplicate the display. A clean external image with a lined internal panel points toward the laptop display path.
Screenshot test: Capture the screen and view the image on another device. A screenshot records the rendered frame, so a clean screenshot does not prove which physical component failed, but it is useful evidence that the artifact may be occurring after the frame is rendered.
Part 2. Protect the Laptop and Capture Evidence
Before changing drivers, firmware, or hardware, protect the laptop and your files. Horizontal lines can remain a minor display issue, but they can also worsen if a damaged cable or panel is repeatedly flexed.
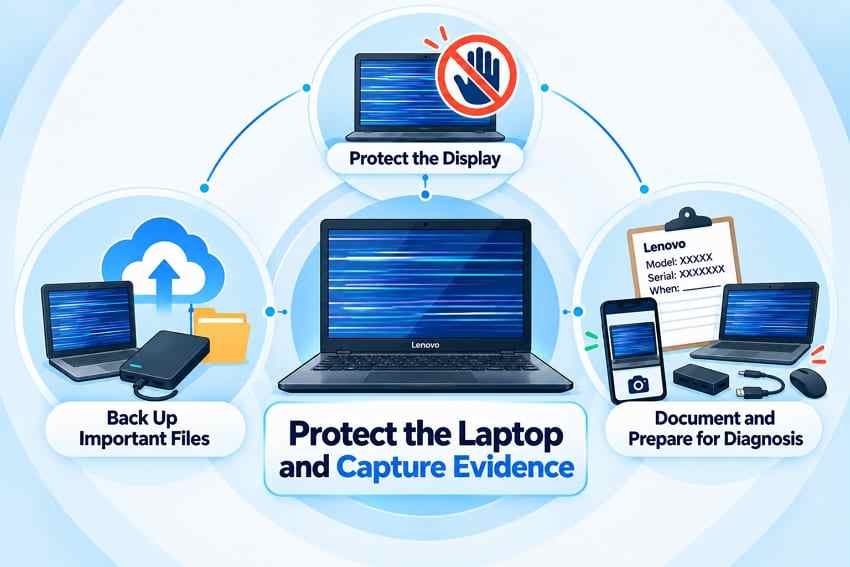
- Do not press or twist the panel: Avoid pushing the bezel or flexing the lid to make the lines disappear. That can worsen panel or cable damage.
- Back up important files now: If Windows is usable, copy important data to external or cloud storage before service or firmware work.
- Record the exact model: Note the Lenovo product family, machine type, serial number, installed BIOS version, and GPU configuration.
- Capture evidence: Photograph the lines at startup, in BIOS, in Windows, and at different lid angles. Save any Lenovo diagnostic error code.
- Establish a baseline: Disconnect docks, USB-C display adapters, external monitors, and eGPU hardware before the first comparison test.
Part 3. Run the Right Lenovo Display Diagnostic
Lenovo provides several diagnostic paths, but availability depends on the product family and model. Use the least dependent test first: an LCD self-test when supported, then Lenovo Vantage if Windows works, or UEFI diagnostics if it does not.
Run the Lenovo LCD Self-Test on Supported Models
Lenovo's current LCD Self-Test guide says the test is available on supported ThinkPad, Lenovo Notebook, and ThinkBook systems. Check the Hardware Maintenance Manual for your exact model before assuming the shortcut exists.
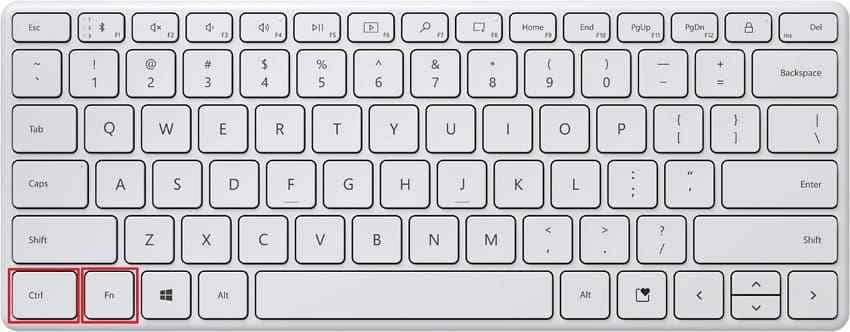
Step 1. Shut down the laptop, connect AC power, then press Fn + Left Ctrl + Power at the same time.
Step 2. On supported systems, the panel cycles through at least five solid colors for about 20 seconds. Watch for the same horizontal lines on every color.
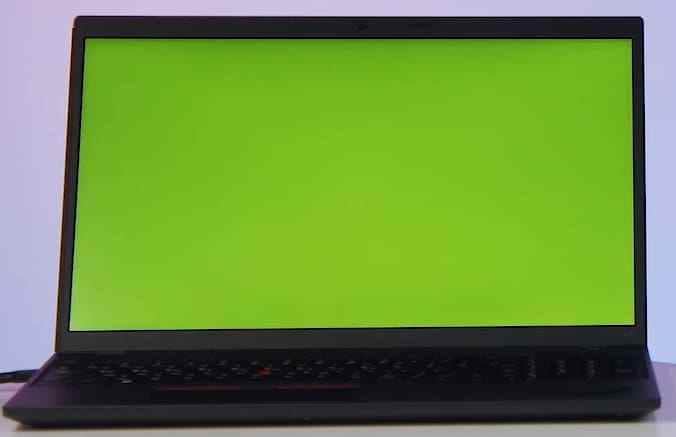
If the lines remain during the LCD self-test, the evidence shifts toward the internal display hardware path. A passed self-test does not rule out every intermittent cable, connector, GPU, or mainboard fault, especially if the symptom depends on lid angle or load.
Use Lenovo Vantage Hardware Scan When Windows Is Usable
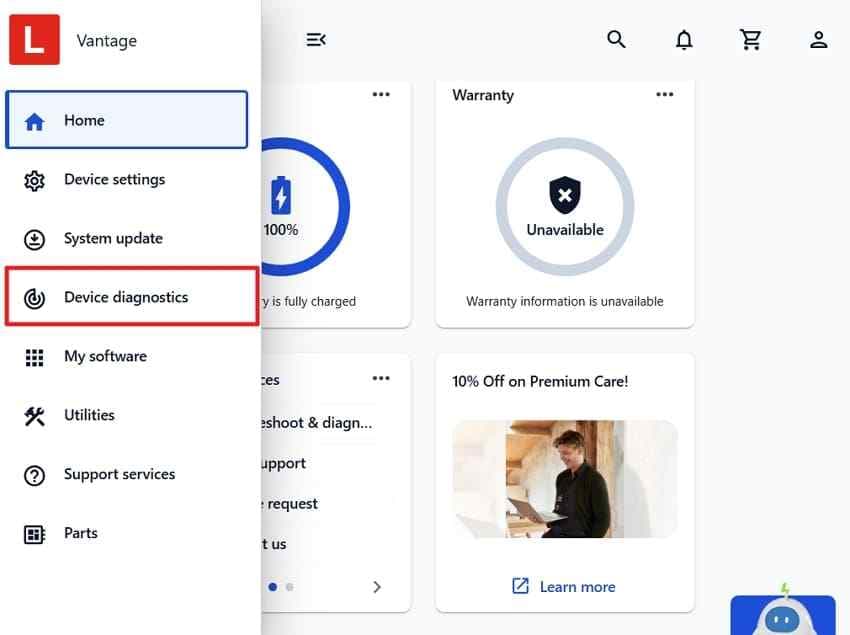
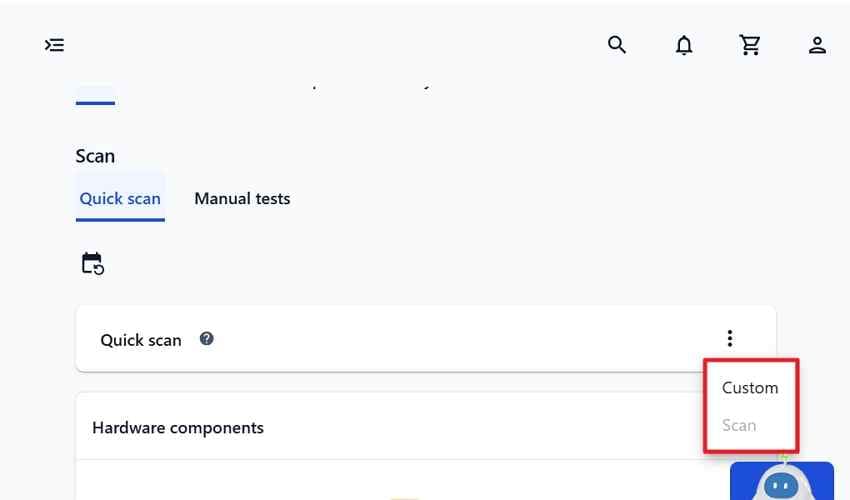
Lenovo Vantage can run hardware scans on supported systems. Menu names can change as Vantage is updated, so use the app's search or support area if Hardware Scan is not in the same place as a screenshot.
Step 1. Open Lenovo Vantage and locate Hardware Scan, Device Diagnostics, or the equivalent support section.
Step 2. Run a quick scan or select relevant components in a custom scan. Save the result if a failure is reported.
Use Lenovo UEFI Diagnostics When Windows Cannot Start
Lenovo's diagnostic entry method now varies by product family. On supported ThinkPad, ThinkBook, and other commercial systems, Lenovo documents F10 during startup for UEFI Diagnostics; the current ThinkPad diagnostics guide is one example. On newer IdeaPad, Yoga, Legion, and LOQ systems, Lenovo documents access through the Novo Button menu and Lenovo UEFI Diagnostics.
Choose Display if that test is available on your model, then follow the on-screen instructions and record any failure code.
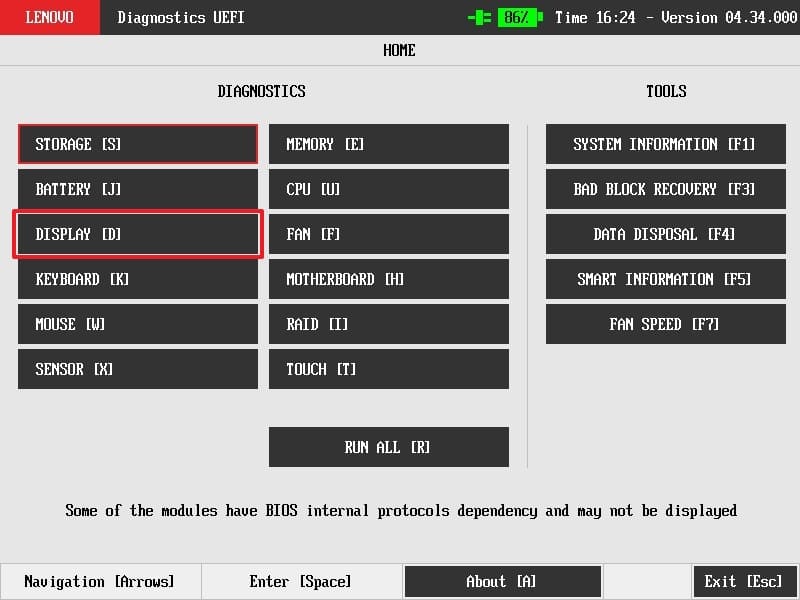
If a display test fails, stop software troubleshooting and use Lenovo's service guidance for the exact model. A failed preboot test is stronger evidence of a hardware problem than a Windows-only flicker.
Part 4. Diagnose Windows Screen Flickering
If the Lenovo logo, BIOS, and hardware tests look normal, move to Windows. Microsoft's current screen-flickering guidance still uses the graphics reset shortcut and Task Manager behavior to separate display-driver issues from incompatible apps.
Reset the Graphics Driver
Press Windows + Ctrl + Shift + B. The screen may blink or briefly go black while Windows resets the graphics subsystem. If the lines disappear only temporarily, treat that as evidence of a graphics-stack issue, not proof that the hardware is healthy.
Check Whether Task Manager Flickers
Press Ctrl + Shift + Esc while the screen is flickering.
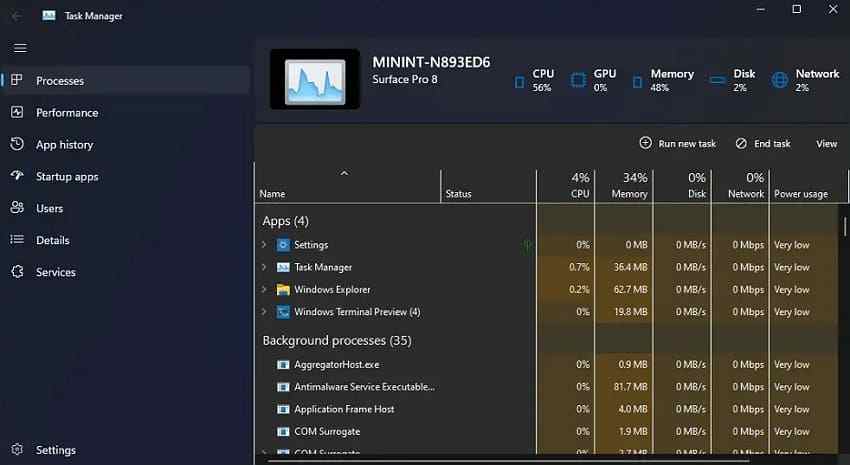
- If Task Manager flickers with the rest of the screen, Microsoft says the display driver is probably involved.
- If Task Manager remains stable while everything else flickers, an incompatible app is more likely.
This test is most useful when the symptom begins only after Windows loads. It does not override evidence from BIOS, LCD self-test, lid movement, or an external monitor.
Use Safe Mode When the Screen Is Too Unstable
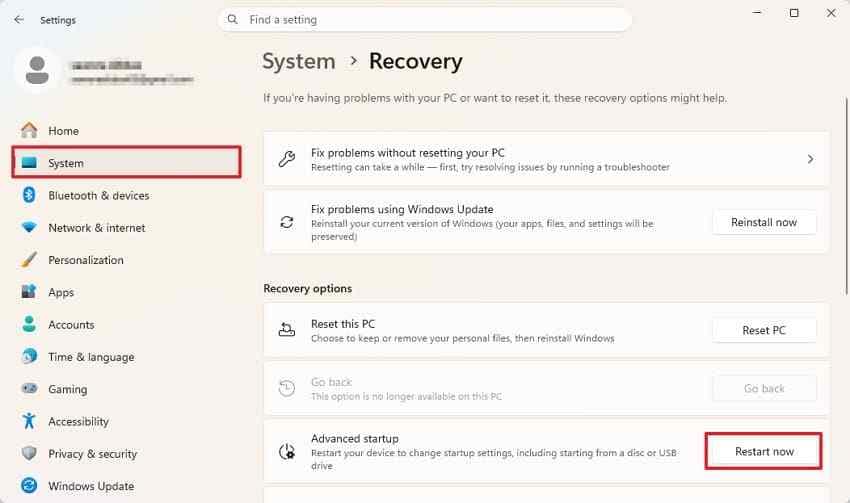
Safe Mode starts Windows with a limited set of drivers and services. If the lines disappear there, focus on the display driver, startup software, or third-party services. Microsoft documents Safe Mode under Windows Startup Settings.
Step 1. Open Settings > System > Recovery > Advanced startup > Restart now.
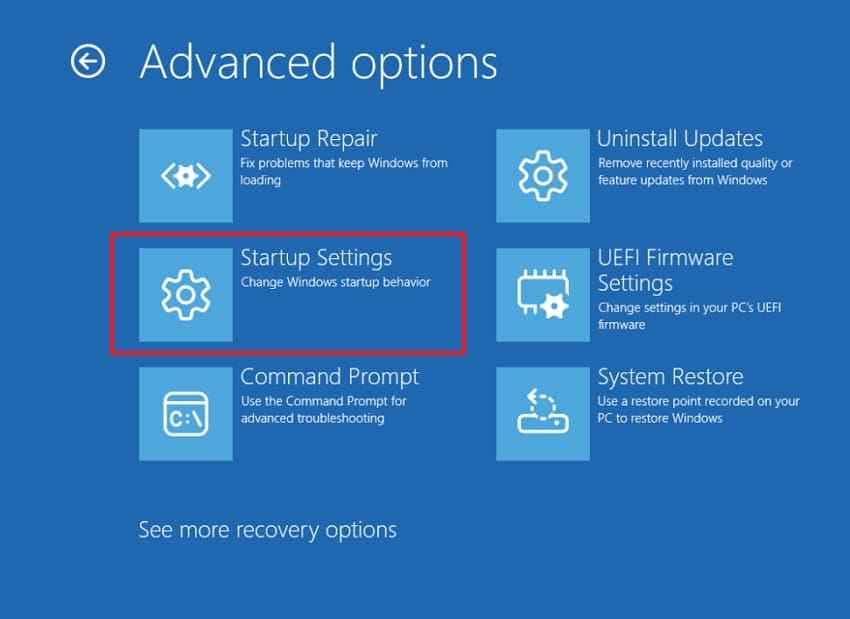
Step 2. Choose Troubleshoot > Advanced options > Startup Settings > Restart.
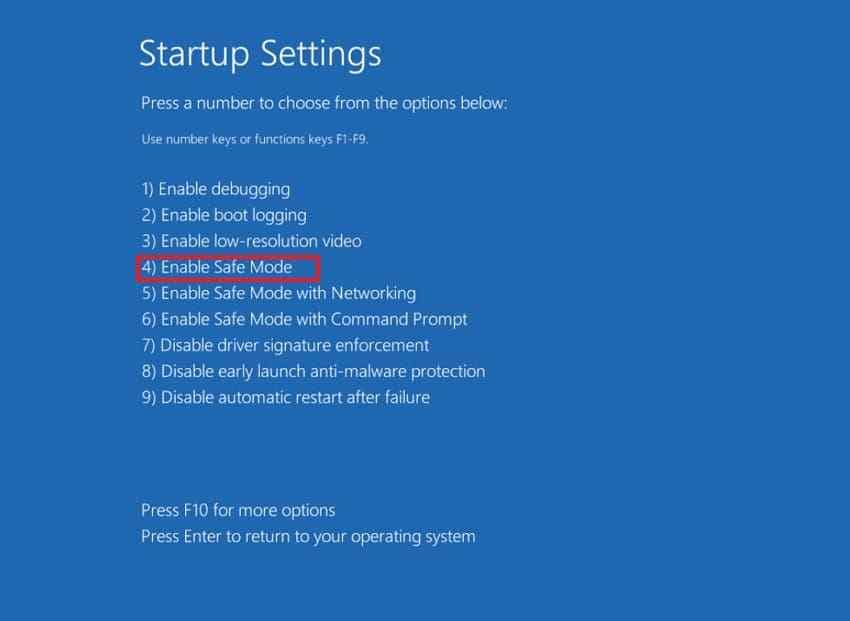
Step 3. Press 4 or F4 for Safe Mode. Restart normally when testing is complete.
Part 5. Repair the Lenovo Display Driver Path
Use driver changes only after the symptom pattern points to Windows or graphics software. Change one thing at a time so you know which action affected the problem.
Install the Display Driver for the Exact Lenovo Model
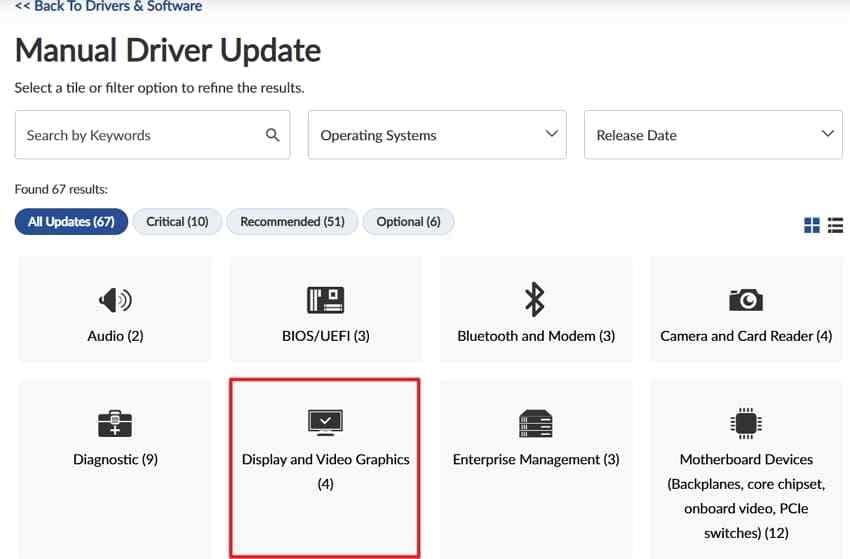
Use Lenovo's model-specific driver package when available, especially on laptops with integrated plus discrete graphics, custom power behavior, or vendor-specific display firmware. Lenovo Vantage can also surface recommended updates.
Step 1. On Lenovo Support, identify the exact product by model or automatic detection, then open its driver page.
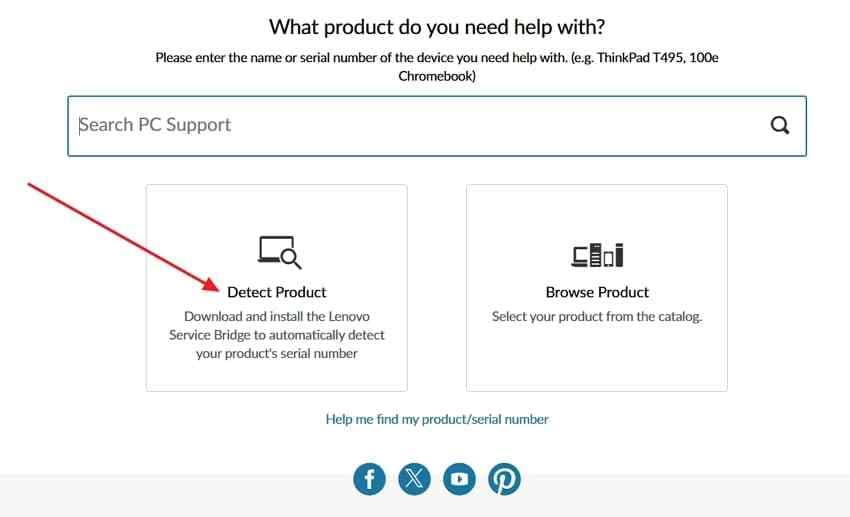
Step 2. Open the display or graphics-driver category, install the package that matches your Windows version and hardware, then restart and retest.
Roll Back or Reinstall the Driver Based on Timing
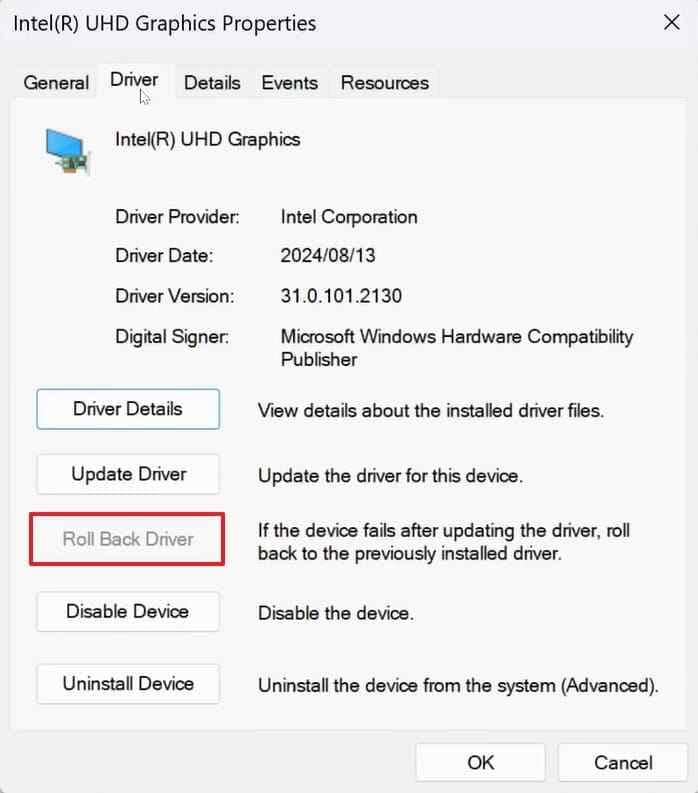
If the horizontal lines began immediately after a graphics-driver update, a rollback is more informative than installing another random version.
Step 1. Right-click Start, open Device Manager, expand Display adapters, and open the graphics adapter's Properties.
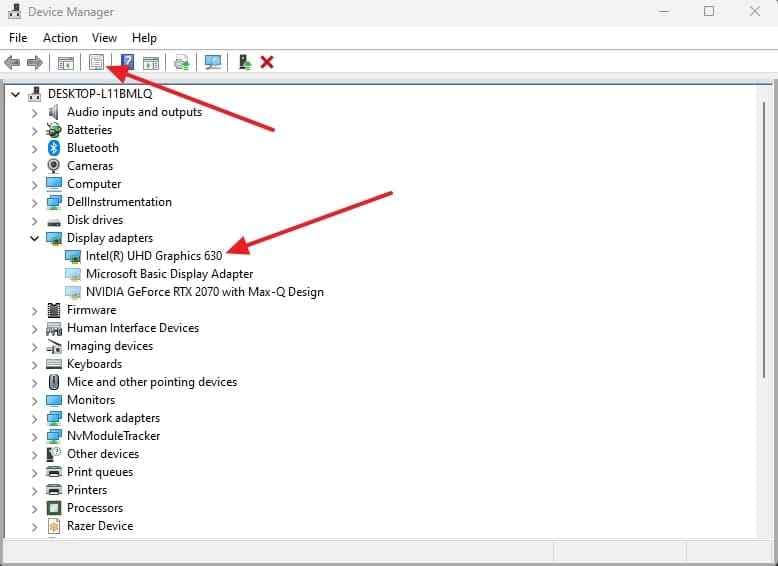
Step 2. Choose Driver > Roll Back Driver if the issue started after the latest update. If rollback is unavailable and the driver appears corrupted or incomplete, uninstall it, restart Windows, and reinstall the correct Lenovo-validated package.
Update BIOS or Firmware Only for the Exact Model
Do not update BIOS merely because the screen flickers. Use a BIOS or firmware update only when Lenovo provides it for your exact model and the release notes or support guidance make it relevant. Keep the laptop on reliable AC power and do not interrupt the update.
If the flicker is already visible before Windows or during Lenovo's display tests, do not expect a Windows graphics-driver reinstall to repair a failed LCD panel or cable.
Part 6. Check Display Settings and Software Conflicts
If preboot tests are clean and the driver path has been checked, test Windows settings and software one variable at a time.
Restore a Supported Resolution and Refresh Rate
Open Settings > System > Display and return the built-in panel to its recommended resolution. Then open Advanced display and choose a refresh rate that the panel supports. Microsoft's current refresh-rate guidance notes that the available rates depend on the display hardware.
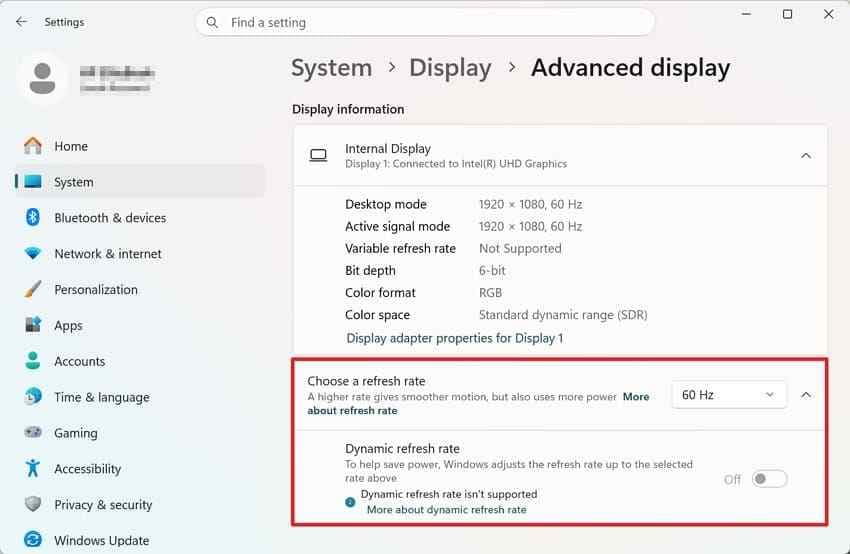
A lower supported refresh rate can be a useful diagnostic test if the problem began after a display-setting change, but it is not a repair for a damaged panel or cable.
Test Apps, Utilities, Docks, and Panel Self Refresh
- Recently added display utility: Disable or remove color, dimming, overlay, refresh-rate, or desktop-customization software that appeared before the flicker.
- Incompatible app: If Task Manager stays stable while the rest of the screen flickers, update or uninstall the suspected app from its official source.
- Dock, USB-C adapter, or eGPU: Disconnect it and retest the internal panel directly. Reconnect one device at a time.
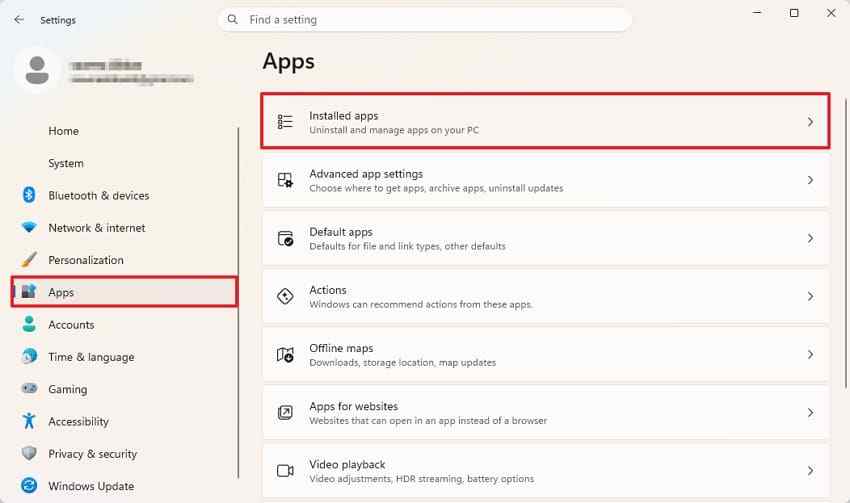
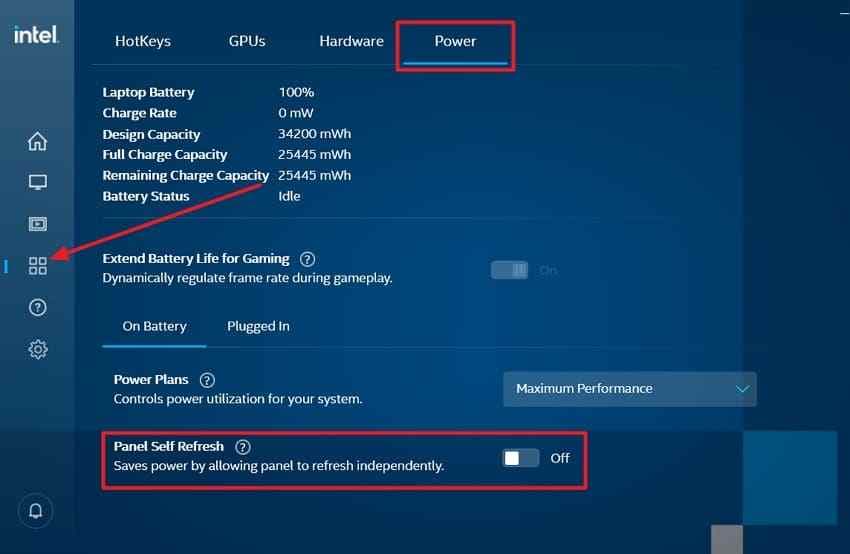
On supported Intel laptops, Panel Self Refresh can be tested separately. Intel's current Panel Self Refresh documentation says the option is available only on supported embedded DisplayPort configurations. If your Intel Graphics Command Center exposes the setting, temporarily turn it off and retest; if the option is absent, do not force a registry workaround.
Use a Clean Boot for Persistent Software Conflicts
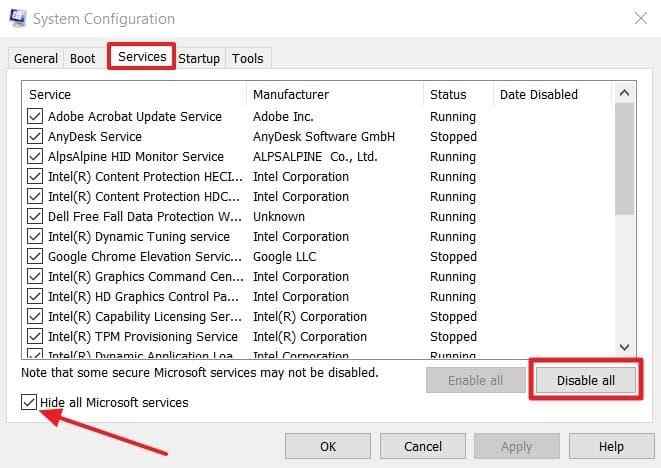
A clean boot is useful only after Windows is usable enough to test. Microsoft's current clean-boot procedure disables non-Microsoft services and startup apps so you can isolate a conflict.
Step 1. Open System Configuration, select Services, check Hide all Microsoft services, choose Disable all, and apply the change.
Step 2. Open the Startup apps section in Task Manager and disable enabled startup items for the test, then restart.
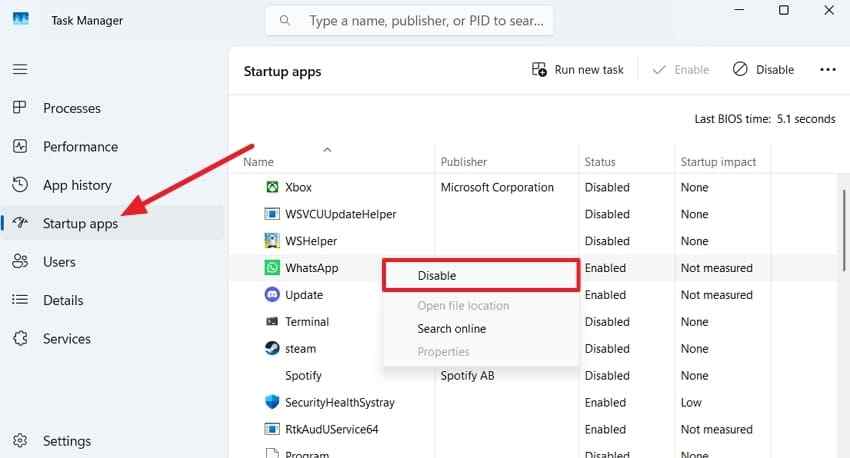
If the lines stop in the clean-boot state, re-enable services and startup items in small groups until the conflict returns. Restore normal startup after the test.
Part 7. Decide Whether the Screen, Cable, or GPU Needs Repair
Persistent lines after software checks should be evaluated by pattern, not guesswork.
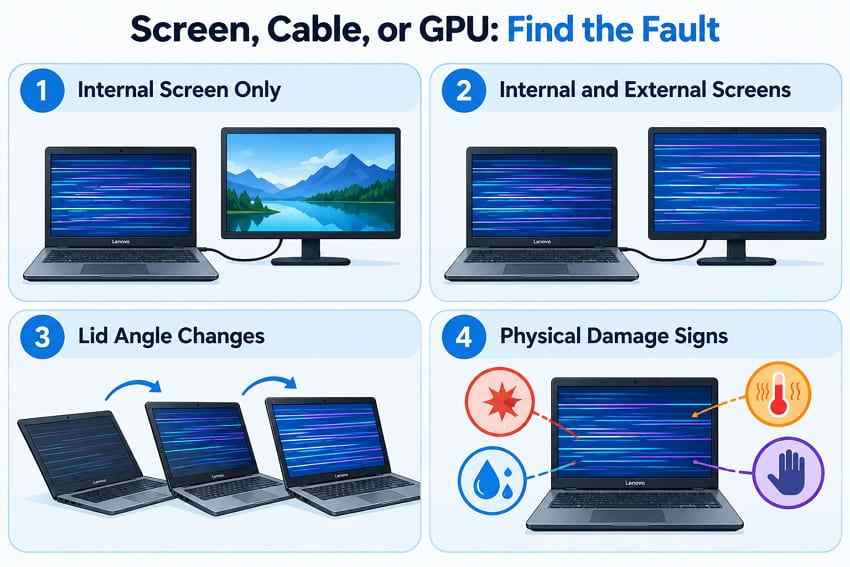
| Pattern | More Likely Area | Next Step |
| Internal screen only; external monitor is clean | LCD panel, display cable, connector, hinge-area path | Stop flexing the lid and arrange model-specific hardware inspection |
| Internal and external displays show matching artifacts | Graphics driver, GPU, shared graphics path, or mainboard | Finish driver/preboot diagnostics, then escalate if artifacts persist outside Windows |
| Lines change with lid angle | Display cable or connector near the hinge | Avoid repeated movement and seek service |
| Lines started after impact, liquid, heat, or pressure | Panel, cable, connector, or board damage | Power down if damage is severe and avoid DIY pressure tests |
| Lenovo LCD or UEFI display test fails | Hardware path | Save the code and contact Lenovo or an authorized service provider |
DIY display disassembly can damage fragile cable connectors, hinge routing, the LCD panel, or warranty seals. If the laptop was recently serviced, document the symptom before reopening it yourself.
If the screen eventually becomes black rather than merely lined, use a known-good external monitor for access when possible. Recoverit's separate Lenovo screen-not-turning-on guide covers that different symptom without treating a black display as the same fault as horizontal lines.
Part 8. Recover Files Before Service, Reset, or Reinstallation
Screen repair does not automatically mean data loss, and a Windows reset should not be a first-line response to horizontal lines. Protect the files first, especially before a reset, clean installation, drive replacement, or service procedure that may involve the system board or storage.
Back Up Normally When the Laptop Is Still Usable
If Windows still works, a normal copy or backup is safer than data recovery software. Connect an external drive or use an external monitor if the built-in display is difficult to use, then copy the important files before service.
Use Recoverit Only When Files Are Missing or Windows Is Inaccessible
Use Recoverit Windows Data Recovery only when local files are already deleted, missing, inaccessible, or Windows cannot provide normal access and the storage drive is still detectable. Recoverit cannot repair the Lenovo LCD, display cable, GPU, motherboard, driver, BIOS, or Windows display settings.
If Windows will not start, the current Recoverit workflow can create bootable media on another working PC. The related PC won't boot data-recovery guide explains the same data-protection scenario in more detail.
Recover From a Detectable Drive and Save Elsewhere
Step 1. On another working computer, open Recoverit and choose Other Tools > System Crashed Computer, then start creating the bootable recovery media.

Step 2. Select the empty USB drive and create the bootable media. Back up that USB first because creation can erase its existing contents.

Step 3. Boot the affected Lenovo laptop from the Recoverit USB, choose Data Recovery, scan the detectable internal drive, and save selected recovered files to a different physical drive.

Recovery depends on drive detectability, drive condition, encryption, and whether the data has been overwritten. If the storage drive is not detected, repeatedly disconnects, or shows signs of physical failure, stop repeated software scans and consult a professional data-recovery service.
Conclusion
Fixing Lenovo laptop screen flickering horizontal lines starts with identifying the layer that owns the fault. Lines in BIOS or Lenovo's preboot tests point away from Windows. A clean external monitor, lid-angle changes, or a clean screenshot can further narrow the internal display path. If the problem appears only after Windows loads, use the Microsoft Task Manager test, Safe Mode, model-specific Lenovo drivers, supported display settings, and a clean boot before considering hardware service.
Back up files before service or reinstallation. Use Recoverit only when data is actually missing or normal Windows access is unavailable; it is a data-recovery tool, not a repair for the display hardware or operating system.

FAQ
-
Why is my Lenovo laptop screen flickering with horizontal lines?
The cause can be a graphics driver, incompatible app, unsupported display setting, LCD panel, display cable, connector, GPU, or system board. Lines that appear before Windows starts or during Lenovo's LCD or UEFI diagnostics make a Windows-only cause less likely. -
How can I tell if Lenovo screen flickering is a driver or hardware problem?
Compare the symptom in BIOS or preboot diagnostics, on an external monitor, in a screenshot, and while moving the lid. If Task Manager flickers with Windows but the preboot screen is clean, the display driver is a stronger suspect. If lines appear before Windows or change with lid movement, investigate the hardware display path. -
Why do horizontal lines change when I move the Lenovo laptop lid?
The display cable runs through or near the hinge area and moves as the lid opens and closes. Lines that change with lid position can indicate a loose, worn, pinched, or damaged cable or connector. Avoid repeatedly flexing the lid to make the image return. -
Can a bad graphics driver cause horizontal lines on a laptop screen?
Yes. A faulty or incompatible graphics driver can create flickering or horizontal artifacts after Windows loads. Use Task Manager behavior, Safe Mode, the timing of the latest driver update, and a Lenovo model-specific driver package to test that possibility before assuming the LCD panel is bad.


