How to Delete a Partition in Windows 7
You can delete a partition in Windows 7 using the built-in Disk Management interface, the Diskpart command-line utility, or third-party software like Stellar BitRaser for File for permanent data destruction.
● To use Disk Management, execute diskmgmt.msc from the Start menu, right-click your target partition, and select Delete Volume after backing up any essential files.
● For command-line execution, run cmd.exe as an administrator, launch diskpart, identify your partition using list volume, and remove it with the select volume # and delete volume commands.
● Stellar BitRaser for File offers up to three erasure passes and 17 algorithms to make deleted data completely unrecoverable across Windows Vista, 7, 8, 8.1, and 10 environments.
Ask AI for a summary
If a partition has been affected by a virus or contains too many bad sectors, it is best to delete it and create a new partition. This would ensure that the virus isn’t able to spread to other partitions of your hard drive or the bad sectors don’t end up corrupting your files stored on the partition. Moreover, another reason why you might want to delete the partition on Windows 7 is if there is some sensitive data present on it. By deleting the partition, you can make sure that no trace of the sensitive data is left behind on the hard drive, and it can’t be recovered using any kind of data recovery tool.
Part 1: How to Delete a Partition in Windows 7
Following are the ways you can try to delete a partition in your Windows 7 system.
Method 1. Delete Partition Using Windows Disk Management
Windows 7 offers a disk management feature that can be used to delete partition in Windows 7. It is important to create backup copies of important data before going ahead with the partition deletion process.
Step 1. In the search field of the Start menu, type diskmgmt.msc and click the Enter key. It would open the window labelled Disk Management.

Step 2. Choose the option Delete Volume from the drop-down menu after right-clicking the partition to be deleted.

Step 3. Click the Yes button in the warning message to confirm the deletion.
Method 2. Delete Partition Using Diskpart in Windows 7
If you’re good at using a command line, you can delete the partition in your Windows 7 system using Diskpart. Here are the steps you need to follow:
Step 1. Tap the Start button and enter cmd into the search box; when cmd.exe is displayed in the search results, right-click it and then tap "Run as administrator."
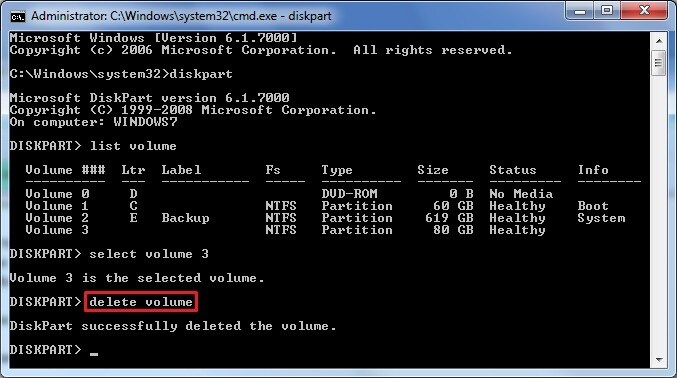
Step 2. The Command Prompt window is displayed. Enter diskpart and press the Enter key.
Step 3. Enter the list volume command and press the Enter key. This command will display all the partitions on your screen.
Step 4. Type select volume # and hit Enter. # is the partition number, and # can be replaced by the partition number you wish to delete.
Step 5. Type delete volume and press Enter. It will uninstall the partition that you choose in step 4.
Part 2: How to Securely Delete Partition in Windows 7
Deleting a partition in Windows 7 isn’t such a difficult task and can be accomplished using the disk management feature. However, it is difficult to guarantee the safety of this deletion. There remains a chance that the deletion of the partition won’t go safely and the hard drive might get damaged in the process. To safely delete partition in Windows 7, you have to make use of an effective data erasure tool like Stellar BitRaser for File. This software is capable of performing this task safely without causing any damage to the hard drive.
Stellar BitRaser for File is widely used for data erasure purposes. The following are some of its features that make it the best tool for deleting partitions.
- Simple and Intuitive User Interface
Stellar BitRaser for File has a simple and intuitive user interface. All of its buttons and features are designed keeping the average person in mind. This makes this software extremely easy to use for one and all. You won’t have any difficulty in using it to erase data from your PC.
- Capable of Erasing Data From Multiple Storage Devices
With this data erasure tool, you can erase data from multiple storage devices like hard drives, flash drives, and even memory cards. You just need to connect the storage device in a Windows PC and Stellar BitRaser for File can erase its data within minutes.
- Compatible with Various Versions of Windows
Stellar BitRaser for File is compatible with many versions of Windows. Thus, it doesn’t matter which version of Windows you are using, this data erasure tool can help you in erasing data on it. The versions of Windows supported by this software include Windows 10, 8.1, 8, 7, and Vista.
This data erasure tool is capable of permanently erasing the data and making it completely unrecoverable. No matter what type of data you are erasing, this software will make sure that it gets completely erased from the system. The data deleted using Stellar BitRaser for File can’t be recovered using even the most powerful data recovery tool.
- Various Data Erasure Protocols
Stellar BitRaser for File offers support for a variety of data erasure protocols. It offers as many as 17 different data erasure algorithms which can all be used for deleting data. You can pick the data erasure standard you want for deleting the files as well.
Here is a guide that offers step-by-step instructions on how to delete partition in Windows 7 using Stellar BitRaser for File.
- Free download Stellar BitRaser for File on Your Windows 7 computer and launch it.
- You can delete a partition from an external hard drive, or delete the partition from the computer hard drive.
- Click the "Erase Now" or "Erase unused space" to select your target hard drive.

- Click the button "Erase Now" to start securely delete the partition on Windows.
- You can reboot your system after completely erased.
Even though Stellar BitRaser for File is completely capable of deleting partition in Windows 7 permanently in a single pass, it allows two extra passes to you for your satisfaction. This is just to ensure that you have no doubts remaining that the partition has been deleted forever.
More Related:
How To Delete Partitions in Linux
How To Delete Partitions on Windows Using DiskPart
Partition Solutions
- Manage Your Partition
- Fix Partition Errors
- Partition Tips


 ChatGPT
 Perplexity
 Gemini
 Claude
 Grok
Grok


Theo Lucia
chief Editor