
 TL;DR:
Deleting Windows partitions is fastest through the DiskPart command-line utility by executing a precise sequence of list, select, and delete commands, though the GUI-based Disk Management tool provides a safer alternative for non-technical users.
● To remove a partition using DiskPart, run Command Prompt as an Administrator, identify the exact target using the list disk and list partition commands, isolate it with select partition, and execute delete partition.
● Disk Management offers a visual Delete Volume option that allows concurrent system use, but it operates slower than DiskPart, utilizes more hardware resources, and blocks the deletion of the primary OS partition.
● Neither native Windows utility offers rollback capabilities, so retrieving data from an accidentally deleted partition requires scanning the hard drive with dedicated recovery software like Wondershare Recoverit.
Ask AI for a summary
 ChatGPT
 Perplexity
 Gemini
 Claude
 Grok
Grok
Most people run a cold sweat when it comes to using commands on their PC. You might need to rebuild the entire computer from scratch in one fell swoop. Yet, it is one of the most effective methods to utilize system functions without draining hardware resources too much. If you want to delete partitions, DiskPart is a valuable utility available on all Windows versions.
This guide will familiarize you with how DiskPart removes partitions on your Windows, its GUI-based alternative, and how you can recover data from any partitions you accidentally deleted.
Why Might You Need to Delete Partitions?
You might need to delete partitions for your Windows PC for several reasons. Some of the most prominent ones include:
- Your disk drive was infected with a nasty virus that made it impossible to access a partition.
- A partition got corrupted due to improper writing or power issues.
- You need to reallocate the storage space on your system.
- You wish to reformat specific sections to be compatible with other file types.
How To Delete a Partition With DiskPart?
You can use the following method to delete the partition using DiskPart CMD.
Step 1: Launch Command Prompt on your system and type in diskpart. Make sure to run the program as an Administrator. Then, press the Enter key.
Step 2: Type the following command and press Enter:
list disk
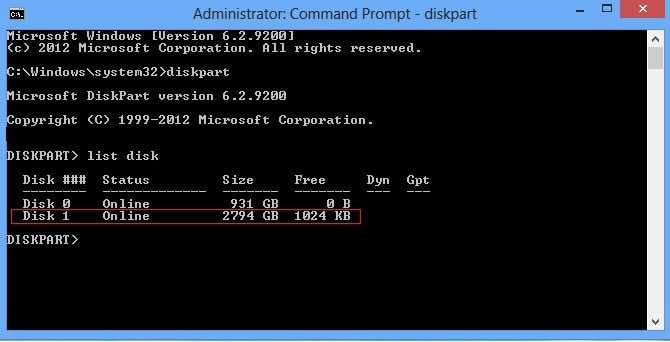
Step 3: You can now observe a list of all disks available on the system. Once you know which one you wish to access, type in the following command:
select disk 0 (You can replace ‘0’ with the relevant number on your screen)
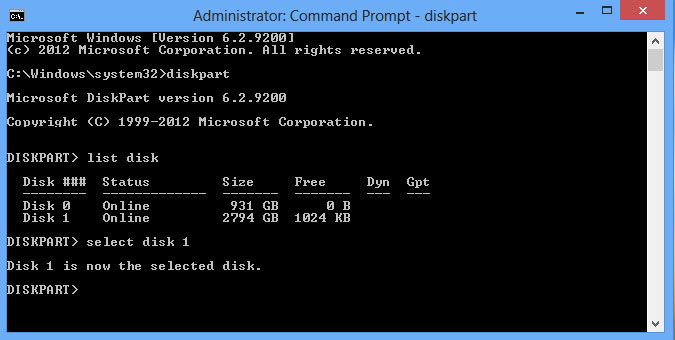
Step 4: Next, type in the list partition command and press Enter. A list of all accessible partitions on the disk will appear on the screen.
Step 5: Choose the one you wish to delete by typing in select partition 2 (replace ‘2’ with the appropriate partition number)—press Enter.
Step 6: To delete the partition, type in delete partition and press the Enter key. DiskPart will now start deleting the partition. It might take a while, so it is best to leave the system idle and tend to more urgent tasks.

Step 7: Once the process concludes, you can exit the DiskPart utility using the exit command.
Before you leave DiskPart, you can verify that the partition has been deleted by typing in list partition after you select the same disk. It should not display the deleted partition anymore.
Pros
It is the fastest method to delete partitions on any Windows computer.
You can use it without installing any additional software.
It doesn’t put much drain on your system’s hardware.
It is the same method for all Windows versions available today.
DiskPart can bypass any access lockouts that may occur due to viruses or other security issues.
Cons
It can be hard to determine the correct partition if you don’t know the exact storage specifications.
You can’t use your system while the partition is being deleted.
Pay close attention to the commands you type in, or you might lose the drive entirely.
It can be challenging for users who aren’t used to a command-line-based interface.
DiskPart Alternative To Delete Partition - Disk Management
If using the DiskPart utility proves too complicated, you can instead go for Disk Management. It is a program available on any Windows OS, whether XP or Windows 11. It brings a graphics interface to the DiskPart method, which might drain time and hardware resources. In return, you get a simplified process that delivers all the necessary information through vibrant visuals instead of lines of code.
To use Disk Management on Windows 10/11:
Step 1: Launch Disk Management from the Start Menu or use the Search function in the taskbar.
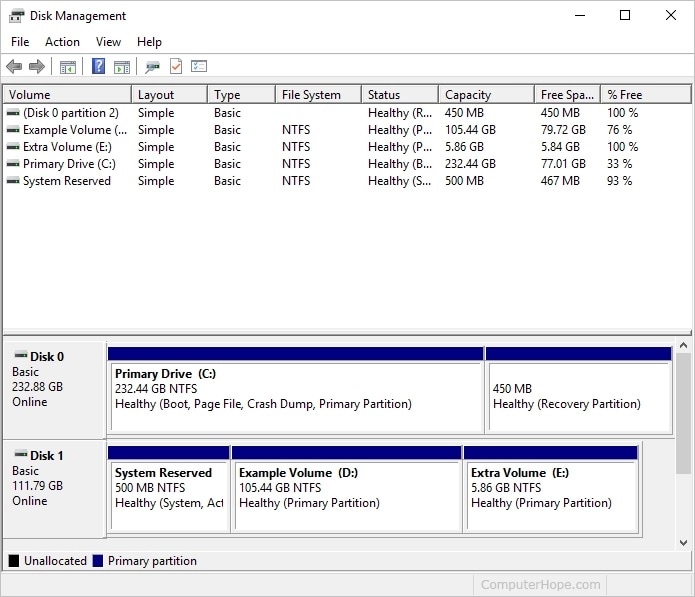
Step 2: Select the drive of the partition you wish to remove. Remember, you can’t delete the primary partition on the disk that has the OS installed.
Step 3: Right-click on the partition you intend to delete. Then, from the drop-down menu, select the Delete Volume option.
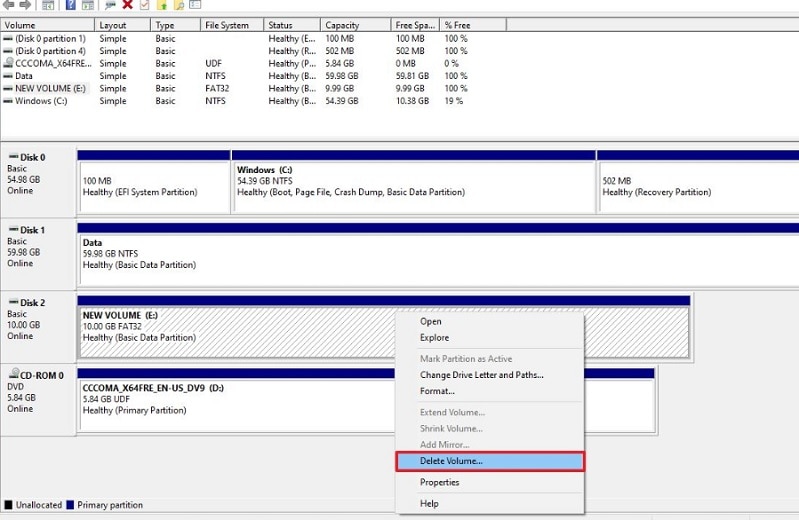
Step 4: A confirmation prompt will appear on-screen. Choose Yes to proceed with the partition deletion.
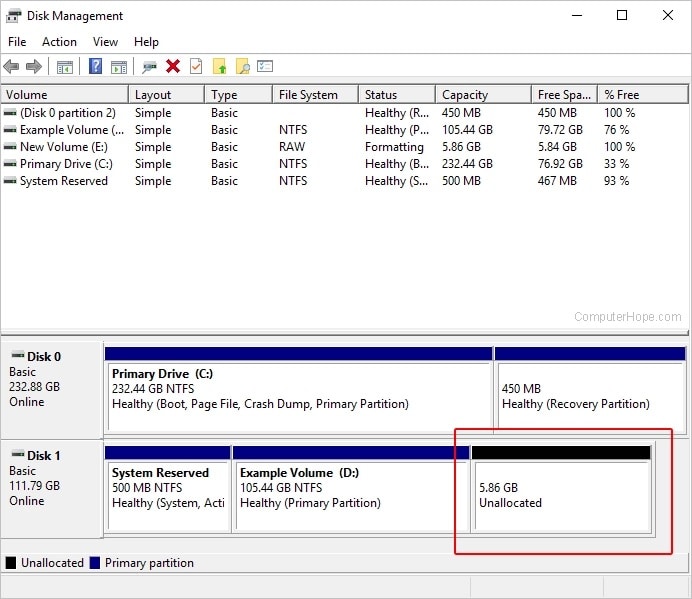
It will take some time for the program to delete the partition entirely. Make sure not to use the disk when the procedure is underway. Once the process concludes, you can observe that the partition no longer appears in the Disk Management utility. The OS designates all the freed space as unallocated.
Pros
The interface is user-friendly. You can quickly identify the partitions you wish to delete.
You can use other disks on your system while the process is underway, provided your system has adequate hardware.
Users who aren’t used to text-based programming can use this method to delete partitions. There is no risk of going wrong by typing in the wrong delete partition cmd in DiskPart.
If you wish to reformat or move specific sections, you can do it without switching dialog boxes or relaunching the program.
Cons
Deleting partitions using Disk Management is slower compared to the DiskPart.
It puts more drain on hardware, especially when you’re using another disk in the meantime.
There is a slight chance that the process might fail midway. You should install third-party software to remedy that.
The process mentioned above might vary slightly for older versions of Windows.
How To Recover a Deleted Partition If You Wrongly Deleted It?
Sometimes, you may not have a backup for the data that you deleted along with the partition. In such a case, you require a reliable data recovery program. While you can find several contenders online, Wondershare Recoverit can prove ideal for most situations. It has installer packages for both Windows and Mac systems. Chosen as the Leader in Data Recovery by G2 users, it is a professional and reliable tool to retrieve data from deleted or lost partitions safely and efficiently.

Wondershare Recoverit - The Most Reliable Deleted Partition Recovery Software
5,481,435 people have downloaded it.
Recover lost or deleted partitions efficiently, securely, and completely.
Support to recover data from 2000+ storage devices, including hard drives, SSDs, SD cards, digital cameras, iPods, and USB drives.
Support to recover data from 500+ data loss scenarios, including unexpected deletion, formatting, hard disk corruption, virus attacks, computer crashes, etc.
Once you install Recoverit, you can follow the below-mentioned method to recover data from a deleted partition.
Step 1: Select Lost Partition
Launch Recoverit and select Lost Partition under the Hard Drives and Location tab.

Step 2: Scan the Lost Partition
Recoverit will scan the data in the deleted or lost partition quickly. Once the scan concludes, you can browse through all the recoverable files. Use the Preview button to ensure that they are the files you desire.

Step 3: Save and Recover
Select the files needing recovery and click the Recover button at the bottom. You can also choose the location where to retrieve the files.

For Windows XP/Vista/7/8/10/11
For macOS X 10.10 or later
When the process is completed, you can observe the files in the designated recovery location. You can also go through a video on our official Youtube channel for a more detailed guide.
For Windows XP/Vista/7/8/10/11
For macOS X 10.10 or later
Conclusion
Losing a partition to a virus or getting corrupted is scary for any user. We hope this guide assisted you with how DiskPart commands delete a partition. However, even if you lost data on the partition, Wondershare Recoverit has you covered.


