


 TL;DR:
To safely format a trail camera SD card, verify that the physical size, capacity limit, and SD family match the exact camera model's manual, back up any needed photos, and prioritize using the camera's built-in format commands to generate the required file system.
● SPYPOINT FLEX models support 2 to 512 GB Class 10 microSD media and use the camera's physical FORMAT button, whereas the LM2, LINK-MICRO, CELL-LINK, LINK, and FORCE series strictly require 2 to 32 GB SDHC cards and a long FAT32 computer format.
● Reformatting a high-capacity SDXC card to FAT32 on a computer will not make it compatible with older 32 GB-limited trail cameras, and using a microSD card with an adapter in a device that requires a full-size SD card can slow performance or trigger data loss.
● If the camera demands a format but contains missing files, or the card suddenly shows RAW or unallocated space, immediately stop recording and extract the data using recovery software like Recoverit through a computer card reader before executing any overwrite operations.
Ask AI for a summary
 ChatGPT
 Perplexity
 Gemini
 Claude
 Grok
Grok
⚡ TL;DR: Safe Format Checklist
● Match The Exact Camera: Do not assume every game camera accepts the same card. SPYPOINT FLEX models support different capacities and formatting steps from LM2, LINK-MICRO, CELL-LINK, LINK, and FORCE models.
● Protect Photos Before Formatting: Copy and open several files first. If photos are missing, the card appears empty, or the camera demands a format, stop using the card and recover the data before formatting.
● Use The Camera When Supported: An in-camera format is usually the safest setup because the camera creates the file system and folders it expects. Follow the exact model manual instead of copying another brand's menu path.
● Replace Repeat Offenders: A format can rebuild a damaged file system, but it cannot repair worn flash memory, cracked contacts, a loose lock switch, or counterfeit capacity.
Quick answer: To format an SD card for a trail camera, first verify the card type, capacity, and speed required by the exact camera model. Back up or recover any needed photos, insert the card with the camera powered off, and use the camera's Format, Delete All, or dedicated format control if the manual provides one. Use Windows, Mac, or the official SD Memory Card Formatter only when the manufacturer permits computer formatting.
There is no universal “trail camera format.” A 32 GB SDHC card normally follows the FAT32 standard, while an SDXC card over 32 GB normally uses exFAT. That does not mean every trail camera can use both. The host device must support the card family, physical size, capacity, and file system. Forcing a 128 GB card into FAT32 does not make an older 32 GB-only camera compatible.
Fact-checked on September 8, 2026: SPYPOINT card rules and FLEX-M2 controls were checked against current SPYPOINT support and the 2026 FLEX-M2 Quick Start Guide. File-system and computer-format guidance was checked against current SD Association, Microsoft, and Apple documentation.
In This Article
Part 1. Choose The Right SD Or MicroSD Card
The card label answers only part of the compatibility question. Before buying or formatting a microSD card for a trail camera, match four details: physical size, SD family, capacity, and minimum speed class. The exact model manual has priority over any general recommendation.
| Camera Or Series | Physical Card | Current Card Rule | Safest Format Path |
| SPYPOINT FLEX series | microSD | 2–512 GB, Class 10, SDHC or SDXC, premium brand | Use the camera's physical FORMAT button. SPYPOINT advises against routine computer formatting for a normal FLEX setup. |
| SPYPOINT LM2, LINK-MICRO series, or CELL-LINK | microSD | 2–32 GB, Class 10, SDHC, premium brand | Use a long FAT/FAT32 format when the card needs computer formatting. |
| SPYPOINT LINK or FORCE series | Usually full-size SD on the models listed by SPYPOINT | 2–32 GB, Class 10, SDHC, premium brand | Use the correct full-size card and a long FAT/FAT32 format. Do not substitute a microSD card in an adapter. |
| Another trail or game camera | SD or microSD, model-dependent | Use only the families, capacities, and speeds listed in the exact manual | Use the camera's format function when the manual provides one; otherwise follow its computer-format instructions. |
The SPYPOINT rows above follow the manufacturer's current SD and microSD support guidance. They explain why the phrase “SPYPOINT micro SD card” is not specific enough: a FLEX can accept an SDXC microSD card that older LINK-MICRO or LM2 models are not designed to use.
The SD Association capacity standard defines SDHC as more than 2 GB through 32 GB and SDXC as more than 32 GB through 2 TB. It also pairs SDHC with FAT32 and SDXC with exFAT. These are card standards, not a promise that a particular trail camera supports every card in the range.
| Card Label | Capacity Range | Standard File System | Trail Camera Decision |
| SD | Up to 2 GB | FAT12 or FAT16 | Legacy capacity. Use only if the camera manual includes it. |
| SDHC | More than 2 GB through 32 GB | FAT32 | Common in older and current trail cameras, but the required physical size still varies. |
| SDXC | More than 32 GB through 2 TB | exFAT | Use only when the camera documentation names SDXC and supports the chosen capacity. |
| SDUC | More than 2 TB through 128 TB | exFAT | Do not assume current trail camera compatibility. |
A faster card is not a substitute for compatibility. Class 10 indicates a minimum sequential write class of 10 MB/s, but a U3, V30, or A2 marking does not override the camera's supported capacity or card family. Buy from a reputable seller and compare the card's capacity and markings with the manufacturer's official product information; counterfeit cards can report false capacity and fail only after enough photos have been written.
Part 2. Check Before You Format
Formatting is an erase operation, not a harmless performance switch. It creates new file-system structures and makes the current files unavailable. A full or overwrite format also writes across the card, sharply reducing the possibility of recovering deleted wildlife photos later.
- Identify The Exact Camera Model: Read the label inside the door, battery compartment, setup screen, or app. A brand name alone is not enough because supported cards can change between product families.
- Verify The Card: Match physical size, SDHC or SDXC family, capacity, and minimum speed to the manual. If a full-size SD slot is specified, do not assume a microSD adapter is safe.
- Back Up Readable Files: Copy the entire card root to a dated folder on another drive, then open representative daytime photos, night photos, and video clips. The separate SD card backup guide covers copy and verification workflows.
- Recover Missing Files First: If the card appears empty, shows RAW or unallocated space, or opens with missing dates, do not format yet. Stop recording so new images cannot overwrite the missing data.
- Use Stable Power: Install fresh or sufficiently charged batteries before an in-camera format. Do not switch off the camera, remove the card, or open the battery compartment while it is working.
- Confirm The Target Twice: On a computer, match both the drive letter and displayed capacity. Disconnect unrelated removable drives if that makes the correct card easier to identify.
- Unlock A Full-Size SD Card: Slide the side lock switch away from the locked position. A loose switch or damaged adapter can return to read-only mode and should be replaced.
| What You See | Format Now? | Safer First Action |
| New compatible card with no needed data | Yes | Use the camera's approved format path and take a test photo. |
| Readable card with a verified backup | Yes, if you intentionally want to erase it | Check the backup, then format in the destination camera. |
| Camera asks to format, but photos are needed | No | Try one known-good reader and recover files before formatting. |
| Card is RAW, unallocated, or suddenly empty | No | Stop writes and scan the card before repair or format. |
| Card repeatedly corrupts after a clean format | Do not keep reformatting | Replace the card after protecting accessible files. |
| Card is cracked, hot, intermittent, or undetected by every reader | No | Stop DIY writes. Use a professional recovery service if the contents are valuable. |
Part 3. How To Format An SD Card For A Trail Camera
Start with the method specified for the exact camera. The first two methods are in-camera paths; the remaining methods are computer fallbacks for models that allow them. None of these steps can make an unsupported card compatible.
Method 1. Use A Menu-Based In-Camera Format
Use this method only when the trail camera has an on-device Format, Format Card, Delete All, or equivalent command. Menu names and button sequences vary, so the model manual remains authoritative.
- Copy or recover all needed files, then power the camera off.
- Insert the compatible SD or microSD card in the direction shown beside the slot. Do not force it.
- Install fresh batteries or connect the approved external power source, then turn the camera on in setup mode.
- Open Settings, System, or the storage menu and select Format or the model's equivalent command.
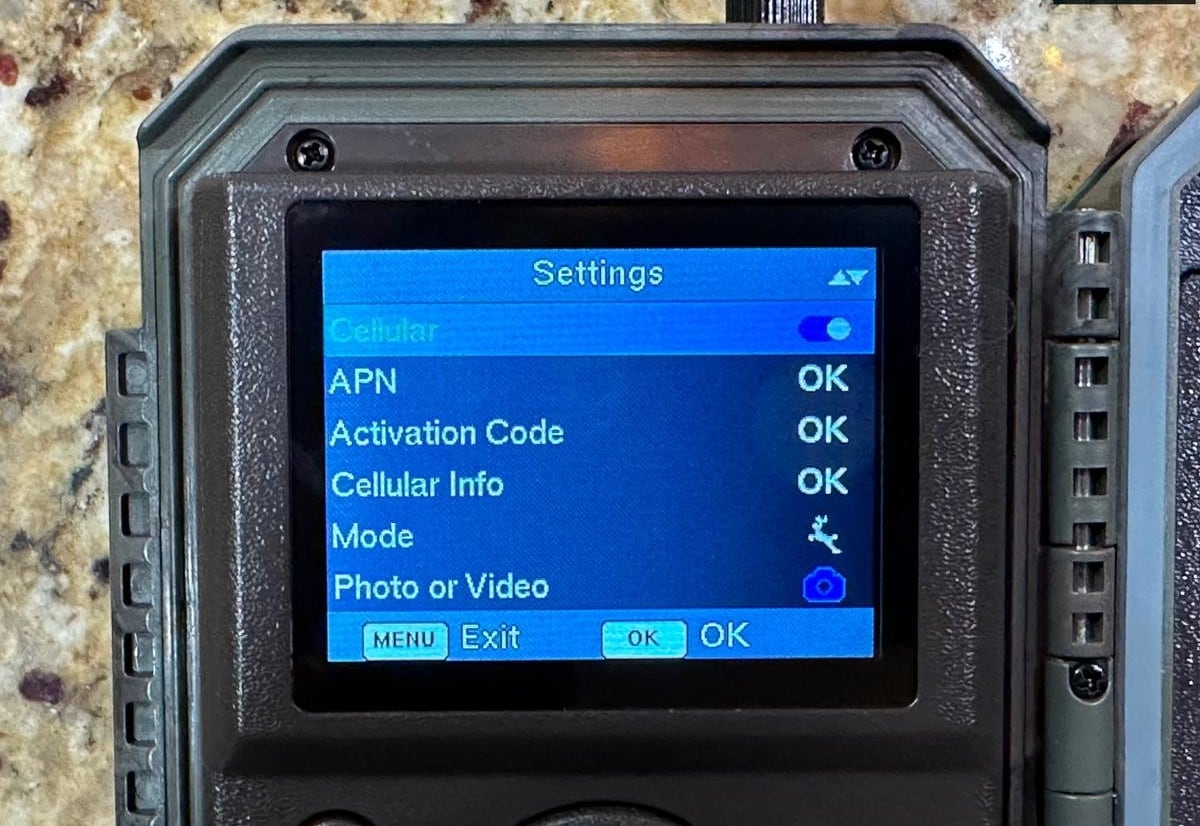
- Confirm the erasure warning. Wait for the completion message or normal status screen without pressing other controls.
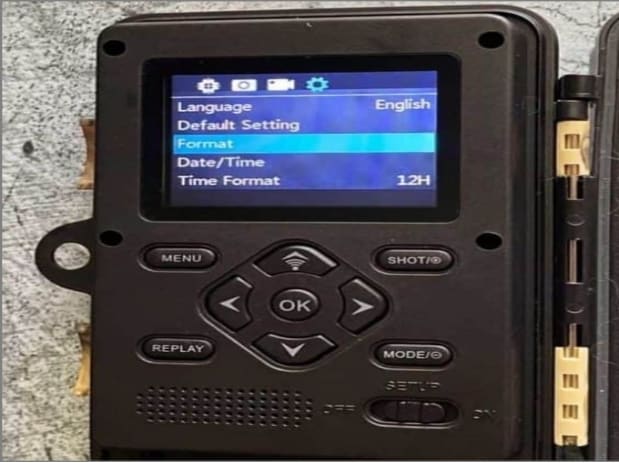
- Take a test photo and a short video if the camera records video. Open both files before leaving the camera in the field.
The screens above show real trail camera interfaces, but they are examples rather than universal menu maps. If your model has no format command, do not improvise with another camera's buttons; use the manufacturer-approved computer method.
Method 2. Format A SPYPOINT FLEX MicroSD Card
SPYPOINT FLEX cameras use a physical format control instead of the generic menu sequence above. Current SPYPOINT guidance recommends a premium Class 10 microSD card from 2 to 512 GB for the FLEX series and says to format it with the camera's FORMAT button.
- Confirm that the card is a compatible microSDHC or microSDXC card and that all needed files are protected.
- With the camera off, insert the microSD card until it clicks into place.
- Turn the camera ON. When the status LEDs begin blinking, immediately press and hold the physical FORMAT button.
- Release the button when the format-status LED begins blinking green. Do not remove power or the card.
- Wait until the green blinking stops. Reboot the camera if directed, then press TEST to capture and transmit a test photo.

The LED sequence and physical controls are documented in the official 2026 SPYPOINT FLEX-M2 Quick Start Guide. Other FLEX revisions can differ, so use the guide for the exact model printed on the camera.
Method 3. Long-Format A Compatible SDHC Card On Windows
This method is designed for models whose manufacturer calls for a computer-based long FAT/FAT32 format, including the SPYPOINT LM2, LINK-MICRO, CELL-LINK, LINK, and FORCE families covered by its current support article. Use a 2–32 GB Class 10 SDHC card of the physical size required by the camera.
Warning: A normal Windows format writes across the volume. Microsoft states that a quick format creates a new file table without fully overwriting the volume, while a normal format fully erases existing data. Recover missing photos before clearing Quick Format.
- Connect the SDHC card through a reliable reader. Open File Explorer and select This PC.
- Match the removable drive's capacity to the card. Right-click the correct drive and choose Format.
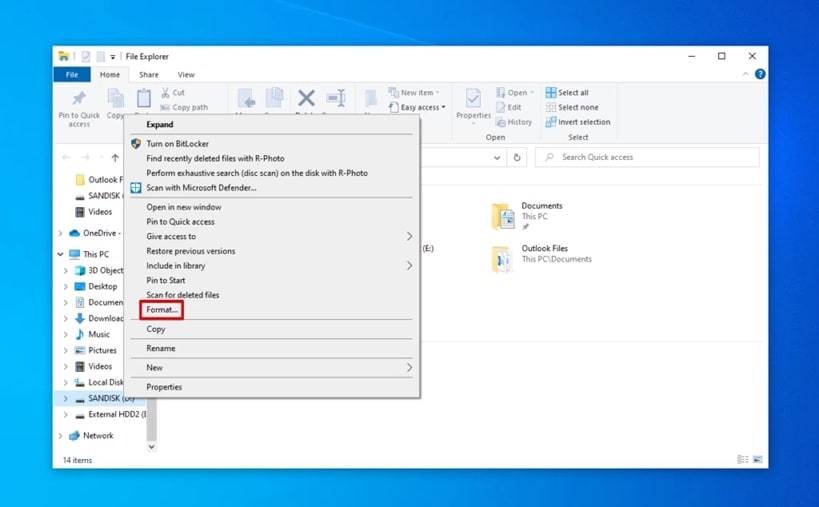
- For a compatible SDHC card of 32 GB or less, choose FAT32. Leave Allocation unit size at its default unless the camera manufacturer specifies another value.
- For the long format required by the SPYPOINT series named above, clear Quick Format. For another brand, follow that brand's instructions; do not choose a full format merely because the camera is slow.
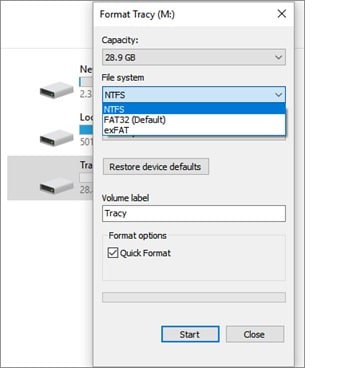
- Select Start, confirm the erasure warning, and leave the reader connected until Windows reports completion.
- Use Eject, insert the card into the powered-off camera, turn it on, and run the model's format or test procedure if required.
The erasure behavior above is confirmed by the current Microsoft Disk Management guidance. Do not select NTFS for a trail camera unless the exact manufacturer documentation explicitly requires it; it is not the standard file system for SDHC or SDXC cards.
Method 4. Format A Compatible Card On Mac
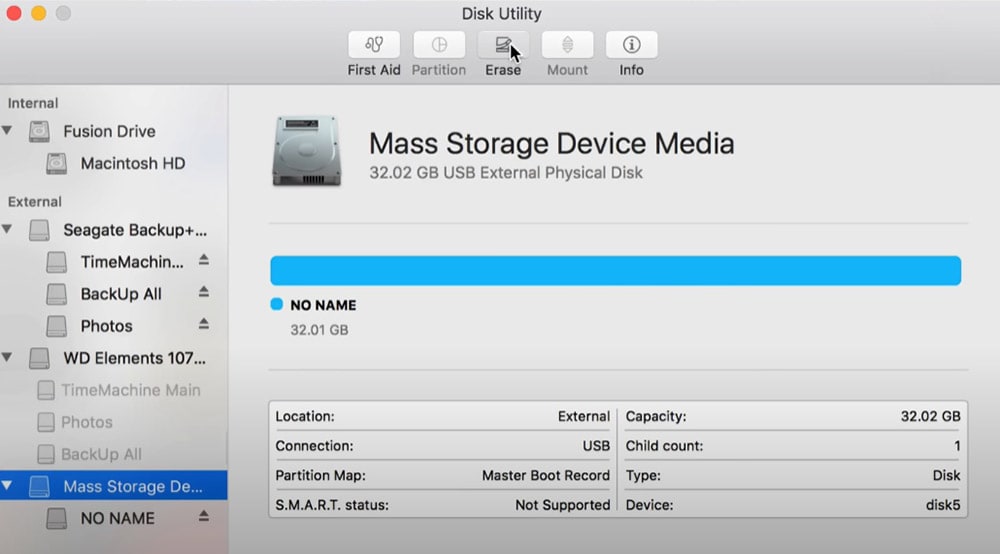
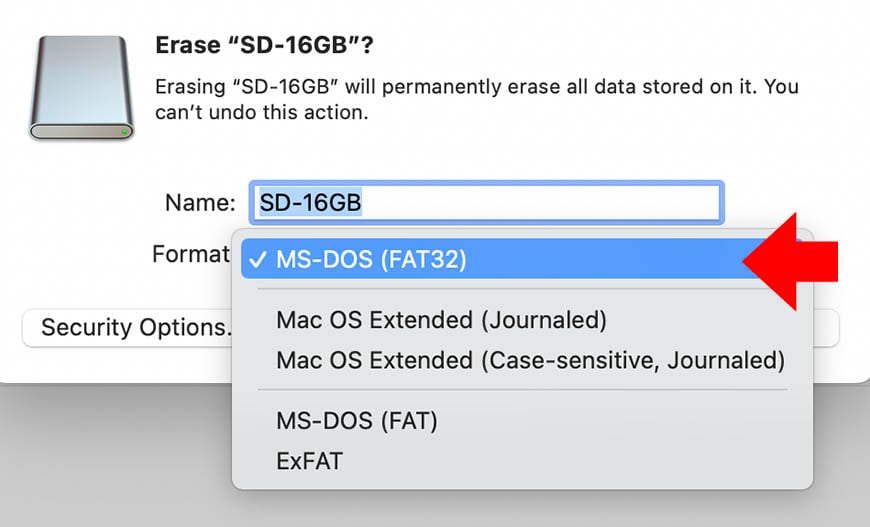
Use Disk Utility only when the trail camera's instructions permit computer formatting. For a 2–32 GB SDHC card that requires FAT32, macOS labels the compatible choice MS-DOS (FAT). For an SDXC card above 32 GB, Apple offers ExFAT, but select it only when the camera supports SDXC at that capacity.
- Connect the card and open Disk Utility from Applications > Utilities.
- Select View > Show All Devices, then select the physical SD card at the top of its device hierarchy. Verify the capacity.
- Click Erase.
- Choose MS-DOS (FAT) for a compatible 32 GB-or-smaller SDHC card. Choose ExFAT only for a supported SDXC card above 32 GB.
- Choose Master Boot Record when the scheme is available, enter a short volume name, and click Erase.
- Wait for completion, select Done, and eject the card before removing it. Put it into the camera and complete the in-camera setup or test.
Apple's current Disk Utility format guidance confirms MS-DOS (FAT) for disks of 32 GB or less and ExFAT for larger disks. That size rule does not replace the trail camera's capacity limit: if the manual caps the camera at 32 GB, a larger exFAT card remains unsupported.
Method 5. Use The Official SD Memory Card Formatter
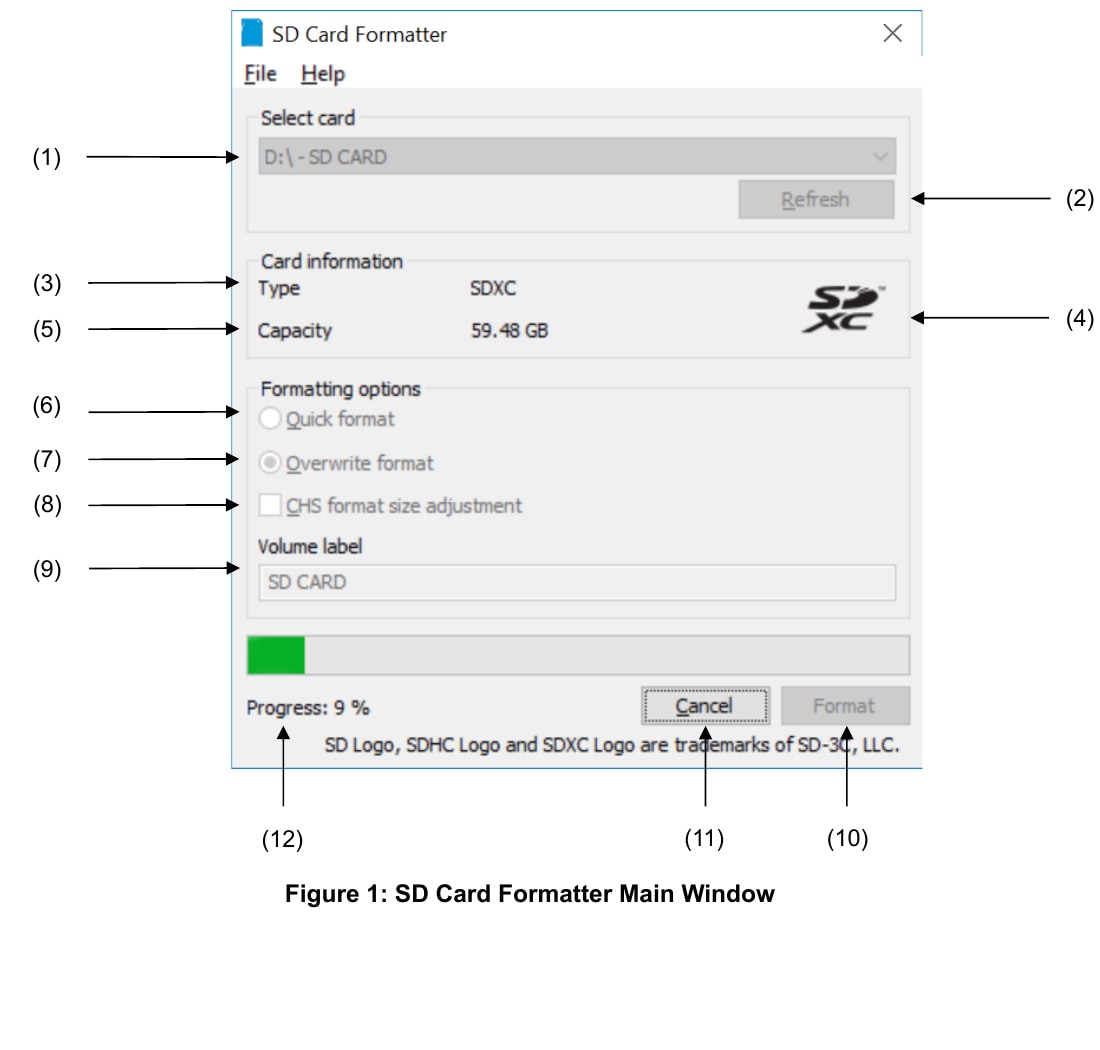
If the camera manual permits computer formatting and built-in operating-system tools do not prepare the card correctly, use the SD Association's official SD Memory Card Formatter. The current tool supports SD, SDHC, SDXC, and SDUC cards on Windows and Mac and selects the SD-standard file system for the card family.
- Recover or back up all needed files, then connect only the card you intend to format.
- Install the formatter from the SD Association page and open it with administrator rights.
- Select the correct card by checking its drive letter and capacity.
- Choose Quick format for ordinary reuse. Choose Overwrite format only when you do not need recovery and the manufacturer calls for a long format or you are testing a suspected logical problem.
- Enter a volume label if desired, select Format, and confirm the warning.
- After completion, eject the card, insert it into the camera, run any required in-camera format, and take a test image.
Do not use this method to bypass a camera's card limit. The formatter can correctly prepare a 128 GB SDXC card, but it cannot make that card work in a game camera designed only for 32 GB SDHC media. SPYPOINT also specifically prefers its physical FORMAT button for normal FLEX-series setup. For device-neutral Windows, Mac, Android, and official formatter instructions, use the separate microSD card formatting guide; this page remains focused on trail and game cameras.
Part 4. Fix Trail Camera Card Errors Safely
A camera that says No Card, Card Error, Card Full, or Format Card is reporting a symptom, not necessarily asking for the same repair. Protect the files first, then isolate the card, reader, format, and camera one variable at a time.
| Symptom | Likely Causes | Recovery-First Action | Next Test |
| No card or card not detected | Wrong physical size, unsupported capacity, incomplete insertion, dirty contacts, reader or slot failure | Do not format if files matter. Try one compatible reader and another computer. | Test a known-good card that matches the manual. |
| Card error immediately after insertion | SDXC in an SDHC-only camera, wrong file system, write protection, adapter issue | Copy or recover the card first if it contains needed media. | Use the exact supported card and the manufacturer's format path. |
| Camera reports card full, but few photos are visible | Hidden files, damaged allocation records, another device's folders, false-capacity card | Copy the entire card, including visible folder structure, before erasing. | Check capacity on a computer, format once, and run a controlled test. |
| Files save but do not transmit to the app | Card write failure, app or network problem, firmware issue | Confirm whether the local file exists on the card before treating it as data loss. | Take a test photo, verify the card file, then troubleshoot transmission separately. |
| Card becomes read-only | Lock switch, worn flash memory, failing controller, adapter fault | Copy readable files immediately. Do not rely on repeated unlock attempts. | Replace the card or adapter if read-only mode returns. |
| Errors return after a successful full format | Failing or counterfeit card, damaged camera slot, unstable power | Do not keep important media on the card. | Test a genuine known-good card and inspect the camera slot. |
If a computer detects the card but the camera does not, revisit the exact capacity, SDHC/SDXC family, physical size, and file system. If neither the camera nor multiple known-good readers detect it, software cannot scan an invisible device. High-value files may require a professional laboratory rather than further formatting.
For a readable but unreliable card, use the dedicated SD card not reading guide to separate reader, operating-system, file-system, and hardware problems. Do not run repair commands or initialize an unallocated card before recovering files you still need.
Part 5. Recover Photos Before Or After Formatting
If all photos are visible, a verified copy is faster and safer than recovery software. Use recovery software when files were deleted, the card appears empty, a transfer failed, the camera demands formatting before the card opens, or the card was formatted by mistake.
Stop using the card immediately. Do not take test photos, update firmware from the same card, run CHKDSK, perform another format, or save recovered files back to the card. Every write can overwrite image or video data that is still recoverable.
Method 6. Recover Trail Camera Files With Recoverit
Wondershare Recoverit can scan a removable SD or microSD card when a Windows PC or Mac detects it through a card reader. It is appropriate for deleted, formatted, or logically inaccessible trail camera media. It cannot repair a cracked card, failed controller, or camera slot, and results depend on overwriting and card health.
- Connect And Select The Correct Card: Power the camera off, remove the card, connect it through a stable reader, open Recoverit, and choose SD Card Recovery. Confirm the card by capacity before scanning.
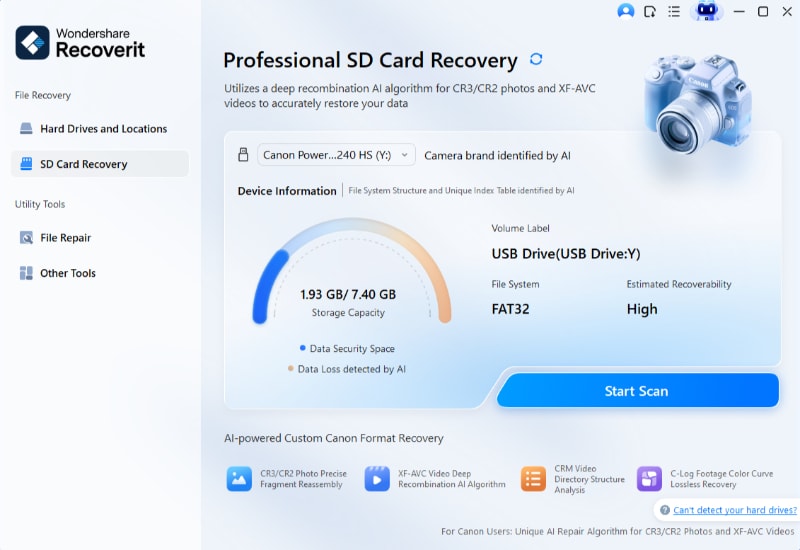
- Scan Without Writing To The Source: Start the scan and let Recoverit search the card. Filter by photo or video type, date, size, path, or filename when you need a particular field session.
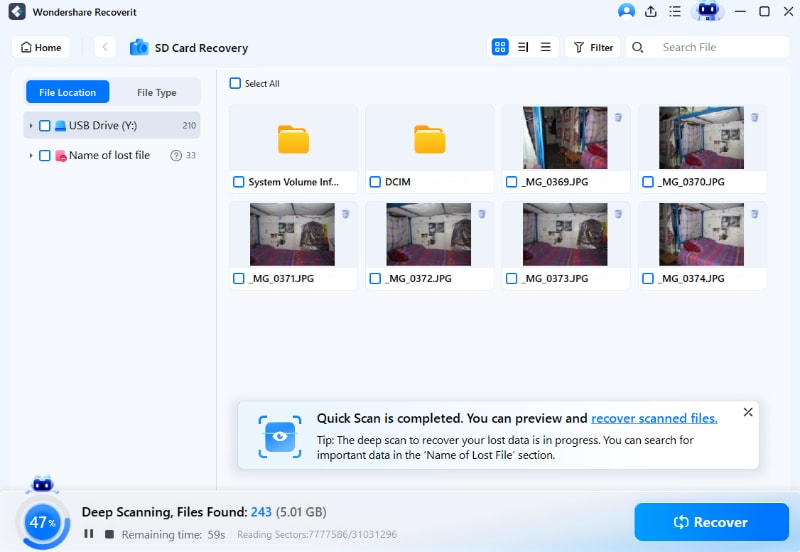
- Preview And Recover Elsewhere: Preview supported photos, choose the files you need, select Recover, and save them to the computer or another healthy drive. Never choose the source card as the destination.
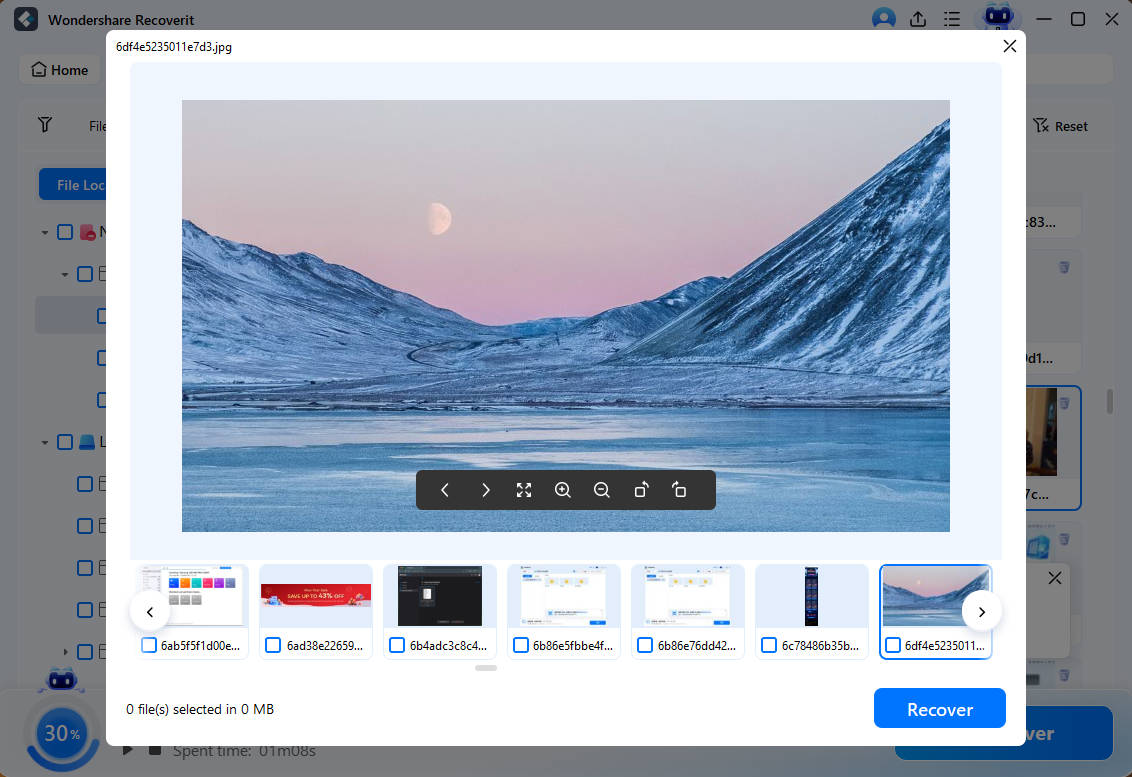
- Verify Before Formatting: Open recovered JPEGs and video clips from the destination drive. Check full-resolution images rather than relying only on thumbnails, and preserve the source card until the important files pass inspection.
A quick format may leave some data recoverable until it is overwritten; a normal Windows format or SD Formatter overwrite format makes recovery much less likely. The formatted SD card recovery guide explains how format type, new writes, and card condition affect the outcome.
Recover Trail Camera Files With Recoverit
 Security Verified. Over 7,302,189 people have downloaded it.
Part 6. Verify The Card Before Field Deployment
A “format complete” message proves only that the file-system operation finished. It does not prove that the card is genuine, stable, compatible through its full capacity, or able to survive a multi-week deployment. Complete a write-read test before leaving the camera unattended.
- Check The Displayed Capacity: Confirm that the camera accepts the card without an error. A small difference between advertised and displayed capacity is normal, but a 128 GB card appearing as only a few gigabytes is not.
- Set The Correct Date And Time: Formatting should not normally change the camera clock, but battery removal might. Accurate timestamps are essential when checking motion events and locating a missing file.
- Trigger Day And Night Tests: Capture several daylight images, a short video if enabled, and a low-light or night image. A single successful thumbnail is not enough.
- Read The Files On Another Device: Power the camera off before removing the card, connect it to a computer, and open the full-resolution files. Check that video plays beyond the first few seconds.
- Test Cellular Transmission Separately: For a cellular trail camera, confirm both local storage and app delivery. A photo on the card but not in the app points to a transmission or account problem, not necessarily card failure.
- Return The Card To The Same Camera: Avoid moving working cards between cameras. If a card must change devices, protect the files and format it in the destination camera before deployment.
- Carry A Known-Good Spare: Keep a labeled card that matches the same model requirements. A spare separates a card fault from a camera or power fault in the field.
Do not use irreplaceable wildlife activity as the first test. Run a controlled sequence near home, verify the files, then deploy. For remote or research sites, maintain two cards per camera and log the camera ID, card ID, format date, deployment date, and retrieval date.
| Field Check | Pass Condition | If It Fails |
| Camera startup | No card warning and plausible available capacity | Recheck card family, capacity, lock switch, insertion, and manual. |
| Still photo | Full-resolution file opens without blocks, truncation, or color damage | Try a known-good compatible card; replace a card that repeats the error. |
| Video | The complete clip plays with expected audio and duration | Check speed requirement, batteries, and camera settings. |
| Reinsertion | Camera recognizes the card again after safe removal | Inspect contacts and slot; avoid an unreliable adapter. |
| Cellular upload | Local file exists and the expected image reaches the app | Keep the card unchanged while checking signal, plan, firmware, and app status. |
Part 7. Mistakes That Cause Missed Wildlife Photos
- Buying By Capacity Alone: “128 GB” does not reveal whether the camera supports SDXC, the card's physical size, or the required speed class.
- Using A microSD Adapter In A Full-Size SPYPOINT Camera: SPYPOINT warns that this can slow performance and potentially cause data loss. Use the native card size specified for the camera.
- Formatting Before Checking The Card: A format request may be the first sign of file-system damage. Recover needed media first.
- Assuming FAT32 Fixes An Oversized Card: Reformatting an unsupported SDXC card as FAT32 does not change its SD family or the camera controller's limit.
- Choosing exFAT Because The Card Is Large: exFAT follows the SDXC standard, but older or SDHC-only trail cameras may reject it completely.
- Formatting On A Computer When The Camera Says Not To: The SPYPOINT FLEX family is a clear example: normal setup uses the camera's physical format button.
- Using Quick Format When The Manufacturer Requires A Long Format: A quick format creates a fresh file table but does not perform the full erase requested for some legacy camera troubleshooting.
- Using Full Or Overwrite Format Before Recovery: This writes across the card and can destroy recoverable photos and videos.
- Removing A Card While The Camera Is On: The device may still be writing an image, index, or configuration file. Power off and wait before removal.
- Deleting Individual Files Repeatedly Across Devices: Copy and verify the session, then use the destination camera's approved format routine instead of mixing file operations from phones, computers, and cameras.
- Trusting A Card After Repeated Corruption: Formatting may temporarily restore access without repairing flash wear or a failing controller. Replace unreliable media.
- Keeping One Copy: An SD card in the field is working media, not a backup. Maintain at least one verified copy away from the card before erasing it.
Conclusion
The correct trail camera format starts with the camera model, not a generic FAT32 or exFAT recommendation. SPYPOINT FLEX cameras use Class 10 microSDHC or microSDXC media from 2 to 512 GB and an in-camera format button, while the named LM2, LINK-MICRO, CELL-LINK, LINK, and FORCE families generally use 2–32 GB Class 10 SDHC media and a long FAT/FAT32 computer format when needed. Other brands require their own model documentation.
Protect the wildlife files first, use the approved format path, and test both local recording and cellular delivery before deployment. If photos are missing or the card suddenly appears empty, stop writing and scan the detected card with Recoverit before you format. If errors return after a clean format, replace the card instead of trusting it with another field season.
FAQ
-
What Format Should An SD Card Use For A Trail Camera?
Use the file system required by the exact model. Under SD standards, SDHC cards through 32 GB normally use FAT32 and SDXC cards over 32 GB normally use exFAT. The camera must support the card family and capacity; forcing another file system does not bypass a hardware or firmware limit. -
How Do I Format An SD Card For A Game Camera?
Back up or recover needed files, verify the compatible card, insert it with the camera off, and use the model's Format, Format Card, Delete All, or dedicated format control. Take and open a test photo afterward. Use a computer only when the manufacturer permits or requires it. -
What microSD Card Should I Use For A SPYPOINT Camera?
It depends on the series. Current SPYPOINT guidance recommends a premium Class 10 microSDHC or microSDXC card from 2 to 512 GB for FLEX models. LM2, LINK-MICRO, and CELL-LINK models generally require a premium Class 10 microSDHC card from 2 to 32 GB. Check the exact model before buying. -
Can I Use A 64 GB microSD Card In A SPYPOINT Trail Camera?
A 64 GB microSDXC card falls within the current 2–512 GB FLEX-series recommendation. It is outside the 2–32 GB SDHC recommendation for LM2, LINK-MICRO, CELL-LINK, LINK, and FORCE families. Do not use capacity alone to decide compatibility. -
Can I Use A microSD Card With An Adapter In A Trail Camera?
Only if the camera manufacturer permits it. SPYPOINT specifically advises against a microSD adapter in cameras that require a full-size SD card because it can slow performance and potentially cause data loss. Use the native physical card size listed for the model. -
Should I Format A New Trail Camera SD Card?
Format a new compatible card if the model manual tells you to or the camera requests setup. A factory-preformatted card may still need an in-camera format so the device can create its expected folders. Verify that the card contains no needed files first. -
Why Does My Trail Camera Say Card Error After Formatting?
The card may be the wrong family or capacity, use the wrong file system, be write-protected, counterfeit, worn, or physically incompatible. Recheck the exact model requirements and test a genuine known-good card. If the error returns on multiple correct cards, inspect the camera slot and power source. -
Does Formatting A Trail Camera SD Card Delete Everything?
Yes. Formatting makes the current files unavailable. Some data may remain recoverable after certain quick formats until overwritten, but a full or overwrite format sharply reduces recovery chances. Back up readable files or recover missing files before formatting. -
Can Recoverit Recover A Formatted Trail Camera SD Card?
Recoverit can scan the card when a Windows PC or Mac detects it through a reader. Results depend on the format type, new writes, flash condition, and overwriting. Stop using the card and save recovered files to another healthy drive, never back to the source card. -
How Often Should I Format A Trail Camera SD Card?
There is no universal calendar interval. Format after a verified backup when the manufacturer recommends it, before moving a card to a different compatible camera, or when clearing it for redeployment. Repeated formatting will not repair a card that keeps becoming unreadable.


