How to Remove Partitions from SD Card on Windows and Mac?
People partition their SD card to help reduce the burden of internal storage on the device. But, it sometimes becomes necessary that you delete the Partition from the SD card to free up space for other programs or prepare the computer to broaden another partition.
In some cases, deleting partition from the SD card may result in data loss. The only means to resolve the issue is by employing professional partition recovery software to enable you to recover your lost data conveniently, within a few minutes.
Part 1: About deleting SD card partition
You delete the Partition from the SD card to free up space for other programs or ready a computer to expand another partition.
Deleting the SD card partition involves merging the partition into the original drive to add space back to the drive, which was partitioned initially
By the way, to clear future confusion on the differences between deleting SD card partition, formatting SD card, and clearing SD card, read the brief explanation below.
Remove Partitions vs. Format SD Card vs. Clear SD card
I feel the difference between these terms is clear, but some don't seem to understand their meaning.
Partitioning an SD card involves the logical division of an SD card mass storage into distinct divisions. Thus, removing partition is the opposite of partitioning the SD card.
Nevertheless, Deleting a partition from an SD card, in simple words, involves merging a partitioned SD card.
Having understood that partitioning an SD card combines a subdivided SD card back to a whole, the process of formatting an SD card pertains to flashing all data on the SD card, leaving it empty.
However, clearing the SD card data involves selecting or removing files that are identified as unnecessary by the card user.
Learn Tips Before Deleting Partition
Deleting a partition from windows or Mac can be very tricky and may result in SD card data loss. Thus it's essential you backup your relevant data before deleting the partition from the SD card.
For you to efficiently execute the SD card partition delete operation, I've outlined some helpful methods you can utilize to make sure nothing goes wrong during the delete process.
Part 2: Methods of deleting Partition from SD card
Generally speaking, there are two solutions to delete SD card partition using Windows, which is either by disk management or DISKPART. Thus, utilize the solutions below to remove partitions from your SD card on Windows.
Method 1: Remove SD Card Partitions on Windows
Solution 1: Remove Partitions by Disk Management
If you try to delete the partition from your SD card with Windows, using disk management is one way to do so. However, Windows disk management is a utility that allows users to access and manage all disk drive installed in the computer and the partition attributed to the drive. Use the steps outlined below to delete the partition from an SD card.
Step 1: Navigate to the left bottom of your PC screen, click the start menu, and launch the settings page.
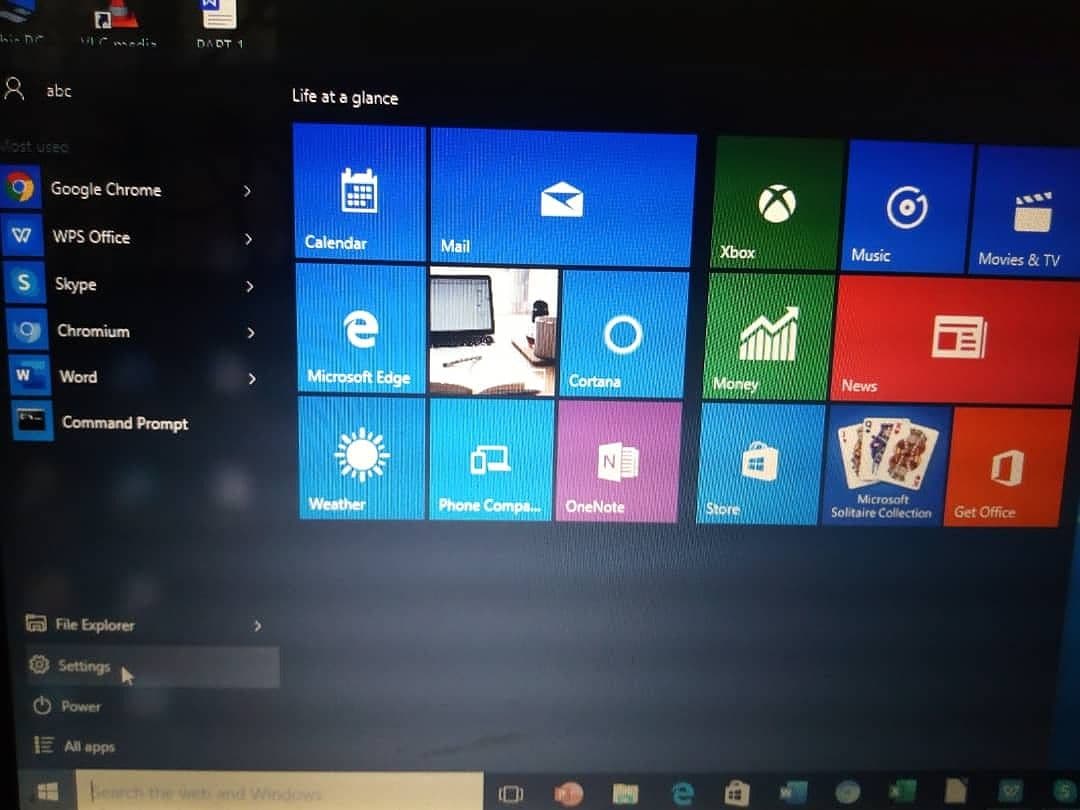
Step 2: At the top right-hand side of the setting page, type 'Disk Management' in the search box and click 'create and format hard disk partitions.p
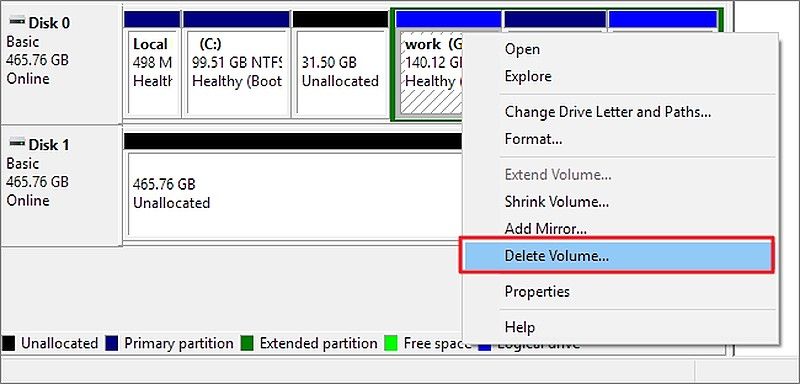
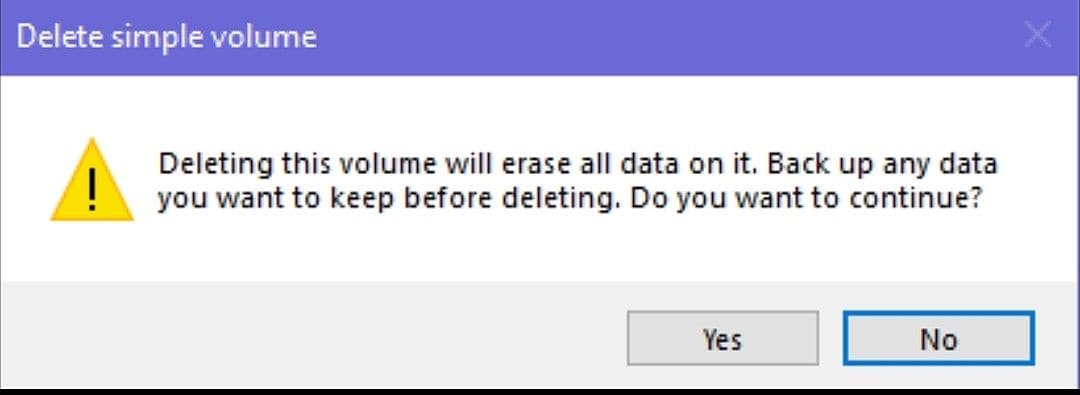
Step 3: A pop-up window will show up on the screen, then you right-click on the drive or partition and click on Delete Volume. After that, select 'Yes' to enable the system to complete the delete process.
Solution 2: Delete Partitions Using DISKPART
The DiskPart is a command-line utility used in the Windows operating system to manage disk partitions from both internal and external devices. Anyway, to remove partition with this program, you'll need to follow the steps mentioned below.
Step 1: Click on Windows+R to start up the Run box, and type cmd and click OK.
Step 2: A command prompt window will come up on your PC screen. Type 'diskpart' and click on enter.
Step 3: Type 'list volume' as the next window shows up on the PC screen. After that, type 'Select volume 3'.
Step 4: Type 'delete volume' to remove partitions from the SD card. Repeat the steps to remove other partitions from the SD card.
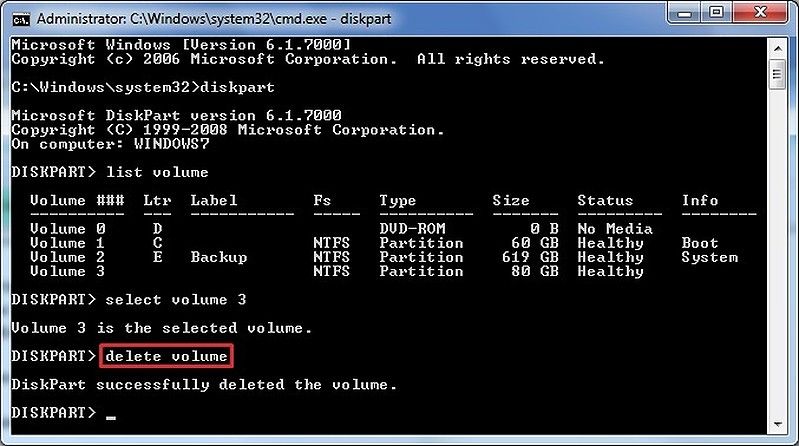
Note: Always click 'Enter' after typing each command. But, deleting partition from the SD card may result in data loss. Therefore, before removing partitions from your SD card, it's advisable to backup relevant data in advance.
More Related: 2 Methods to Delete Partitions in Linux
Method 2: Remove SD Card Partitions on Mac
The easiest way to remove SD card partitions on Mac is by using 'Disk Utility' installed on the Mac system. Therefore, launch the Disk Utility by simultaneously clicking "Cmd+space" and search for it in the Spotlight.
The steps below show more explanation on the SD card partition delete process using Mac.
Step 1: Launch disk utility via 'Spotlight.' On the sidebar, you'll see all available hard drives and their partitions, while the central panel displays the information about the drive you've chosen.
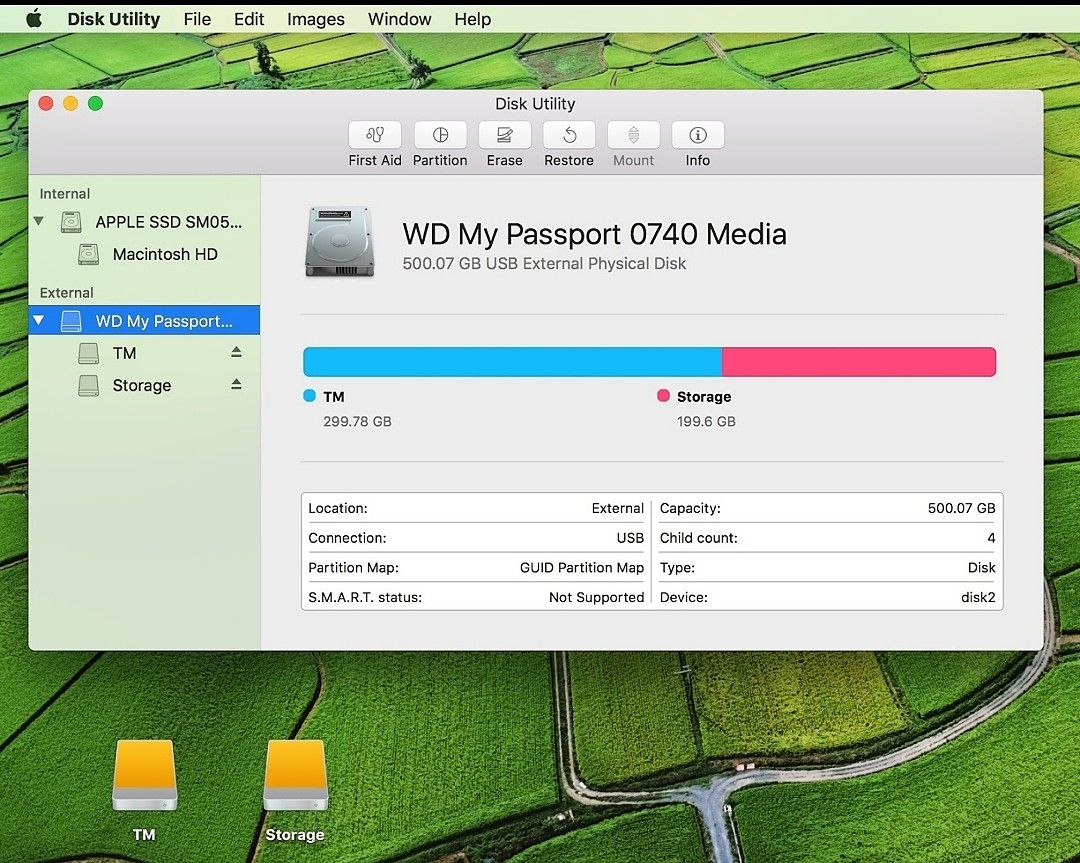
Step 2: Using the sidebar, locate your SD card containing the partition you want to remove. After that, your SD card info will be highlighted in the central panel.
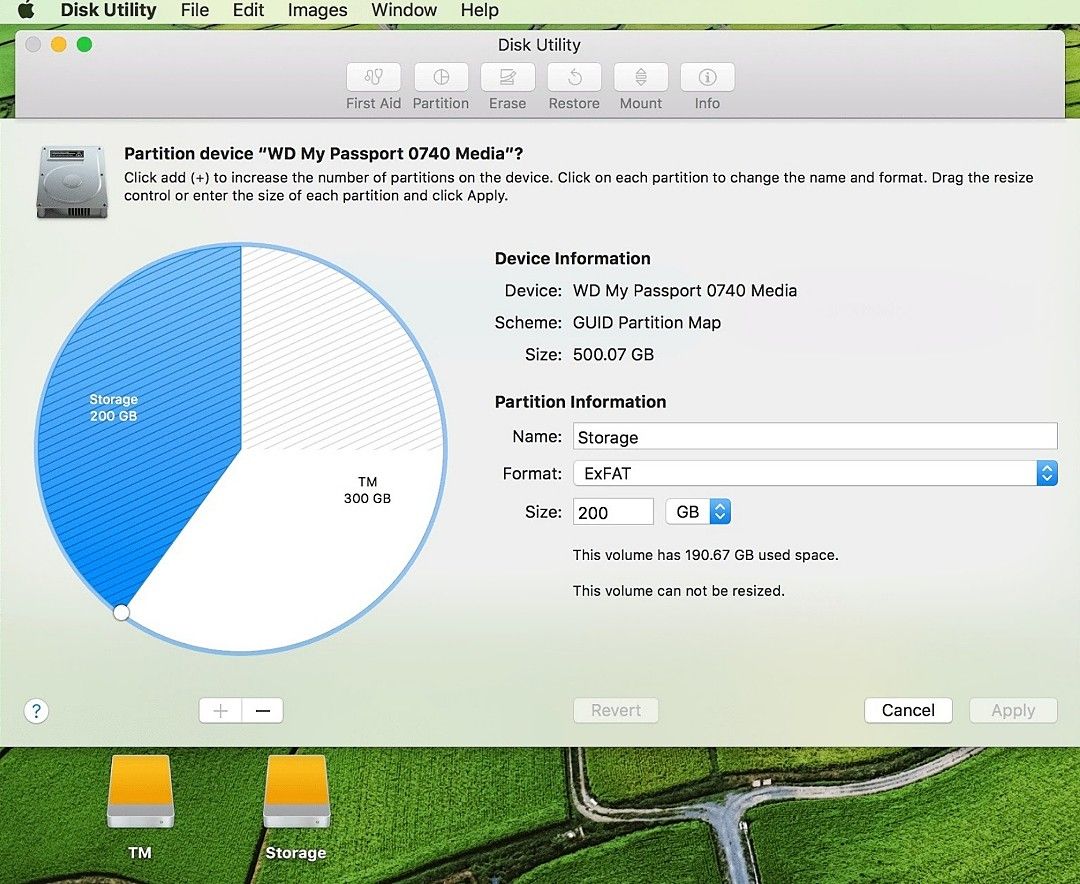
Step 3: Navigate to the top bar of the disk utility window and 'Partition,' another window will come up showing the partition map in the pie chart.
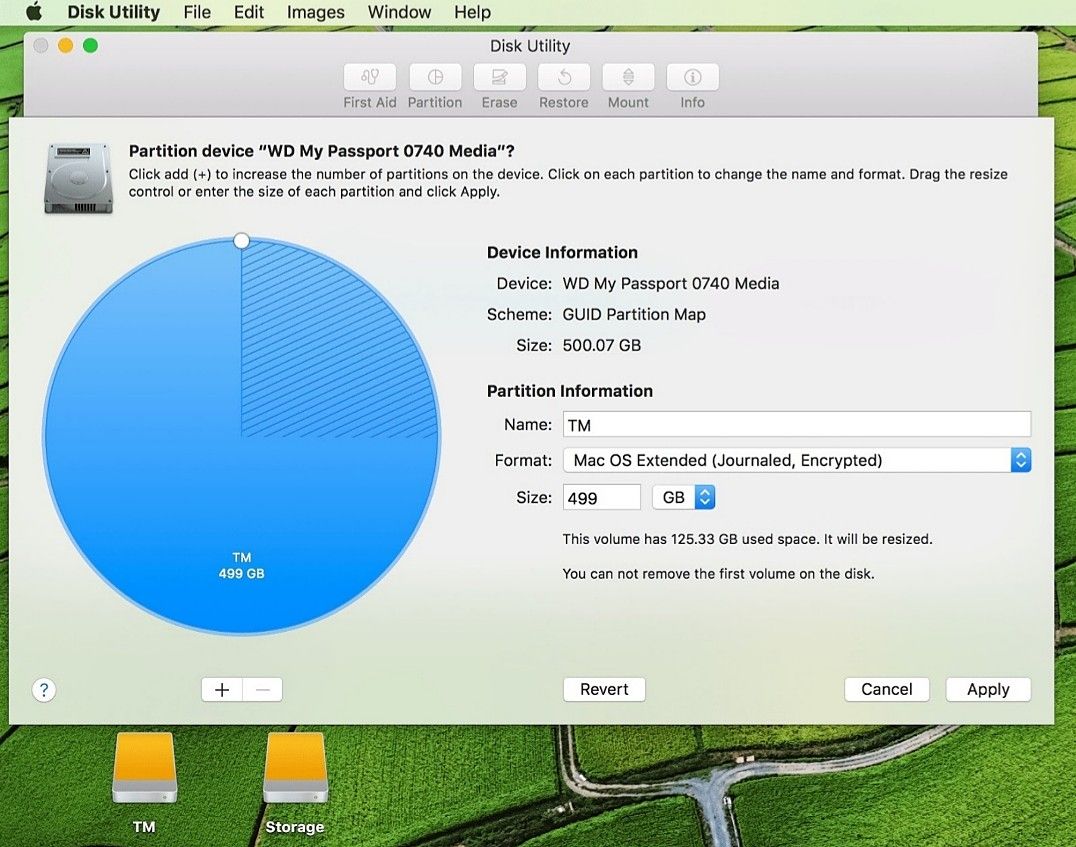
Step 4: Click on the pie chart displayed on the screen, and a window will pop-up, then click 'Partition.'
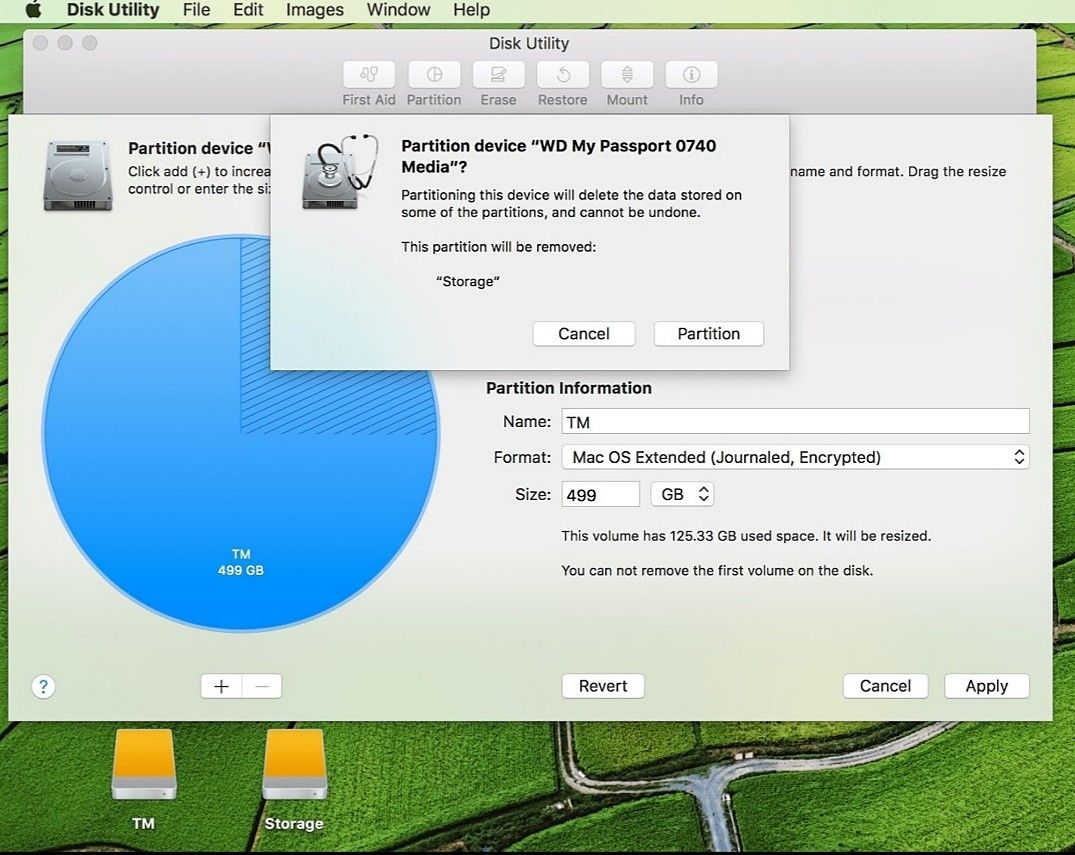
Step 5: After deleting partitions from SD card, click on 'Apply' to complete the whole process
Note: On completion of the operation, a confirmation window will appear on the screen, summarizing all you've done so far. It's advisable to read the confirmation dialogue carefully before proceeding and be sure all changes you made implied on the SD card.
Method 1: Remove Partitions From SD Card on Linux
To delete the Partition from SD card on Linux, you'd have to utilize the fdisk command prompt to execute the partition removal process. You may ask, what is ''FDISK''?
FDISK (fixed or format disk) is used basically for manipulating partitions on Unix and Linux systems.
Use the steps below to delete the Partition from SD card using your Linux system.
Step 1: Firstly, use the mount command to locate the mount point of the partition and type 'P' to show the current partitions on the system and SD card.
Step 2: In the next prompt that shows up, Type 'D.' Doing this will prompt you to enter the partition number
Step 3: Provide the disk number you're willing to delete, then the partition will be deleted. After removing the SD card partition, click on p to check your partition table.
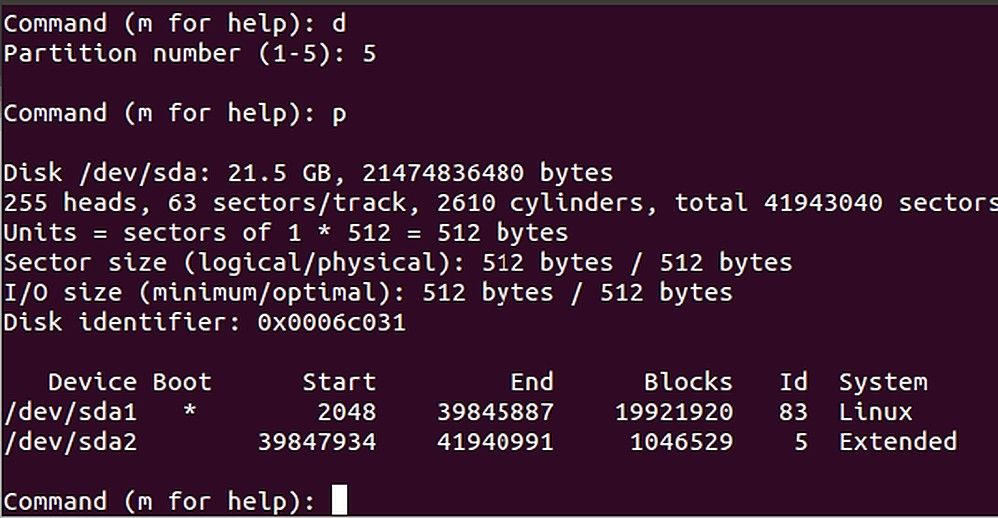
Note: procedure to delete an extended and primary partition is the same. However, after completing the partition delete process, the SD card may appear empty but, fdisk will finalize changes when you click 'W.'
Method 4: Get Tricks After Deleting a Partition on SD Card
Trick 1: Fix ''Can't Partition SD Card''
Nowadays, many people find it hard to partition their SD card, but have you ever asked yourself what may be the cause of this annoying issue or how can the problem be resolved within a few minutes? Let's take you through some causes of the problem and how you can easily rectify it within a short time.
Causes of SD Card Cannot partition
There are several causes of the SD card can't partition problem, check out some reasons below.
Write protection: This may occur whenever you insert the SD card with an adapter or card reader into your computer, you can see and read all files on the SD card but can't perform any operation on it.
Any video, audio, or photo files on a write-protected SD card would remain unavailable. Even when you try to format or partition SD card, you'll still get a windows prompt message saying, the disk is write-protected.
Locked error: Whenever there's an SD card locked error on your computer, camera, or Android device, you can't get access to add new files to the SD card, modify or delete data stored on the card. As a result, the SD card won't partition because it'll be blocked from receiving and editing files.
SD card corruption: If you're experiencing an SD card corruption problem, you'll not be able to partition your SD card. This is always a result of inappropriate SD card handling and many other devastating circumstances.
Solutions to SD Card Cannot Partition error
It's believed that all SD card users would surely encounter errors while using their cards. This is always as a result of mishandling the SD memory card. In order to fix this error effectively, I've summed up two easy solutions you can use to resolve and eradicate this SD card cannot format error from your PC.
Solution 1: Eject and re-insert the SD card
This solution force Windows to re-organize the disk arrangement. It's easy to execute but usually takes some time.
Step 1: If you encounter this kind of error, remove the SD card from your PC and exit the installation wizard to go back to the main page where you started the process.
Step 2: Now, on the main setup page, click on 'install now' without inserting your SD card.
Step 3: An error message will come up saying Windows is unable to locate the setup files. You'll be asked to load a CD/DVD driver for windows set up to continue, click on 'OK' to return to the main setup page.

Step 4: Re-insert your SD card to the PC and select 'Install Now' to partition the SD card.
Solution 2: Create Boot Partition Manually
While the first solution helps to organize Windows disk configurations, Creating a boot partition manually helps to delete all data on the SD card, leaving it empty. Thus If you still see the error message, you can utilize this solution.
Step 1: Click on Shift+F10 at the point where you see the error message, and It'll start up a command-line console. Then type disk part and click on enter.
Step 2: Type List Disk and click on enter to continue. After that, type Select disk 0 and click on enter, again.
Step 3: Type Clean and click on enter to clean the disk. Then, type creates partition primary size = 5000 and click on the enter button. (5000 indicates 5000MB).
Step 4: carry out a quick format for the partition and format it into NTFS by typing 'format fs= NTFS quick' and click enter, afterward, type assign and click on the enter button to assign a drive letter to the newly established partition.
Step 5: Activate the partition by typing active. Don't forget to click enter and on the next procedure type list volume and press the enter button. This will list the drive letter of that SD card, then type exit, and click enter.
Step 6: Copy the installation file to the partition you've just created. Type e and click enter, then type copy e: c:/e /h /k, press enter, and relax while the copy process will complete.

Step 7: Remove the SD card and restart your PC. You'll now be able to partition your SD card conveniently.
Trick 2: Recover SD Card Lost Data
In a case where you delete partition without the advance backup of SD card data, you may encounter data loss. This is because deleting partition from the SD card completely erases your SD card data. As a result, you'll need the intervention of professional and efficient data recovery software to retrieve your SD card data.
However, one leading data recovery software that'll enable you to execute this operation easily and conveniently is the Recoverit data recovery software.
With Recoverit lost partition recovery mode, you can recover SD card deleted partition within a few minutes.
Let's take a look at how to recover deleted partition data with the use of Recoverit.
Step 1: Select storage of your lost file

Download Recoverit data recovery software on your PC/Mac and insert your memory card using a card reader or adapter. Open Recoverit data recovery software tool, select the inserted SD card and click on Start to begin your recovery operation.
Step 2: Scan your inserted SD memory card

Recoverit data recovery will do a scan to search out your lost videos, audios, or photo files and preview them.
Step 3: Preview and recover your deleted SD card data

Finally, your lost photos, audio, or video files will be displayed on the computer screen after the quick scan process. At the bottom of your screen, click Recover to access your SD card lost data.
Conclusion
Digital storage media have been a blessing in the way individuals store their files. You may be familiar with the term ‘partition SD card', but it sometimes becomes a necessity to delete these partitions from the SD card.
The procedures outlined on this page are known to be the simplest and quickest means of deleting partition from an SD card. However, as a result of SD card data loss that may occur during the process of deleting the partition from an SD card, Recoverit is the perfect data recovery software you can reach out to reclaim your files.
SD Card Troubleshooting
- Recover Data from SD Card
- Card Repair Solutions


 ChatGPT
 Perplexity
 Google AI Mode
 Grok
Grok


Eleanor Reed
staff Editor