How to Fix Mapped Network Drive Not Showing Issue
Q: How to fix the mapped network drive not showing the issue?
"Hey, I can't see my drive under network locations in the file explorer. I tried to use the command prompt method, but it didn't help. How can I make my mapped network drive visible? What should I do if the network drive doesn't show all folders/files?"
You could be mapping network shares to drive letters if you have a network set up for your Windows computer. Mapped drives give easy access to network folders and files, the same thing traditional local disks do. This is convenient for most users, although in some cases, they face errors. For example, mapped drives in Windows should reconnect reliably and automatically upon login. This does not always happen.
Besides drives, Windows users also map their servers and folders. Even when it is done successfully, a mapped network drive not showing error can be encountered. Here we are going to take a look at these errors and how to fix them.
Part 1: Overview of the Error - Mapped Network Not Showing in Windows 10/8/7
Even when mapping a drive is successful, the mapped network drive can fail to show. This can be quite frustrating, especially when you need to share the files. Sharing the files will not be possible when you cannot see the mapped drive on File Explorer. It will not be possible even when the PCs are on the same network.
Mapping a network drive allows you to save your files and folders on another computer. Using the local area network, you can also virtually see your data from another computer to yours.
However, it is not always that the mapped drives will work. A mapped network drive not showing all folders is an error that can show up. Here are the symptoms of this error.
In the File Explorer, it could be that the drive is not visible under the Network Locations. Depending on how the mapping of the drive is done, you can either access it or not, via the Command Prompt.
In some scenarios, you can access the mapped drives in File Explorer. Despite this, you may not see the same mapped drives when you browse through any application.
When this problem occurs, there are various ways that it can be solved in Windows 7, 8, and 10. Although re-mapping the drive can help with the problem, it is not always that it will work. Here are ways that you can resolve the issue.
Part 2: How to Fix the Network Drive Not Showing Issue?
The level at which the mapped drive is accessed is the major reason this error is encountered. For example, you will have limited rights when you try to access it from the user account level. This is shown in File Explorer. However, it will not show in File Explorer if you access it from the administrator level. Below are simple steps you can follow to avoid this issue.
Method 1. Repair the Network Drive Not Showing in File Explorer
Microsoft helps users in notifying them whether to use system file authorization or hard drive for applications. This is to prevent system damage from malicious programs. To do so, it uses User Account Control or UAC in Windows Vista and later OS.
Due to UAC by Microsoft, if you are using standard user permissions to run the Shell, you will not see the mapped drives. This is when administrator rights were used during the configuration. You will get an error that the mapped network drive not showing in the application. With this issue, you can work around it using the below steps.
Step 1: Proceed to click "Start," and in the search box, type "Regedit." To open the "Registry Editor" press the "Enter" button.
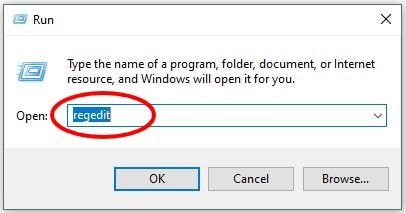
Step 2: Head over to the following address:
HKEY_LOCAL_MACHINE\SOFTWARE\Microsoft\Windows\CurrentVersion\Policies\System
Once you reach there, you need to create a new "DWORD Value" here. To do so, right-click and select key.
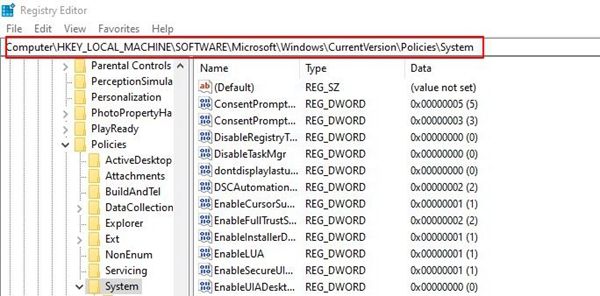
Step 3: You must give the new value the name "EnableLinkedConnections." You must also modify the value data to 1 at this point; and to do so, right-click on the value. This will in turn enable the user type "administrator in Admin Approval Mode" and other UAC policies.
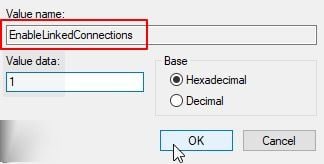
Step 4: To save the new value that you created, click "OK." Exit the "Registry Editor" and restart the computer.
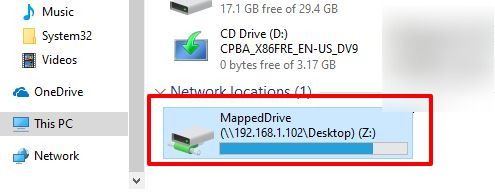
These steps will help in alleviating the mapped network drives not showing. If the steps are not effective, others will help. The two steps below will see your windows computer identify the network drive better.
1. Configure the Network Proxy Settings
Step 1: To open the "Settings" window, press "Windows + I" on your keyboard. Once you are on the settings window, select the "Network & Internet" option.
Step 2: In this step, select "Change adapter options" in status.
Step 3: Proceed to right-click on the Ethernet and then select "Properties."
Step 4: Now, here you need to choose the "Internet Protocol Version 4 (TCP/IPv4)" option, which you can find in the "Networking" tab. Go ahead and click on "Properties." Next, you will see a popup window. Here, you must make sure you are on both "Obtain an IP address automatically" and "Obtain DNS server address automatically."
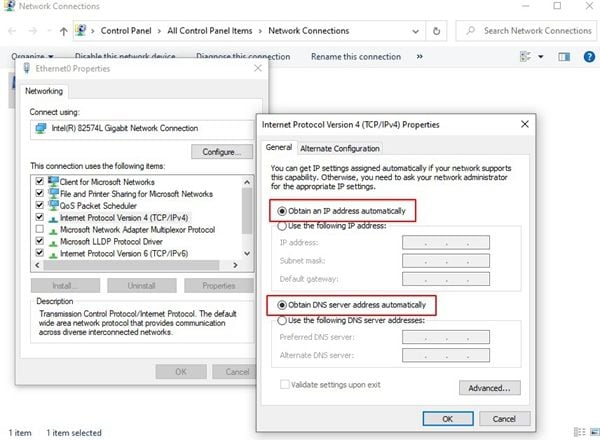
Step 5: In this step, make sure you go back to the "Status" tab. You can see "Change adapter options" here. You should choose "Sharing Options."
Step 6: A new window will come up. Here, you need to make sure that the "Network Discovery" section is on. Expand the "Private" section to confirm this. Once you confirmed it is turned on, proceed to select "Save Changes."
2. Turn on the SMB Features
Step 1: In the search box, start the process by typing "Programs and features." Make sure that you open it.
Step 2: You will see the "Turn Windows features on or off" on the left pane. Go ahead and select it. A mini window will show, and you can see all the Windows features are detailed there.
Step 3: Here you will see the features that started with SMB. Scroll down the window find it and check all the SMB folders and then click "OK" here.
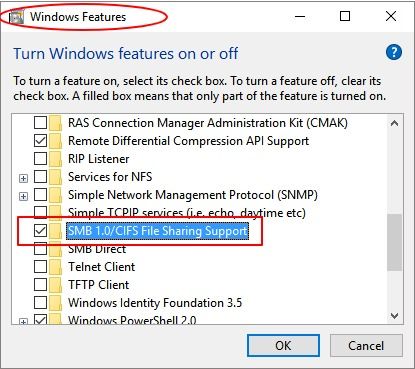
Step 4: To make sure that the changes did are affected, reboot your computer.
Method 2. Network Drive Not Showing All Folders/Files
If your files and folders are hidden on the NAS drives, your network drive may fail to show all of them. To clear the NAS drive not showing on network windows 10, including network drive and mapped network drive, there is a simple step. Firstly, you should open the "File Explorer" on your computer and then go to the "View" section. In front of the "Hidden Items," there is a box that you should check to complete the step. Once this is done, you will realize that all the hidden folders and files will show on the mapped network drive.

Part 3: How to Recover Hidden Files When Mapped Network Drive Not Showing?
Probably, the above methods have solved your mapped network drive not showing windows 10/8/7. But what if you somehow lose the data while executing any of the above operations? How else can you fix this frustrating problem? Do not worry as there is the best solution for this. This solution is known to be highly effective in fixing the data recovery issues and is known to be an effective software. Recoverit will help in data recovery even when it’s deleted.
Step 1: Get Recoverit!
If you do not have this software, you will first need to install and launch it. Once you have launched Recoverit Data Recovery software on your computer, follow the below steps.
Step 2: Choose the Drive
Proceed to choose the location of the drive. This is where the hidden files and folders are stored. Next, click "Start."

Step 3: The Scanning Process
In this step, the scanning of the disk starts. Recoverit Data Recover tool will search the hidden folders and files. In case you need to search for more files, you should take up the "All-around Recovery" option. Wait for it as it scans which can take a few minutes.

Step 4: Review and Recover Files
You can view some of the recovered photo files with this software. You will need to select the hidden folders and files. So, head over to the "Recover" option and click it to recover the data.

When you see the mapped drive not showing error, you should not worry as it can be fixed. It is not because your computer or system is malfunctioning. This is not a new error. By using these above methods and setting some changes, with only a few clicks, you can fix the issue.
Conclusion
If you are a user having issues accessing your mapped network drives, you need to find out how to fix it. With the above methods, you can fix the mapped network drive not showing Windows 10/8/7. The first two methods should work but if you somehow get into the trouble of losing data, then try the third one.
Using Recoverit is the best method that is known to be quite effective. It has a high success rate especially when recovering data that is also deleted. Due to its effectiveness, it should help in clearing the Windows 10 mapped drives not showing in a program error.
FAQs
Can't reconnect all network drivers?
If you are unable to reconnect the network drivers, you need to close down the running apps and programs. Secondly, you can download third-party apps for scanning the driver updates and download the driver updates for streamlining the connection.
How do I restore the network connection?
There are different ways of restoring the network connection. For instance, you need to clear off the physical obstructions and restart the internet router. In addition, if you are struggling with network connectivity, you have to update the Windows and optimize the DHCP settings.
Why would a network drive disappear?
If the network drive disappears, there are chances that the drive is not mapped and the computer won’t be able to process the scripts. It generally happens when the computer is configuring itself.
How do I restart a network drive?
For restarting the network, you need to run the administrator by pressing the Windows and R buttons. Then, type msc. and right-click the server option. Then, click on the restart button and the network drive will be restarted.
How do I fix a mapped network drive?
The mapped network drive can be fixed by developing and running two scripts through the StartUp folder. In case you’ve access to the active directory domain, we suggest that you reconfigure the Group Policy settings.
What's Wrong with Drive
- Recover Your Drive
- Fix Your Drive
- Format/Wipe Drive
- Know Your Drive


 ChatGPT
 Perplexity
 Google AI Mode
 Grok
Grok


Theo Lucia
chief Editor