
Jun 22, 2026 • Filed to: Answer Hard Drive Problems • Proven solutions
 TL;DR:
Resolve a Windows 10 "Repairing disk errors" startup loop by leaving the system running uninterrupted overnight to complete its automatic scan, or escalate to Advanced Startup troubleshooting options if the boot sequence remains permanently frozen.
● The built-in disk repair typically takes 40 to 80 minutes, but can safely extend to over four hours or require an overnight wait if the hard drive suffers from physical wear, bad sectors, or severe data corruption.
● Access troubleshooting options without external media by holding the Shift key while clicking the Power button to restart, then navigating to Troubleshoot > Advanced options > Startup Settings to Enable Safe Mode with Networking.
● If the system completely fails to load the sign-in screen, boot from a Windows installation USB or DVD using the F12 key, select "Repair your computer," and run a System Restore to revert system settings without losing personal files.
Ask AI for a summary
 ChatGPT
 Perplexity
 Gemini
 Claude
 Grok
Grok
Q: How to fix Windows 10 stuck on repairing disk errors?
"Hey, friends. I am facing an issue right during the Windows startup. When I start my PC, the logo of Windows 10 shows up and disappears. After some time, it pops up again with an error that says, 'preparing automatic repair.' After that, a new message 'Repairing disk errors. This may take over an hour to complete' keeps showing on my screen. How can I resolve this disk error?"
If your computer is stuck on a startup repair loop, ignoring it can lead to severe operating system crashes or total data loss. Windows 10 automatically attempts to resolve these errors when booting. However, if the underlying block corruption is severe, the boot manager will freeze, trapping your PC in an infinite repair loop.
Part 1. What Triggers the "Repairing Disk Errors" Loop?
Regardless of your computer brand—though it frequently occurs on HP, Dell, and Lenovo builds—a stuck disk repair loop means your system cannot read the boot volume allocation data. The primary causes include:
- Abrupt System Shutdowns: Immediate power failure or forced hard shutoffs while the drive is writing metadata.
- Bad Sectors and Flash Degradation: Physical wear on traditional hard drive platters or exhausted write cells on solid-state drives (SSDs).
- Malware Infiltration: Viruses modifying the system registry, active boot paths, or system file directories.
- Corrupted Windows Updates: Incomplete or broken system file upgrades altering the core operating system framework.

Part 2: How to Safely Fix Windows 10 Stuck on Repairing Disk Errors
Method 1. Boot into Safe Mode with Networking to Clear Errors
Safe Mode loads Windows with a minimal set of drivers. This isolates the storage drive from background application conflicts, allowing the operating system to safely clear stuck disk access logs.
- Trigger the Advanced Windows Startup Screen (Access system recovery options)
Turn on your PC. As soon as the Windows logo appears, press and hold the power button to force a shutdown. Repeat this process 3 times until Windows enters the Automatic Repair environment console. Alternatively, hold down theShiftkey while clicking Restart on the login screen.
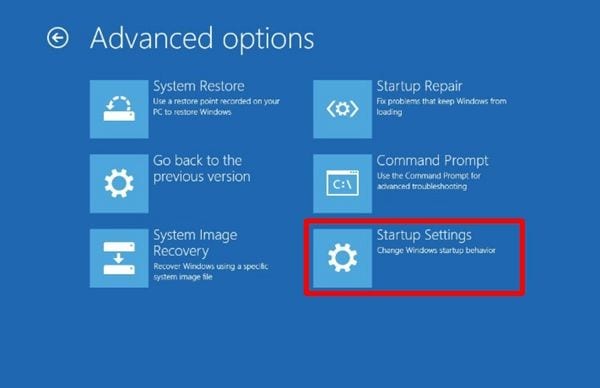
- Navigate the System Recovery Menu Path (Locate startup settings configurations)
On the Choose an option screen, select Troubleshoot. Next, click on Advanced options and choose Startup Settings. - Execute System Restart for Safe Mode Entry (Launch core system diagnostic trees)
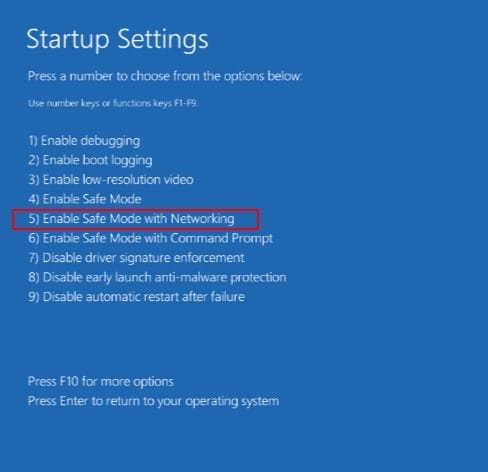
Click the Restart button. Your computer will reboot and display a list of startup options. Press 5 or F5 to select Enable Safe Mode with Networking.
Method 2. Run Windows Startup Repair via Installation Media
If your computer fails to boot into Safe Mode, you can use an external Windows Installation Media USB to repair the corrupted core boot files.
- Boot from Your Windows Installation USB Media (Override primary storage access)
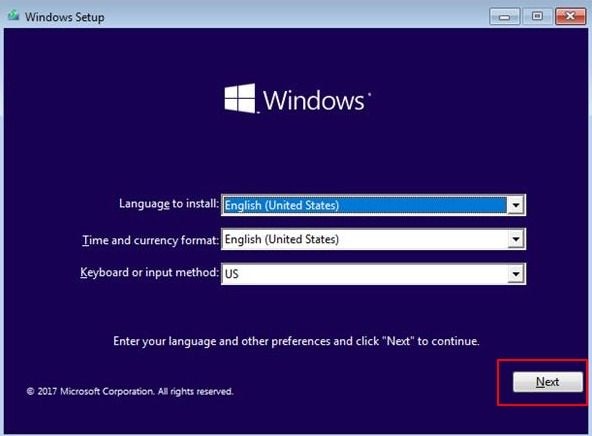
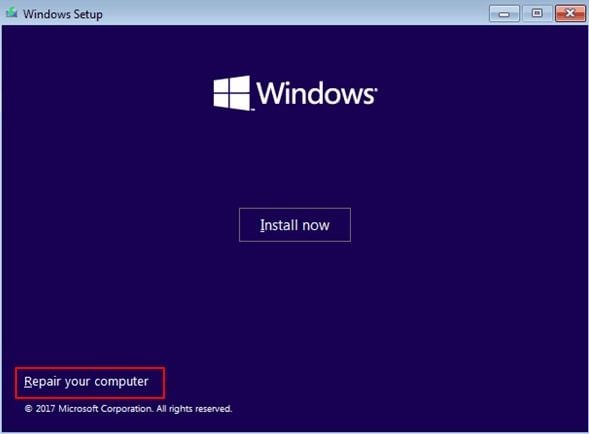
Insert a bootable Windows installation USB drive into your computer and restart. Press your system's boot menu key repeatedly (typically F12, F11, or Esc) and choose the USB drive as your primary boot device. - Access the Local System Repair Console (Bypass standard installation setups)
Configure your language, time, and keyboard options on the initial screen, then click Next. On the bottom left corner of the window, click Repair your computer.
- Launch the Automated Startup Repair Engine (Execute boot file diagnostic blocks)
Navigate through Troubleshoot > Advanced options and select Startup Repair. Choose your target operating system to let Windows scan and repair your broken startup environment files automatically.
Method 3. Execute Storage Repair via Administrative PowerShell Tools
If you can access Safe Mode, you can use advanced PowerShell commands to check your storage volume health and fix bad sectors without running full command line disk scans.
- Launch PowerShell as an Administrator (Open the advanced system console)
Right-click the Windows Start Menu button and select Windows PowerShell (Admin) from the quick-access menu options list. - Execute Volume Volume Scan and Fix Sequences (Repair the target system drive letter)
Type the following commands one by one, replacingCwith your primary Windows installation or target drive letter, and press Enter after each command line:
Once the diagnostic process completes, restart your computer normally to check if the error is resolved.repair-volume C -scan repair-volume C -offlinescanandfix repair-volume C -spotfix
Method 4. Restore Your System Configuration to a Working State
Performing a System Restore reverts your Windows system files and configurations back to a previous point in time when the computer booted normally, without affecting your personal documents.
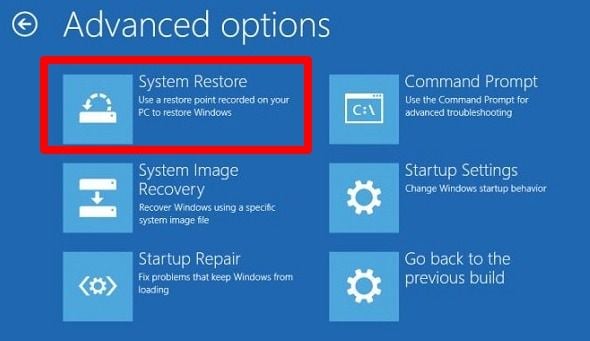
- Open the System Restore Utility Console (Navigate the advanced options interface)
Boot your PC using the Windows Installation Media USB or access the Advanced Startup environment. Go to Troubleshoot > Advanced options and select System Restore. - Select an Available Restore Point (Choose a stable historical configuration)
Click Next in the restoration wizard window. Select a restore point created before your computer started showing the disk repair errors, then click Next again. - Confirm and Finalize the Restore Process (Revert operating system settings)
Verify your restore details and click Finish. Windows will restore its core files and reboot automatically once the process is complete.
Method 5. Diagnose Drive Degradation and Replace Your Drive
If your computer gets stuck on disk repairs every time you boot, your storage device may be physically failing. Connect your drive to another computer to back up your files, or consider replacing it with a new drive.

💾 HDD vs. SSD Structural Upgrade Guide
Use this technical comparison table to choose the right replacement storage option for your needs:
| Evaluation Attribute | Mechanical Hard Drives (HDD) | Solid-State Drives (SSD) |
| Operational Architecture | Moving mechanical read/write arms writing to magnetic disks. | Solid-state flash memory cells with integrated silicon controllers. |
| Physical Durability | Vulnerable to drops, shocks, and mechanical motor wear. | Highly resilient; has no moving parts to break or wear down. |
| Data Throughput Speeds | Limited to standard read/write speeds under 150 MB/s. | Fast speeds up to 3500+ MB/s for NVMe M.2 formats. |
| Component Lifespan | Determined by mechanical motor wear and physical usage. | Determined by total Terabytes Written (TBW) to cell blocks. |
| Optimal Use Cases | Cost-effective option for large-scale long-term file storage. | Best for primary operating system boot drives and heavy applications. |
Part 3. How to Recover Data from an Unstable, Failing Hard Drive
When a drive is struggling with physical block wear or bad sectors, attempting continuous system repairs can stress the hardware and lead to permanent data loss. The safest approach is to copy your files off the drive immediately.
Wondershare Recoverit uses advanced raw sector scanning to bypass corrupted partition structures, allowing you to salvage your files from unstable or unbootable storage devices safely.
 Security Verified. 3,591,664 people have downloaded it.
Step 1. Select Your Unstable Storage Drive
Open Wondershare Recoverit. Go to the Hard Drives and Locations section on the left panel, and select your primary system boot drive or connected external drive from the menu list.

Step 2. Run the Comprehensive Data Sector Scan
Click Start to launch a deep sector scan. The software will locate lost, hidden, or corrupted files on your drive. You can track file paths and preview items while the scanner runs.

Step 3. Preview and Extract Your Recovered Files
Browse through the found files. Double-click any file to open the preview window and check its quality. Select the checkboxes next to the files you want to save, click Recover, and choose a secure folder on a separate, working drive to export your data.

Video Tutorial on How to Recover Data from Damaged Hard Drive?
Conclusion
Well, resolving the "Repairing disk errors" issue is not a hard task. You can execute some of these methods without even signing in whereas some methods will need a logged-in user. However, you should first try a simple scanning and repairing process by using the chkdsk command. In most cases, this command will solve the disk error. But if this command doesn't work out, then you already know three different methods to fix it.
Many Windows 10 users often come across this error. After getting this error, a lot of users prefer to wait. But sometimes the error persists and gets stuck at the main booting screen. So, if this error doesn't disappear even after trying all three methods mentioned above, then chances are something is wrong with the hard drive. You can try replacing the hard drive and see if it resolves the issue.
People Also Ask
-
How long does it take to repair disk errors?
If you are repairing the disk errors with chkdsk, it will take a minimum of four hours to fix the disk errors. However, it can take a longer time as well. -
Does repairing disk errors ever work?
Yes, repairing the disk errors works because it helps store the data properly and the drive will work normally after repair. -
What is the cause of repairing disk errors?
These errors generally occur when the boot disk is not capacitated to boot the computer. It can be caused by bad sectors as well. -
How do I fix Windows 10 that failed to boot without a disk?
You just need to launch the advanced startup options menu (press F11 for it). Then, open the advanced options from troubleshoot option and click on the startup repair option. Now, you just need to wait for a few minutes for fixing the bootup issue. -
How do I restore my computer if it won’t boot?
Switch on your computer and keep pressing the F8 key until the advanced boot option appears. Then, choose with safe mode from command promote and hit the enter button. Now, type in rstrui.exe and press the enter button. It will result in the wizard instructions, so just follow them and the computer will be restored.
What's Wrong with Drive
- Recover Your Drive
- Restore formatted drive
- Recover undetected drive
- Retrieve WD drive data
- Get files from external drive
- Wiped data can be recovered
- Recover data from dropped hard drive
- Fix Your Drive
- What if drive not showing up?
- Hard drive won't boot? Fix it
- What if a disk unallocated?
- Deal with hard drive crash
- Repair disk & recover data
- Fix Toshiba external drive not working
- Fix a broken hard drive
- Format/Wipe Drive
- Know Your Drive


Theo Lucia
chief Editor