How to Repair Linux Disk Using FSCK and Recover Linux File?
Last night, I ran into disk problems in my Linux system. I have tried my hand at repairing it using tutorials from the internet, but nothing seems to be working for me. Then I stumbled upon a resource, which introduced me to fsck command. Everything changed from there.
Part 1. Overview of Linux Check Disk
The Linux check disk option checks bad sectors and errors on the drive.
1. What Linux Check Disk Means?
In Linux, the check disk command is represented by fsck, which is an abbreviation for file system consistency check. Simply put, it is a utility that helps a user scan the file database for any existing errors and repairs them if need be. Using a set of built-in tools, it checks the disk and then auto-generates a report of its evaluation. In certain systems, fsck often runs by default, usually, after the system shuts down improperly or after a series of reboots.
The Linux check disk (fsck) is a standard operation in Unix-based operating systems, the likes of which includes Linux and Apple operating systems. For the most part, fsck is activated by the system administrator manually or is automatically used at boot time. It works on the data structures directly, which are stored on the disk. The particular behavior of fsck can differ, but it generally follows a specific protocol for internal operations and give the users a common command-line interface.
2. Causes of Linux Drive Corruption
The Linux drive often gets corrupted to these common causes:
1. Accidental data deletion or some human error: Due to accidental deletion of key data, the Linux drive is often corrupted. This is often due to a lack of understanding or toying with files that you may be unaware of in the system.
2. Infection due to viruses: Malicious software or virus infection could be another cause for the corruption of the drive. It is often due to accessing of compromised websites from where these elements enter the system. It could also be due to access to unknown internet connections.
3. Bad sectors present on the hard drive: Bad blocks on the hard drive could cause drive corruption. It often occurs when the situation has gone from bad to worse.
To your benefit, Live CD of any given Linux Distros can easily detect the drive corruption and allow the users to recover their much-needed data in its original form.
Part 2. How to Check Linux Disk?
Fsck function is not just used for checking the hard drive in Linux systems. It can also perform a range of functions that will be examined below. Follow these simple, quick commands and you can execute a range of functions with it.
Smartctl
The modern Linux hard drives come with the S.M.A.R.T function. It is a useful tool, which allows the OS (Linux and Windows) to check up on their health and overall functionality. A fast way to check if your hard drive is equipped with the SMART feature is to extract it from your personal computer and check the information given on the label. You may also check the box it came packaged in.
Install smartmontools
In the case of Linux, there are multiple ways to affirm the S.M.A.R.T status of your hard drive. But the quickest of the lot is probably smartctl. Before looking at how to use this tool, let us first examine how the health of the hard drive is checked with smartctl.
For installing the Smartmontools, you need to open the terminal and follow the given instructions that show on your particular Linux distribution (there are so many).
For Ubuntu:
''Sudo apt install smartmontools’’
For Debian
''Sudo apt-get install smartmontools’’
For Arch Linux
''sudo pacman -S smartmontools’’
Fedora
''sudo dnf install smartmontools’’
OpenSUSE
''sudo zypper install smartmontools’’
As we can see, all of the different Linux distribution systems will display different commands. This is why they are mentioned for your familiarity.
1 Checking the Linux Disk Speed
The 'dd'command in Linux is used to check the reading and writing performance of the disk on the Linux platform. Let us see how the 'dd'command is used to check the I/O performance.
Step 1: First, open the shell prompt. You can also login to a remote server if need be.
Step 2: In order to measure the server throughput (writing speed) dd if=/dev/zero of=/tmp/test1.img bs=1G count=1 oflag=dsync
Step 3: The dd command is also used to check the server latency dd if=/dev/zero of=/tmp/test2.img bs=512 count=1000 oflag=dsync
This command finds out simple I/O performance.
2 Checking the Linux Disk for Errors
The 'fsck'is quite handy in the Linux system as it is used for checking errors in the filesystem. It performs a similar function as 'chkdsk'in the Windows operating system.
For checking the Linux filesystem for errors, the fsck command comes in handy more than often. To check the error and repair it at the same time, use 'a'option. Other than that, the 'y'option can be used in place of 'a’.
$ fsck -a /dev/sdb1
For performing the error check on just one partition, you can run the command from your terminal:
$ umount /dev/sdb1
$ fsck /dev/sdb1
Part 3. How to Repair Linux Disk?
In the Linux operating system, a powerful command exists, known as 'fsck’. It is used to repair the file system. Fsck is an abbreviation for the 'File System Consistency check’. It is very easy to use. All you have to do is open a terminal and write:
Fsck/dev/sdal
This command will check the sda1 partition only. However, this fsck command is unusable on a mounted partition. If you do such a thing, there is a high probability that it can damage the system. To check the home folder that is present on a different partition (for instance, sda2), you should use the following command:
Umount/home
Fsck/dev/sda2
Note: For running the 'fsck'command, you will need to root/superuser permission.
The 'fsck'command can also be used to check your external drive, for instance, the SD card or the thumb drive.
For instance:
umount/dev/sdb1 #thumb drive
sudo fsck/dev/sdb1
When you are unsure about which partition number you need to scan, use this command:
sudo fdisk -1
It will list out all the available partitions.
1 Using 'fsck'to Auto Repair Filesystem
If errors are detected during the filesystem check, use the 'fsck'command to automatically repair the filesystem with –a flag. For instance, let us look at this instance below:
fsck –a/dev/sdal
You can use the –y flag to perform a similar function as well:
Fsck –y/dev/sdal1
2 Repairing Linux Filesystem Errors
At times, you may find more than one error in the filesystem. In cases as such, you can use 'fsck'to rectify these errors automatically. Type this:
#fsck –y/dev/sdb
This –y flag will automatically 'yes'to any given prompts by fsck to correct the error.
Furthermore, you can also use it on all filesystems without root:
$ fsck –AR –y
3 Running fsck on the Linux Root Partition
At other times, you may need to run the fsck on the root partition of your Linux system. Given that fsck cannot be run when the partition is mounted, you can try this option:
- Use fsck in rescue mode
- Invoke fsck when the system reboots
Let’s look at both situations:
4 Invoke fsck When the System Reboots
This is an easy process to complete and all you need to do is create a file named 'forcefsck'within the root partition of the system. Use this command:
#touch /forcefsck
By doing so, you can schedule a reboot of the system. On the next restart, fsck command will perform its function. You need to be extra careful using this command. If there are many inodes, this command will take its time.
After the system has restarted, check if the file exists:
# 1s /forcefsck
If the file exists, then you may need to remove this because the fsck command will be executed each time.
5 Fsck in Rescue Mode
There are a few more steps involved in the case of using fsck in rescue mode. Prepare your system for a reboot and halt critical functions like MySQL/MariaDB and type:
#reboot
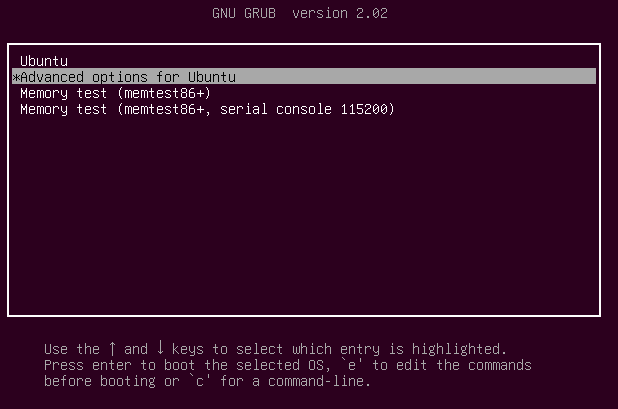
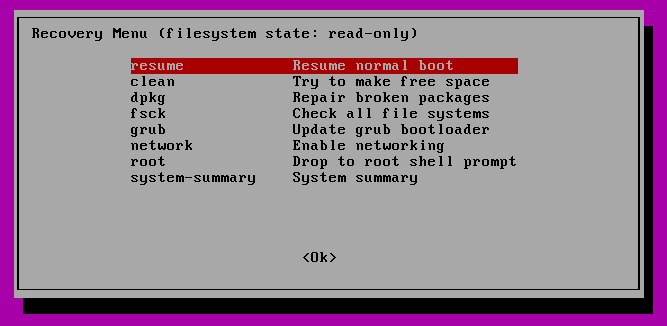
When the boot is about to appear, press the shift key so that the grub menu pops open on the screen. Go to the Advanced Options:
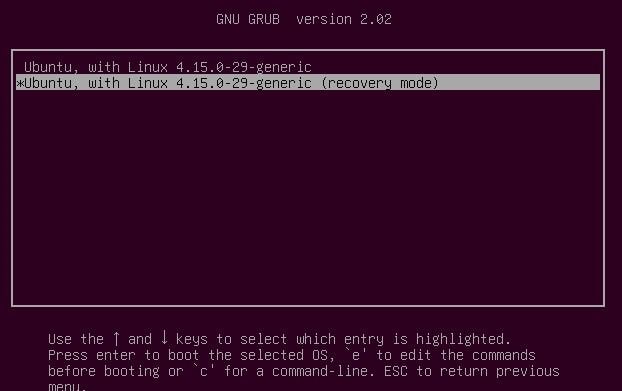
Now go to Recovery Mode
Now select fsck
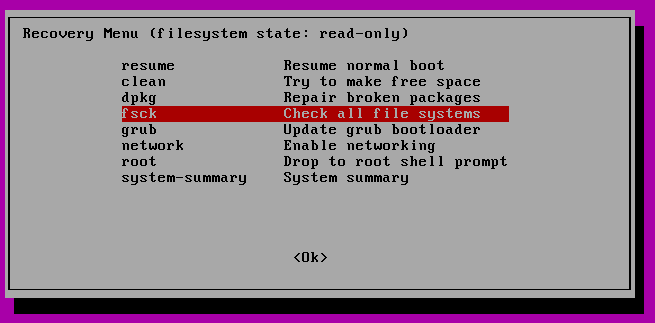
Now you will be given an option if you wish to remount the filesystem. Select yes.

This pops up:
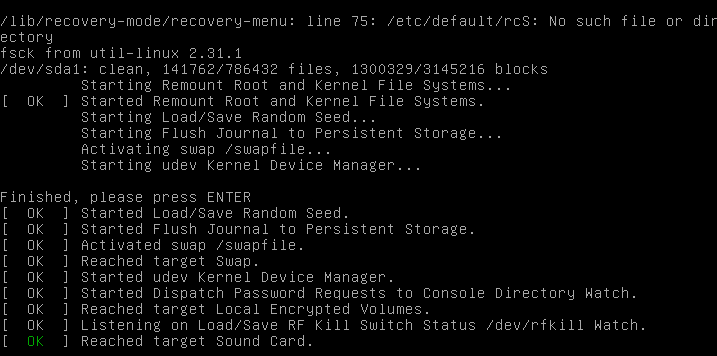
After this, select normal boot and select 'resume’.
Part 4. How to Find Deleted Files from Linux Hard Drive?
For most of us, losing data is a source of great worry. Thankfully, Wondershare Recoverit Data Recovery can help you recover more than 1000+ kinds of formats and file types. With Recoverit Data Recovery, you can retrieve lost or deleted in a matter of 3 steps. Let us see how we go about this process:
Step 1: Select Your Location
For recovering the data from your computer, choose a location from where the data was lost. Now, select the desired hard disk shown in the hard disk drives tab. You can also select a location tab for that matter. When you click start, the system will begin scanning the system.

Step 2: Scan Location
The Recoverit software will commence an overall scan of the system. It usually takes a few minutes to be done with it. At other times, it may take a few hours depending on the size of files stored on your system.

While the scanning process is continuing, you may pinpoint the files and halt the scanning system.
Step 3: Preview & Recover the Files
The software allows the users to first preview their recoverable files before clicking on the recovery step. Select the desired file and click the 'recover'tab to retrieve your files now.

Closing Words
In this guide, we examined how to check disk in Linux for any existing drive corruption, monitoring its speed along with its repair function. The viability of the fsck command cannot be negated. We also examined the usage of fsck and how it operates within the Linux system. When Linux commands are of no avail, use Recoverit to help you get data back. Rest assured, with it, your data is always within your reach.
FAQs
How do I run fsck on root filesystem in Linux?
Since fsck cannot check the root file system on a computer while the operating system is running, you can run fsck in boot or boot the system in recovery mode. Either of these two practical and fast options will help you get fsck to run on the root filesystem on Linux.
Will fsck delete files?
Generally not, since although fsck can delete files, they are those that have been erased, but still exist in the filesystem. There are cases in which it is mentioned that fsck deletes files, but this is due more to errors in the filesystem or corrupt files that hinder the operation of this program.
How do I fix a corrupted superblock in Linux?
You can restore that superblock. First of all, become superuser. Then you have to change to a directory outside of the corrupted file system, now unmount the file system. Once you did that you must display the superblock values through “newfs -N” command and finally you have to set a new superblock through “fsck” command.
Can you run fsck on a mounted filesystem?
Yes, you can, but this can lead to several serious problems on your disk because fsck is not usually part of the filesystem. There are some very particular exceptions, but it is a process that almost entirely should not be executed on a mounted filesystem so it is recommended to discard this idea, unless you are a professional.
How do you check if a filesystem is mounted in Linux?
There are several ways to do it. One of the most common is by using the command "findmnt." All you have to do is open the terminal command and type "findmnt," all mounted filesystems will automatically be displayed along with extra information such as their targets, sources, types and options.
What's Wrong with Drive
- Recover Your Drive
- Fix Your Drive
- Format/Wipe Drive
- Know Your Drive


 ChatGPT
 Perplexity
 Google AI Mode
 Grok
Grok


Theo Lucia
chief Editor