Feb 05, 2026 • Filed to: Solve Mac Problems • Proven solutions
Have you ever found yourself in a situation where you need to boot your Mac from a USB drive? Whether you're upgrading your operating system, troubleshooting an issue, or simply exploring new possibilities, knowing how to boot your Mac from a USB drive can be incredibly useful. In this guide, we will walk you through the step-by-step process of making your Mac boot from a USB drive. So grab your USB drive and let's get started!
Part 1. Reasons for Mac Boot from USB
Booting the Mac from USB in a way gives the power back to the user. The likeliest of the reason for choosing the boot from the USB method is that your Mac won't start which denies the user access to the computer. Using an external source like a USB drive helps the user get around the problem. It provides the user access to the contents of the internal drive, assuming the data is safe and not corrupted. It also helps to repair the Mac disk with Disk Utility and other tools. Here are the top reasons why the user should choose to Boot Mac from USB:
- 😍Allows the user to install a different version of macOS.
- 😎Allows the user to test a new version before you decide to upgrade.
- ✅Allows risk-free testing of the Beta version.
- ⏰Faster and more efficient.
- 👍Install older versions through USB, which permits certain Apps to run that are not compatible with the latest macOS.
Part 2. How to Boot Mac from USB?
Step 1. Preparations for Booting Mac from USB
To ensure a risk-free procedure, certain measures should be taken:
- A name-brand flash drive.
- The USB should contain 16-32GB of free space.
- Scan the flash drive with some reputable Anti-Virus software.
- Check to see what size of ports you have on the Mac. A 12' Mac only contains a single C-Type port.

- Make sure to purchase the C port flash drive to avoid any inconvenience.

- It is advised that the user should go with a USB 3.0 supported drive, with a size of 16GB, to ensure a swift transfer of data.
- The USB drive should be formatted with a supported GUID partition.
- It should contain an OS X installer or a usable operating system to work with.
Step 2. Create Bootable USB on Mac
There are a few general guidelines that can help get your machine started which are mentioned above, regardless of the OS the user prefers. Here are the methods to create a bootable USB drive on a Mac.
Creating a Bootable USB Using Terminal
The terminal is the default gateway to the command line on a Mac. It is just like the Command Prompt feature works for MS Windows. The Terminal feature ensures a hassle-free experience for the Mac user without the conventional pointing and clicking, the user just has to type the commands, and the computer does the rest. The user can find Terminal in the Applications > Utility folder or it can be checked in the finder utility.
Using the Terminal feature is the most simple way to create a bootable USB drive. The user just needs to follow one easy step which is renaming the MyVolume portion of the command with the name of the drive. The name of the drive can be changed using the Disk Utility of Mac. Here are the steps required after opening the Terminal feature to create a bootable USB drive.
- Copy and paste the command that is suited for the version of the operating system into the Terminal window.
- The command for MacOS Mojave is as follows:
sudo/Applications/Install\macOS\Mojave.app/Contents/Resources/createinstallmedia --volume/Volumes/MyVolume - Press the Return key.
- Enter the password.
- Confirm to erase the USB drive by typing Y followed by the Return key.
- The terminal will erase all the data inside the drive and create the bootable USB drive.

If there is a need to install a different version of the operating system then the user just has to replace the above-underlined command with their desired version of OS. For example, if the user wants to install Mac OS Sierra instead of Mojave then they would have to replace "Mojave. app" with "Sierra. app" inside the command line.

Step 3. Boot Mac from USB Media
After creating a bootable USB drive, the user simply needs to plug the created drive into the open port on the Mac. Here are the steps to boot Mac from the USB flash drive:
- Power on the system.
- Press and hold the Option (Alt) key on the keyboard when the computer starts.
- Select the USB drive as a startup disk when the option appears.

- The system will start the boot process off the USB drive.
- Install the operating system from the macOS utilities.
- Data can be restored by using the Time-Machine backup option.
Bonus Tip: How to Recover Data from Unbootable Mac
The Mac becomes unbootable when the BIOS which is a firmware that is used to perform hardware initialization during the booting process fails to recognize the startup process. It usually happens when there is a failed system update, a system crash, damaged MBR, or when the drive becomes corrupt. However, sometimes the Mac won't boot from a USB. In such situations, Recoverit Mac Data Recovery is the most efficient option to recover all the lost data when the Mac becomes unbootable.
Developed by Wondershare, Recoverit is one of the most preferred recovery tools in the world. The tool provides an instant preview of what is recovered after a detailed scan. It allows us to connect almost every type of portable device and recover data from them. Data can be restored by performing the recovery and repair process.
The process involves the installation of the Recoverit software by clicking on the button below. (If you are using a mobile device, you can press the button and leave your email, then you will be emailed the download link and open it on your computer to complete the installation.)
Video Tutorial on How to Recover Data from Crashed Mac?
Step 1. Create a Bootable Media
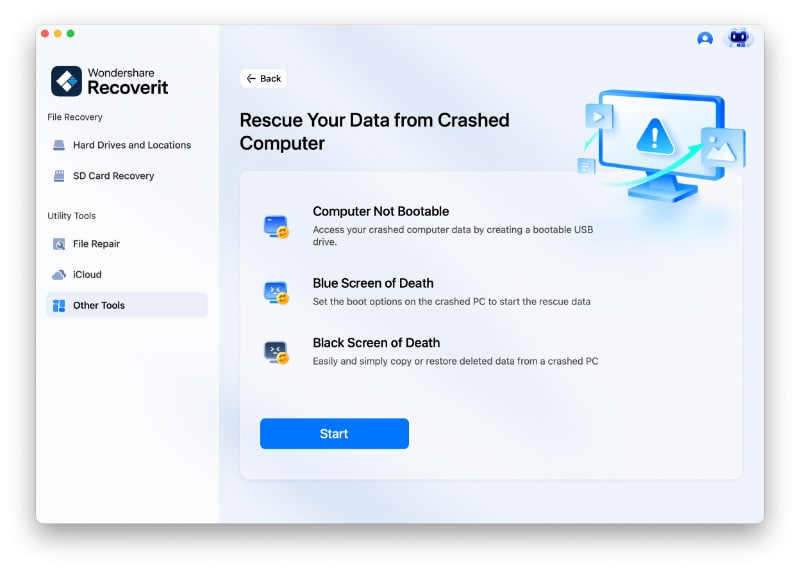
To recover data from an unbootable Mac, you need to create a bootable media first. After launching Recoverit, follow the steps below:
- Select an option: For your crashed Mac, please choose the "Computer Crash Recovery" option.
- Initiate Recovery Process: Click on "Start" for the recovery process to launch.

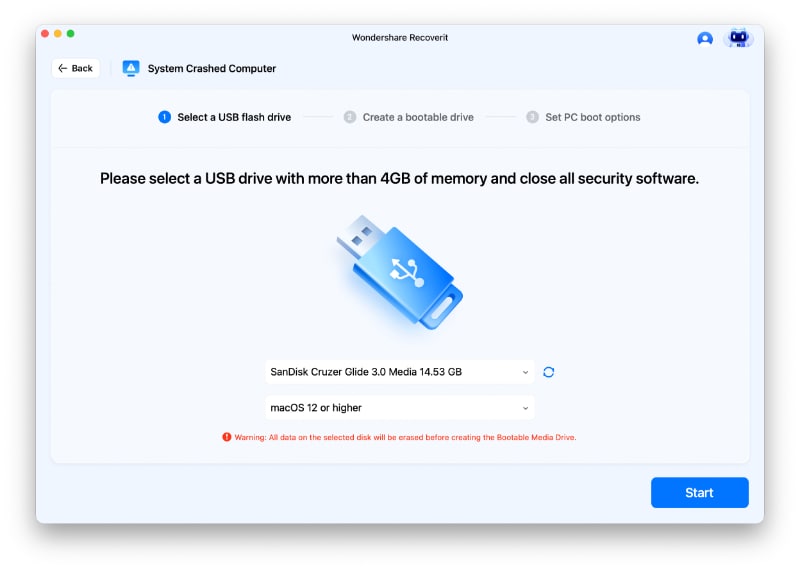
- Create Bootable Drive: Select the "Create USB bootable drive" option and click on "Create".

- A pop-up dialogue will appear that will prompt the user to format the USB drive.
- Format the Drive: Click on "Format" Now.
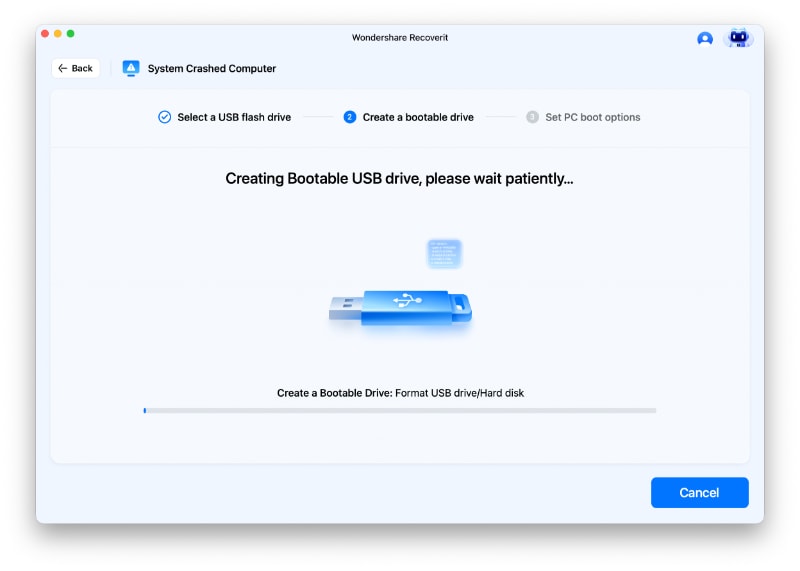
- Recoverit will show you the process of formatting the USB drive and creating a bootable drive.

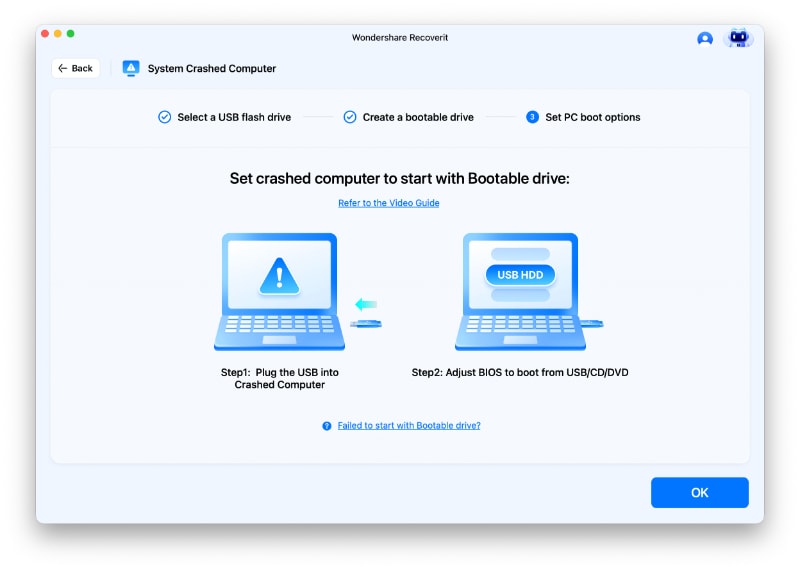
- After a while, the bootable drive will be built up. And please follow the guides which Recoverit shows you.

Step 2. Recover Data from Crashed Mac
Here are the following steps required to recover data from an unbootable computer.
1. Select the Location
When you launch Recoverit, you can select a location to scan. In this case, we will be performing data recovery on Mac's internal hard drive (Macintosh HD) instead of any other connected source.

2. Scan the Location
As soon as you would click on the "Start" button, Recoverit will take the needed steps for data extraction. If you want positive results, then try not to close the application in between.

3. Preview and Recover
When the data recovery process is completed, the application will display the results on the interface. You can go to any category of your choice from here and preview the retrieved content. Make the needed selection and click on the "Recover" button to save your files to a secure location.

All hope gets lost when the computer becomes unbootable and the data gets deleted. Recoverit recovery software is the most convenient program when it comes to retrieving lost data from the computer.
Installing the macOS from a USB flash drive gives the user an instant solution when the Mac installer for some reason refuses to work. The method to create a bootable drive is easier than it sounds. Now, you know what to do whenever you want to upgrade your macOS from a bootable external source by following different methods to ensure a safe and hassle-free process. If you lose valuable data when the Mac becomes unbootable then you can easily recover the lost files by using the Recoverit recovery software. Recoverit guarantees data recovery in no time.
People Also Ask
-
Can I Upgrade my MacOS system from USB?
Yes. You can download the file of the operating system that you want to upgrade to from the Apple Store first. Then connect the bootable USB drive to your computer to upgrade the macOS system. -
Can I run MacOS from a USB drive?
Yes. Running macOS from a bootable USB device is much like running one from an internal one. There鈥檚 no difference in the operation between these two systems.
What's Wrong with Mac
- Recover Your Mac
- 5 best data recovery software for Mac
- Recover my trashed files.
- Recover deleted files on Mac.
- 3 ways to restore Mac photos.
- Recover SD card files on Mac.
- Recover files from external hard drive on Mac
- Fix Your Mac
- Fix grey screen at startup.
- Ethernet issues occur | Fixed.
- Mac won't shut down. Boot it.
- Solve flashing question mark.
- Fix slow WiFi after upgrade.
- Delete Your Mac
- Format your USB drive.
- Delete APFS partition.
- How to format APFS drive.
- What can be cleaned on Mac.
- Format external hard drive.
- Learn Mac Hacks


 ChatGPT
 Perplexity
 Google AI Mode
 Grok
Grok


Sue Wayne
staff Editor