How to Fix "Time Machine Can't Find Backup Disk" for File Recovery
Fixing an unrecognized Time Machine backup on a Mac involves remounting the disconnected drive, repairing corrupted disk configurations, or extracting the trapped data via dedicated recovery software.
● Eliminate connection interference by waking the Mac from sleep mode, matching network connections for Time Capsules via AirPort Utility, and actively reselecting the backup drive in System Preferences.
● To repair an unmounted drive that appears greyed out in Disk Utility, click the Mount button and run First Aid; if corruption persists, execute sequential fsck_hfs command codes in Terminal to force a volume repair.
● If system-level tools fail to make the Time Machine backups accessible, use Recoverit Data Recovery software to directly scan the external hard drive and extract the missing files.
Ask AI for a summary
When Time Machine corrupts on your Mac, you most likely will not be able to access or find the backups you previously created, if your time machine backups are missing, lost or even corrupted, applying these effective methods would help you repair corrupted time machine backup drive as well as fixing and recovering lost time machine data using Recoverit software tool.
Why Time Machine Backup Is Not Available?
The time machine backup might not be available for many reasons. Very few people know the reasons why their time machine backup disk is not available. Even after hours of trying fixing it, they still never get it right. However, it may be due to one of these reasons:
Backup disk ejected or disconnected wrongly
This is a common reason why the time machine backup disk might not be available. Sometimes, it may have been disconnected without your knowing. You can fix this by making sure the disk is firmly connected, plugged into a power source and the Mac device is turned on, however, there are more reasons why your time machine might not be accessible or available.
- Mac and disk may be connected to different networks. It is vital to make sure your Mac device and disk are on the same network. If they are not on the same network, it may cause the backup disk not to be available.
- The backup disk may be connected to the computer which is on sleep mode. If this is the case, just disable sleep mode and continue.
- The backup disk must have been erased: Sometimes, the machine backup disk may not be available because it has been erased. If this is the trouble, simply reselect your backup disk and restart.
- Confirm if you are using a time capsule as a backup or other network disk, this might be the reason why it isn't available, make sure it is set up properly and connected to your network by using the "AirPort Utility"
- The backup drive may not be selected for the time machine feature to work properly, reselect your time machine drive from "system preferences"
Solution 1. Find Time Machine Backup Disk and Recover File
Using a series of well-detailed quick fixes, you can retrieve or restore files from your time machine by performing a series of tasks that should not take you more than 5 minutes.
To perform a backup restore, simply follow these steps below;
There are several reasons why your time machine disk may become undiscoverable or unrecognizable by your computer, the most common reason could be that the drive was previously ejected abruptly or wrongly, thereby messing up the configuration of the time machine backup disk, this is why it is important to eject or disconnect your time machine drive properly after use and also ensure that your USB cables are compatible and fully functional with your MacBook device.
However, all hope is not lost as the drive can still be fixed using the Mac "Disk Utility" feature which is a sure bet for restoring, repairing, and formatting your time machine backup drive to work properly.
The first thing to do when your time machine backup becomes unrecognizable is to run a quick check-up on it using "disk utility"
Step 1: Connect your time machine external hard drive to your Mac and then launch the "disk utility" by searching for it in the search bar of your Mac, after launching, scroll to the left panel of the disk utility interface to view all the drives connected to your Mac.

Now you'll see that there is a hard drive on the left panel, which sadly is greyed out and is your time machine backup drive. The hard drive is tagged "untitled", meaning that the hard drive is not mounted on your Mac computer.
Now you know why you can't access it, it's not mounted. So what do you do?
Step 2: Click the untitled external hard drive and then select the "mount" button which is visible after selecting the untitled external hard drive.
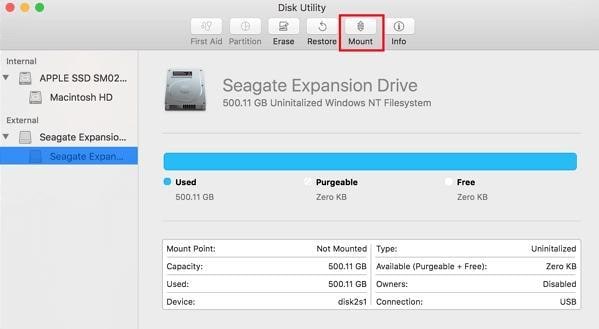
Step 3: Go back to the left panel interface of "disk utility" and select "time machine drive" and then click "first aid" which is listed among the "disk utility" features. Shortly after this, you should get a processing page which shows "Running First Aid on Time Machine"
Note: the processing page may not necessarily show "time machine" but it would show you the hard drive letter or name of your time machine"

Wait for the process to be completed and try again to see if your Time machine back up is now accessible for use, if not then your time machine drive has been corrupted.
On the flip side, if your time machine had been corrupted in your Mac, it is almost impossible for you to access your files unless you repair it. You would also find the backups created by the time machine impossible to access; the only way forward is to repair your time machine drive or disk.
Firstly, how do you know if your time machine is corrupted? Here are some things to look out for before you conclude that your time machine is corrupted or not:
- Backup fails to complete
- Missing time machine backups
- Time machine asks to create a new backup
- Time machine disk is not recognized
These are the signs to watch out for before you can conclude that your time machine is corrupt or not. Now, let us check some ways you can repair a faulty time machine. There are several methods to do this.
You can either:
- Repair corrupted time machine
- Restore lost or missing time machine backups
Solution 2: Repair Time Machine and Restore Files
Create new backup
If you keep getting a notification message from your time machine asking you to create new backups, the best thing to do is click on "create new backup". When you create a new backup, your time machine might just start working again, but it's better to make sure that it's working fine.
Restart to fix time machine
If that's not the case, you can as well try to restart the time machine several times. Restart the time machine four to six times if it does not work on the first restart.
Set up a new external hard drive
If restarting the time machine does not work, the next thing to do is to set up a new external hard drive with time machine as a backup drive.
Fixing the time machine with terminal control
Are you familiar with terminal control?
These are command codes on your Mac that just might fix your time machine in no time at all!
Firstly, Open Terminal on Mac and type: "$ sudo su - and hit Return.
After that, type"$ chflags -R nouchg "/Volumes//.sparsebundle" and click on "Return".
When the previous step has been done, the next thing to do is Type: $ hdiutil attach -nomount -readwrite -noverify -noautofsck "/Volumes//.sparsebundle" and hit Return.
Then type the command below
/dev/disk5 GUID_partition_scheme
/dev/disk5s1 EFI
/dev/disk5s2 Apple_HFS
Then Type: $ fsck_hfs -drfy /dev/diskxs2and click on "return". You should get a message like 'The Volume was repaired successfully'. If you get a different reply like 'The volume could not be repaired', continue with the next step.
After getting the notification that your volume could not be repaired, type $ fsck_hfs -p /dev/diskxs2and click on run
Then type: Type: $ fsck_hfs -drfy /dev/diskxs2 and click on return. Then wait for the process to complete.
Finally, Type: $ vi "/Volumes//.sparsebundle/com.apple.TimeMachine.MachineID.plist"and hit return. While working on that, change the value of the integer from 2 to 0 within that file.
Note: Remember to add a space where necessary as shown above
Note: This might seem a lot technical but it's definitely worth it, before trying out the last and final solution, which is the Recoverit Data Recovery software
Restore any lost or missing time machine backup files
After using the "disk utility" fix for repairing and making your time machine drive discoverable by your Mac and also the "terminal shortcodes" fix, your time machine drive should be ready for use now
However, it is advisable to use this method as a definite fix for recovering and restoring broken or corrupted time machine backup data by installing Recoverit Data Recovery Software. First, you need to install Recoverit Data Recovery, and then plug in your time machine external backup drive, then open your installed Recoverit software and find your Mac Os drive name, then select it and click "scan", then just let it run its course.
After you have must have gotten the scan result, select all the files and click on Recover Now".
Solution 3: Recover Files If No Time Machine Backup Is Found
You can still recover your files even when you don't have the backup. You can use your time machine to move from one MacBook to another. The time machine is not only made to backup files. So if you are thinking of changing to a new MacBook sometimes in the future, you need to back up your files on your time machine and use it to move to another MacBook.
This is where you will learn how to recover files if your time machine can't find a backup disk. It may be difficult for some people if there is no time machine backup found but with these little steps, you can easily perform a full recovery, you can even recover formatted documents within five minutes or less.
Recoverit software is the most trusted tool for performing this task. It helps you recover old photos, videos, spreadsheets, or any kind of document which was accidentally deleted or formatted.
If you want to recover those lost files using Recoverit Mac data Recovery, follow the steps below:
You can launch Recoverit on your Mac by double-clicking the Recoverit icon on the desktop. If you don't see the icon there, just click on finder, click on applications and select Recoverit.
It will take a little while to start the recovery program. When it's up and running, follow these three steps below:
Step 1. Choose a location
After launching the app, you would see a page detailing the hard drives connected to your system, now all you have to do is to check for your time machine backup drive and select it.

Step 2. Scan that location
The Recoverit tool will automatically start scanning all your lost or deleted data. You can also get all your formatted data through scanning and the files will be recovered, during the recovery process, you can view the recovered files as it would be displayed, the software also provides you with the luxury of time to pause or stop the scanning at any point of the operation if you think you have gotten the results you want.

Step 3. Preview and recover your file
Recoverit allows you to preview a file before recovering it. You can preview your videos, documents, and images before recovering them. After previewing, recovery is only a click away.
After previewing, you can now choose if you want to recover the file or not. Simply click on the "recover file" button at the bottom of the file after previewing it. Save the file in a different location. Don't save it in the hard disk where you deleted it in the first place.

You can as well recover files from emptied trash, external devices and also repair corrupted videos, so you never have to worry when your time machine drive malfunctions.
Performing a system back up with time machine
Backing up on time machine should be a very easy task; you can perform a full back up or selective backup of your files with the time machine. The time machine efficiently backs up all files on your computer including apps, videos, images, documents, and so on. It is important to always back up your files in case you lose them. Time machine will help you recover your files if you accidentally delete them or format them from your device.
Whenever your time machine is turned on, it will help you back up your files depending on the frequency you set. You can set it to backup files hourly, daily, weekly, or monthly. The time machine feature gives you total control.
In other to avoid future issues and tough situations where your time machine can't find backup disk again, you need to know when and how to back up your files and data on an external hard drive. Below are a few steps on how to back up with time machine:
Firstly, you need to connect an external hard drive to the computer.
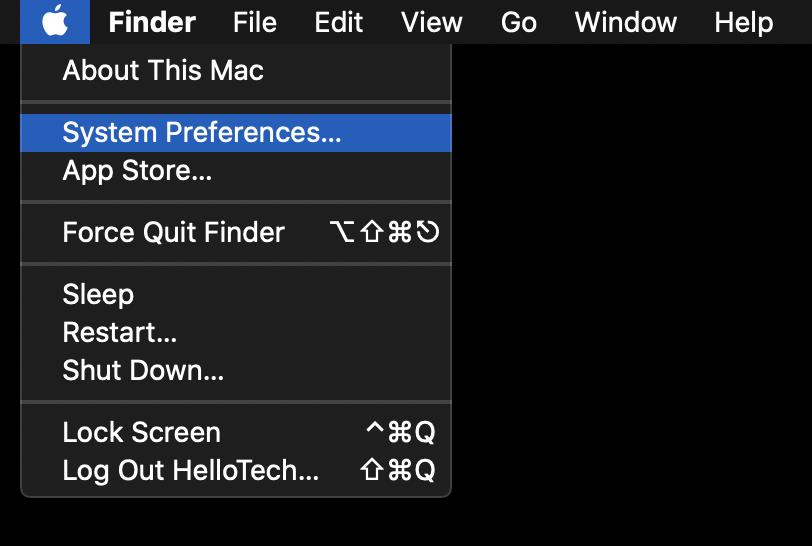
Click the apple icon on the Apple menu
Select system preferences.
Step 1: Click on the time machine icon
After previously selecting "system preferences", almost of system apps would be shown, look for "time machine" and select it.
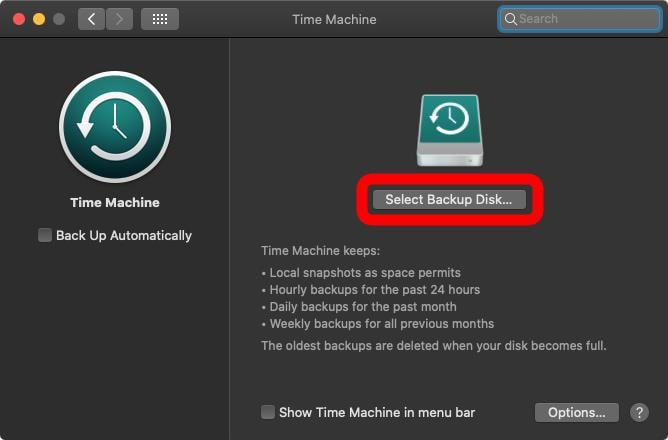
Step 2: Select Backup Disk
Click the "select backup disk" icon to choose the preferred hard drive to use as time machine backup disk.
Step 3: Select drive to use as a time machine
After clicking the "select backup disk" you would be presented with a list of connected drives that are compatible to be used as time machine backup drive.
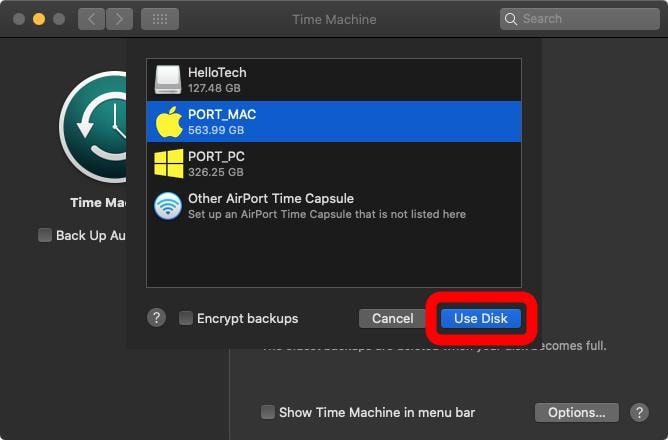
Backup automatically by clicking the "Backup automatically" button
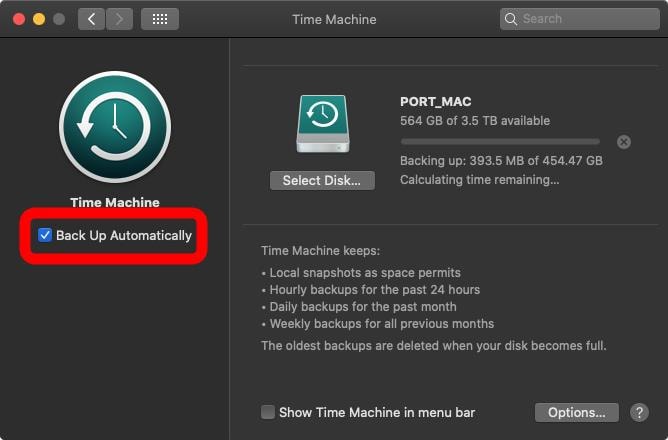
After backing up for the first time, the time machine will start checking your computer for updates in case you have deleted any file recently. It will continue checking every hour and back up your files within the set time interval. The time machine has various advantages. Perhaps the biggest advantage is recovering files you mistakenly deleted.
Conclusion
Using the time machine makes things a lot easier for you. You can use it to move from one computer to another computer provided both computers are MacBooks. The time machine is like a storage drive that can help you recover files that have been deleted, damaged, or formatted for one reason or the other. It does not take too much time to perform a full recovery on a time machine and that is one of the best things about it.
What's Wrong with Mac
- Recover Your Mac
- Fix Your Mac
- Delete Your Mac
- Learn Mac Hacks


 ChatGPT
 Perplexity
 Gemini
 Claude
 Grok
Grok


Sue Wayne
staff Editor