File Recovery
- Recovers deleted or lost files effectively, safely and completely.
- Supports data recovery from 500+ data loss scenarios, including computer crash, partition loss, accidental human error, etc.
- Supports 1000+ file formats recovery with a high success rate and without any quality loss.

How to Use Time Machine on Mac for Backup and Restore

Jun 03, 2026 • Filed to: Solve Mac Problems • Proven solutions
 TL;DR:
Time Machine is Mac's built-in tool that automatically secures your entire system by saving incremental hourly, daily, and weekly backups to a connected external drive or NAS.
● Setup requires an external USB, FireWire, Thunderbolt drive, or AirPort Time Capsule, which macOS may prompt to erase and format before allowing you to encrypt the backup data.
● The system retains hourly backups for 24 hours, daily backups for a month, and weekly backups until the external drive is full, while APFS users also retain local snapshots on their internal disk.
● If older backups are overwritten due to space limits or Disk Utility cannot repair a corrupt drive without erasing the partition map, file recovery requires third-party software like Recoverit.
Ask AI for a summary
 ChatGPT
 Perplexity
 Gemini
 Claude
 Grok
Grok
Have you recently bought a Mac? Do you know about the in-built backup feature of the Mac OS? Mac comes with Time Machine that is the most recent backup feature in it. This excellent tool tracks your every activity or changes made in your system files that make it easy for you to recover any lost data or changes.
The outstanding features of the Time Machine are surprisingly amazing. If you are wondering how to set up Time Machine on Mac and how do I use Time Machine, then we would like to tell you that it is much simpler.
In this article, you will learn all about Time Machine, how it back up with the machine, how to use it to restore files, and the other options with which you can recover Mac files.
Part 1. Overview of Time Machine on Mac
The backup application software, Time Machine, introduced by MAC OS X Leopard, is the part of your Mac Operating System that is developed by Apple. It can work with AirPort Time Capsule, Wi-Fi router that has an in-built hard disk, and other internal and external drives.
Let us learn a more about Time Machine, how it works, and for what it is used for.
1. What's Time Machine
Time Machine is an in-built feature of your Mac that helps to take a backup of your Mac operating system. It is the best backup solution, and the exciting thing is that it is part of your operating system.
If you want to make a wireless connection, connect it over a network. But for wired connection, you need to connect an external hard drive.
It backup your data every hour, and the oldest backup gets deleted when the drive runs out of space.
2. What Is Time Machine Used for
Time Machine is used to back up your Mac completely. It includes apps, music, system files, emails, photos, videos, and all your documents. When you turn on the machine, it will start the hourly, daily, weekly backups automatically.
3. How Does Time Machine Work on Mac
When you use the in-built Time Machine to take backups that can be restored later, it back up the entire system and even specific files. The machine captures the most recent changes, and when it gets old in comparison to the newer data or alterations, these are deleted.
You can get a backup from the last 24 hours, daily, weekly, and even monthly backup. But when the space gets limited older backups are deleted.
Different types of external devices that you can use to set up time machine backup are:
- External USB, FireWire drive or Thunderbolt
- External drive connected to AirPort Time Capsule or AirPort Extreme Base Station
- Mac used as a backup destination for TimeMachine
- NAS – Network-attached storage device that time Machine Supports
4. Where Is Time Machine on Mac
The inbuilt Time-machine backup feature on the Mac operating system stores a copy of the most recent data and can be searched very easily.
- It is stored on your external backup disk
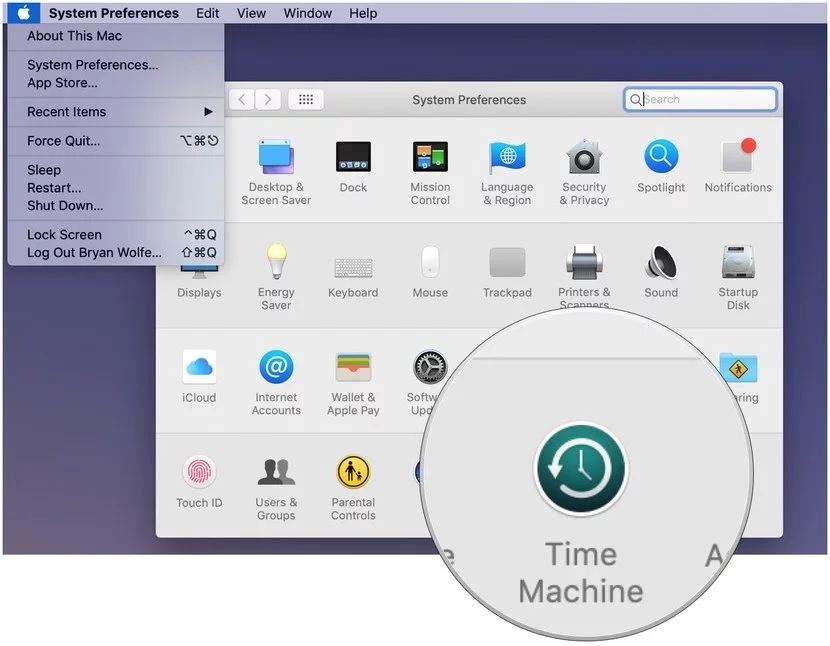
- Search it in the path: Apple menu -> System preferences -> TimeMachine
Part 2. How to Backup with Time Machine
The in-built time Machine app is very beneficial and simple to use. In this part, you will learn what does machine backup, how to backup, how long it will take to backup, and how to set preferences. Read on to learn about all.
1. What Does Time Machine Backup
You can backup your complete Mac with the Time Machine. From system files to apps, photos, music, emails, documents, everything. Once Time Machine is turned on, it automatically starts back up of the Mac also takes hourly, daily, weekly, and monthly backups.
The machine not only stores the backup on your connected external back up disk but also saves the snapshots of the changes on your internal disk. This makes it easier for you to recover your previous versions.
All these snapshots get saved on an hourly basis till the time you deselect the option – backup automatically. So, while working on your Mac, if you accidentally delete any data, you can easily recover it from the Time Machine backup.
APFS users can get these snapshots from the APFS disk irrespective of the disk is portable or on your desktop Mac.
2. How to Backup Using Time Machine
At times some of the useful data get accidentally deleted. During such instances, these prove very advantageous. It helps to get your data back into your system.
The "Time Machine" in your Mac helps you get backup of your data. You can take automatic backups with this in-built backup feature, "Time Machine". From photos to music, apps, documents, system files, and email, it can backup all.
Are you thinking about how to use Time Machine to backup? Here are the steps that will guide you on how to back up with Time Machine.
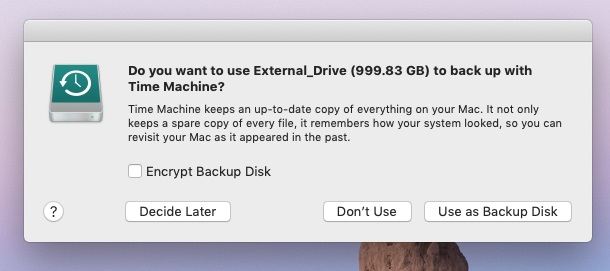
Step 1: Connect an external storage device
Step 2: After a successful connection, select the connected device as your backup disk.
Step 3: When prompted, pick "Encrypt Backup Disk" and then select "Use as Backup Disk."
Encrypted data remains secure, as only users that have a password of this backup can access it.
If your Mac Time Machine does not ask for a drive, add it manually. Click on the "Time Machine Preferences" from the menu.
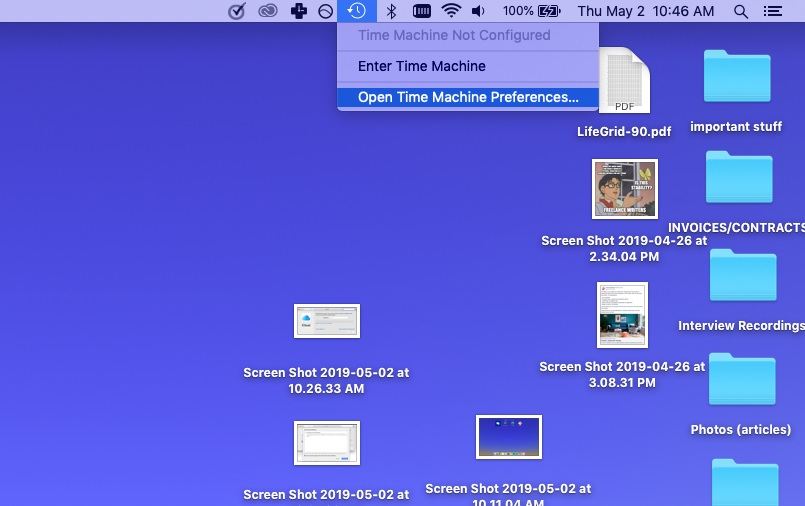
Select the option Backup Disk.

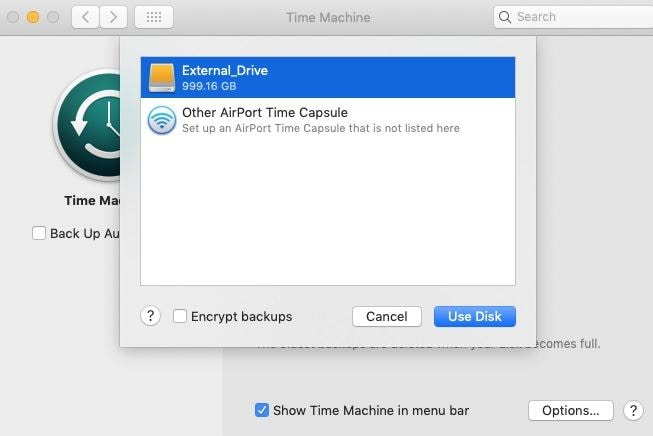
Select the connected external drive and check the checkbox Encrypt backups. Now you can click on the Use Disk button.
Step 4: Click on Erase
If your external drive is not of the format required by the Time Machine, Mac OS prompts you to erase the connected disk first. All the information on the disk gets erased in this process.
Step 5: Your periodic backup automatically starts with the Time Machine. Click on close when the backup completes.

If the backup is for the first time, it will take a little longer. But after this, the backups will be much quicker. In the periodic backups, TimeMachine will only backup the files that observe any changes from the previous backup.
As only the required files are backup and not the entire data stored on the system, this makes the backup process faster.
3. How Long Does Time Machine Backup Take
When the time machine takes the first backup of your Mac, it will perform a full backup. So, it may take some time to finish with the complete process of the first backup. Once it is complete, Time Machine checks your Mac for every changed, deleted, and new data on an hourly basis. All these backups after the first backup are much quicker than the initial one.
All the previous backups remain saved for 24 hours. After 24 hours, a daily backup is saved for a complete month. Weekly backups are also saved, but only till the external drive does not fall short of space. The moment backup drive is full, old backups get deleted from the in-built backup machine.
4. How to Set up Time Machine Backup Preferences
As the Time Machine helps to back up your Mac, you can also set preferences to allow this in-built feature to take backup as per your requirements.
You can set to backup with specific options like to send you a notification when your old backup is getting deleted, what files to include in the backup, and what needs to be excluded.
Do you want to set up Time Machine with the new preferences? If yes, then check here.
Step 1: Select the Apple menu
Step 2: Click on System Preferences
Step 3: Select Time Machine

Step 4: Click on Options
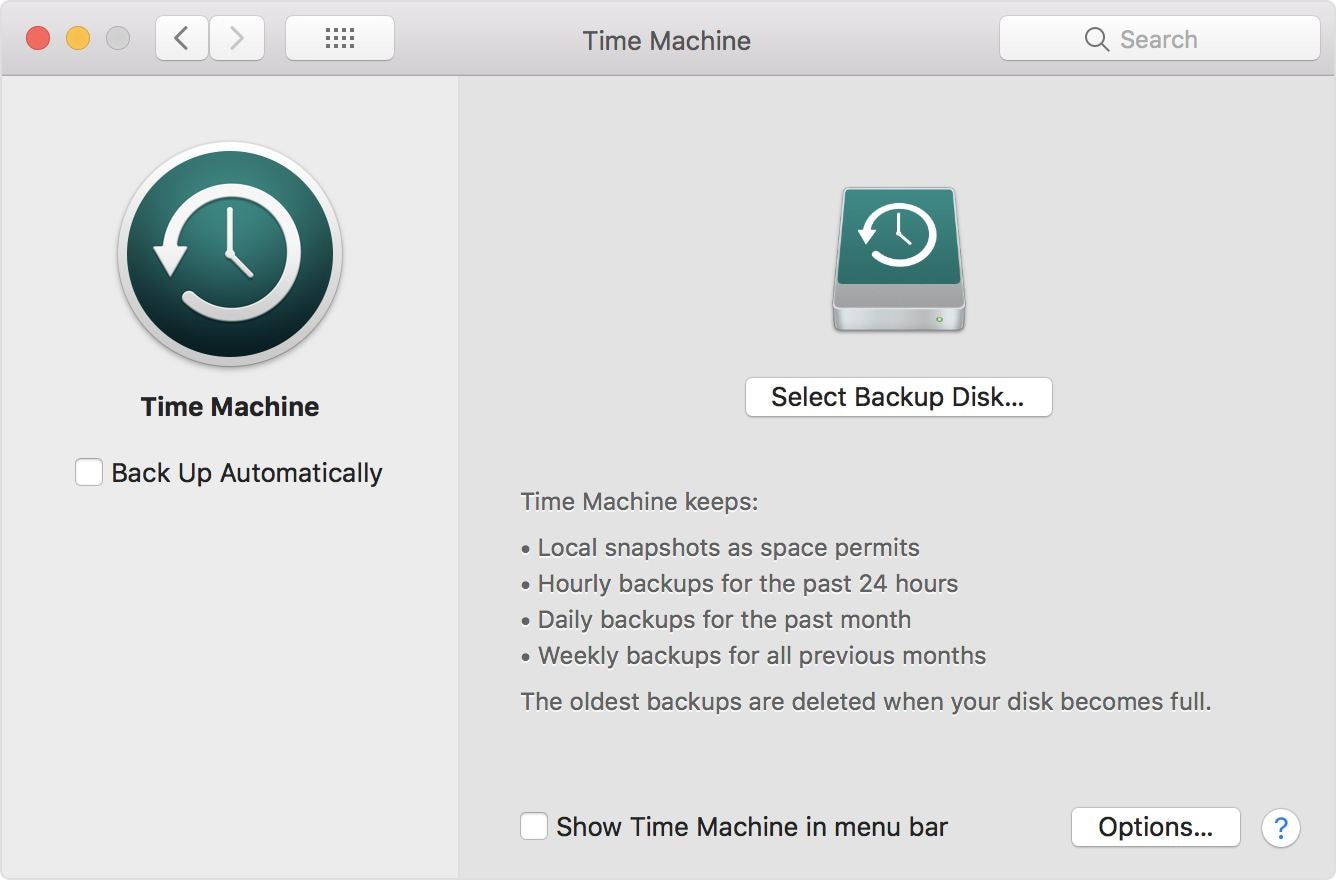
You can find this option in the right corner at the bottom of the screen
Step 5: Press on the "+" sign and then choose the file, folders, applications, files, or the hard drive that you want to exclude from the backup. After making the selection, click on "Exclude." Other options that you can select are:
- Back-Up Automatically: Select to allow Time Machine to backup files automatically.
- Select Backup Disk, Disk, Remove or Add Backup Disk.
- You can also select the option to allow Time Machine to show up in the menu bar.
Part 3. How to Use Time Machine to Restore Files
Taking backup of files stored on your Mac is very simple with Mac's in-built Time Machine. However, when you have lost or deleted some of your important data from the Mac, you need to restore it from the backup taken by your Mac.
As taking backup is easy, Apple has also made it easy to restore it too. If you want to restore the previous backup, you will learn how to do that in this part.
Along with learning how to restore files, you will also learn here what you can restore, how long the restoration process takes, and how you can set up restore preferences.
1. What Can Be Restored from Time Machine
You can restore your complete Mac from TimeMachine. Your backup can help you get back your files and also Mac OS specific versions that you were using at the time of the creation of the backup.
However, if you do not have your backup disk, then also you can restore your data. The local snapshots taken by the TimeMachine on startup disk helps to restore data back on your system.
2. How to Restore Files with Time Machine
If you have lost any of your data from the Mac, and thinking how to restore files from time machine, proceed with the following steps:
Step 1: Click on System Preferences in the Apple Menu and select Time Machine icon
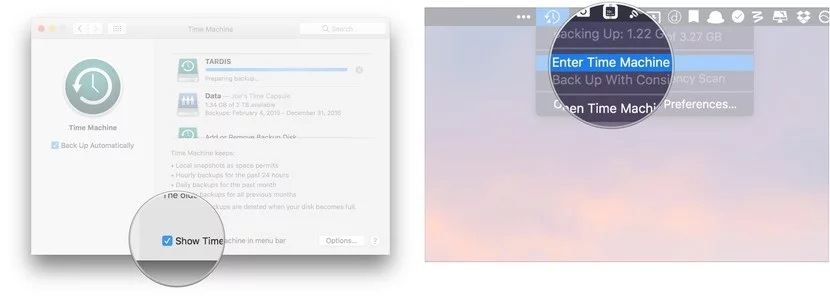
Step 2: Select the box that is next to the option "Show Time Machine."
Step 3: Click on "Time Machine" from the menu and then on "Enter Time Machine."
Step 4: Click Restore after selecting on the required file or folder
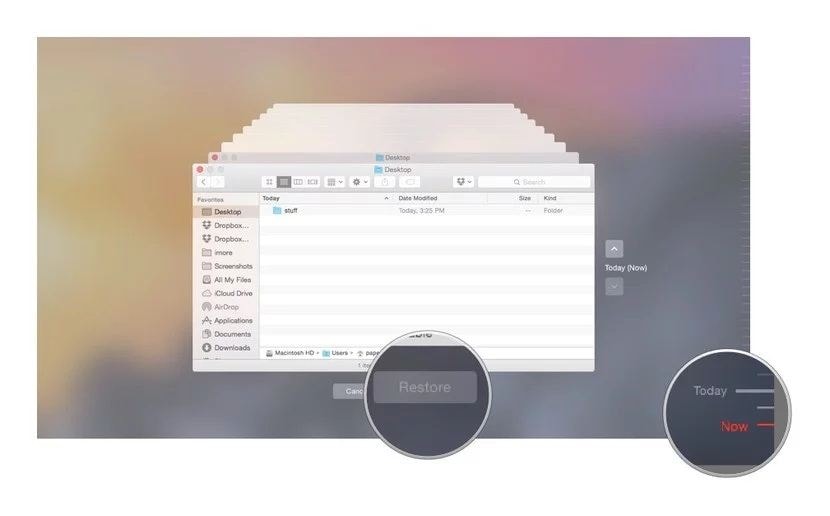
Step 5: Once you click on restore, Time Machine will copy the desired file or folder back to its location where it has initially been saved on your system.
3. How Long Does Time Machine Restore Take
Restoring a backup is very easy. We have already discussed the steps above. However, if you are restoring a single file or a few files, the process will be comparatively faster than the one if you are restoring your complete Mac data.
When you click on restore, you will be asked for how you need to restore data. Like whether you want to replace existing versions of the files that are under restoration process or you want to keep both versions. Select your option and follow the on-screen instructions to complete the data restoration process.
If you are restoring more files, be a little patient as it may take some time.
4. How to Set up Time Machine Restore Preferences
You can restore the things that you need to restore selectively. Selecting the preferred backup files is very easy. Just follow the below steps to restore only your needed files:
Step 1: Open Finder and select the Time Machine drive
Step 2: Browse the folder and reach to the latest link for opening the backup folder
Step 3: Find and select that you need to restore by browsing this folder. After selecting, click on restore.
If you want to select only the files and not the settings, you can simply drag or copy the files or folders that you need.
In this way, you can get back only the stuff that you need in your Mac. However, you still have the chance to get back any of the other files or folders till the time the backup is not deleted.
Part 4. More Options for Mac Files Recovery
If you have lost your backup, as the TimeMachine deletes the oldest backup when the drive gets full, you can still restore any of your deleted data. Must be thinking about how? Well Recoverit, is one of the best data recovery software for Mac users. It recovers your lost and deleted files with its 3 easy steps and that too in minutes.
The software can restore data lost in any scenario, it may be deletion, empty Trash, virus attack, driver issue, card error, formatting, Mac crash, etc.
Solution 1. Restore Files from Mac Trash
When you delete a file from your system, it moves to Mac Trash temporarily. This gives you a chance to restore files that you might have accidentally or unintentionally deleted. But if you have emptied your Trash, then you lose them forever. But with Recoverit, you still get the chance to recover these files.
As the data in the Trash is from different partitions, hard drives, sectors, so scanning it takes some. You can recover files with two modules: an all-around scan as well as a deep scan.
Follow the below steps to recover files deleted from your Mac Trash.
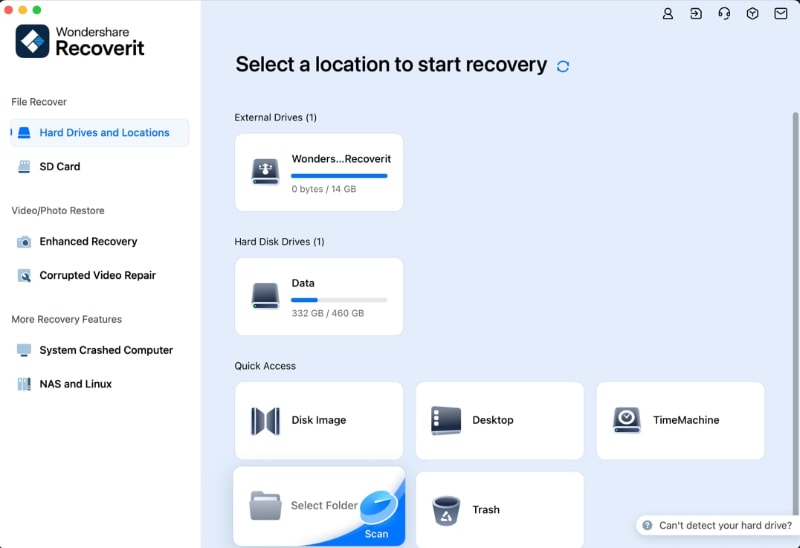
Step 1: Select Trash
Select "Trash" to recover deleted data from the emptied Trash. You can find the "Trash" option in the location tab. After selecting "Trash" click on scan to begin the scanning.
Step 2: Scan Trash
When you click on start, from the two different recover modes, a quick scan will be started first. The scan will take only a few minutes to complete the process.
However, if you are unable to find files with the quick scan, you can proceed with the advanced scan. It will do a more in-depth search and recover your deleted files of any format or size.

Step 3: Preview and Save
Once the scanning completes, you can locate the recovered files, preview it, and select them for recovery. When you click on recovery, the software prompts you to select the location at which you need to save the file.

Solution 2. Recover Data with Mac Utility
Disk Utility is another solution with which you can recover your lost data of corrupt Mac hard drive. You can launch the Mac utility via recovery mode and proceed with the Mac disk repair procedure. Perform this absolutely free procedure with the below steps:
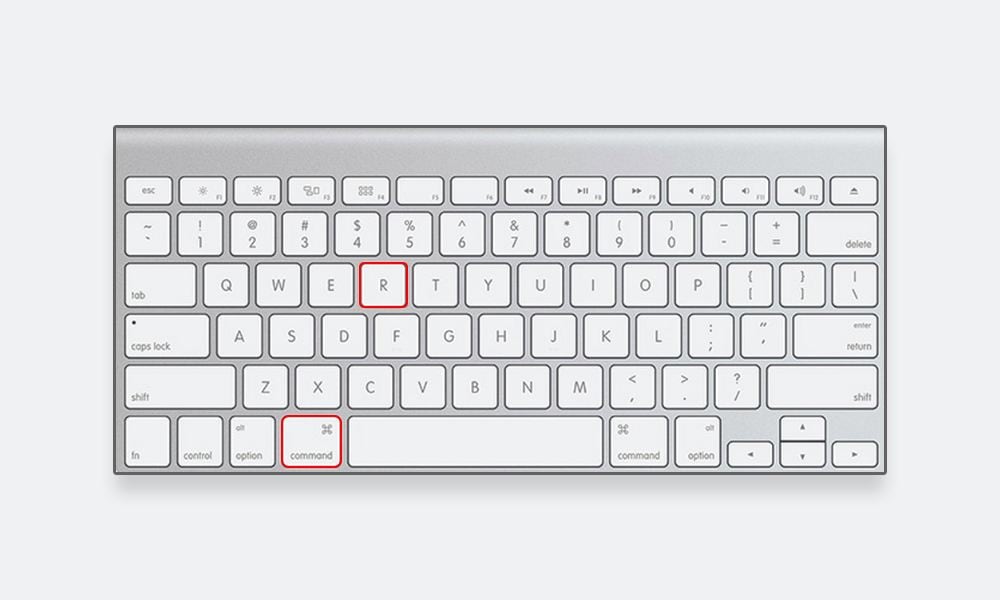
Step 1: Reboot your macOS and keep pressing the keys Command + R till it boots into the Recovery Mode.
Step 2: Click on Disk Utility when you reach the Recovery mode.
![]()
Step 3: Select Macintosh HD and click on First Aid to begin repairing disk errors of your Mac hard drive.
![]()
When the Disk Utility repair completes, you can get two outcomes:
- Disk repaired successfully: If the disk is successfully repaired, you can log out and boot into your Mac like you usually do.
- Disk Utility Can not Repair Corrupt Drive: Disk Utility has certain limitations due to which it can not repair all types of corruption. Like it is unable to repair the corrupt partition map. For this, you need to erase hard drive with the new partition scheme. If you do this, you will lose all your data because the process erases the drive. In such a scenario you can refer Recoverit Data Recovery Tool for recovering lost data
Closing Words
Whether you are new to Mac or already a Mac user, it is always easy to prevent losing data because of any accidental deletion. The in-built Time Machine takes backup of all your data at regular intervals and allows you to store it whenever you feel the need for it.
If by any chance, your backup is lost, you can recover files with Recoverit Data Recovery tool.
What's Wrong with Mac
- Recover Your Mac
- Recover your data for free.
- What is New in MacOS 13 Ventura?
- Back Up Macbook Before Upgrade
- How to Downgrade MacOS System
- Files overwritten? Recover it.
- Top 5 Mac recovery tools.
- Get USB drive files on Mac.
- Recover a formatted SD card.
- Fix Your Mac
- Mac won't turn on? Solved.
- Know and fix kernel panic.
- You installed macOS anyway.
- Force quit Mac to fix issues.
- Make frozen Mac responsive.
- Delete Your Mac
- Delete files and folders.
- Do Ctrl Alt Delete on Mac.
- Format USB to FAT32.
- What's Other on Mac?
- 3 ways to format your Mac.
- Learn Mac Hacks


Sue Wayne
staff Editor