


New features and improvements can be added by updating your Mac to the latest macOS Sequoia 15.0. Unexpected problems, like losing important files during or after the update, could arise for some users. Particularly if they contain valuable data, losing files can be annoying. Fortunately, with the right method, recovering lost files is possible.
After the macOS Sequoia update, you can retrieve your documents, photos, and other data using these easy-to-follow steps. These methods will enable you to recover your files quickly and effectively, regardless of whether you are a beginner or a tech-savvy user. Let's look at how to recover lost files after macOS Sequoia 15.0 update?
⚡ Quick Answer: How to Recover Lost Files After macOS Sequoia 15.0 Update
| Situation | Best Method | Difficulty |
| Desktop files disappeared | Check iCloud "Desktop & Documents" sync first | Beginner Friendly |
| Files hidden after update | Show hidden files: defaults write com.apple.finder AppleShowAllFiles TRUE |
Intermediate |
| Files moved to Trash | Restore from Trash > Put Back | Beginner Friendly |
| Mac had a Time Machine backup | Restore from Time Machine | Beginner Friendly |
| Files permanently lost | Wondershare Recoverit deep scan | Beginner Friendly |

Try Recoverit to Recover Lost Data After Sequoia Update
 Security Verified. Over 7,302,189 people have downloaded it.
Part 1: Common Issues After Updating to macOS Sequoia 15.0
Updating to macOS Sequoia 15.0 adds and changes some great features, but it can also cause some common issues for users. These difficulties may disrupt your experience and lead to confusion and anger. You can recover lost files after macOS sequoia update by being aware of these issues, which will make the update go more quickly for you.
- Lost Files: Losing important files during the update process is one of the most upsetting issues. Many users discover that important documents, photos, or projects are missing after an update post.
- Performance Glitches: Some users report unresponsive applications and slow system performance after updating. It is crucial to address these bugs right away because they may have an impact on daily tasks.
- Application Compatibility: Not all applications are optimized for the latest version of macOS. Users may experience issues with outdated software, which can result in crashes or malfunctioning features, necessitating updates or other options.
- Network Connectivity Problems: Following the update, some users are having difficulties connecting to Wi-Fi and Bluetooth. The inconvenience can be caused by these issues, which can make it difficult to use online services and devices.
Why Do Files Go Missing After a macOS Update?
- File System Changes: macOS updates tweak how files are managed, which can make some files temporarily inaccessible.
- iCloud Sync Issues: If sync settings change during the update, files may appear missing until they re-sync.
- Disk Permission Errors: Permission changes during the update can make files or folders invisible.
- Corrupted Data During Installation: In rare cases, the update process itself can corrupt data, causing file loss.
Know that there are ways to recover deleted files during the macOS update if you've encountered any of these problems. To help you navigate these common issues successfully, solutions and tips will be given. If you know about these worries, you can make sure that using your Mac goes more smoothly.
Part 2: How to Recover lost files after macOS sequoia update
Many users are upset that they lost files after switching to macOS Sequoia 15.0. The steps provided in this guide will help you get through your recovery. You'll learn effective methods to restore files disappeared from macOS 15, ensuring that your valuable data is recovered quickly and easily.
Method 1: Use Recoverit Data Recovery Software (Recommended)
It can be difficult to recover macOS data lost after an update, but the process can be made easier by employing a trustworthy data recovery tool. As a top-rated solution, Wondershare Recoverit stands out. Regardless of the reason, you can recover lost, damaged, overwritten, corrupted, deleted, or corrupted files with this professional software. It is designed to enable users to restore crucial data effortlessly.
- Manages over 500 data loss situations, such as deletion, formatting, and disk corruption.
- The user-friendly interface allows you to recover data in just a few clicks.

The best secure and effective way to recover lost files on macOS 15 is with Wondershare Recoverit for Mac. This software functions flawlessly on a variety of devices, including MacBooks, iMacs, external hard drives, USB drives, SD cards, and digital cameras, whether you need to retrieve documents, photos, videos, or other file types. You may quickly and efficiently regain access to your valuable data thanks to its user-friendly interface and strong recovery features.
Steps:
- Download and install the latest version of Wondershare Recoverit for Mac.
- Launch the program on your computer.
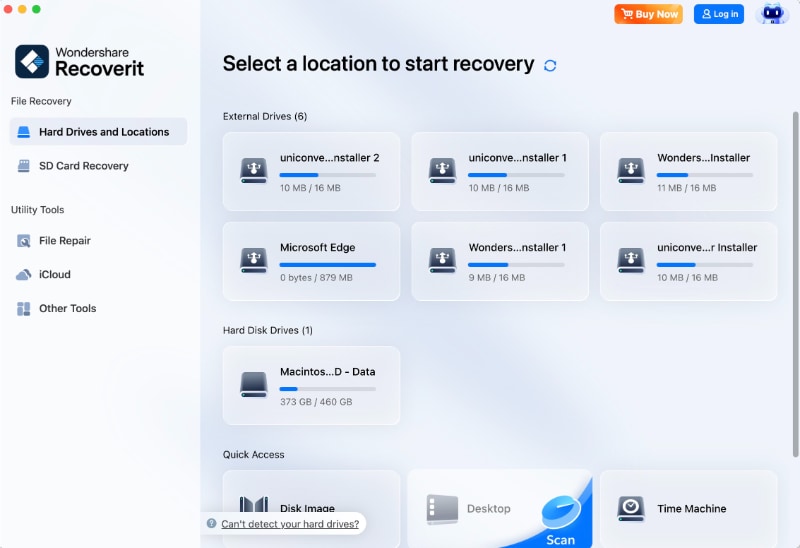
- Go to the main menu and select "Hard Drives and Locations".

- Find and click on your Mac hard drive where the files are lost.

- The program will scan the selected drive for recoverable files. Preview the results, and Recoverit will repair any corrupted documents or photos automatically.
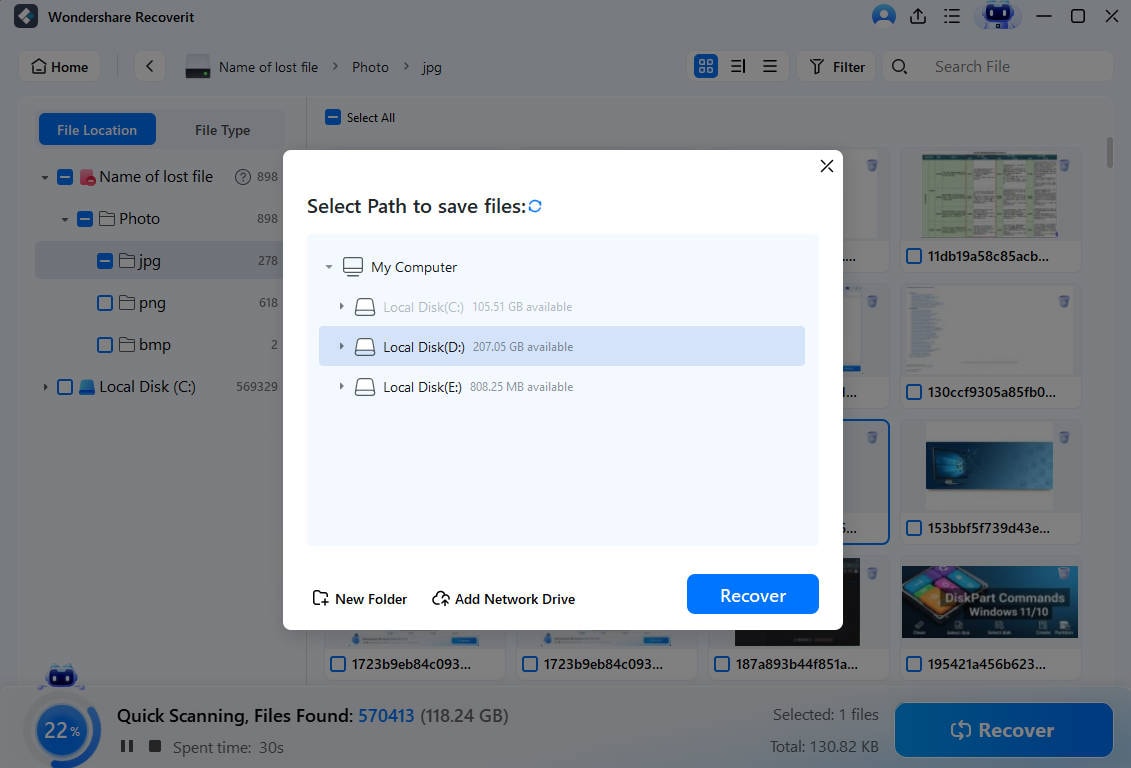
- Click "Recover" to restore your lost files and save them to a new location.
Bonus Video Tutorial: How to Recover Lost Files After a macOS Update?
Method 2: Check iCloud Drive Sync (Fix "Desktop Empty" After Update)
If your Desktop files disappeared after the update, they may just be unsynced. iCloud can appear to "hide" Desktop files when sync is interrupted.
- Go to Apple menu > System Settings > Apple ID > iCloud.
- Check that iCloud Drive is enabled and syncing correctly.
- Ensure Desktop & Documents is selected under iCloud Drive. Enabling it restores files from iCloud.
Method 3: Show Hidden Files After the Sequoia Update
After the Sequoia update, some files may be marked as hidden. Reveal them with a Terminal command.
- Open Terminal (Finder > Applications > Utilities).
- Type the following command and press Enter:
defaults write com.apple.finder AppleShowAllFiles TRUE - Then run:
killall Finderto restart Finder and reveal hidden files. - To hide them again later, change
TRUEtoFALSEand runkillall Finderagain.
Method 4: Restore Files Disappeared from macOS 15 with TestDisk
If you want to recover deleted files on macOS Sequoia, TestDisk is a crucial tool. For Mac users who need to restore lost data, this dependable software provides a solid option. Even though the recovery process may seem complicated, complying with the steps below will streamline the process and let you effectively recover missing data on macOS 15.
Steps:
- Launch Terminal on your Mac.

- Type sudo testdisk and hit Enter.

- Choose Not Log and press Enter.
- Select your hard disk for evaluation and press Enter; choose the partition by hitting P.
- For a new Apple Mac, select EFI GPT; for older models, choose Mac. Then, select Analyze, hit Enter, and conduct a Quick Search.
- Navigate the list of missing files, hit C to copy, and select the destination by hitting Y.
Method 5: Restore Files Disappeared from macOS 15 from Trash Bin
The Command + Z shortcut is your first line of defense on your Mac if you've unintentionally moved or deleted files. Check the Trash on macOS Sequoia to see whether any files that you recently deleted still reside inside. After the macOS 15 update, the Trash icon remains located in the Dock, allowing easy access to recover missing data on macOS 15.
Steps:
- Click the Trash icon located in your Dock to open it.

- Browse through the contents of Trash to find any mistakenly deleted items.

- Right-click on the file you wish to recover and select "Put Back" to return it to its original location.

Method 6: Rebuild Spotlight Index
Sometimes macOS fails to index files correctly, making them appear missing. Rebuilding Spotlight can fix this.
- Go to Apple menu > System Settings > Siri & Spotlight > Spotlight Privacy.
- Add your entire drive to the list, wait a few seconds, then remove it. This forces Spotlight to re-index your drive.
- Wait for the re-indexing to finish, then search for your missing files again.
Method 7: Recover Missing Data on macOS 15 via Time Machine Backup
Time Machine is an integrated backup and recovery tool for macOS that is designed to protect your data. You can use an external storage device to back up documents, photos, music, and videos, among other files. You can easily recover lost files after macOS Sequoia update if you experience data loss as a result of a bad Mac update using Time Machine. Simply connect your backup device and follow these directions.
Steps:
Here are the steps to recover files using Time Machine:
- Open Finder and use the search bar to find Time Machine on your Mac.

- In the menu bar, click on Time Machine and choose Browse Time Machine Backups.

- If the Time Machine isn't visible in the menu bar, go to the Apple menu > System Settings > Control Centre > Time Machine > Show in Menu Bar.
- Select the backup version containing the files you wish to recover and click Restore, then follow the prompts to retrieve your data.

Part 3: Tips to Recover Missing Data on macOS 15
On macOS 15, losing crucial data might be upsetting, but recovery is frequently achievable. In order to effectively recover lost files and safeguard your valuable information, here are some essential tips to assist you restore files that have disappeared.
- Utilize Time Machine: Time Machine is a built-in backup tool that automatically saves your files. You can quickly restore files disappeared from macOS 15 if you regularly back up your data. Connect your Mac, launch Time Machine, and then browse through your backups to locate and recover the lost things.
- Check the Trash: Files are frequently left in the Trash after being deleted. Search for the missing files by opening the Trash icon in your Dock. To restore the file to its original location, right-click on it and choose "Put Back."
- Use Data Recovery Software: If the methods above don't work, you might want to look into data recovery software like Wondershare Recoverit or TestDisk. Even after accidental deletions or system failures, these programs are designed to recover lost files from your Mac. In order to retrieve data that would not be available otherwise, they can scan your hard disk.

- Examine the iCloud Drive: Inspect the iCloud Drive if you store your files on iCloud. Check your account by logging in to verify if the files you're missing are there. This is especially useful if you have your data and documents set up for iCloud backup.
- Seek Professional Help: If you've exhausted all of these methods and are still unable to recover lost files on macOS 15, you might want to speak with a data recovery company. You won't lose valuable information forever thanks to their sophisticated tools and expertise in recovering lost files.
Conclusion
In conclusion, recovering lost files after the macOS Sequoia 15.0 update is entirely feasible with the right approaches and tools. You can successfully recover your files by using methods like Time Machine, scanning the Trash, or using data recovery software. Never forget that the best defense against future data loss is proactive data management. Professional aid is available if you run into difficulties. You can successfully recover missing information on macOS 15 and protect your valuable data by using these techniques.
Try Wondershare Recoverit to Perform Data Recovery
Security Verified. Over 7,302,189 people have downloaded it.
FAQ
-
Why did all my Desktop files disappear after the Sequoia update?
The most common cause is an iCloud "Desktop & Documents" sync interruption. Go to System Settings > Apple ID > iCloud > iCloud Drive and confirm Desktop & Documents is enabled. If the files aren't there, they may be hidden or in Trash — use the recovery methods above. -
Are my files hidden after updating to macOS Sequoia?
Possibly. Rundefaults write com.apple.finder AppleShowAllFiles TRUEthenkillall Finderin Terminal to reveal hidden files. If files remain missing, check iCloud, Trash, and Time Machine before using a recovery tool. -
How do I recover files lost during a macOS update?
Check iCloud Drive, the Trash, and Time Machine first. If those don't help, use Wondershare Recoverit to deep-scan the drive and restore documents, photos, and videos that were lost or corrupted during the update. -
Can TestDisk recover files on macOS Sequoia?
Yes. TestDisk can recover lost partitions and files via Terminal (sudo testdisk), but it requires technical expertise. For an easier, beginner-friendly option, use Wondershare Recoverit for Mac instead.


