

 TL;DR:
Choose your Raspberry Pi SD card backup method based on your recovery goals: create a bootable clone using SD Card Copier for immediate hardware swaps, generate a full raw image offline for archival restoration, or use Rsync for lightweight file-level backups.
● Creating a raw full-card image requires shutting down the Raspberry Pi first for data consistency, and restoring it demands a destination card with an actual physical capacity equal to or greater than the original source media.
● The SD Card Copier utility within Raspberry Pi OS Desktop allows cloning a live, running system to a different-sized destination card, provided the target has enough usable space for the copied data and required filesystem layout.
● File-level backups do not yield bootable media and require write-heavy services like MariaDB or SQLite to be stopped or natively dumped before copying to prevent inconsistent archives.
Ask AI for a summary
 ChatGPT
 Perplexity
 Gemini
 Claude
 Grok
Grok
“I want a full and complete image I can use as a backup so I won't lose my active image incase something goes wrong. Help!”-MauiPunter
A Raspberry Pi SD card can be difficult to rebuild once it is damaged, since the OS, settings, apps, and project files are stored together. To back up Raspberry Pi SD card data, keep a bootable clone for quick swaps, save a full image for complete restoration, or copy selected files for lighter routine backups.
Whichever Raspberry Pi SD card backup method you choose, verify important backups before relying on them. If the card fails before a usable backup exists, Recoverit may help recover files from a computer-detected card.
In This Article
Part 1. Compare Raspberry Pi SD Card Backup Methods and Recovery Goals
Your recovery goal should determine the backup method. The main approaches to backing up a Raspberry Pi SD card differ in what they preserve, where the backup is stored, and how quickly you can recover:
| Method | Produces | Restore Speed | Best For |
| Spare-Card Clone | A bootable copy of the card | Fast, swap and boot if verified | Quick replacement after card failure |
| Full IMG Image | A complete disk-image file | Rewrite image to a card, then boot | Archival snapshots and off-site copies |
| File Backup | Selected files and directories | Reinstall OS, then restore files | Small, frequent, incremental backups |
| Network Backup | Remote or NAS-based copies | Depends on backup type | Scheduled, versioned, or off-site protection |
When backing up a Raspberry Pi SD card data, choose between a bootable clone, full image, file-level backup, or a combination of these methods. A clone restores service quickly; a full IMG preserves partition layout and data but must be written to storage before booting.
Keep dated images or file backups for recovery points, because one clone reflects only its captured state. Raspberry Pi’s official Imager documentation confirms that Imager writes images to storage and recommends completing verification. Always verify critical backups before relying on them.
Part 2. Prepare a Consistent and Verifiable Backup
Once you choose how to back up the SD card Raspberry Pi data, prepare the system so the copy is consistent, identifiable, and secure. These five checks reduce restore problems:
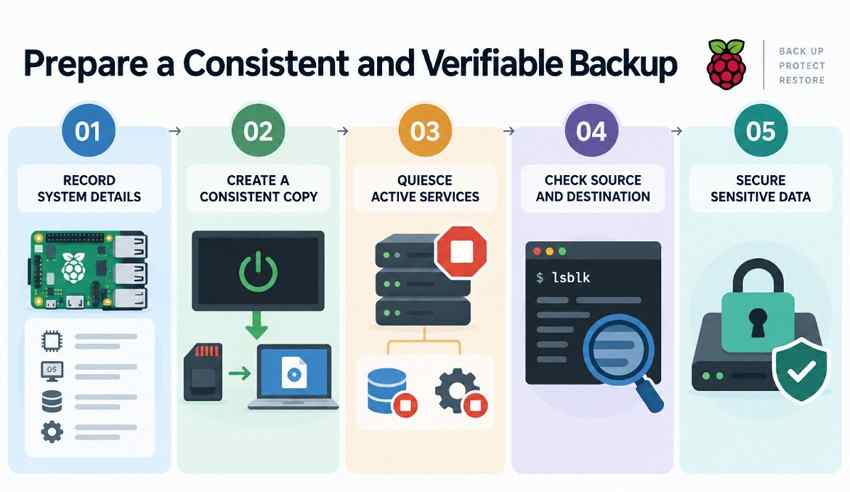
- Record System Details: Note the Raspberry Pi model, OS release, storage capacity, partition layout, and important configuration details. These records can help when restoring the backup to replacement hardware.
- Create a Consistent Copy: For a raw full-card image, shut down the Raspberry Pi cleanly and image the SD card from another computer. This prevents files from changing during the imaging process.
- Quiesce Active Services: Stop write-heavy services such as databases before a live file backup, or create application-aware dumps or snapshots. Copying active database files may produce an inconsistent backup.
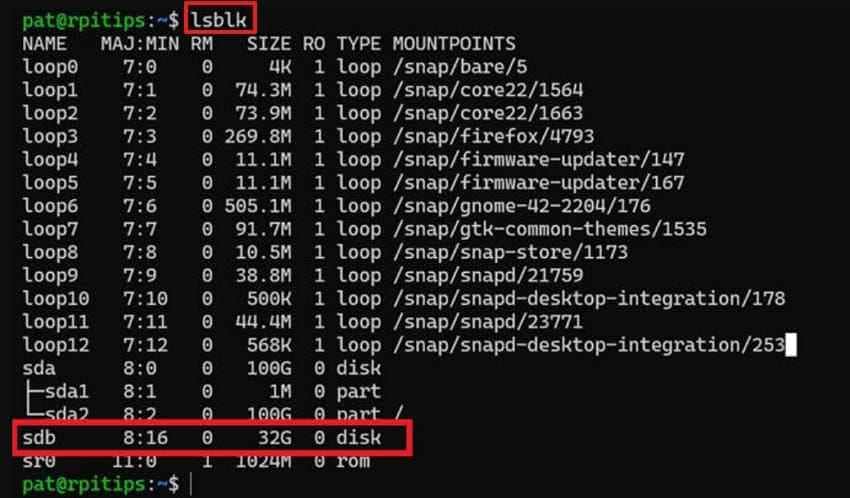
- Check Source and Destination: Confirm the source device, destination device, and available destination capacity before starting. On Linux, use lsblk to verify device names, sizes, partitions, and mount points.
- Secure Sensitive Data: Full-card images may contain SSH keys, password hashes, tokens, Wi-Fi credentials, and other sensitive data. Encrypt important backups or store them on properly access-controlled storage.
Part 3. Create a Bootable Raspberry Pi SD Card Clone for Fast Recovery
A clone is the fastest route back to a working Pi, since recovery means swapping the card and powering on. Raspberry Pi OS Desktop includes a purpose-built tool for it, and that makes this the most approachable Raspberry backup SD card method.
Use SD Card Copier Where It Is Available
SD Card Copier in Raspberry Pi OS Desktop can copy the running system to another SD card or supported storage device. If the utility is unavailable, use another supported cloning method rather than assuming “piclone” is installed.
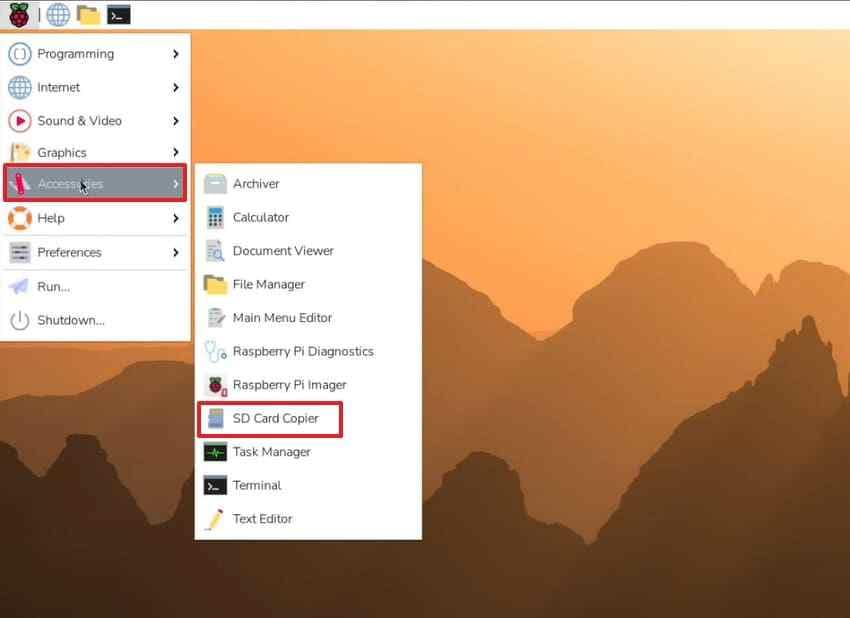
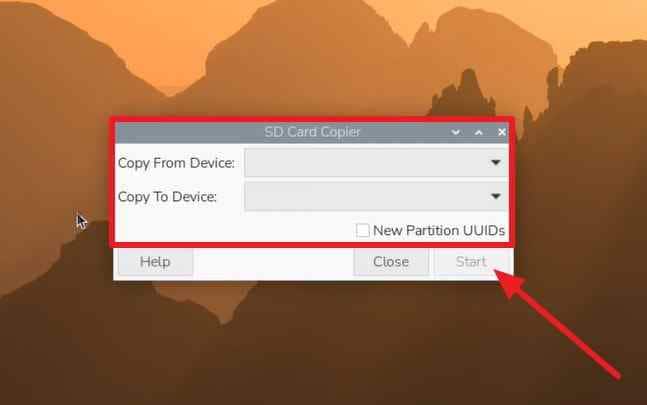
SD Card Copier can clone the running Raspberry Pi OS system, unlike a raw dd image, which is safer to create from an offline card. Use the 2 steps below to create the clone correctly:
Step 1. Connect the destination SD card or USB drive > open “Accessories > SD Card Copier.”
Step 2. Select “Copy From Device” and “Copy To Device” > enable “New Partition UUIDs” if both drives may be connected together > click “Start” > confirm the erase warning.
Clone to Equal or Larger Media
Sizing rules differ by cloning method. With Raspberry Pi SD Card Copier, the destination does not need to match the source card’s capacity, but it must have enough usable space for all copied data. SD Card Copier can sometimes copy to smaller media when the destination has enough usable space for the source data and required filesystem layout.
Raw sector-level imaging works differently because tools such as dd copy the device data block by block. An unmodified full-device image normally requires a destination with at least the capacity represented by the image.
Label Both Cards Before You Start
When you back up an SD card for a Raspberry Pi, source and destination cards can be easy to confuse once removed from their readers. Label both before cloning and verify the selected target carefully. SD Card Copier will not offer the currently booted card as the destination, but selecting another wrong device can still erase its contents.
Boot-Test the Clone
A completed copy is not fully verified until you test it. Shut down the Pi, insert the cloned card by itself, and power the system on. Confirm that it reaches the desktop or accepts an SSH connection, then check that important applications and services start correctly. Raspberry Pi describes the resulting card as a bootable copy, so testing it before relying on it is a sensible verification step.
Part 4. Create a Full Raspberry Pi SD Card Image for Complete Restoration
After covering cloning, the next option is to save the entire card as an image file. This backup SD card Raspberry Pi method is better for archiving, off-site storage, compression, and keeping multiple dated recovery copies without needing several spare cards.
When a Raw Image is the Better Choice
Choose a full image when you want dated restore points, an off-site copy, or a reference build that can be written to multiple cards. The trade-off is restore time: unlike a ready-to-use clone, the image must first be written back to physical media before the Pi can boot.
Create the Image on Your Computer
Create a full SD card image on another computer after shutting down the Raspberry Pi. Use platform-appropriate imaging tools to capture the card, then store and verify the image safely. Choose your operating system below and follow the matching imaging workflow:
For Windows
Step 1. Connect the card > open Win32 Disk Imager > confirm the SD card’s correct drive letter under Device.
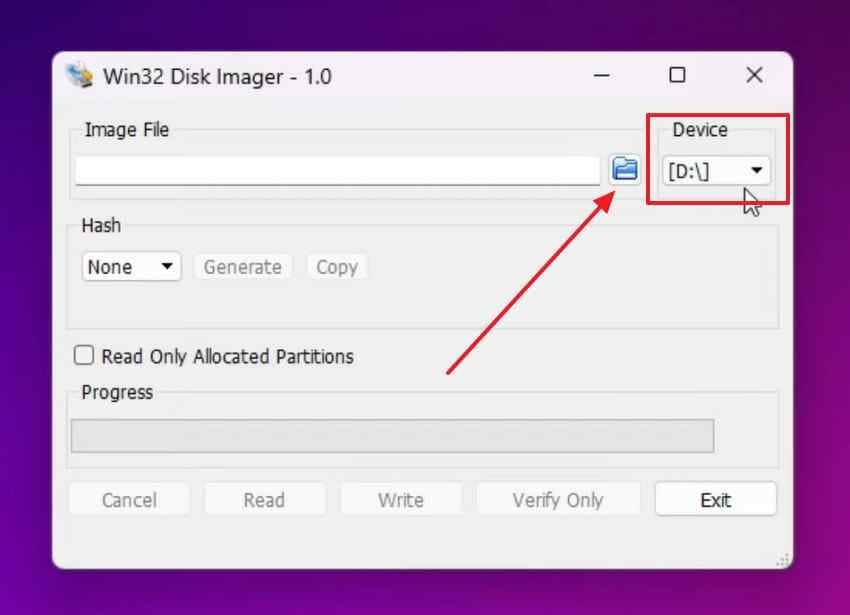
Step 2. Enter or browse to a destination filename such as “pi-backup.img.” Make sure the image is being saved to your computer, not the SD card. Click “Read” > wait for the operation to finish > safely eject the card.
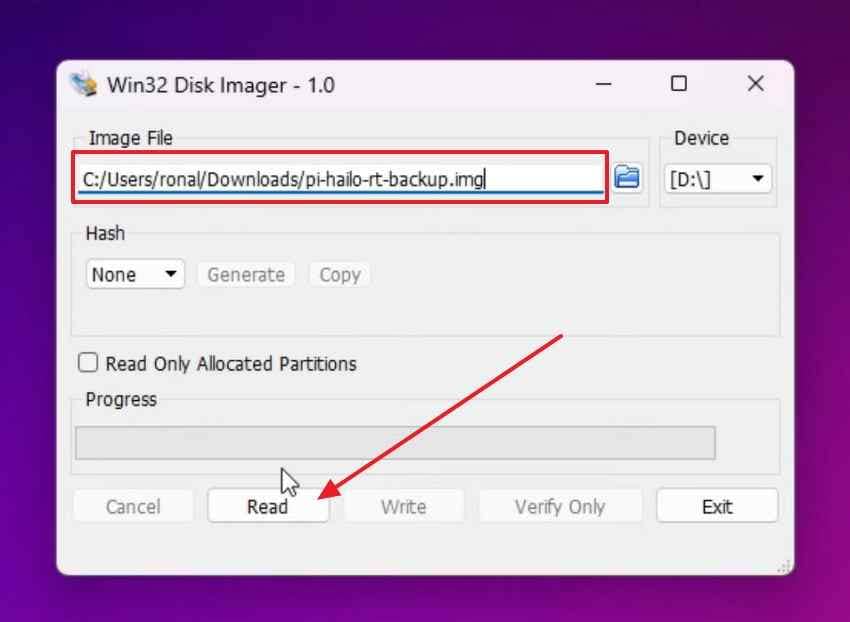
Note: Read copies the removable device into the image; Write performs the opposite operation. Double-check the device letter before clicking Read or Write, especially before restoring an image.
For macOS
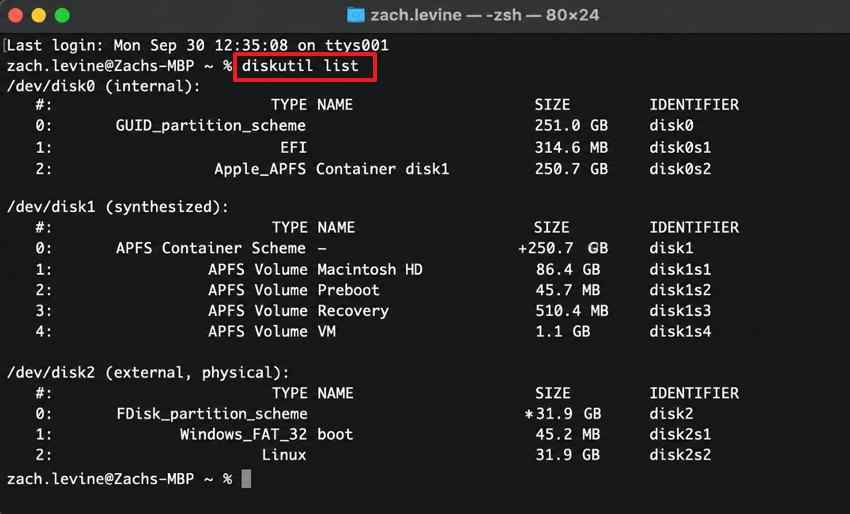
Step 1. Connect the card > Navigate to “Applications > Utilities > Terminal” > run diskutil list > identify the complete SD card device, such as /dev/disk4.
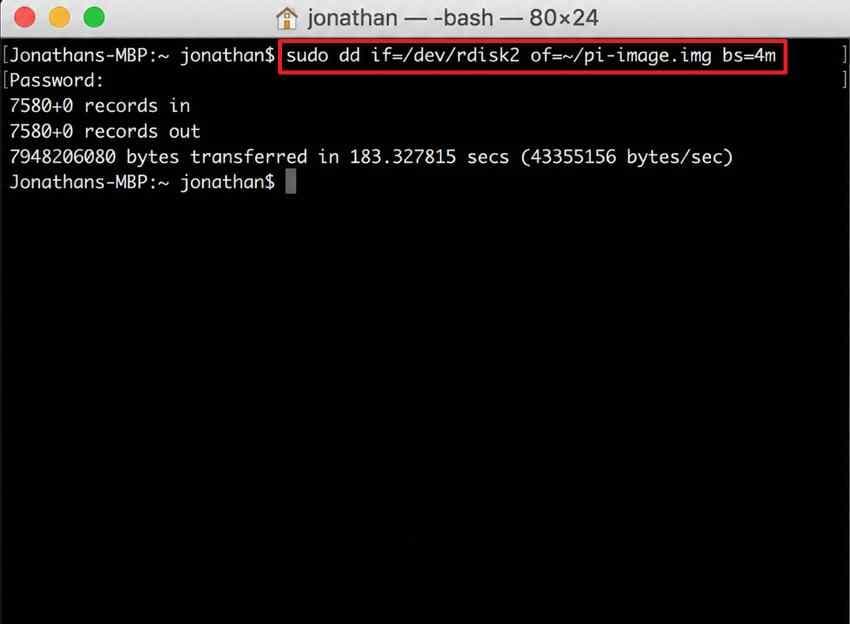
Step 2. Run “diskutil unmountDisk /dev/disk4,” replacing disk4 with the correct identifier. Do not eject or physically remove the card. Then, run: “sudo dd if=/dev/rdisk4 of=~/pi-backup.img bs=4m.” Replace rdisk4 with your card. Wait for dd to return to the command prompt without an error before ejecting the card. Do not add status=progress; that option belongs to GNU dd and is not portable to macOS.
For Linux
Step 1. Connect the card > run “lsblk” > identify the whole device, such as “/dev/sdb,” by checking its size and device type.
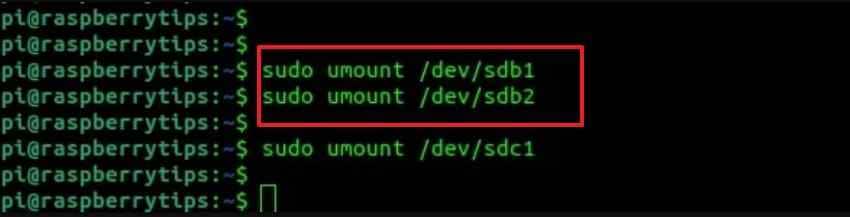
Step 2. Unmount any mounted partitions, for example: “sudo umount /dev/sdb1” and “sudo umount /dev/sdb2.” Keep the SD card connected. Run: sudo dd if=/dev/sdb of=~/pi-backup.img bs=4M status=progress. Use the whole device “/dev/sdb,” not a partition such as /dev/sdb1. Wait until the command finishes successfully. GNU documents if, of, bs, and status=progress for this purpose.
Store the Image Somewhere Else
For a reliable backup SD card Raspberry Pi setup, save the image on a computer, external drive, NAS, or remote storage rather than the original card. Keep at least one copy on separate hardware.
Watch the Capacity Trap
SD cards with the same advertised capacity can have slightly different actual usable sizes. A raw full-card image can fail to restore if the target card is even slightly smaller than the source. For fewer compatibility problems, restore raw images to media with equal or greater actual capacity.
Part 5. Back Up Files and Application Data
After creating a clone or full image, add a file-level SD card backup Raspberry Pi routine for files that change frequently. It is well suited to scheduled backups because it can copy only selected or changed data, but it does not create bootable media. Use it alongside a clone or image rather than as a direct replacement.
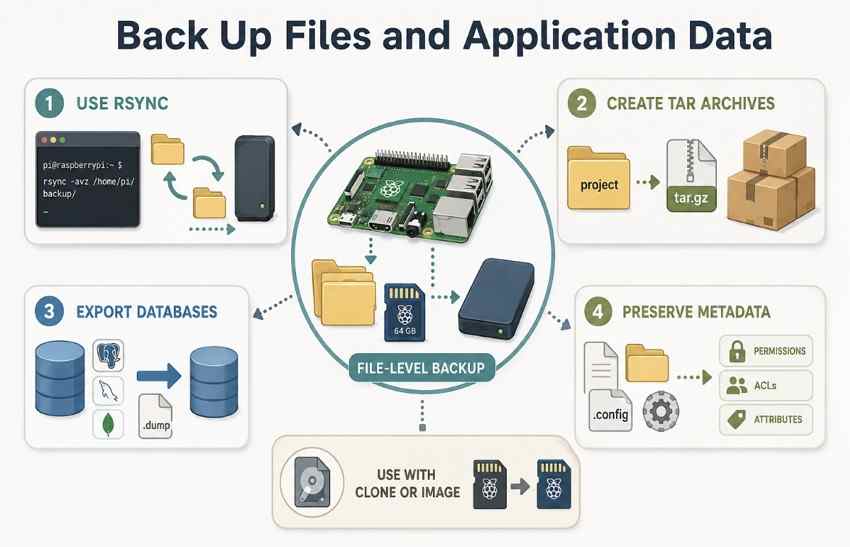
- Use Rsync: Raspberry Pi’s official rsync guide explains that repeated runs can skip unchanged files and update modified ones. For example, “rsync -aAX /home/<username>/ /mnt/backup/<username>/” preserves permissions, symbolic links, ACLs, and extended attributes when supported. The official rsync manual explains the -a, -A, and -X options.
- Create Tar Archives: Use tar -czf project-backup.tar.gz /home/<username>/project to create a compressed archive of a project directory. This works well for dated copies of projects and configuration folders. GNU’s tar documentation confirms that the -z option creates gzip-compressed archives.
- Export Databases: Avoid ordinary file copies of databases while they are actively changing. Use the database’s native backup or dump method to create a consistent copy first. For example, MariaDB documentation recommends mariadb-dump, while SQLite documentation provides dedicated methods for backing up live databases.
- Preserve File Metadata: Preserve ownership, permissions, ACLs, extended attributes, and hidden configuration files when applications depend on them. Otherwise, restored services may behave differently. Metadata preservation also depends on sufficient privileges and whether the destination filesystem supports those attributes.
Part 6. Back Up Raspberry Pi SD Card to a NAS or Remote System
To strengthen your backup Raspberry Pi SD card strategy, use the methods below to add storage, versioning, monitoring, and isolation:
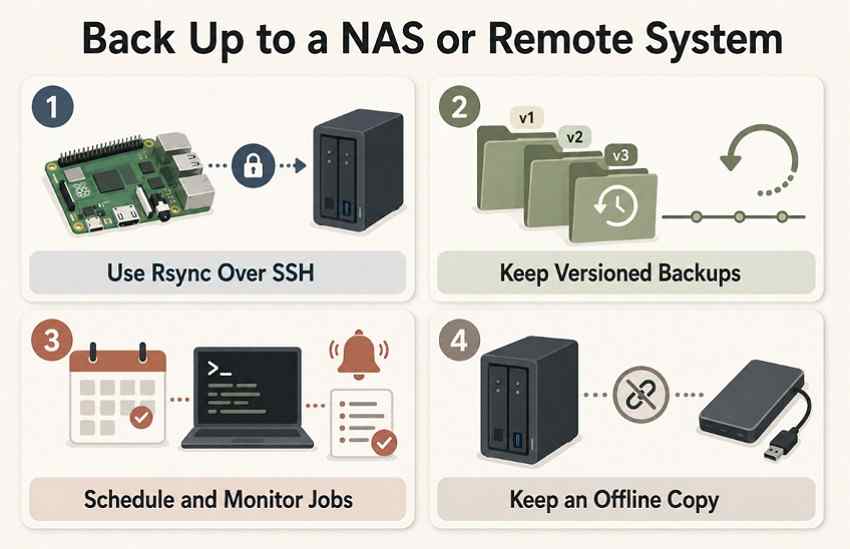
- Use Rsync Over SSH: Rsync can transfer files to a remote host through SSH, which authenticates the connection and encrypts data in transit. On repeated runs, rsync can reduce transfer volume by updating changed files instead of copying everything again.
- Keep Versioned Backups: Retain multiple recovery points instead of continually replacing one copy. Version history lets you restore an earlier state after deletion or corruption. Encrypt sensitive backup archives or storage when they contain credentials or private data. The UK NCSC backup guidance recommends retention periods and version history.
- Schedule and Monitor Jobs: Use cron or another scheduler for regular backup runs, then record logs or exit status and configure separate alerts for failures. The Linux crontab documentation confirms that cron executes scheduled commands at specified times.
- Keep an Offline Copy: A NAS or remote backup may still be vulnerable if the same account or network is compromised. Keep one offline, off-site, or otherwise isolated copy as another recovery layer. The CISA Ransomware Guide recommends maintaining offline backups, while the UK NCSC recommends protecting backups from destructive actions.
Part 7. Verify and Restore the Raspberry Pi Backup
After you back up the SD card Raspberry Pi data, verification confirms whether the backup can actually support recovery. Check each backup type appropriately rather than relying only on a completed copy operation.
| Backup Type | How to Verify | Proves |
| Cloned Card | Boot the Pi from the clone and check key services | The copy is bootable and required services start |
| IMG Image | Check its SHA-256 hash and test-restore the IMG to spare media | The image remains unchanged and can be restored |
| Tar Archive | Check its hash, extract it separately, and inspect representative files | The archive is unchanged, readable, and extractable |
| Rsync Copy | Compare important files, hashes, and required metadata | Copied data and selected metadata match expectations |
- Verify Image Hashes: On Linux, create a checksum with sha256sum pi-backup.img > pi-backup.img.sha256, then verify it later with sha256sum -c pi-backup.img.sha256. Apply the same process to important archive files. The GNU Coreutils documentation explains checksum verification. A matching hash detects later changes or corruption but does not prove the original backup was created correctly.
- Test Backup Contents: Extract archives into a separate location and open representative files. GNU tar documentation also provides verification and comparison features for checking archived data.
- Boot Test Copies: Start the Raspberry Pi from a cloned or restored card and confirm that important applications and services work. Raspberry Pi Imager documentation also recommends completing verification after writing an image to storage.
- Record Restore Details: Note the Raspberry Pi model, OS release, backup date, storage details, and restore procedure. These records make recovery easier when hardware or system configuration has changed.
Part 8. Recover Data When No Usable Backup Exists
If no usable Raspberry Pi SD card backup exists, stop using the original card as soon as possible. Avoid formatting, repairing, or writing new data because these actions can overwrite files that may still be recoverable. If the card remains detectable on a computer, Recoverit SD Card Recovery can scan it for files lost through deletion, formatting, corruption, or inaccessible partitions.

Recoverit can also scan supported disk-image files, including compatible IMG files. This lets you attempt recovery from an image instead of repeatedly reading unstable media. If the SD card is not detected, test another reader, adapter, port, or computer first. A card that remains unreadable may require professional recovery. Recoverit also supports EXT4 and other Linux filesystems commonly used on Raspberry Pi storage.
Key Features
- Detected Card Scanning: Scans computer-detected SD cards affected by deletion, formatting, corruption, or inaccessible filesystems without requiring you to format the card first.
- Lost Partition Recovery: Detects lost partitions on SD cards and can help recover files from partitions that no longer appear normally in the operating system.
- Disk Image Support: Opens compatible IMG files so recovery can be attempted from an image instead of repeatedly reading an unstable Raspberry Pi SD card.
- AI Search and Filtering: Uses AI Search, natural-language queries, and filters to help locate specific recovered files more quickly within large scan results.
- Separate Save Location: Saves recovered files to another drive or computer location instead of writing them back to the Raspberry Pi SD card.
How to Recover Data When No Usable Backup Exists
If the SD card is still detected, follow the steps below to scan it safely and save recoverable files to a separate location:
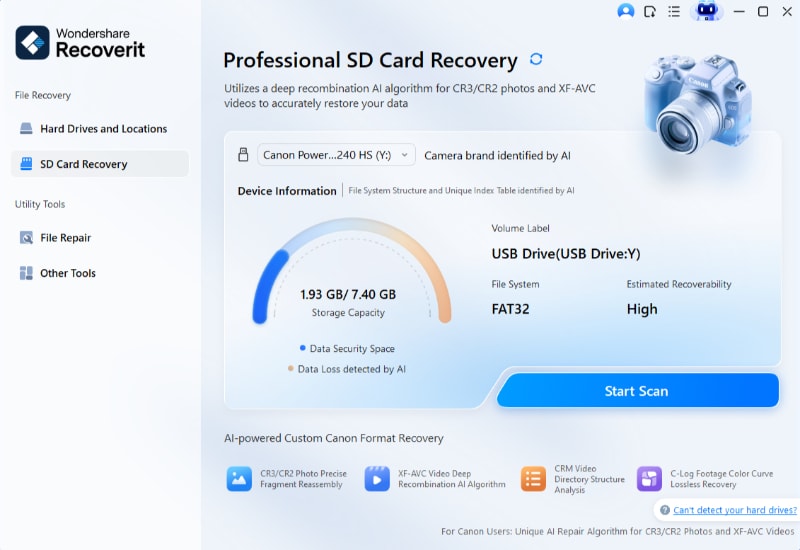
Step 1. Scan the SD Card
Open Recoverit > “SD Card Recovery” > Select the detected Raspberry Pi card > Click “Start Scan” to begin searching for lost files.
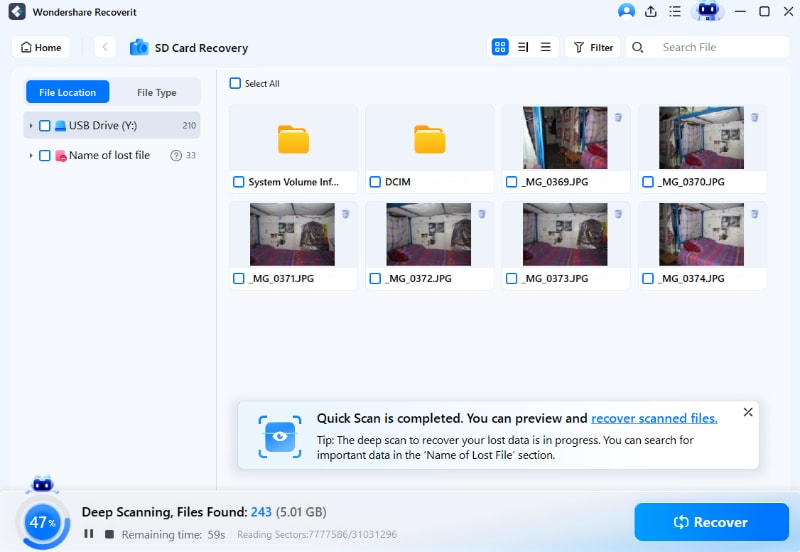
Step 2. Review the Scan Results
Wait for scanning > Browse files by location or type > Use “Filters” > Preview important files before choosing them for recovery.
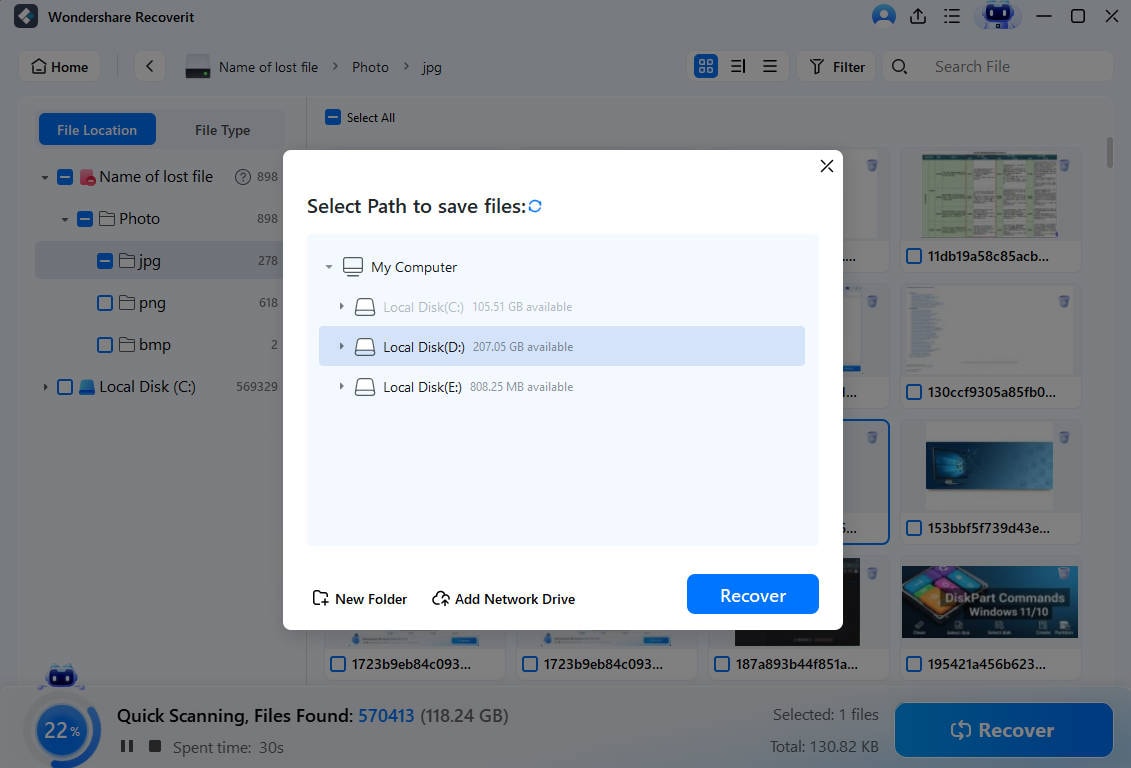
Step 3. Recover and Save Files
Select the files you need > Click “Recover” > Choose a different drive or folder > Save the recovered data safely.
Recover Data When No Usable Backup Exists
 Security Verified. Over 7,302,189 people have downloaded it.
Conclusion
To conclude, choose a Raspberry Pi SD card backup method based on recovery speed and backup frequency. A bootable clone enables fast replacement, while dated images preserve complete restore points. File backups efficiently protect frequently changing data. Always verify important backups before relying on them. If the card fails without a usable backup, Recoverit may help recover accessible files.
FAQ
-
How often should I back up a Raspberry Pi SD card?
Back up after major configuration changes and schedule file backups according to how much recent data you can afford to lose. -
Can I back up a Raspberry Pi SD card while the Pi is running?
Yes, though the result may not represent one consistent moment, since files change during the copy. File-level backups and SD Card Copier can operate while Raspberry Pi OS is running. For a raw full-card image, shutting down first is safer. -
Can I clone a Raspberry Pi SD card to a larger card?
Yes. A larger destination is normally suitable. With SD Card Copier, a smaller destination may also work if it has enough usable capacity for the copied data. Raw sector-by-sector images generally require a destination at least as large as the original image. -
Does Raspberry Pi Imager back up an existing SD card?
No. Imager writes an image onto a card, not the other way around. Use SD Card Copier for a clone, or a sector-level tool to create an image file.


