

 TL;DR:
Locate unsaved Word drafts after a crash by checking the "Manage Document" menu or manually navigating to hidden .asd temporary files within the Windows AppData or Mac Library folders.
● AutoRecover strictly protects locally stored files by saving temporary .asd copies at predefined intervals, whereas AutoSave requires OneDrive or SharePoint to continuously sync cloud updates.
● Windows stores these hidden recovery files in C:\Users\[UserName]\AppData\Roaming\Microsoft\Word, while Mac users must use Finder's "Go to Folder" to access ~/Library/Containers/com.Microsoft.Word/Data/Library/Preferences/AutoRecovery.
● Because AutoRecover removes temporary copies upon normal file closure, recovering lost .doc or .docx files in these scenarios requires a dedicated tool like Recoverit to scan storage drives directly.
Ask AI for a summary
 ChatGPT
 Perplexity
 Gemini
 Claude
 Grok
Grok
TL; DR
- AutoRecover Role: It saves temporary Word copies during crashes, restarts, or sudden closures.
- Windows Paths: Check the Manage Documents, AppData folders, Recent Documents, and ASD files.
- Mac Locations: Use Finder, Library folders, Word Preferences, and Finder Search.
- Safe Settings: Keep AutoRecover on, set the interval to 5 minutes, and save manually.
- Recoverit Option: Try Recoverit when AutoRecover folders are empty or missing.
Quick Answer: To learn how to find AutoRecover files in Word, start with Manage Document. Next, check the ASD files, AppData folders, Mac Library, and Word Preferences. When no copy appears, Recoverit can scan for lost Word documents.
Word documents can disappear unexpectedly after a crash, power cut, forced update, or accidental closure. In many cases, the file is not gone completely because Microsoft Word creates AutoRecover copies during active editing. These temporary versions can help users restore recent work without starting again from zero.
Still, recovery depends on knowing how to find AutoRecover files in Word across Windows and Mac. The right folder, file extension, and recovery option may differ by device, Word version, and save settings. Thus, this guide explains the main locations, so lost drafts become easier to trace and reopen.
In this article
Part 1. What Is AutoRecover in Microsoft Word?
Before learning how to find auto recovery files in Word, it helps to understand what AutoRecover actually does. AutoRecover is a Microsoft Word safety feature that saves temporary recovery copies while a document is open.
Common AutoRecover File Extensions
The following AutoRecover file extensions help users identify Word recovery files after sudden Word crashes:
| File Extension | What It Means | When Users May See It |
|---|---|---|
| .asd | Main Word AutoRecover file | After a crash, forced shutdown, or unsaved document loss |
| .wbk | Word backup file | When "Always create backup copy" is enabled |
| .tmp | Temporary Word file | During editing, failed saving, or unexpected closure |
How Often Does Word Create Recovery Files?
Word typically saves AutoRecover files at the interval you set in Word Options. The default AutoRecover setting in Word is every 10 minutes, but it can be changed. For this reason, recovery can only be done based on the setup, editing time, and availability of a recent Word recovery copy.
When Does Word Create AutoRecovery Files?
During active editing, Microsoft Word creates AutoRecovery files at the selected save interval, especially before users manually save changes. These copies become useful after crashes, power failures, frozen screens, or accidental closure. However, they remain temporary, so knowing where to find the AutoRecover files in Word helps users recover work quickly.
Difference Between AutoRecover and AutoSave
After users find AutoRecover files, they should identify each file's source. The comparison below explains how AutoRecover and AutoSave clearly protect work in different situations:
| Feature | AutoRecover | AutoSave |
|---|---|---|
| Purpose | Restores temporary copies after crashes or sudden closure | Saves changes continuously in real time |
| Works Best For | Unsaved or locally stored Word files | Files saved in OneDrive or SharePoint |
| File Type | Usually creates temporary recovery files like .asd | Updates the original cloud file directly |
| Internet Needed? | No, it can work locally | Yes, usually needed for cloud syncing |
| Main Limitation | May not save the latest few minutes | Can overwrite changes quickly if users edit incorrectly |
| Best Use Case | Recovering work after Word crashes | Keeping cloud documents updated automatically |
Part 2. How to Find AutoRecover Files in Word on Windows?
Locating Word recovery files on Windows becomes easier when users know where Word stores temporary copies. Some files appear inside Word's recovery tools, while others remain inside hidden folders or use the .asd extension. The following methods explain how to check the default location, confirm the saved path, and recover available files without random searching:
Default Word AutoRecover File Location on Windows
On Windows, Word usually stores AutoRecover files inside the user profile folder. Since this folder is often hidden, users may need to paste the path directly into File Explorer's address bar.
| File Location | What It Usually Stores |
|---|---|
| C:\\Users\\[UserName]\\AppData\\Roaming\\Microsoft\\Word | AutoRecover files created while editing Word documents |
| C:\\Users\\[UserName]\\AppData\\Local\\Microsoft\\Office\\UnsavedFiles | Unsaved Office files available through recovery options |
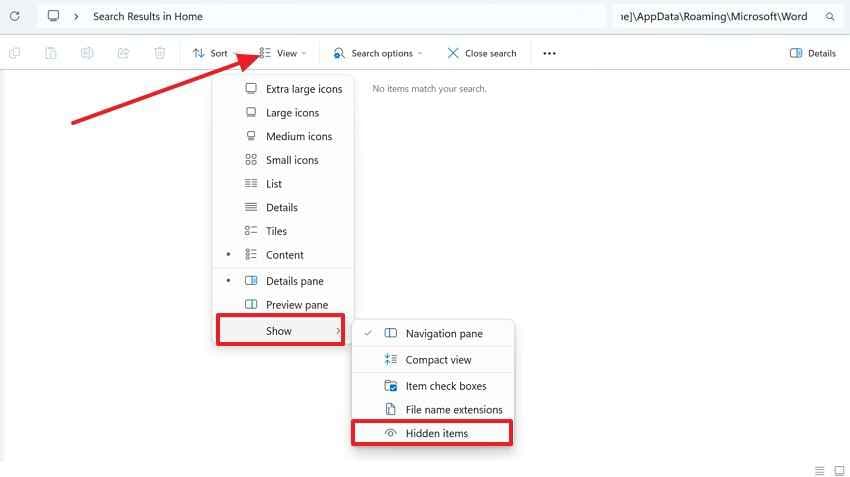
Furthermore, replace [UserName] with the actual Windows account name. If the folder does not appear, open "File Explorer," press "View," choose "Show," and enable "Hidden Items."
How to Customize AutoRecover File Location in Word
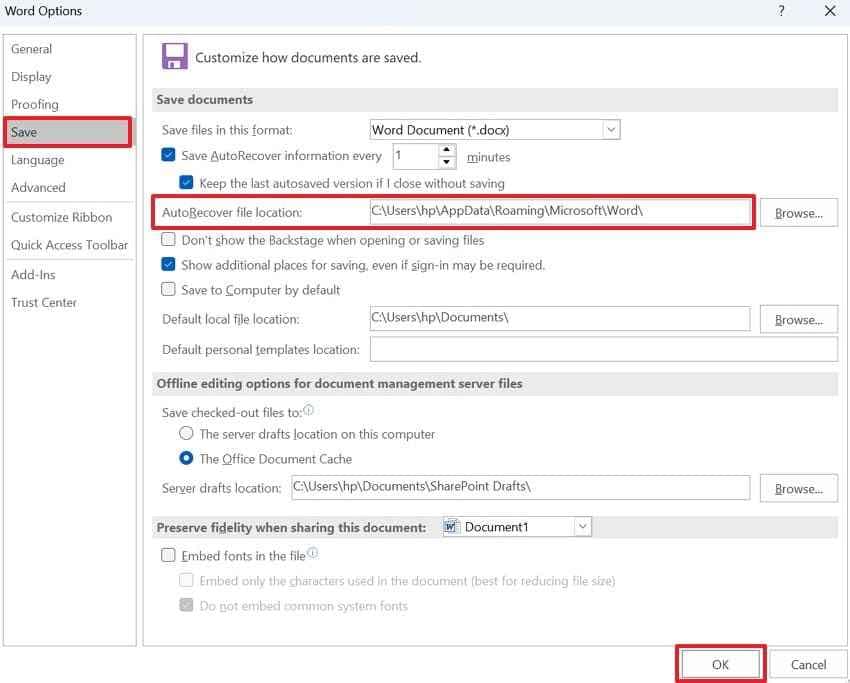
To customize Word's AutoRecover location, navigate to "File > Options > Save" and review the AutoRecover file location field. Users can copy the path, open it in File Explorer, or replace it with a preferred folder. This also supports how to find auto recovery files in Word more easily later for future recovery.
Before checking hidden folders manually, users should try Word's built-in recovery options first. The methods below explain three practical ways to locate AutoRecover files on Windows:
Option 1. Find AutoRecover Files Through "Manage Document"
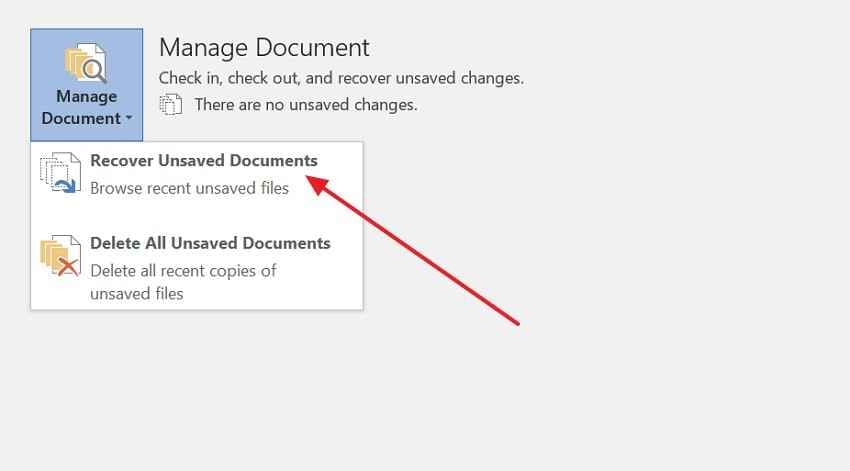
The Manage Document menu gives users the quickest route to Word's unsaved recovery area. For anyone learning how to find auto recovery files in Word, this option is the easiest starting point. It works best when Word is closed suddenly, but it has still saved a temporary version. Use the steps below to recover unsaved files through Manage Document:
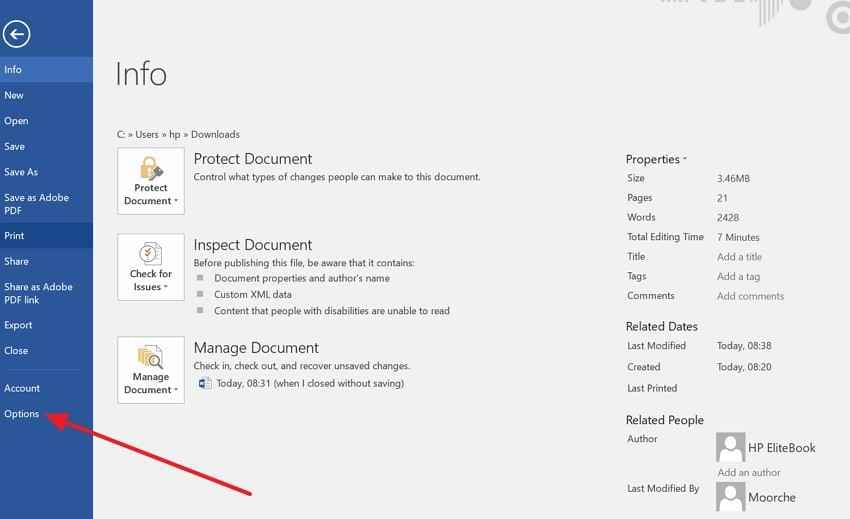
Step 1. In Microsoft Word, go to "File > Info," and choose the "Manage Document" option.
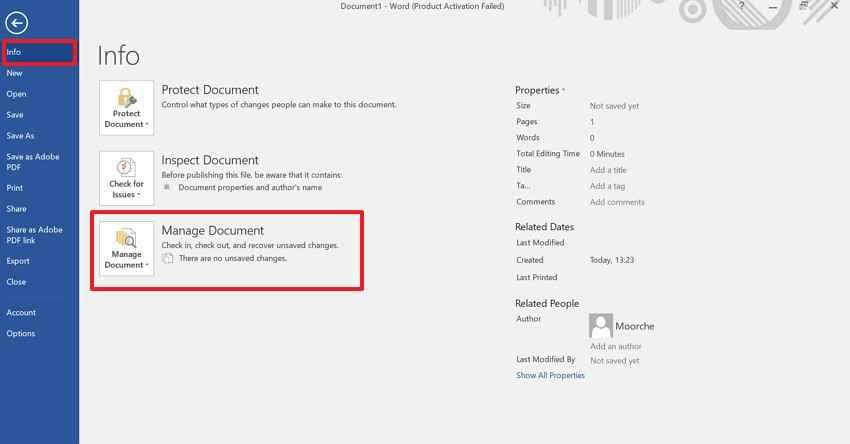
Step 2. From the dropdown menu, choose "Recover Unsaved Documents." Afterward, select the available recovery file from the folder and open it in Word. Then, click "Save As" and store it as a normal DOCX file.
Option 2. Search for ASD AutoRecover Files
Some recovery copies remain hidden, especially when Word's recovery panel shows nothing. In that case, users can search Windows manually to check where to find the AutoRecover files for Word. The .asd extension helps identify temporary files created during an editing session. Follow these steps to locate ASD files through File Explorer:
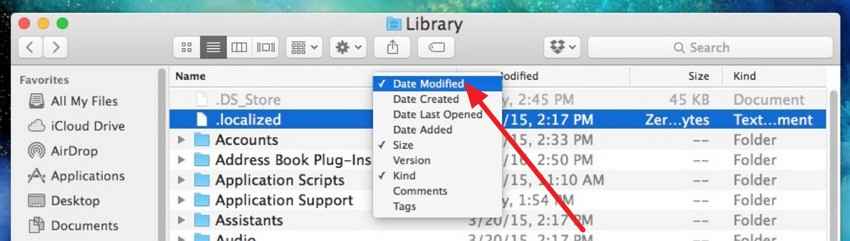
Step 1. Open File Explorer and type ".asd" in the search bar. Next, right-click on the file and in "Sort By" select "Date Modified" to find the most recent recovery file.
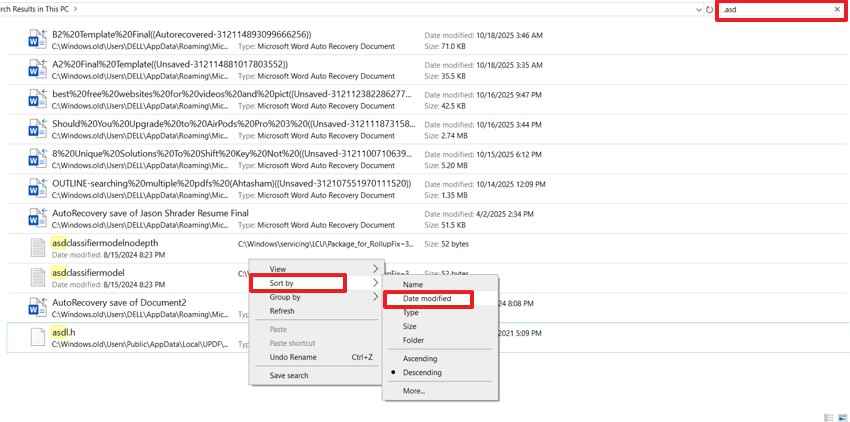
Step 2. Now, select the relevant ASD file and open it with Microsoft Word. After checking the content, press "Save As" to save it with a new file name.
Option 3. Check Recent Documents in Word
Recent Documents helps users trace the last opened file and its original folder location. This option is useful when the saved document exists, but the latest draft seems to be missing. Users can also find AutoRecover files word by checking related file paths and recent activity. Adhere to the instructions mentioned below to review recent Word files:
- Launch Microsoft Word, navigate to "File > Open," and select "Recent." Review the listed files by name, date, and location.
- Open the closest matching document and check whether the missing content appears. If it is useful, save a new copy immediately.

Part 3. How to Find AutoRecover Files in Word on Mac?
Finding Word recovery copies is slightly different on Mac because AutoRecovery files are usually stored inside the hidden Library folder. The default AutoRecovery folder location is /Users/<username>/Library/Containers/com.Microsoft.Word/Data/Library/Preferences/AutoRecovery, where <username> should be replaced with the Mac account name.
Moreover, users can open it quickly through Finder > Go > Go to Folder and paste the path. If this folder is empty, the options below show other ways to find AutoRecover copies on Mac:
Option 1. Check the Default AutoRecovery Folder in Finder
Finder gives the most direct route when users need to find the AutoRecover files in Word on Mac. The hidden AutoRecovery folder may contain temporary copies created before Word closed unexpectedly. So, use the steps below to open the folder path and check saved recovery copies:
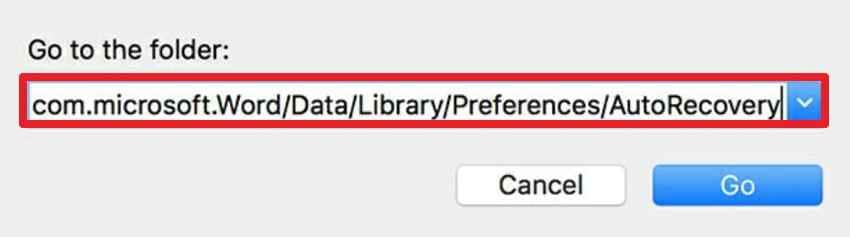
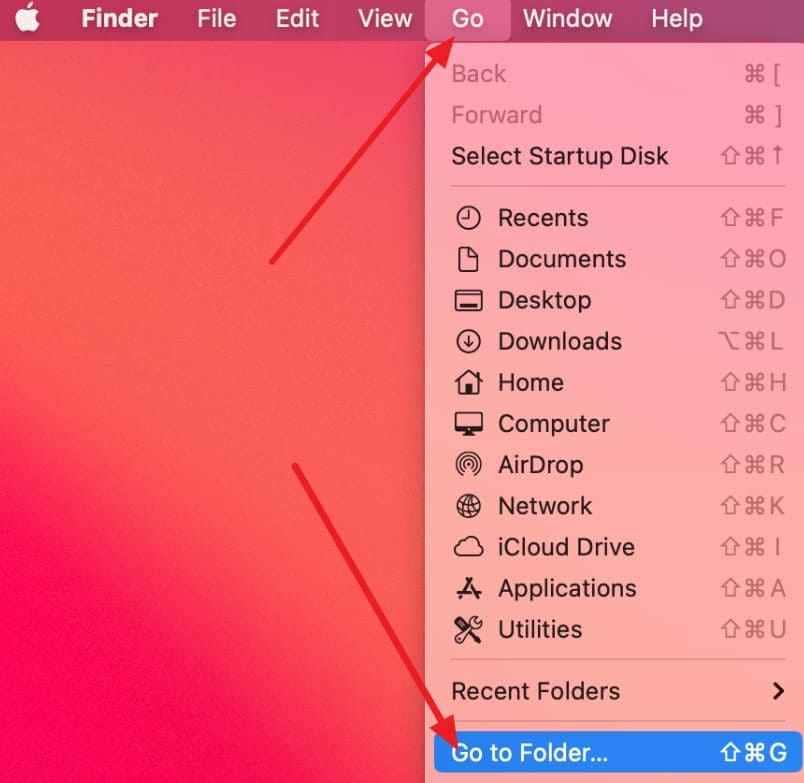
Step 1. Open Finder, navigate to "Go > Go to Folder," and paste this path:
~/Library/Containers/com.Microsoft.Word/Data/Library/Preferences/AutoRecovery
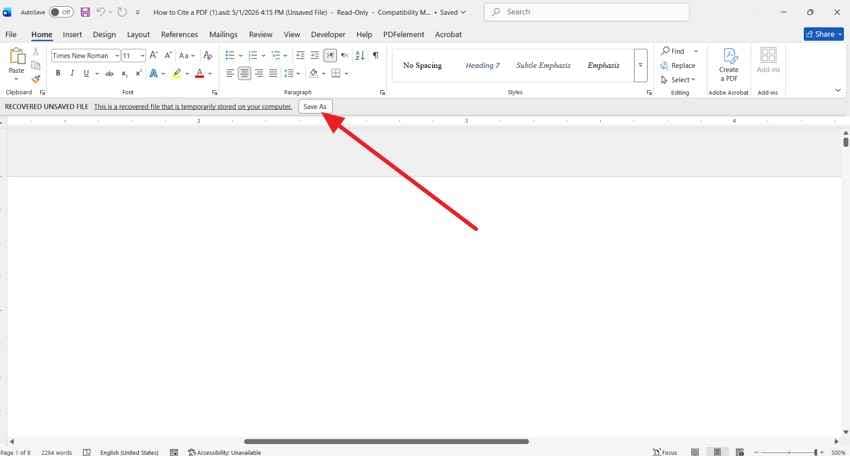
Step 2. Look for files starting with "AutoRecovery Save Of" or a similar Word recovery name. Open the needed file in Word, then save it as a normal DOCX document.

Option 2. Check Word Preferences on Mac
Word Preferences helps confirm whether AutoRecovery files are saved in the default folder or another location. However, this option is useful when the standard Library path appears empty or unavailable. Follow the guide below to check the active AutoRecovery folder from Word settings:
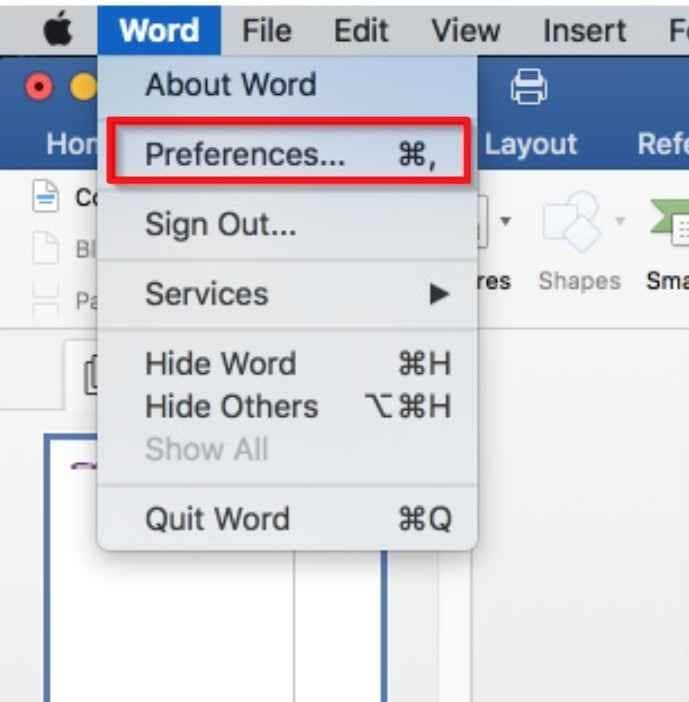
Step 1. Start by accessing Microsoft Word on Mac, then select "Word > Preferences," and choose "File Locations" if available. Next, select "AutoRecover Files" to check where Word is saving recovery copies.
Step 2. After that, copy the listed folder location and open it through "Finder > Go > Go to Folder." Check the folder for recovery files, then open and save the needed copy.
Option 3. Use Finder Search to Find AutoRecovery Files
Some recovery files may not appear in the expected folder, especially after restarts or storage changes. Therefore, Finder Search makes finding AutoRecover files in Word for Mac easier across hidden and visible locations. The steps below show how to search by file name, date, and recovery-related terms:
Step 1. In Finder, choose "This Mac," and search terms like "AutoRecovery," "AutoRecovery Save Of," or the missing document name.
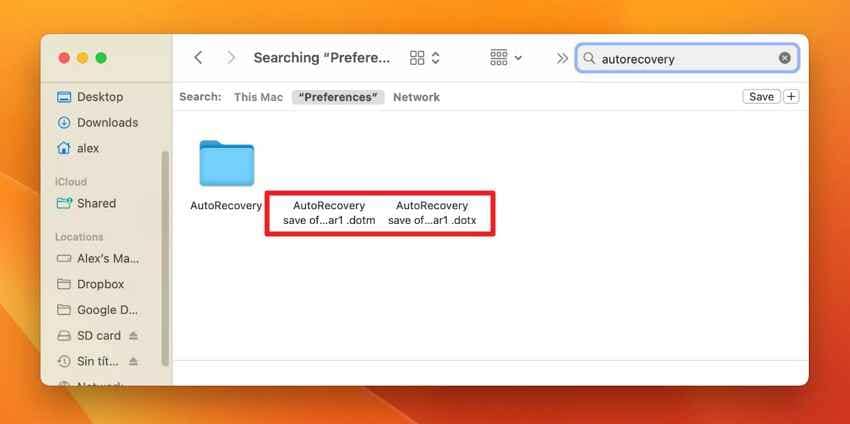
Step 2. Next, sort the results by "Date Modified" to find the newest recovery copy. Access the relevant file in Word and save it immediately with a new DOCX name.
Part 4. How to Enable AutoRecover in Microsoft Word
AutoRecover must be enabled before Word can create recovery copies. Users can adjust their timing, location, and related save settings from Word's options on Windows and Mac.
Enable AutoRecover on Windows
In Word for Windows, AutoRecover settings sit inside the Save options, where users can control the recovery interval and keep unsaved versions. The steps below show how to turn on these settings before editing important documents:
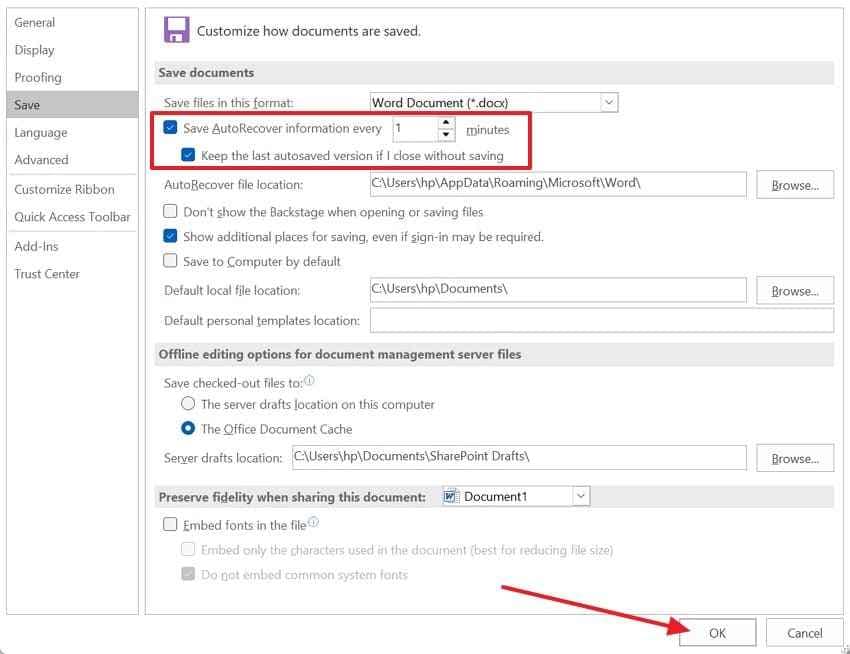
Step 1. Upon accessing Microsoft Word, choose "File > Options," and select "Save" from the left menu.
Step 2. Afterward, check "Save AutoRecover Information Every X Minutes" and "Keep the Last AutoRecovered Version If I Close Without Saving." Next, set the time interval, then press the "OK" button.
Enable AutoRecover on Mac
For Mac, AutoRecover is managed through Word Preferences rather than the File menu. The following steps explain how to enable recovery saving and set a suitable time interval:
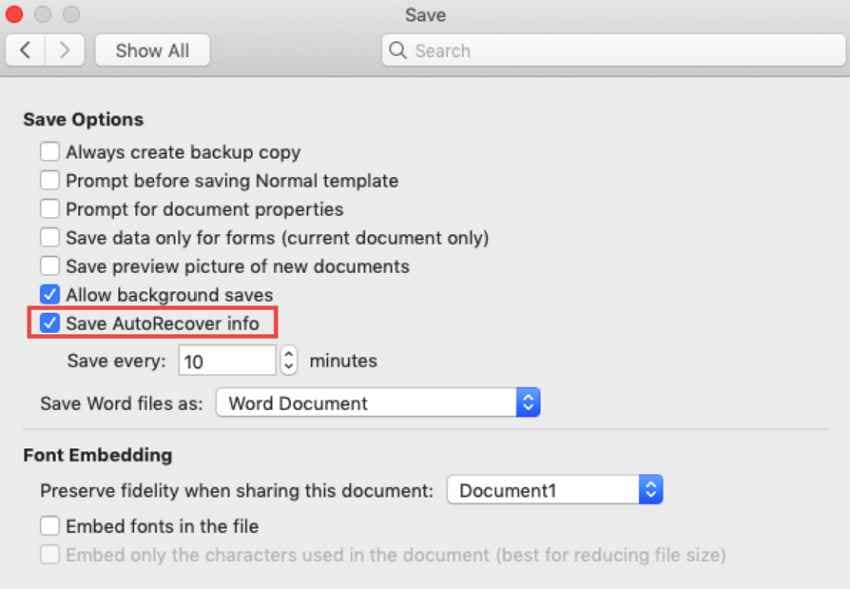
Step 1. From the Mac menu bar, select "Word," then open "Preferences" to reach Word's main settings panel.

Step 2. Choose "Save," turn on "Save AutoRecover Info," and select how often Word should save recovery details, then close the window once the setting is updated.
Best AutoRecover Settings for Maximum Protection
AutoRecover works better with the right settings before editing important files. Below are recommended settings to reduce loss during unexpected crashes, restarts, or accidental closures:
| Setting | Recommended Choice | Why It Helps |
|---|---|---|
| Save Interval | Every 5 minutes | Reduces the amount of recent work that could be lost |
| Last Recovered Version | Keep this option enabled | Helps restore a file after closing Word without saving |
| AutoRecover Location | Use a clear, accessible folder | Makes recovery files easier to locate when needed |
Why AutoRecover Sometimes Fails
Even when users know how to find AutoRecover files in Word, recovery may fail because of these common causes:
- Disabled AutoRecover: AutoRecover cannot create recovery copies when the feature is disabled. Users should enable it before editing important Word documents for stronger protection.
- Long Save Interval: A longer interval leaves more edits unsaved between scheduled AutoRecover copy updates. Shorter intervals reduce the risk of loss if Word shuts down without warning.
- Normal File Closure: AutoRecover may remove temporary copies when users close Word normally. Saved documents should be checked first before searching recovery folders manually.
- Limited Editing Time: Word may not create copies if the document is left open for a brief period. Recovery works better when files remain active beyond the save interval.
- Full or Unstable Storage: Low storage space can stop Word from saving recovery data properly. External drives or cloud sync issues may also interrupt recovery copies.
Part 5. Can't Find AutoRecover Files? Try Recoverit Instead
Sometimes Word's recovery folders appear empty even after users check the default path, Manage Documents, Recent Documents, and Finder search. This usually means the temporary copy was deleted, overwritten, never created, or saved outside the expected location. At this stage, users may still need another way to find the AutoRecover files in Word or recover the original document.
Therefore, Recoverit Word Recovery can support the next recovery attempt by scanning selected drives, folders, the Desktop, USB storage, or other locations where the Word file was saved. Instead of relying only on temporary AutoRecover copies, it searches for lost, deleted, or inaccessible DOC and DOCX files. Users can preview recoverable documents first, then restore the needed version safely.
Key Features
- File Type Filters: Narrows scan results to DOC, DOCX, and related files, reducing time spent checking unrelated data quickly.
- Deep Scan Support: Searches storage sectors more thoroughly when quick results miss documents lost after deletion, formatting, or corruption.
- Path-Based Recovery: Shows original file paths when available, helping users identify the correct Word draft before restoration safely.
How to Recover Lost Word Files Using Recoverit
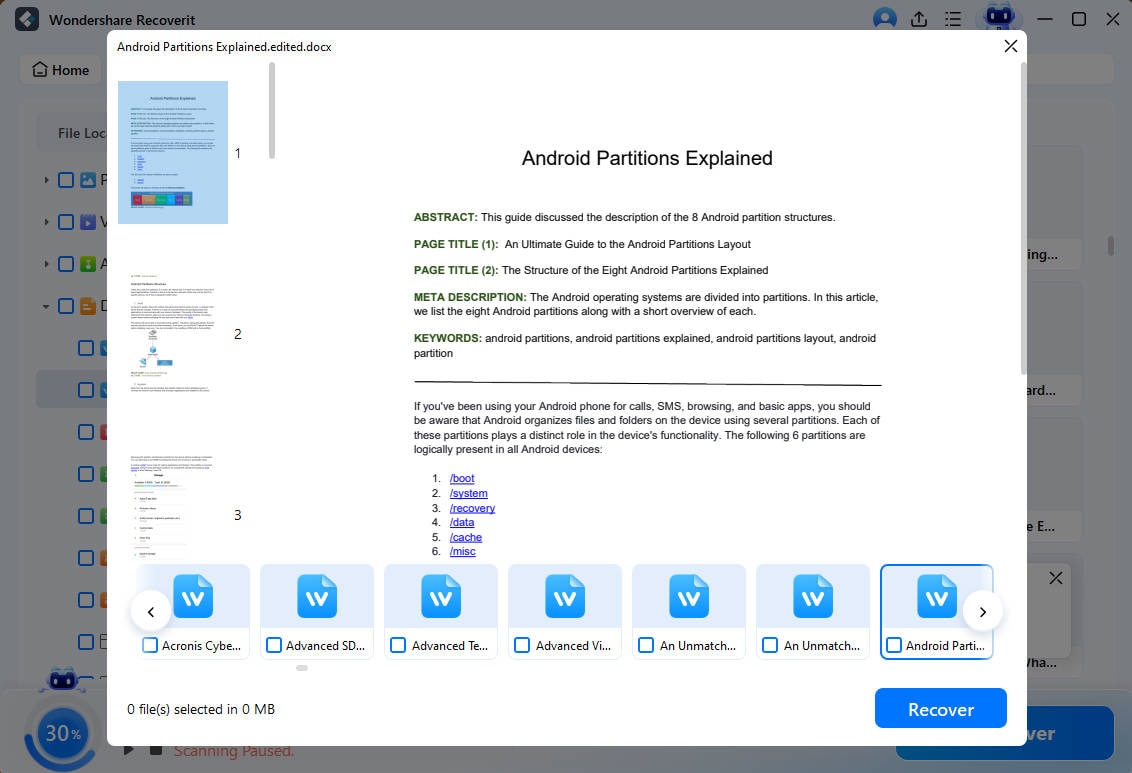
Once Recoverit's recovery features are clear, the next step is using them correctly. The guide below shows how to scan, preview, and restore lost Word files safely:
Step 1. Launch Recoverit and move to "Hard Drives and Locations." Choose the drive, Desktop, folder, USB, or external storage where the missing Word document was last saved.

Step 2. Let Recoverit scan the selected location, then use the search bar or file filters to reduce unnecessary results. Enter "DOC" or "DOCX" so the scan list shows Word-related files more clearly.

Step 3. Review the file name, date, size, or preview before restoring the document. Next, choose "Recover," then pick a different storage location to avoid overwriting remaining recoverable data.
Why Recoverit Helps When AutoRecover Fails
When AutoRecover leaves no usable copy, Recoverit helps by targeting the original document rather than Word's temporary cache. It is useful after accidental deletion, interrupted transfers, formatted drives, system crashes, or emptied Recycle Bin cases, where built-in recovery options fail.
Conclusion
To conclude, AutoRecover gives users a practical way to restore Word drafts after crashes, restarts, or accidental closure. By checking recovery folders, Word menus, and Mac or Windows paths, users can learn how to find AutoRecover files in Word more confidently. When no temporary copy appears, Recoverit is a useful next option for scanning and restoring lost DOC or DOCX files.
Frequently Asked Questions
-
Where are Word AutoRecover files stored on Windows?
Word AutoRecover files are usually stored in the user profile under the AppData folder. Users can also check Recover Unsaved Documents in Word if the recovery copy does not appear manually. -
Where can users find AutoRecover files in Word on Mac?
Mac users can check the hidden Library folder through Finder > Go > Go to Folder. If the default AutoRecovery folder is empty, Word Preferences can help confirm the active recovery location. -
Why are AutoRecover files not showing in Microsoft Word?
AutoRecover files may not appear if the feature was disabled, the file was closed normally, or Word did not stay open long enough. Low storage, long save intervals, and deleted temporary copies can also affect recovery. -
Is AutoRecover the same as AutoSave in Word?
No, AutoRecover creates temporary recovery copies after crashes or sudden closure. AutoSave saves changes continuously in OneDrive or SharePoint files, so it works differently from local recovery copies.


