


 TL;DR:
To recover an unsaved Word document, reopen Microsoft Word immediately to access the automatic Document Recovery pane, or navigate to File > Info > Manage Document > Recover Unsaved Documents to restore cached drafts.
● Search your system manually for `.wbk` backup files or press Windows + R to scan the `%temp%` directory for `*.tmp` fragments if the draft is missing from Word's visible recovery menus.
● Word permanently discards recovery data if you explicitly selected "Don't Save" upon closing the application or if the AutoRecover background saving feature was disabled prior to a crash.
● Use a drive-level recovery tool like Recoverit to detect file signatures when built-in paths fail, ensuring you save the successfully recovered draft to a completely different storage location to avoid overwriting.
Ask AI for a summary
 ChatGPT
 Perplexity
 Gemini
 Claude
 Grok
Grok
When a Word draft disappears, the safest approach is to move from simple checks toward deeper recovery only when needed.
- First Check: Reopen Word and review the Document Recovery pane immediately.
- Built-In Paths: Try Recover Unsaved Documents, AutoRecover files, backups, and temporary folders.
- Deleted Files: Check the Recycle Bin, OneDrive, SharePoint, or available version history.
- Final Option: Use Recoverit when built-in recovery paths show no usable draft.
- Safe Restore: Always save recovered files to another secure storage location.
An unsaved Word document can vanish after crashes, shutdowns, or accidental closure. This issue feels stressful when the file contains urgent writing work. However, Word often keeps recovery copies; users can still access them safely. These copies may appear inside AutoRecover, temporary folders, or recent documents.
Thus, this guide explains how to open unsaved Word document files carefully. It covers built-in recovery paths before moving toward deeper checks later. Users can restore drafts without overwriting newer or safer document versions. That makes recovery faster, cleaner, and less confusing for beginners, too.
Quick Answer: How to Open an Unsaved Word Document Fast
Reopen Microsoft Word and check whether the Document Recovery pane appears automatically. Then open File > Info > Manage Document > Recover Unsaved Documents and save the recovered draft immediately.
In this article
-
- Way 1. Restart Word and Check the Document Recovery Pane
- Way 2. Use Recover Unsaved Documents
- Way 3. Search for .wbk Backup Files
- Way 4. Check .tmp Temporary Files
- Way 5. Check the Recycle Bin
- Way 6. Check the AutoRecover Location Manually
- Way 7. Check the Mac AutoRecover Folder
- Way 8. Restore from OneDrive or SharePoint If the File Was Already Saved
Part 1. Start Here First: Is Your Word Document Unsaved, AutoRecovered, or Deleted?
Before starting recovery, identify what happened to the Word file first. This helps choose the right path instead of repeating random recovery steps.
- Never Saved Draft: A document closed without saving usually has no fixed file location. Word may still keep it inside the Unsaved Documents section.
- Crash Recovery Copy: After a crash, Word can reopen the latest available recovery version. Save that copy immediately before editing or closing Word again.
- AutoRecover or Backup File: Some drafts remain inside AutoRecover folders or backup file locations. These copies are useful when Word does not show recovery prompts.
- Deleted Saved Document: A once-saved file needs a different recovery approach after deletion. Start with the Recycle Bin, OneDrive history, or available system backups.
Part 2. How to Recover and Open Unsaved Word Files in Microsoft Word
Once the file status is clear, recovery becomes easier inside Word. The following methods show where Microsoft Word stores unsaved drafts and recovery copies:
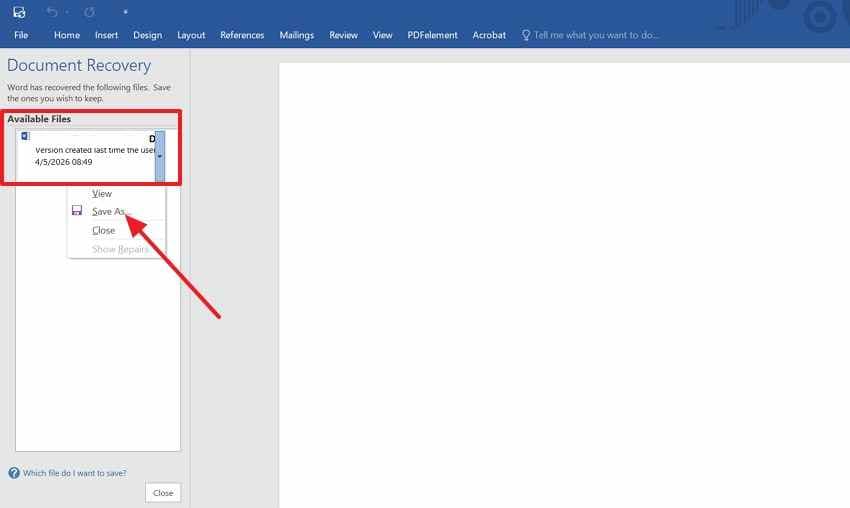
Way 1. Restart Word and Check the Document Recovery Pane
Sudden Word crashes can leave draft versions inside the recovery pane after reopening. However, the pane appears only when Word captures enough session data before closure again. Frozen screens, forced restarts, and closed windows make early recovery checks useful under pressure.
Users get a practical starting point for how to open an unsaved Word document safely. Follow the steps mentioned below to try this method:
- Reopen Microsoft Word after the crash and check the "Document Recovery Pane."
- Next, click the recovered file, choose "Save As," and store it separately.
Way 2. Use Recover Unsaved Documents
Word's built-in recovery area supports drafts closed before permanent saving happened. In many cases, recovery stays simpler because users remain inside Word. The feature can open unsaved Word document copies after accidental closure. Unsaved draft checks belong here before deeper storage searches begin later. So, adhere to the steps below to use this method:
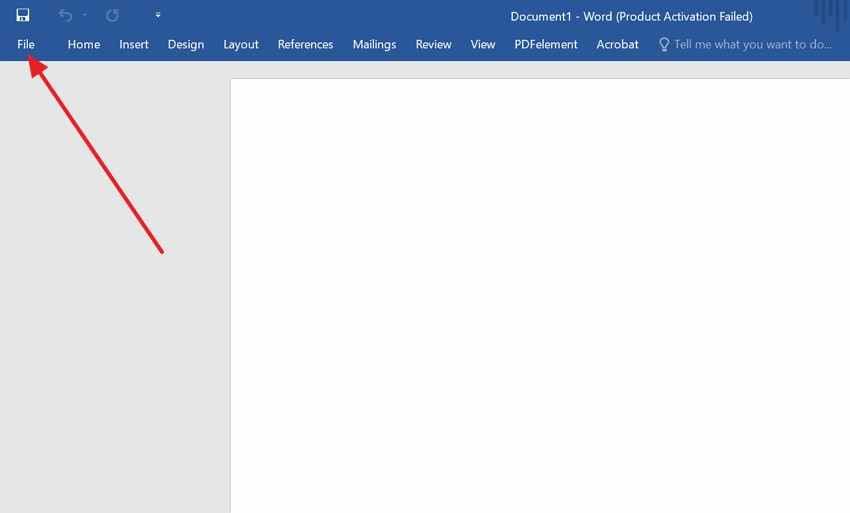
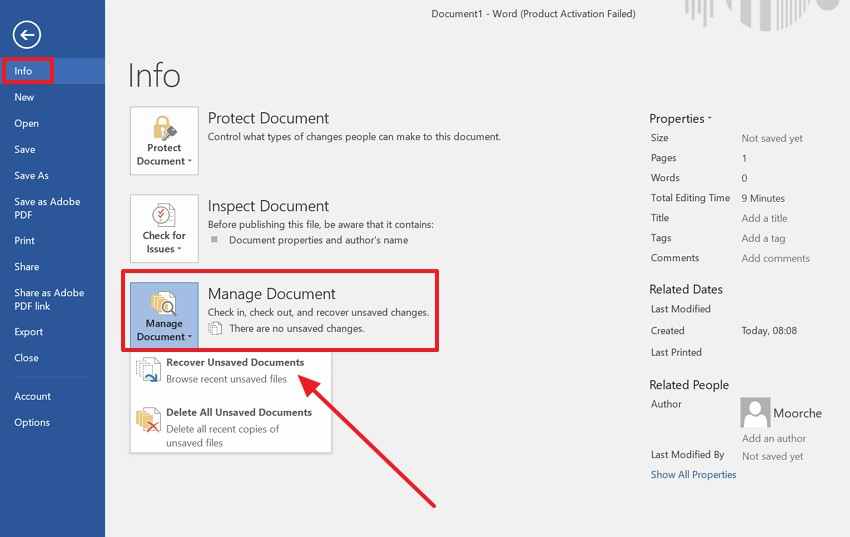
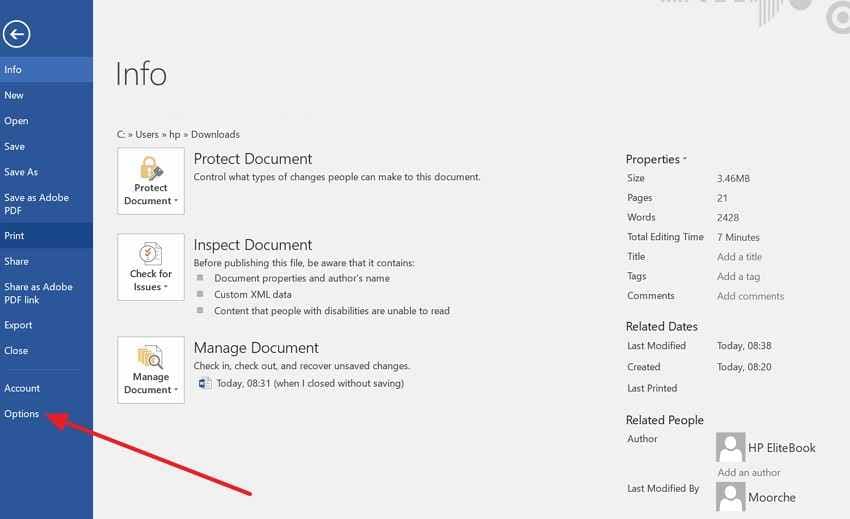
Step 1. In Word, navigate to "Files," then choose "Info" from the left menu.
Step 2. Afterward, choose "Manage Document," then select "Recover Unsaved Document," and open the unsaved document.
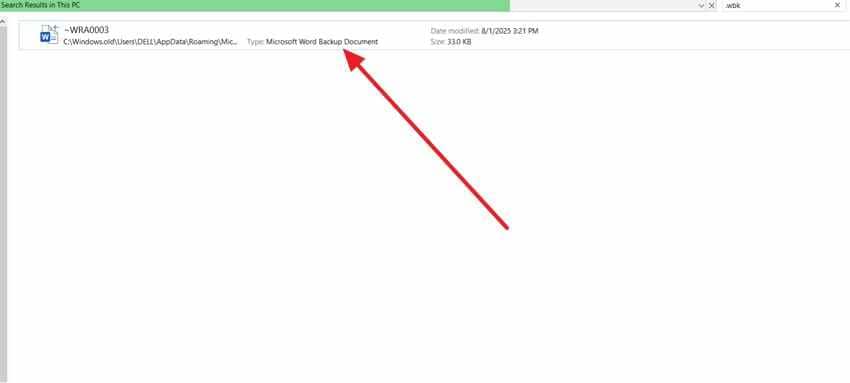
Way 3. Search for .wbk Backup Files
Backup files serve a different purpose from standard AutoRecover copies inside Word. Instead, .wbk versions depend on earlier backup settings and previous saves. This option shows how to safely open an unsaved document in Word.
These older safety copies help when newer changes disappear unexpectedly during editing. Now, walk through the instructions mentioned below to try this method:
- Use File Explorer to search ".wbk" across This PC carefully.
- Then, select the Word backup result, check its date, and open it in Word and save it separately.
Way 4. Check .tmp Temporary Files
Temporary files can preserve document traces after crashes, interrupted Word sessions, or freezes. At the same time, file names may appear unclear or incomplete. The check supports how to open unsaved Word document content from fragments.
Temporary storage becomes useful when standard recovery locations reveal nothing useful. Try the stepwise guide below to check temporary files with ease:
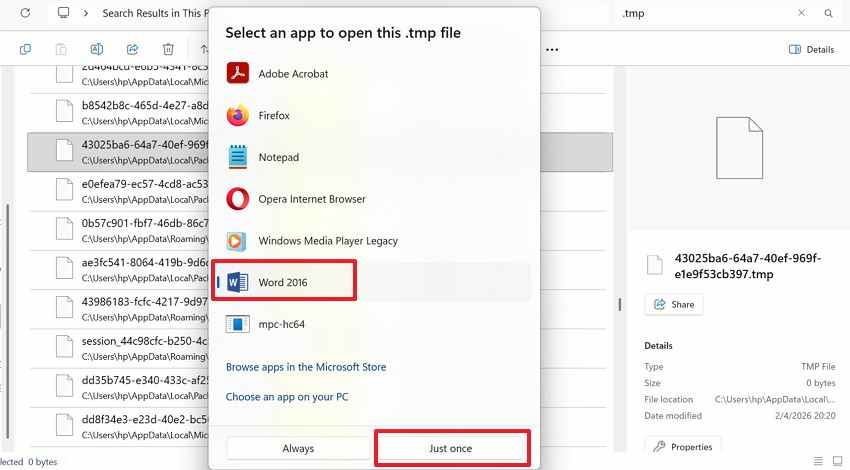
Step 1. Press Windows + R, type "%temp%," and search "*.tmp" for possible Word traces.
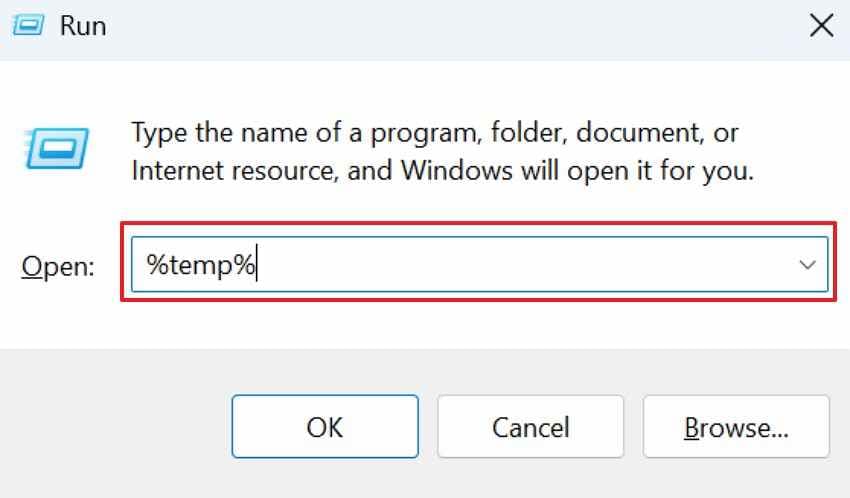
Step 2. Select a recent .tmp file, choose Word, and press "Just Once" to test it.
Way 5. Check the Recycle Bin
Deleted documents follow a different recovery logic because saving already occurred in a folder. Therefore, the Recycle Bin is better suited for restoring Word files than for fresh drafts during recovery checks.
This location helps restore previously saved Word documents deleted accidentally or during cleanup, even when trying to open an unsaved Word document from earlier work. Now, move toward the instructions below to check the Recycle Bin:
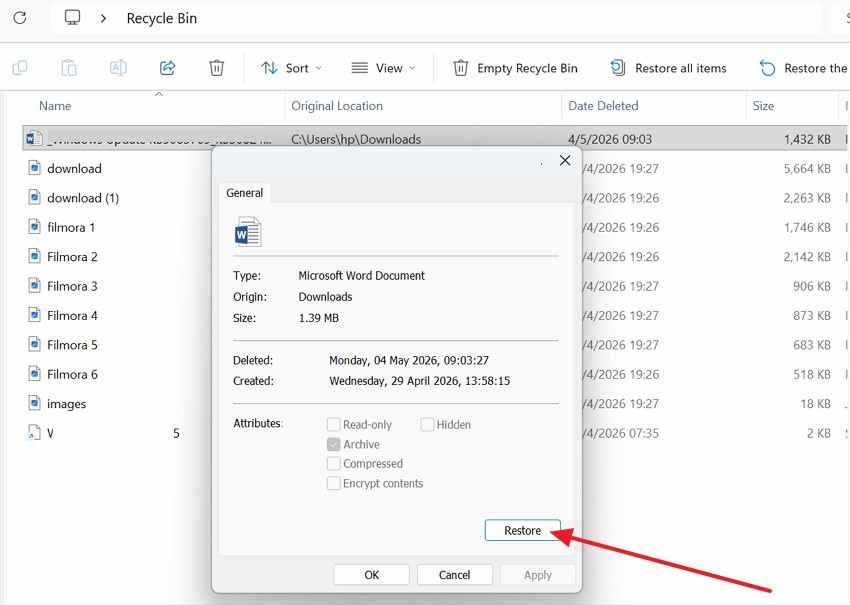
- In the Recycle Bin, select the deleted Word document and check its details.
- Then, click "Restore" in the properties window to return it to the original location.
Way 6. Check the AutoRecover Location Manually
Word can store recovery data without displaying anything after relaunch. Even then, the manual AutoRecover location may reveal hidden draft copies. The folder explains how to open an unsaved Word document manually.
Recovery paths help when Word's visible options appear empty or unreliable. Follow the stepwise guide below to check the AutoRecover location manually:
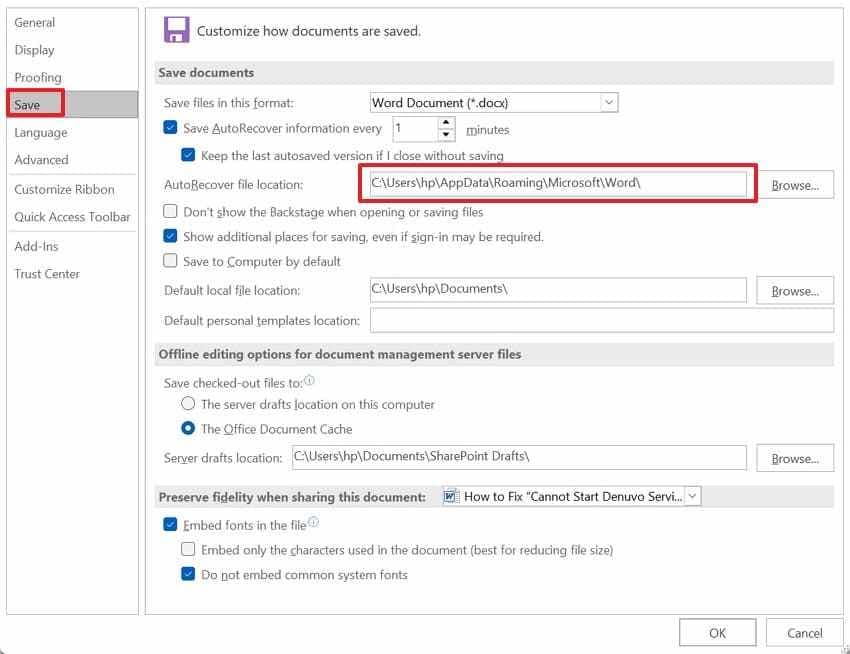
Step 1. In Word, move through "File," then choose "Options," and later select "Save" settings.
Step 2. Copy the "AutoRecover File Location," paste it into File Explorer, and review available files.
Way 7. Check the Mac AutoRecover Folder
On macOS, Word recovery does not follow the usual Windows folder logic. AutoRecovery copies often sit inside Library containers, away from visible documents. For Mac crashes, this location can reveal drafts still holding recent writing.
That makes it useful for how to open an unsaved document in Word safely. Try the following instructions to check the Mac auto recovery folder:
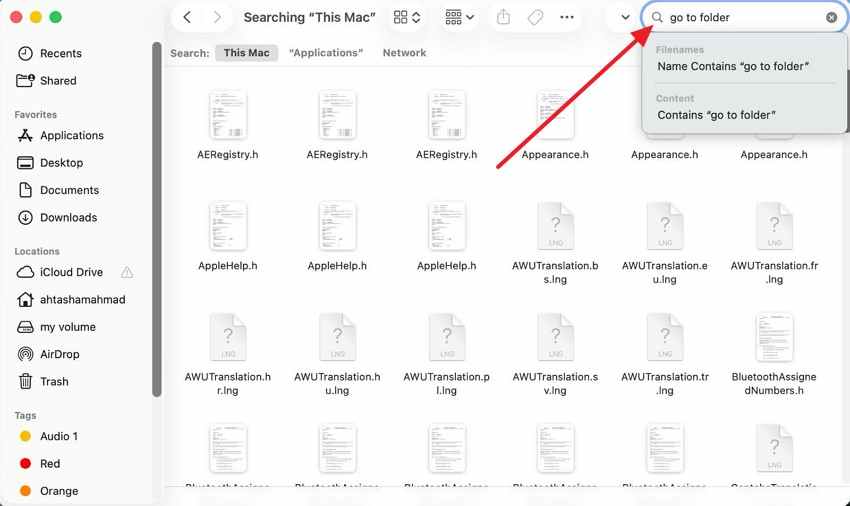
- In Finder, choose "Go to Folder" from the top menu. Paste the Word AutoRecovery folder path and review the recovered document copies.
Way 8. Restore from OneDrive or SharePoint If the File Was Already Saved
Cloud recovery belongs to documents synced online before the latest version disappeared. OneDrive and SharePoint can keep earlier edits through version history. This matters when local Word shows nothing after overwrites or device failure.
Users can recover how to open unsaved Word document changes from saved cloud versions. Adhere to the steps below to restore from OneDrive if the file was already saved:
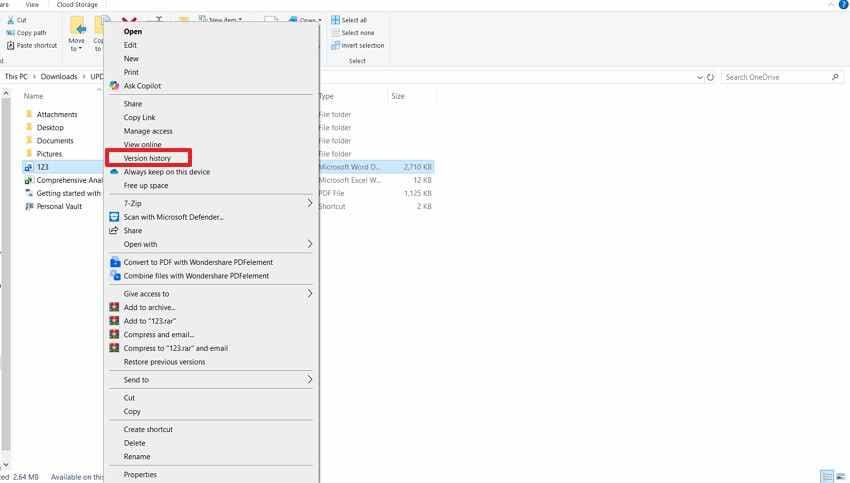
Step 1. Select the synced Word document in OneDrive, right-click it, and choose "Version History."
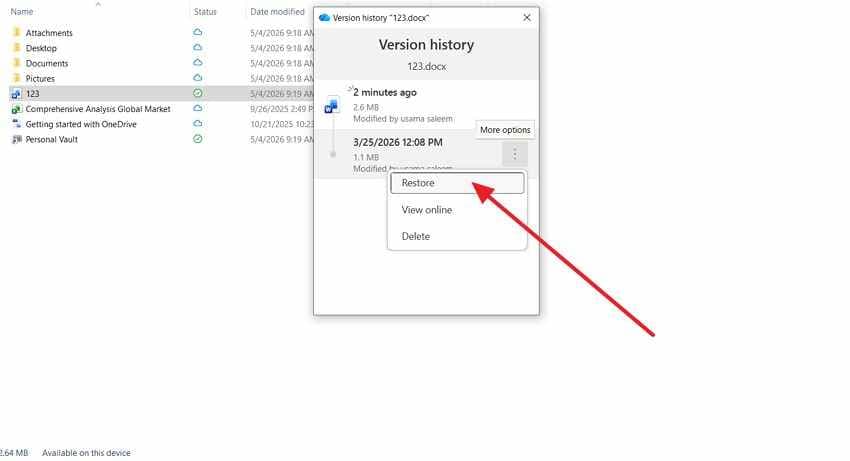
Step 2. Choose the needed older version, click "More options," and select "Restore."
Part 3. Why Unsaved Word Documents Still Cannot Be Found
After all Word recovery checks, some drafts may still remain missing. The following causes explain why Word cannot always find every unsaved file:
- AutoRecover Settings Disabled: With AutoRecover disabled, Word stops saving background copies during active writing sessions. A crash then leaves little recovery data for Microsoft Word to show.
- Don't Save Selected: Selecting Don't Save tells Word to discard changes from that session immediately. Recovery becomes unlikely because Word treats the draft as intentionally closed work.
- Recovery Copies Cleared: Saved documents can make Word remove older recovery copies from temporary locations. Those files vanish because Word assumes the main version is protected now.
- Recent Snapshot Missing: A sudden crash may happen before Word records another recovery snapshot properly. Recent edits disappear, while older recovered text may still remain available separately.
- File Location Changed: Previously saved documents may disappear after deletion, transfer, or folder reorganization later. Word recovery folders cannot display files moved outside their original paths anymore.
Part 4. If Built-In Word Recovery Fails, Use Recoverit
Built-in Word recovery may not find every missing draft after serious interruptions. AutoRecover folders, temporary files, backups, and recent documents may still appear empty. This often happens after deletion, cleanup, storage errors, or file movement later.
At that stage, users need deeper recovery beyond Word's saved paths alone. Recoverit Word Recovery can safely scan the original storage location for any remaining document traces. This software fits this section because it supports recovery after built-in checks fail. It should follow AutoRecover, temporary folders, Recycle Bin, and backup searches first.
For guidance on how to open unsaved Word document files, this keeps the guidance balanced. Users can select the affected drive, scan results, and preview documents carefully. Finally, they can restore recovered files to another safe storage location afterward.
Key Use Cases
For users learning how to open unsaved Word document files, Recoverit fits after Word's built-in routes show no usable draft.
- Deleted Draft Recovery: Recoverit is useful when deleted Word drafts no longer appear anywhere locally. Users can scan the original drive and preview recoverable document versions safely.
- Formatted Drive Recovery: After accidental formatting, Word files may disappear with entire folder structures instantly. Formatted storage can still be scanned for documents beneath old file records.
- Crash-Based Recovery: Sudden crashes can leave Word documents missing before proper saving completes successfully. Storage scanning helps locate remaining file data after the interrupted session ends.
- External Device Recovery: Missing drafts on USBs or external drives need targeted device scanning first. Recoverit lets users select that device and check document results before restoration.
- Readable Copy Preview: Several recovered copies may appear when Word documents were saved repeatedly earlier. Previewing inside Recoverit helps users pick the cleanest readable version before restoration.
Why It Works When Built-in Methods Fail
When Word stops showing recoverable drafts, the failure is often path-based. The points below explain why Recoverit works when built-in methods fail:
- Path-Independent Search: Word depends on remembered locations, so missing paths can block recovery entirely. A Recoverit drive-level scan checks data beyond Microsoft's folders and cached routes.
- File-Signature Detection: Renamed or damaged extensions may hide documents from Word's normal checks completely. File signatures help Recoverit recognize Word content even without clear filenames shown.
- Layered Scan Depth: Basic recovery often stops after recent sessions and visible temporary locations only. Layered scanning reviews hidden records that Word never opens by itself.
- Document-Focused Sorting: Full drive searches can become messy when many unrelated files appear together. Document filters inside Recoverit sort results by type, date, size, and path.
- Restore-Safety Control: Word recovery may reopen files inside the same risky storage area again. Saving elsewhere protects recovered documents from overwriting or further corruption during restoration.
Step 1. Select the Lost File Location
First, launch Recoverit and select "Hard Drives and Locations" from the left panel. Then, choose the drive, USB, Desktop, Recycle Bin, or folder where the Word file disappeared.

Step 2. Scan and Filter the Results
Next, let Recoverit scan the selected location and display recoverable files. Use "File Location" or "File Type" filters to find the missing document faster.

Step 3. Preview and Recover the Word File
Finally, preview the recovered document to confirm the correct file content. Select the required Word file, then click "Recover" to save it safely.
Part 5. How to Prevent Losing Word Documents Again
The following habits reduce the chances of losing Word drafts again. Each tip helps Word save, sync, or preserve safer copies of documents.
- Keep AutoRecover On: Keep AutoRecover enabled so Word saves recovery copies during active writing sessions. Review this setting after updates, since preferences may change without a clear warning.
- Shorten Save Interval: Set a shorter save interval when working on long documents regularly. Five minutes gives Word a better chance of automatically and safely capturing recent edits.
- Use OneDrive AutoSave: Save important documents to OneDrive when online editing suits your workflow. AutoSave keeps cloud versions up to date and makes version history easier to review.
- Enable Backup Copies: Turn on backup copies for documents that need extra protection during editing. These files help when newer drafts become damaged, changed, or missing suddenly.
- Avoid Risky Closing: Read close prompts carefully before choosing Don't Save during busy writing sessions. Save another copy before closing when Word looks frozen or unstable again.
Conclusion
To conclude, learning to open unsaved Word document drafts begins with Word's recovery options, including AutoRecover, temporary files, backups, and cloud history. When these routes show no usable version, Recoverit becomes a practical next step for scanning remaining storage traces. Always restore files to another safe location, so recovered work stays protected from overwrite risks later.
Frequently Asked Questions
-
What should I do first when a Word document is not saved?
Open Microsoft Word again and look for any recovered draft shown there. If nothing appears, use Manage Document to check unsaved file copies. -
Can Word recover a document after a sudden laptop shutdown?
Yes, Word may keep a recovery copy if AutoRecover captured the session. However, very recent edits may disappear when no snapshot was created. -
Why does Word show no recovery file after closing without saving?
Word may remove draft data when users choose the Don't Save option. Recovery also becomes limited when AutoRecover settings were disabled earlier. -
When should users try Recoverit for missing Word documents?
Try Recoverit after Word folders, temporary files, backups, and cloud history fail. It can scan storage for document traces outside Word's recovery system.


