File Recovery
- Recovers deleted or lost files effectively, safely and completely.
- Supports data recovery from 500+ data loss scenarios, including computer crash, partition loss, accidental human error, etc.
- Supports 1000+ file formats recovery with a high success rate and without any quality loss.

How to Create Windows 10 System Repair Disk or Boot Drive

Jul 29, 2026 • Filed to: Windows Computer Solutions • Proven solutions
 TL;DR:
Create a Windows 10 recovery drive using an empty 16 GB or larger USB flash drive to troubleshoot boot errors, access advanced startup options, or reinstall the operating system.
● Recovery media is strictly architecture-specific, meaning a 64-bit Windows 10 drive only works on 64-bit PCs and cannot be used to repair 32-bit machines or Windows 8 systems.
● A USB boot drive is recommended over a CD or DVD system repair disc because the USB option backs up essential system files required for a full Windows reinstallation.
● If the creation process fails with an error, the Windows Recovery Environment is likely disabled and must be reactivated by executing the reagentc/enable command in an elevated Command Prompt.
Ask AI for a summary
 ChatGPT
 Perplexity
 Gemini
 Claude
 Grok
Grok
The greatness of Windows 10 is that you are allowed to create a system repair disk or boot drive which can be used to troubleshoot as well as restore your PC. With this media, you get access to advanced startup options of Windows 10.
Part 1. What Is the Purpose of a Recovery Disk?
When your PC faces some error or is in some kind of bad condition, it becomes essential to troubleshoot that problem and in severe cases, your PC needs to be reset. Starting from Windows 8, there has been a feature in your OS with which you can easily create a USB recovery drive and resolve all serious issues of your PC. If you don't have any USB drive, there is no need to worry because you can create a system repair disk with the help of a CD or DVD also.
A recovery disk helps you to utilize different Windows recovery choices. even if your computer doesn't boot.In case you can't restore your PC, the system repair disk or boot drive allows you to reinstall your OS. Some users complain that their system crashed before making a recovery disk. They can create a Windows 10 recovery disk on another computer and use it to boot their troubled PC.
Note that you can't use a recovery disk made for Windows 8 to recover/troubleshoot/repair a Windows 10 PC. Also, a Windows 10 recovery disk made for 64-bit computers can't be used on 32-bit computers.
Part 2. How to Create Recovery Drive (USB) in Windows 10?
Recovery drive creation in Windows 10 is helpful if your computer faces a major problem like hardware failure.A common concern while preparing a system repair disk in Windows 10 is the USB drive of what capacity should be used.
Well, here is the answer. Your USB drive shouldn't be less than 16 GB. Note that all your Data on that USB will get erased during the process of creating a Windows 10 System Repair Disk. Thus, make sure you use an empty USB drive. Here are the simple steps you should follow:
Step 1: Connect your USB drive with your PC.
Step 2: Now, write "recovery drive" in the Search Box. Then, from the list of results, choose "Create a recovery drive".
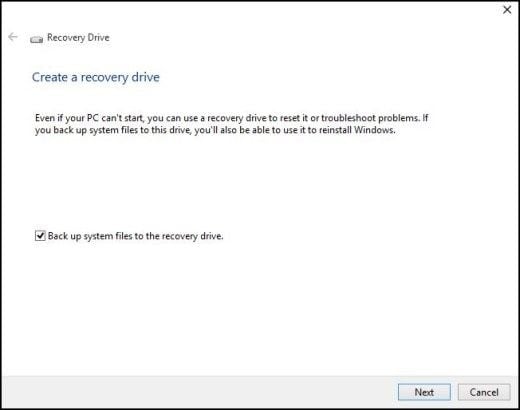
Step 3: A Window will open. You have to check "Back up system files to the recovery drive" and click on "Next".
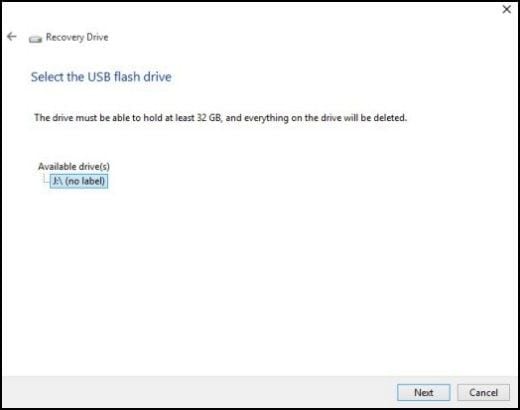
Step 4: Now, you should select the USB flash drive, then click on "Next" to continue.
Step 5: On the next screen, you have to click on "Create" to begin the process.

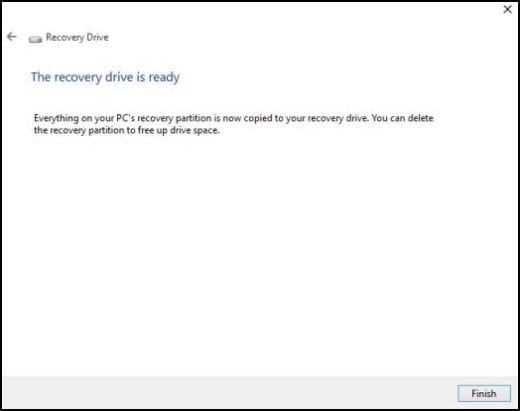
Step 6: Congratulations! The drive is ready. You should click on "Finish"
Part 2. How to Create a System Repair Disc in Windows 10?
System repair disc is used to boot PC. You can create a 64-bit repair disc only in 64-bit Windows 10 and can only be used to repair 64-bit Windows 10. Here are the steps for creating a bootable system repair disc in Windows 10:
Step 1. Sign-in as an administrator and Open Control Panel.
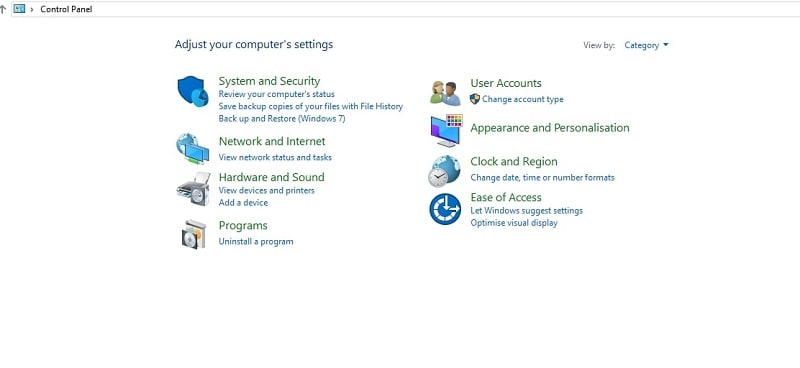
Step 2. Hit the Backup and restore icon.
Step 3. Press Create a system repair disc and Add a blank disc into the DVD or CD drive.
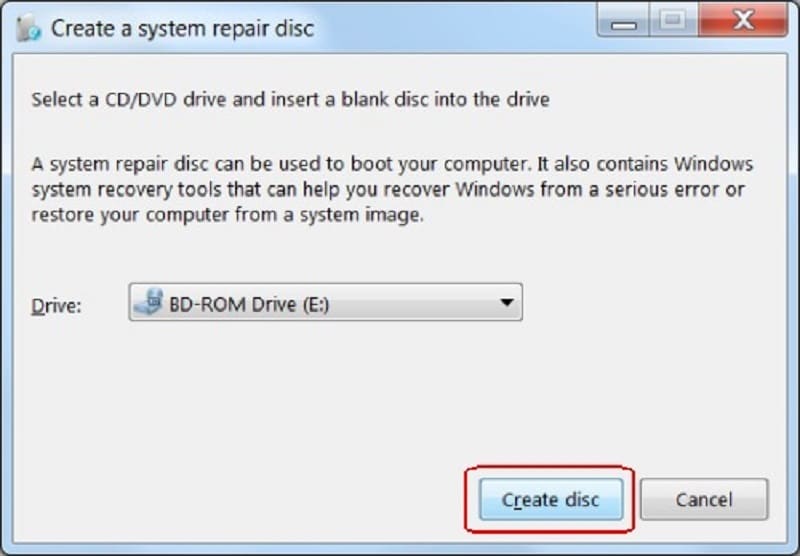
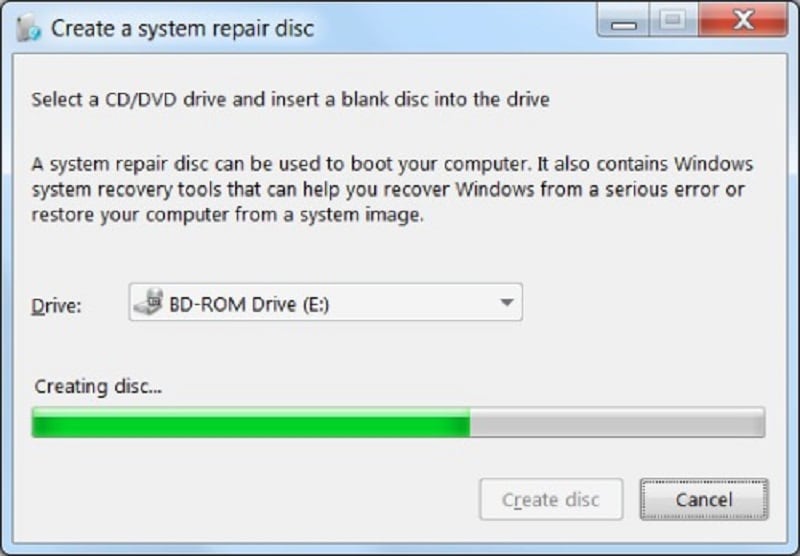
Step 4. Choose DVD/CD drive, and press create the disc. Now wait for the system repair disc creation. alt –
Step 5. Click the close button when it gets completed. Press Ok. alt –
Step 6. Store your system repair disc in a secure area.
Related topic: How to Create a Windows 7 System Repair Disc?
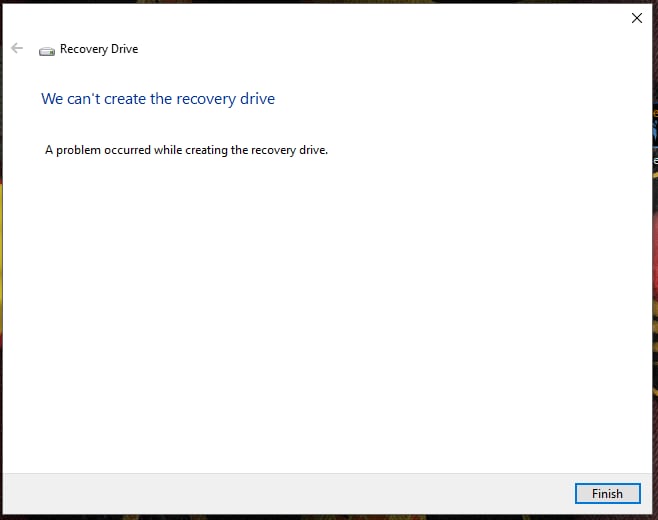
Part 3. What should you do if a problem occurs while creating a recovery drive?
Well, it's a technical task, errors can occur any time and you can't neglect them. Of course, you can resolve them.
1. Burn recovery drive ISO to your USB drive
When Windows fails to create the recovery drive and gives the error "We can't create the recovery drive", the first thing you should do is check whether you have properly connected the USB drive, and is it identifiable by Windows?
If this isn't the problem, you should simply download the ISO file of Windows 10 recovery disk and burn it on your CD/DVD or USB drive.
2. Fix the problem we can't create a recovery drive
This problem occurs when the Windows recovery environment gets disabled. You can open an elevated Command Prompt and run the "reagentc/info" command in it.
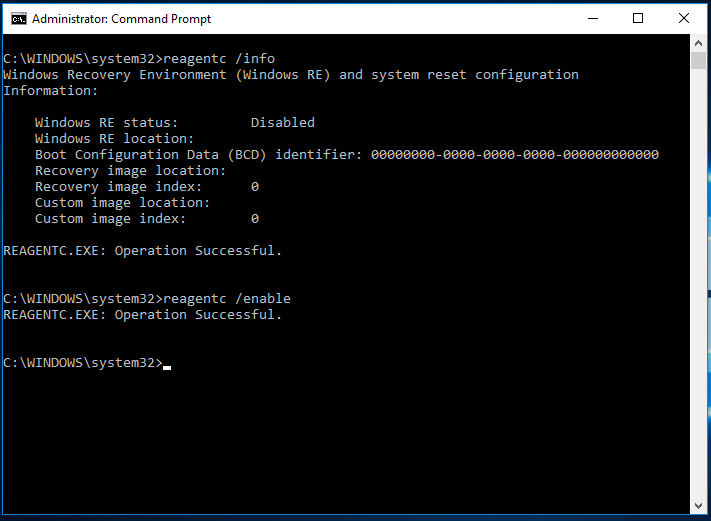
When Windows RE (Recovery Environment) is disabled, you can't even boot in that. For re-enabling it, just write "reagentc/enable". If this also doesn't work, make use of Windows 10 installation ISO file and fix this issue. Follow these steps:
Step 1: If there isn't any Recovery folder in C drive, make one. Now, make another folder in that Recovery folder and name it WindowsRE. Note that the default state of the Recovery folder is hidden. So, you should type "show hidden files" in the Search Box. File Explorer will open. Now, click on the checkbox before Show hidden files, folders, and drives option and uncheck Hide protected operating system files(Recommended) option.
Step 2: From this to Step No. 4, you will be creating Winre.win file (however, if you already have a backup of that file or if it can be copied from some other Windows 10 PC, move directly to Step No. 5). Mount Windows 10 installation ISO file as a virtual drive and open it.
Step 3: Go to the Source folder and find Install.wim file. Copy the location path of this file.
Step 4: Now, you should type the following command in the elevated cmd (Command Prompt): dism /mount-wim /wimfile:[just copied path of install.wim file] /index:2 /mountdir:[the location path where you want the mounted file to be saved]
Thus, the command will be something like this: dism /mount-wim /wimfile:"F:\windows 10 ISO\sources\install.wim" /index:2 /mountdir:D:\mount_image_file\
Step 5: Go to the location path you mentioned in the previous step and find out Winre.wim file. Then, copy this file to the location C:\Recovery\WindowsRE.
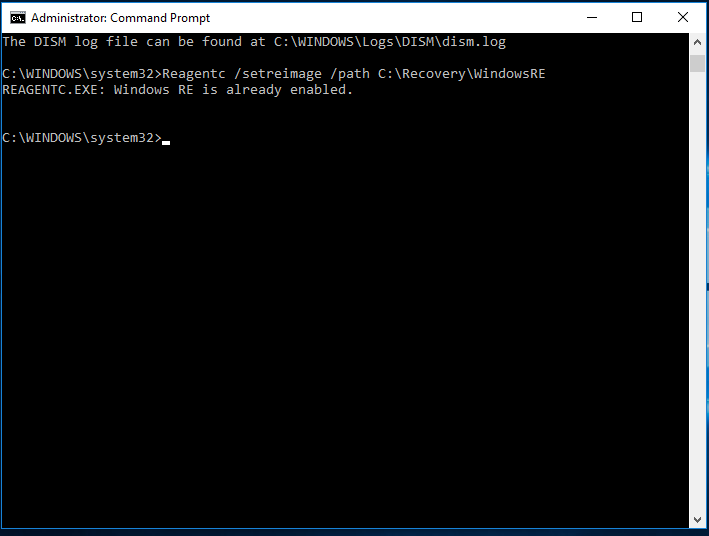
Step 6: Finally, type the command "Reagentc /setreimage /path C:\Recovery\WindowsRE" (don't use quotes). This way you can successfully create Windows 10 System Repair Disk or Boot Drive.
Conclusion
A Windows 10 System Repair Disk or Boot Drive troubleshoots your PC's problems even when your OS doesn't open. With the simple methods available in this article, it becomes super-easy to create a Windows 10 Recovery Disk, recover Windows 10 from crucial error(s), and restore your PC from an ISO file.
People Also Ask
What is a System Repair Disc and Bootable Drive?
A system repair disc is a bootable DVD or CD with all the needed software to troubleshoot Windows and restore the PC when it fails to start properly. It has been around since the Windows 7 innovation. A bootable drive (or the bootable USB drive) is the recovery drive that offers users access to the same troubleshooting software as the system repair disc. However, it also allows users to reinstall Windows (if Windows comes with it).
Which Repair Tool is Best? – Boot Drive or System Repair Disc
Although both repair tools are good, we advise using a USB recovery drive because it has similar tools as that of the system repair disc. It even back-up the system files essential to reinstall Windows. However, it does back up the installed applications or personal data. Thus, keep your computer backed up with our professional backup tool.
What Are the Benefits of Creating a System Repair Disc?
There are tons of reasons for making a system repair disc. They are as mentioned below:
- Create DVD/CD system repair disc if your computer cannot boot using USB.
- It will allow you to troubleshoot start-up issues occurring on various PCs having the same Windows version.
How Often Should I Need to Create a Recovery Drive?
Since Windows updates to boost the performance and security of PC, create a recovery drive every year.
How to Recover or Restore PC with a Recovery Drive?
Here is how you can use a recovery drive to restore/recover your PC:
- Connect recovery drive and switch off the computer.
- Press Windows key + L and restart PC by hitting the shift key while choosing the Power button > Restart. And it will restart your computer in the WinRE environment.
- Pick troubleshoot and chose from these two options – restore from the system restore point and reinstall Windows 10.
- Choose Advanced options > System Restore for the system restore point. This option will eliminate the recently installed drivers, applications, and updates triggering issues in your PC. But there is no effect on the personal files.
- Pick Advanced options > Recover from a drive for reinstalling Windows. This option will eliminate your drivers, apps, settings changes, and personal files.
Partition Solutions
- Manage Your Partition
- Top 9 Partition Manager for Mac
- How To Partition a Hard Drive
- RAW partition to NTFS
- Convert GPT to MBR
- Remove partition on Mac
- Recover deleted partition
- Create a boot partition
- Create partition on Win/Mac
- Convert exFAT to NTFS
- Fix Partition Errors
- Fix "Active Partition Not Found" Error
- Fix "No Bootable Partition in Table"
- Fix current read only state yes
- Repair a damaged partition
- Can't create new partition
- Partition Tips


David Darlington
staff Editor