If you are a gamer who often shifts from one PS3 to another, you will know how some of them support the old FAT32 system while the rest stick to the NTFS system. These common file systems are quite frequently seen in operating systems. However, people struggle to convert the recent NTFS to FAT without losing data in the process. It can be quite unpredictable. The online tools that claim to be free are not usually reliable to convert NTFS to fat because of their obvious drawbacks which include - data loss, malware, and inconsistency. That being said, here are some of the best ways to adapt if you want to format NTFS to fat without losing data.
Part 1: What are NTFS and FAT?
The shortest explanation about NTFS and FAT will be - they are two file systems that the operating systems utilize to comprehend data on a hard drive.
FAT is an older version that has been in use for a very long time. NTFS is relatively new and is relevant to modern requirements. It offers extra security and also aids in effective data organization. The FAT32 was created in the year 1977 and NTFS came 16 years later.
While FAT can only support files of smaller size and rejects file permissions, NTFS supports files with larger sizes and also accommodates file permissions. Undoubtedly, NTFS is an advanced version and is very reliable. You can set specific permissions to individual files and folders with it. However, FAT only offers shared permissions.
It is clear that NTFS has an upper hand. However, there are situations when you have to convert from NTFS to fat. We will know more about it in the next section of the article.
The facts clearly show that NTFS is a newer technology and definitely weighs down FAT. But still, you'll see that a lot of techno-lovers are looking around for the right NTFS to FAT converter. This is because, even though NTFS is having the upper hand, several operating systems still support the FAT32. So, a hard drive with an NTFS partition needs to be converted to FTS for accessing it.
Though the actual process of converting NTFS to FAT is not that difficult, the real problem is the data loss that can happen. If you decide to directly format the drive, you will lose data for sure. There is no avoiding that. So, to save you all that trouble, here are some of the methods that you can use to convert NTFS to fat without any data loss.
Part 3: Methods to Convert NTFS to FAT
One thing to remember is that - never use the conventional methods to change NTFS to FAT. This can wipe out the data from the drive and it becomes really difficult to retrieve it again.
Method 1: Using CMD
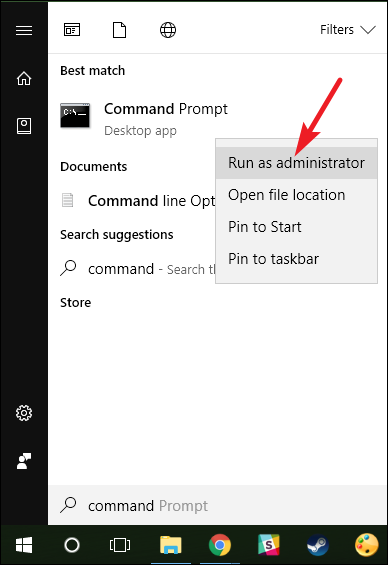
You can use the command prompt application on your system to make the conversion. This is a simple two-step process and you don't need coding efficiency either. However, you will have to be in the administrator account to use this method. If your computer has more than one account, make the shift before you begin with step 1. Otherwise, you can right-click on the command prompt and open it as an administrator.
Step 1: Open the command prompt application by going to the Start Menu. Type 'Command Prompt' or 'CMD' to open it. Do not forget to open it as an Administrator.
Step 2: Now you have to enter the command to initiate the conversion. The command is - convert X: /fs:fat32, where in place of X, you should be entering the drive letter that you are planning to format. Press 'Enter'.
The disadvantage of using the CMD method is that - you cannot be completely sure that the data will not be deleted. It is unpredictable. That is why we have other methods for people who want to be 100% sure about not losing their data.
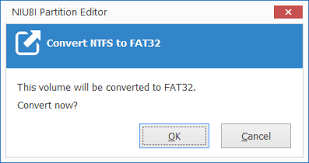
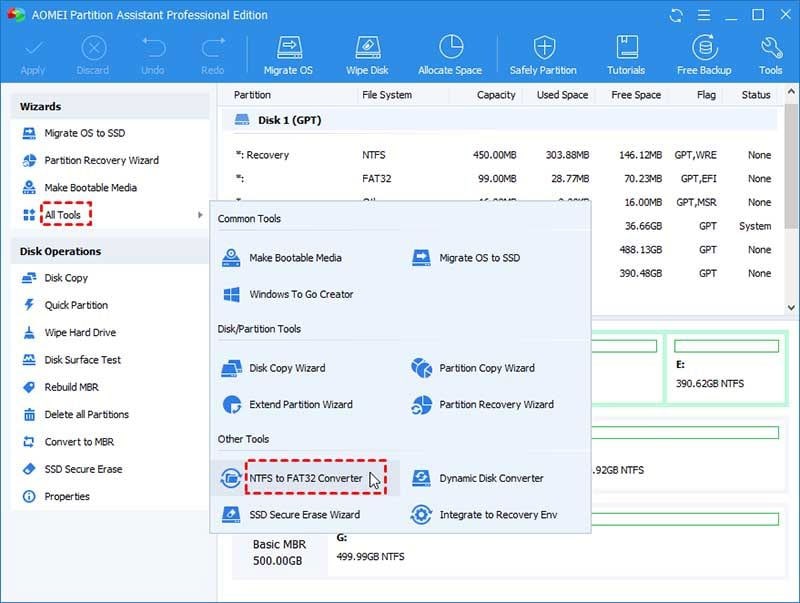
Method 2: AOMEI Partition Assistant
Remember how we asked you to not rely on the usual methods to make the conversion? The conventional routes can lead to complete data wash out. But if you decide to use tools like AOMEI Partition Assistant, you can stay assured that this dedicated tool will convert NTFS to FAT without disturbing the data. This is how you go about it -
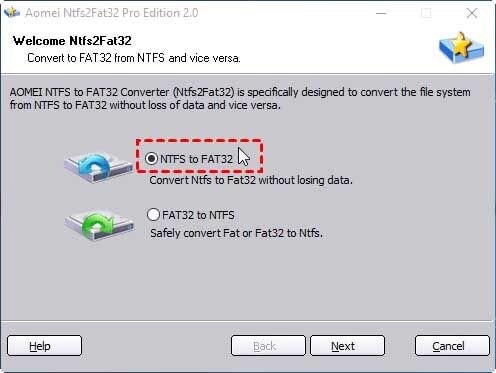
Step 1: Install the AOEMI Partition Assistant and launch it on your computer. Once you start seeing the options, go with the NTFS to FAT32 Converter.
Step 2: A new window will open with a grey backdrop. Select NTFS to FAT32 here and proceed further by clicking on 'Next'.
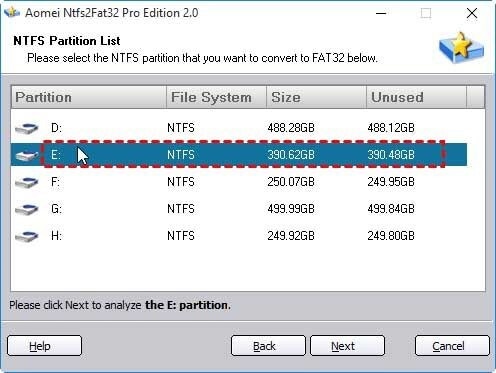
Step 3: Now you have to double-check and be extremely careful. You will have to choose the partition that you want to convert. Do not make a mistake here and precisely choose the right one.
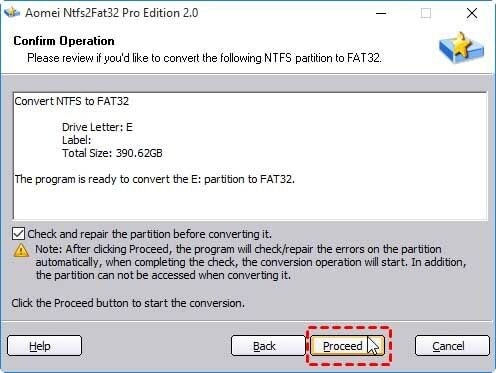
Step 4: A final window will appear where you will be shown all the details and the tool will ask you for final confirmation. Once you look it over and decide that the partition and the rest of it are right, click on 'Proceed'.
Now, the conversion will start immediately and you will successfully change NTFS to FAT32.
Method 3: Using Disk Management
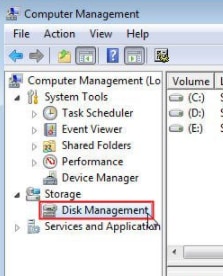
There is a small thing that you need to note down while using Disk Management. Using disk management directly without shrinking the volume of the drive can cause data loss. That is the fine line between the conventional route and the special steps that we will introduce to you. This is how you shrink the volume and use disk management for conversion from NTFS to FAT.
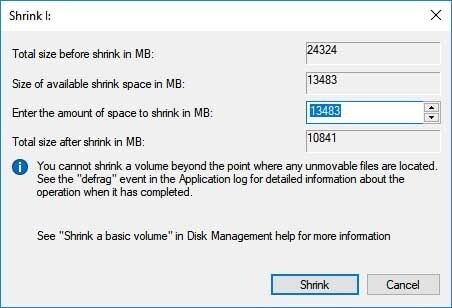
Step 1: You need to shrink the volume to half of its initial size and then click on 'Windows + X' and choose disk management.
Step 2: Right-click on the partition that you want to change and then shrink the volume.
Step 3: You can then enter the size that you want and shrink the partition. Make sure you are shrinking it by half. Proceed by clicking on 'Shrink'.
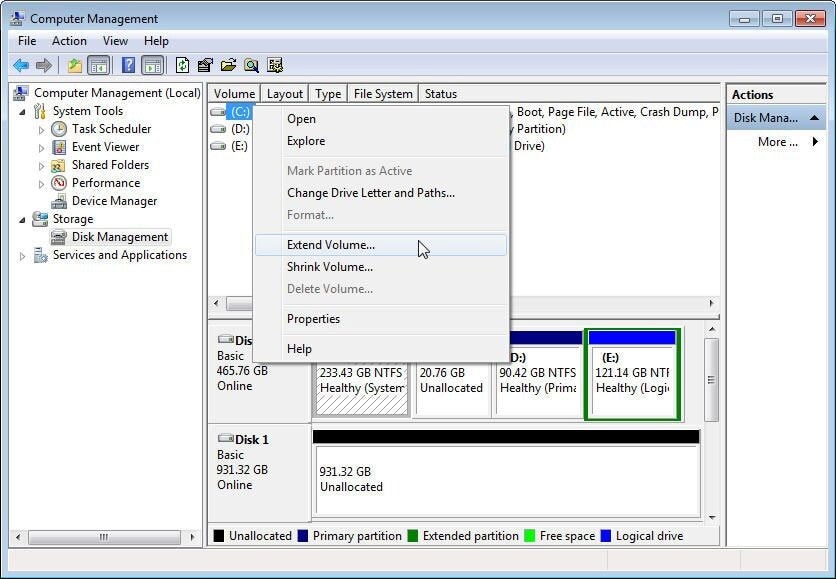
Step 4: Once the shrinking is done, format the drive to FAT32 and delete the NTFS partition after you shift data from NTFS to FAT32. Now, right-click on the FAT 32 partition and choose 'Extended Volume'. Choose any unallocated space and click on 'Extend'.
Now, that's how you do it! Your drive will revert back to its previous size and you will not end up losing any essential data.
Here we are discussing the worst-case scenario. What if you end up losing data? By any chance, if you lose the data, you can use third-party software to recover your files. Our best suggestion would be to place your bets on Wondershare Recoverit. This application works with more than 1000 formats of files and recovers data from your drive partition as well. It is a three-step process that doesn't require any expertise and techno-beginners can also use it.
Step 1: You need to select the location where you have lost your data. In our case, we would be choosing the partition drive that previously had your data. Once you are done with that, click on 'Start'.
Step 2: Then the application will run an all-around scan to detect all those files that have been deleted. It takes about a few minutes for this to be done. You need to be patient and do not interrupt the process.
Step 3: Now you can preview the files and data that display on the screen. You can select the ones that you want to recover. In this scenario, you will be choosing all the files and either previewing or directly proceeding with the 'Recover' option.
These pretty simple steps will help you recover the lost files. If you are going to go with the command prompt method that we mentioned earlier, you can use Wondershare Recoverit to recover any data lost during the conventional method. If you don't lose anything, well, that is a matter of celebration. Even if you do, Wondershare has your back.
Conclusion
Those are all the methods you can use to make an easy conversion from NTFS to FAT without any trouble. Even if you are not well-acquainted with complex codes and computer technology, you can still use the above-mentioned methods to convert NTFS to FAT. It is very convenient to use the AOMEI partition tool and get the job done in minutes. However, if you lose your data, Wondershare Recoverit is proved the best software to get back the files that you've lost.
Can I convert NTFS to FAT32 using the Windows "convert" command?
No. Windows includes a built-in command (convert X: /fs:ntfs) to change FAT32 to NTFS without losing data, but it does not work in reverse. To go from NTFS to FAT32 using the standard Windows tools, you need to reformat the drive, and it will erase all data. For a no-data-loss conversion, you would need a third-party partition software.
Why does Windows say the drive is "too large" to format to FAT32?
Windows has a native formatting limit that prevents it from creating FAT32 partitions larger than 32GB, even though the file system itself can technically support up to 2TB. If your drive is larger than 32GB, the FAT32 option will simply disappear from the Format menu. You can bypass this by using free third-party utilities like FAT32 Format or GUIFormat. Learn more ways to format your drive to fat32.
What is the biggest risk when moving from NTFS to FAT?
The primary risk is the 4GB file size limit. NTFS can handle massive files (like 4K movies or virtual machines), but FAT32 cannot store any single file larger than 4GB. If you try to move a 5GB file to a FAT32 drive, you will receive an "Illegal Function" or "File too large" error. You must split or compress these files before the move.
How can I change NTFS to FAT without losing my data?
Since Windows doesn't offer a direct tool to convert NTFS to FAT without data loss, the safest method is:
1. Back up your data to another drive. 2. Format the target drive to FAT. 3. Copy the files back. Alternatively, tools like AOMEI Partition Assistant can perform an "in-place" conversion, but a backup is still highly recommended.
Should I choose FAT32 or exFAT for my external drive?
If you are converting because you want to use the drive on a Mac, exFAT is usually the better choice. It is compatible with both Windows and macOS (read/write) and does not have the 4GB file size limit. Use FAT32 only if you need to connect to much older hardware, like a PlayStation 3, an old car head unit, or a digital photo frame.


 ChatGPT
 Perplexity
 Google AI Mode
 Grok
Grok


Theo Lucia
chief Editor