
 TL;DR:
To export Office 365 mailboxes to PST files, use the Outlook desktop client for the most straightforward manual process, the Microsoft Purview eDiscovery tool for compliance-level content searches, or PowerShell to grant administrative access to target mailboxes.
● The eDiscovery Export Tool splits PST files at a 10 GB limit to prevent corruption and strictly requires eDiscovery Administrator permissions, along with Microsoft Edge, Internet Explorer, or a ClickOnce browser extension to download the results.
● The PowerShell method requires executing cmdlets to grant FullAccess rights to another user's mailbox, but it still relies on configuring that mailbox in the local Outlook application to perform the actual PST extraction.
● Native Microsoft solutions do not support automated or real-time exports; configuring scheduled, incremental, or continuous PST backups requires connecting a third-party desktop tool like Wondershare UBackit to an active Outlook profile.
Ask AI for a summary
 ChatGPT
 Perplexity
 Gemini
 Claude
 Grok
Grok
Do you want to save your Microsoft Office 365 or Exchange Online mailboxes to a PST (Personal Storage Table) file? Many organizations export Exchange Online archives to PST files for regular backups, migration, compliance, or legal reasons.
This step-by-step guide covers the Office 365 (Exchange Online) PST export using PowerShell, eDiscovery PST Tool, and Outlook and introduces the pros and cons of third-party software. Before diving into it, let’s see the benefits of exporting PST from Office 365.
As you try to export Office 365 Mailboxes to PST, you must realize the importance of data backup. Join us to celebrate World Backup Day. Let's take the pledge, and make data backups a regular part of your day.
In this article
Benefits of Exporting Mailboxes From Office 365 to PST
Exporting PST from Office 365 mailboxes is beneficial for several reasons, including:
- Security – Data loss can happen due to cybersecurity threats or other issues, but saving your mailboxes to a local drive will keep your files safe.
- Saving storage space – Backing up your mailboxes to local PST files (which take less memory) will make more room in your Exchange Online account (assuming you delete them from online storage). You’ll save both storage space and money.
- Email migration – Exporting your mailboxes to PST files is perfect when switching to another email client or computer. You won’t have to worry about lost communications and data.
- Legal and compliance issues – Every company must back up and archive emails and other critical data to comply with various regulations. Backups are also crucial when providing the necessary records during lawsuits or other legal disputes.
Here are all the methods for exporting your mailboxes from Office 365 or Exchange Online to PST.
Method 1. Export PST From Office 365 Using eDiscovery PST Tool
If you want to export your mailbox from Exchange Online, the eDiscovery Export PST tool is one method to try. It is Microsoft Office 365’s integrated feature for searching, collecting, and saving mailboxes in PST files.
Note: eDiscovery limits your exported PST files to 10 GB. You can exceed the limit, in which case eDiscovery will split your PST into multiple smaller-sized files to ensure quality. Besides, exporting larger files increases the risk of PST file corruption.
Here’s how to export Office 365 mailboxes to PST using eDiscovery:
- Sign into Microsoft Purview Compliance Manager to set user permissions and roles for eDiscovery. Select Permissions in the left-side navigation pane, hit Compliance center to expand it, and click Roles.

- Type “ediscovery” in the search bar, so you don’t have to scroll down to find it. Click the checkbox to select eDiscovery Manager.

- Look through the Assigned roles to check if they include the Export option. Click the Edit role group to add the Export role if necessary. Then, click Edit under eDiscovery Administrator to add an admin account so you can export Office 365 mailboxes to PST using eDiscovery. Click Close.

- Navigate to Content Search in the left-side navigation pane, select the Search tab, and click New search.

- Type the Office 365 mailbox name in the Name box and click Next.

- Toggle the switch to On in the Exchange mailboxes section. In the Included section, click Choose users, groups, or teams.

- Type the Office 365 mailbox name in the Exchange mailboxes search box.

- Once the mailbox appears, click the checkbox and hit Done.

- That’s it for the Locations section, so click Next.

- Skip the Conditions section if you wish to export the entire mailbox. Otherwise, search for specific data by adding relevant keywords, query language, and conditions like file type, date, size, subject, etc. Click Next.

- Review your content search, edit anything if necessary, and click Submit.

- Once you see the following window, click Done.

- Navigate to Content search in the Compliance Manager’s left-side navigation pane and click your new mailbox.

- You’ll see the summary, the status showing a completed search, and the Actions drop-down menu.

- Click Actions and select Export results from the drop-down list.

- Select the desired search results from the three Output options and choose how to export Exchange content to PST. We recommend leaving the default One PST file for each mailbox as it’s the most convenient. Click Export.

- Return to Content search and navigate to the Export tab to download your Office 365 export mailbox to PST file. Click the created mailbox.

- Under the Export key section, click Copy to clipboard because you’ll need the key to install the Microsoft Office 365 eDiscovery Export Tool. Hit Download results.

- You’ll get a warning if you don’t use Internet Explorer or Microsoft Edge. Get Microsoft’s ClickOnce extension if you don’t want to switch to a supported web browser. Once everything is in order, click Download results again. That will launch a prompt asking you if you wish to open the file, so click Open.

- A security warning will pop up asking if you want to install the eDiscovery Export Tool. Click Install to initiate the process.

- eDiscovery will launch once the installation completes. Paste the export key you copied to the clipboard, choose where to download the Office 365 mailbox, and click Start.

- You might wait a while to download your Office 365 mailbox, depending on its size. Click Close once the download completes.

That’s it! Exporting PST from Office 365 using eDiscovery took a while, but it was worth the effort. You now have your mailbox on your computer and more space on your mail server.
Method 2. Export Office 365 Mailboxes to PST With Outlook
Microsoft Outlook is another tool to access Exchange Online email and export Office 365 mailboxes to PST. Here are the steps to using it:
- Launch the Outlook app on your computer.
- Go to File > Add Account to add your Office 365 mailbox to Outlook.
- If you use Outlook 2003 or 2010, type your name, email address, and password and click Next > OK > Finish. Newer versions require only entering your email address and clicking Connect.
- Go to File > Open & Export and choose the Import/Export option.

- Select Export to a file in the dialog box and click Next.

- Click the Outlook Data File (.pst) option and hit Next.

- Select the Office 365 mailbox folder you wish to export, check the Include subfolders box, and click Next.

- Choose where to export the PST file, select the desired option regarding duplicates, and hit Finish.

- Outlook will prompt you to create an optional password for your PST file. Whether you add one or click Cancel, the export will start and quickly save your desired mailbox to your PC.

That’s it for exporting your O365 mailbox to PST with Outlook. It’s the most straightforward way to do it, requiring no technical expertise.
Method 3. Export Office 365 Mailboxes to PST Using PowerShell
PowerShell is Microsoft’s program for automating and configuring tasks in Windows systems using its scripting language. It has a command-line interface (CLI) requiring you to use specific commands – cmdlets (command-lets) – to perform various actions like exporting Exchange Online mailboxes.
You can quickly export an O365 mailbox to PST with PowerShell. The Exchange Online export mailbox to PST with PowerShell requires technical expertise, but the following step-by-step guide will help you do it without a hitch.
- Launch PowerShell on your Windows PC by pressing the Windows + R to open the Run dialog box. Then, type PowerShell and press Enter.
- Type the following cmdlet and press Enter to run it:
$UserCredential = Get-Credential - Enter your admin Microsoft account’s username and password in the prompt.
- Run the following cmdlet:
$Session = New-PSSession -ConfigurationName Microsoft.Exchange -ConnectionUrl https://outlook.office365.com/powershell-liveid/ -Credential $UserCredential -Authentication Basic -AllowRedirection - Run this cmdlet next:
Import-PSSession $Session - After establishing the necessary connection, run the following cmdlet to gain access rights to the desired mailbox (enter the correct email addresses inside the quotation marks):
Add-MailboxPermission -User “your email address” -Identity “target mailbox address” -AccessRights FullAccess -InheritanceType All - Sign into Outlook using your email address and wait for the target mailbox’s address to appear in the left-side navigation pane.
- Go to File > Info Page > Account Settings.
- Select Account Settings, click the Exchange Online account in the Email tab, select Change, and hit the Use Cached Exchange Mode checkbox to enable it.
- Export the mailbox to PST using Outlook’s Import/Export option (steps 4–9 in the section above).
- After your Exchange Online PST export with PowerShell and Outlook completes, remove the access rights in PowerShell with the following cmdlet (enter the correct email addresses inside the quotation marks):
Remove-MailboxPermission -User “your email address” -Identity “exported mailbox address” -AccessRights FullAccess - The last step is ending the PowerShell session with the following cmdlet:
Remove-PSSession $Session
That’s it! It may seem complex, but you’ll achieve your goal in minutes with this PowerShell guide.
Method 4. Export Office 365 Mailbox to PST Using Third-Party PST Export Tools
You can use many third-party Office 365 mailbox export tools, such as SysTools Office 365 Export Software, Stellar Converter for Office 365, and CloudAlly Backup for Microsoft Exchange. However, the three Microsoft solutions above might be better, although they require more effort.
Here are the pros and cons of third-party PST export tools to help you make an informed decision.
Pros
Fast, automated exporting
Backups in multiple file formats
Bulk exporting
Splitting PST files for seamless management
No technical knowledge requirements
Cons
Paid tools
Limited free features
Typically expensive full software versions
The disadvantages may be fewer and don’t need to be a deal-breaker, but the manual methods above (albeit more complex) are free. You don’t need an external tool now that you have this detailed guide to using Microsoft’s available solutions.
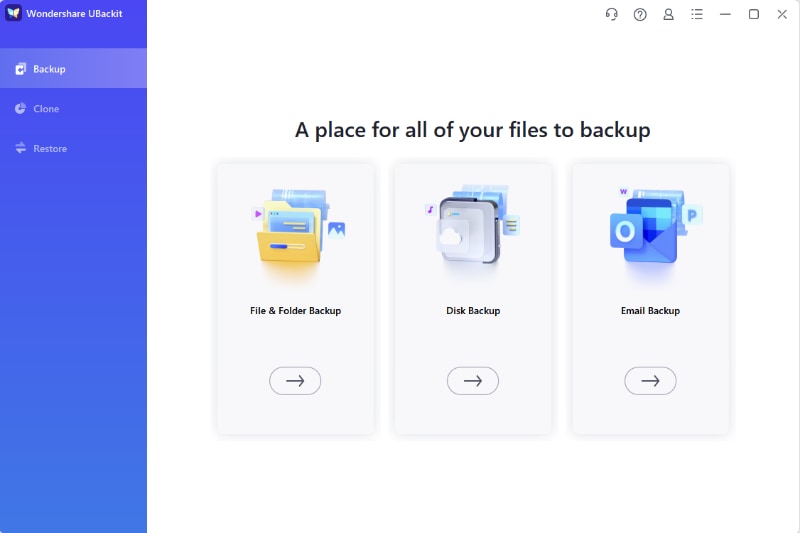
Method 5. Backup Your Office 365 Mailbox to PST Automatically [Recommended]
You can back up an Office 365 mailbox to PST using PowerShell, Outlook, or eDiscovery, but that won’t save real-time data. These tools don’t support automated exporting. Wondershare UBackit might be your go-to solution to that problem, helping you back up any files with ease.

Wondershare UBackit - Your Reliable Email Backup Tool
Back up emails to local hard drives or external storage devices effectively, safely, and completely.
Provide automatic backup to back up your email files daily, weekly, monthly, or non-stop.
Set a password to protect your backups, keeping your data confidential should it be stolen, lost, or compromised.
Choose which drives, folders, or file types to search and recover from.
Support incremental backup, which saves only the changes made to your files since the last backup, reducing backup time and saving storage space.
Here’s how to back up Office 365 mailbox to PST regularly with UBackit:
- Open Outlook and log into your Office 365 account. Go to File > Add Account if you haven’t connected your O365 with Outlook.
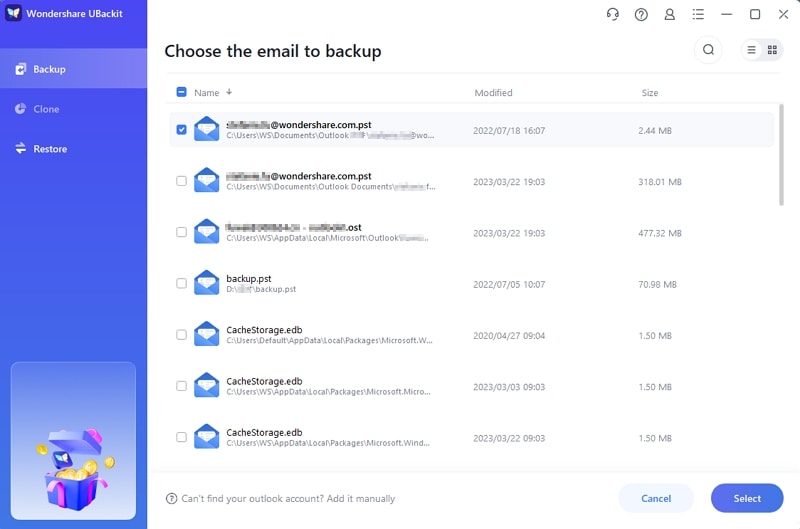
- Download, install, and launch UBackit. Click Backup in the left navigation pane and select Email Backup.
- Ubackit automatically searches and displays available email PST files. To proceed with the backup, simply check the box next to the desired email account and click on the Select.
- Pick the destination for backing up your Office 365 PST file and click Backup. You can opt to back up your files locally, to external drives, or to a NAS server.

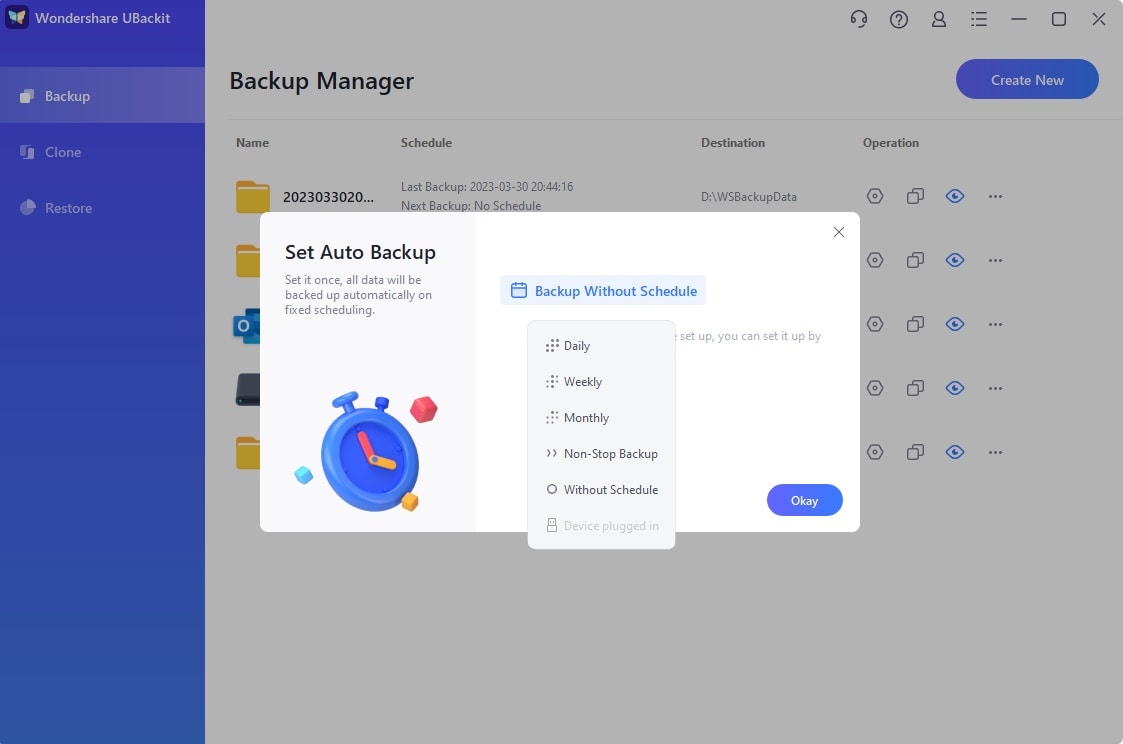
- Ubackit can complete the backup process within a matter of seconds. Afterward, you can head over to the backup manager section and utilize the Schedule icon to configure daily, weekly, monthly, or even non-stop automatic backups that align with your unique specifications.
- Optionally, you can click the Backup icon to update your Office 365 PST files at any time.

Conclusion
Exporting PST from Office 365 mailboxes may seem complex after this lengthy guide, but the steps above are the best for backing up your emails. Bookmark this guide for future reference, and schedule regular backups with Wondershare UBackit to prevent losing critical correspondence.


