
 TL;DR:
Synology Photos is an all-in-one photo management toolkit introduced in DSM 7 that allows NAS users to securely store, automatically organize, and share images using AI recognition.
● Requires the installation of Node.js v12 and Synology App Service on the NAS device before setup, while the mobile app demands iOS 13 or Android 8 or later.
● Consolidates legacy programs like Photo Station into a single interface offering AI-driven conditional albums, permission-based Shared Spaces, and isolated Personal Spaces.
● Accidentally deleted images from the NAS require a remote connection via third-party software like Recoverit NAS Recovery to scan and restore the lost files.
Ask AI for a summary
 ChatGPT
 Perplexity
 Gemini
 Claude
 Grok
Grok
Do you have a NAS device and are looking for ways to organize and manage your photos? You can use the Synology Photos toolkit. This powerful tool allows you to securely store your valuable images and share your memories with your close ones. Since this tool is constantly improving, you will find numerous new features in the latest version, enabling you to achieve more in less time.
Table of Content
About the Latest Synology Photo Management Tool
In the previous version of Synology management tools, you could find different programs for specific purposes. For example, there was a program called Photo Station where you could manage your images, collect feedback, etc. However, since the upgrade of DSM 6 to DSM 7 (DiskStation Manager), Synology combined all photo-related features into one toolkit.
You can now access all photo-management tools in one place: Synology Photos. You don’t have to download separate programs for different purposes since it is an all-in-one kit. Plus, with the new version, you will have many more features, enabling easier photo management and sharing (more on that below).
Requirements for Using Synology Photos
If you don’t have much experience handling images on your NAS device, don’t worry. Synology Photos are user-friendly, and you can use them without previous experience. However, there are a couple of requirements your device must fulfill so you can use the program without a hitch.
First, you should install Node.js v12 and Synology App Service before downloading Synology Photos. If you use your phone to download the app, you need iOS 13 or Android 8 or above. You can download and use Synology Photos without issues if you meet these requirements.
How To Install Synology Photos
Installing Synology Photos is a quick process. Follow the steps below to get this toolkit up and running successfully:
- Step 1: Open your DSM administrator account and go to Package Center > Install Synology Photos.
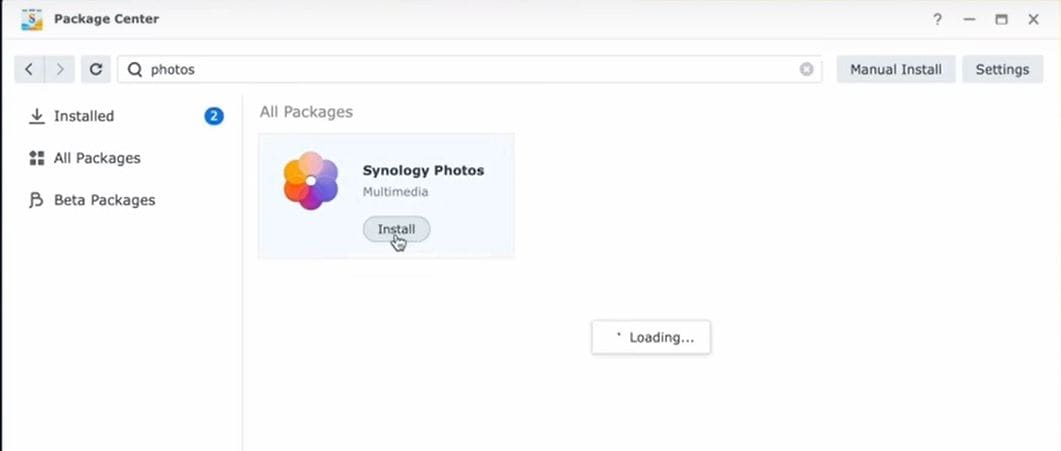
- Step 2: After installing, head to DSM Control Panel > Login Portal > Applications > Synology Photos
- Step 3: In the Alias box, enter “Photo” and type in your information instead of Your_NAS_IP_address or Your_QuickConnect_ID.
After setting up Synology Photos on your NAS device, you will receive a QR code you can scan to download the mobile app. Below, you will see what you can do after installing this toolkit.
Photo Management Capabilities
Synology created Synology Photos with easy management solutions in mind. Thus, with this platform, you can easily create new albums, use facial recognition for automatic album creation, name your images and camera, select the time, etc. With the help of this tool, you can completely customize your photography experience.
Managing Albums in Synology Photos
Managing albums has never been easier than with Synology Photos. You can manually edit and create new albums or let the tool do the work instead.
Using your preferred tags and face recognition, Synology Photos will automatically back up your photos to a conditional album, saving you time from manual work. The latest version emphasized the usefulness of AI, thus incorporating artificial intelligence for better management of albums and photos.
Adding Photos in Synology Photos
No matter your images’ current location, you can quickly add them to your Synology Photos toolkit by dragging and dropping your photos into the program or clicking the “+” icon in the top right corner and selecting the desired images. After a few seconds, you will have your photos in your home folder.
Synology Photos Main Features
Managing and adding new photos are not the only features this fantastic toolkit offers. Here are some of its best features to make your photography experience unique.
Shared Space Feature
If you want to share some special memories with your close ones, you can create separate folders in the Shared Space and permit them to access them. You can choose the number of permissions you want to provide each member, whether it is read-only or full permission. Moreover, you can add new memories in the same folder and always keep your close ones up to date.

Personal Space Feature
You can use the Personal Space feature if you share your NAS device with someone but want your personalized photo section. This feature allows you to create separate folders and store images in a customized space.
Filtering and Searching Features
Photography lovers usually have hundreds or thousands of photos on their Synology Photos accounts. They often spend much time finding the specific photo they need, but this toolkit solves this issue.
You can search for particular tags you have created for your photos or use AI recognition to find what you need in the sea of images. Moreover, you can categorize your images under specific categories, such as Nature and Friends, for easier access.
Synology Photos Graphical User Interface
Synology Photos’ user interface is one of the cleanest. It presents all the necessary features when you launch the program, so you don’t have to spend time searching for something specific. Moreover, it is neatly organized and easy to navigate, so you will have no trouble mastering this toolkit, thanks to the graphical user interface.
Synology has created a user interface adaptable to the device and screen size. Thanks to this intuitive design, no more scrolling left and right to find the desired feature. In the latest version, the GUI is more responsive than ever, meaning you can access whatever functionality you want in seconds.
Synology Photos Mobile App
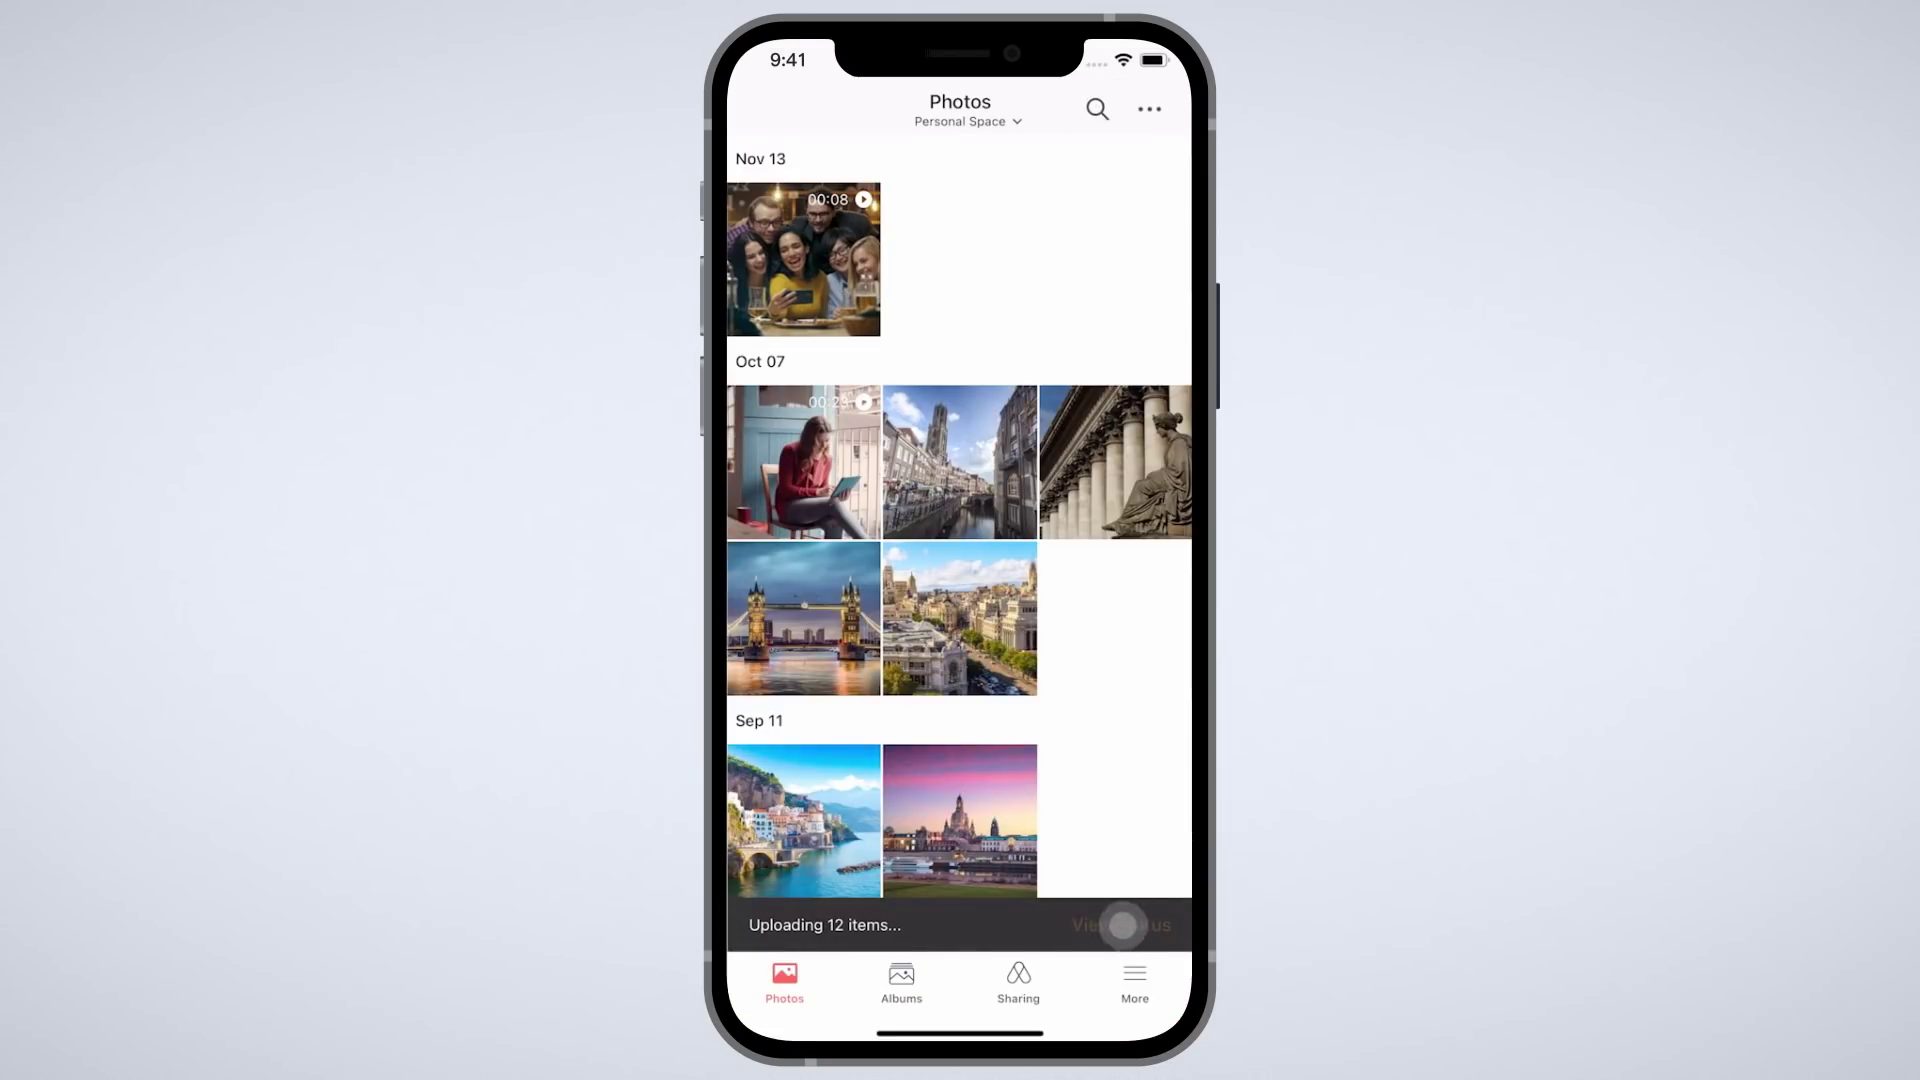
If you want to carry your memories in your pocket, you can try the mobile version of Synology Photos. You will have all the same features as on your NAS device but in a compact form. If your smartphone is your preferred photography device, you should automatically incorporate Synology Photos to back up your memories on the go.
Imagine you are on vacation and want to preserve all your treasurable memories. However, sometime during your trip, you lose your phone, and your photos are gone forever. With the help of the Synology Photos app on your phone, you won’t have to think about this scenario since you can always view your photos from other devices.
Bonus Tip: How to Recover Accidentally Deleted Photos From Synology NAS
If you don’t happen to have the phone app or accidentally delete some of your favorite memories, we have a solution for you. You can use Recoverit NAS Recovery to regain access to your lost images. With a recovery rate of over 95%, this tool is currently one of the most powerful on the market.
The best part about Recoverit is that it is compatible with numerous devices, including NAS devices for your Synology photos. You can try many more excellent features using Recoverit, such as recovering corrupted audio and video files or deleted documents. It is a versatile tool that will help you quickly get your digital valuables back in every scenario.
Download Recoverit for NAS now and be prepared for every scenario with your Synology Photos program. Here’s a step-by-step guide on recovering Synology Photos:
For Windows 7 or later
For macOS 10.10 or later
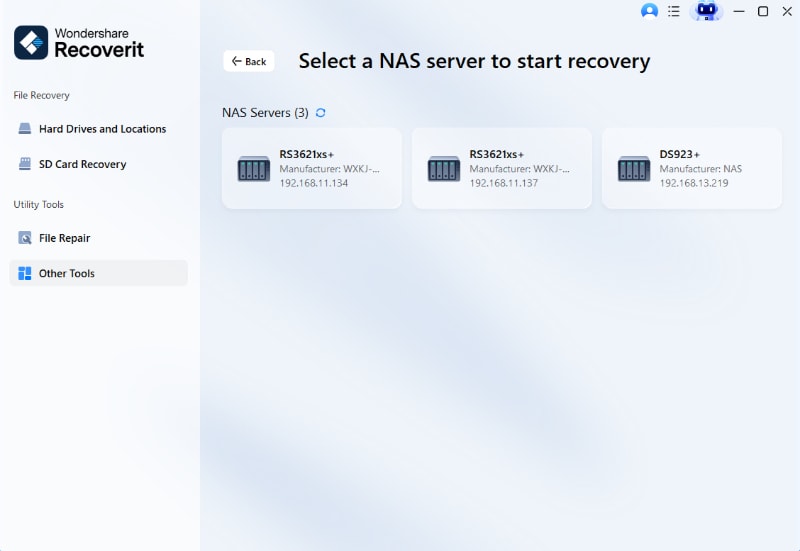
- Step 1: Open Recoverit > NAS and Linux > NAS Recovery;

- Step 2: Recoverit will automatically detect and display available NAS devices. Select your Synology NAS that you have lost your photos;
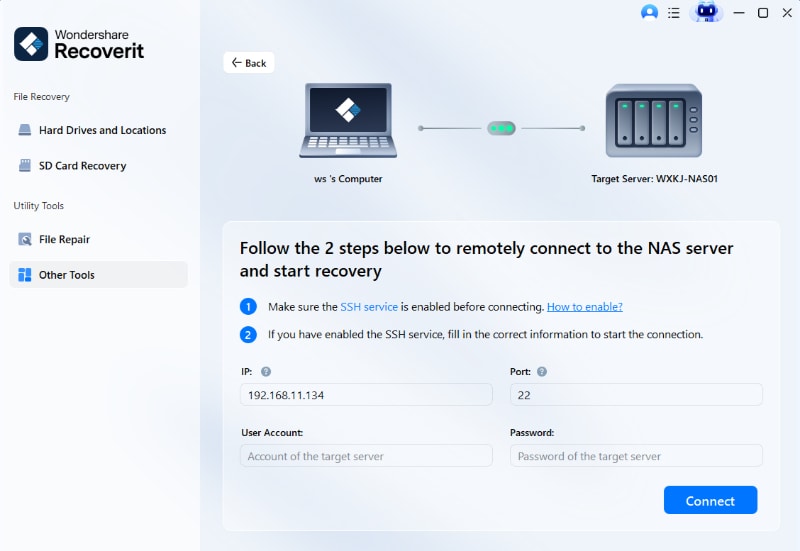
- Step 3: Fill in the required information and select Connect to create a remote connection between your Synology NAS and the NAS data recovery software.
- Step 4: Recoverit will start scanning for lost files once the connection is successful. After the program scans for lost files and photos, you can preview and select the ones you want to recover and click on the Recover button;

- Step 5: You will be asked where you want to save the recovered files; after you choose, click on Recover to finish the process.

For Windows 7 or later
For macOS 10.10 or later
The recovery process is quick and easy, and you will retrieve your lost Synology Photos in no time.
Conclusion
Synology Photos is one of the most versatile and powerful photo management platforms. Thanks to its user-friendly interface, you will have no trouble mastering the toolkit and enjoying its benefits. Now that you know how to install it on your NAS device, it’s time to take your photo storage, management, and sharing to the next level.
However, there is always a chance of accidentally deleting some of your best artwork from your Photos. To prepare for this scenario and act as quickly as possible, try Wondershare Recoverit. This versatile tool will help you retrieve lost memories and other digital assets. Always have a plan B in case something goes wrong.


