
 TL;DR:
QNAP Hybrid Backup Sync (HBS 3) executes 3-2-1 data strategies through proprietary backups and raw file synchronization on NAS devices running QTS 4.5.1 or later, while Wondershare UBackit serves as a simpler, universal alternative for beginners requiring local drive or non-QNAP hardware support.
● HBS 3 Backup Jobs package data into compressed, AES 256-bit encrypted .qdff blocks that require software extraction, whereas Sync Jobs mirror raw, uncompressed files via SMB/CIFS for immediate accessibility without on-the-fly encryption.
● Utilizing client-side deduplication features like QuDedup demands a minimum of 2GB system RAM, and any remote CIFS/SMB destination folder lockups during configuration can be resolved by manually typing absolute forward-slash paths and enabling SMB v2/v3.
● Wondershare UBackit is best suited for home users needing native Microsoft Outlook, partition, or full disk cloning across universally mounted network shares, whereas HBS 3 targets network administrators managing cloud object storage strictly within the QTS and QuTS hero ecosystem.
Ask AI for a summary
 ChatGPT
 Perplexity
 Gemini
 Claude
 Grok
Grok
Quick Summary: QNAP HBS 3 Key Takeaways
The Core Tool: QNAP Hybrid Backup Sync (HBS 3) is an enterprise-grade utility that unifies backup, restoration, and synchronization tasks into a single QTS application. It is primarily built to execute the industry-standard 3-2-1 backup strategy by replicating your data locally, remotely, and to cloud storage tiers.
Backup vs. Sync: A Backup Job packages your data into secure, compressed blocks with optional version control, encryption, and deduplication (.qdff format), requiring HBS 3 to extract. A Sync Job mirrors raw, uncompressed files directly to a target destination (e.g., via SMB/CIFS), making them immediately readable without any software.
Crucial System Requirements: Your QNAP NAS must run QTS 4.5.1 or later (or QuTS hero). Running modern operational pipelines like QuDedup (client-side deduplication) requires a minimum of 2GB system RAM (4GB+ highly recommended for optimal stability).
QNAP NAS devices are a popular solution for home users and businesses needing backups. However, they’re not the easiest to work with and often require technical knowledge and an advanced setup to control your QNAP NAS data backups and file management.
Fortunately, QNAP also offers the Hybrid Backup Sync application to simplify the process. As the name suggests, the app lets you control everything related to QNAP backups, restores, or file synchronization.
Read below to learn more about QNAP Hybrid Backup Sync’s features and see an alternative solution to backing up and restoring data to QNAP NAS devices.
What Is Hybrid Backup Sync (HBS 3)?

Architecture Matrix: Backup Jobs vs. Synchronization Jobs in HBS 3
Feature Variable |
Backup Job Protocol |
One-Way / Two-Way Sync Job |
| Data Format | Compressed, deduplicated proprietary blocks (.qdff) | Native, uncompressed raw file layout |
| Client-Side Encryption | Supported (AES 256-bit military-grade encryption) | Not supported on standard sync paths |
| Version History Space | Highly efficient via Smart Versioning tree structures | Consumes full file sizes per historical copy |
| Immediate Accessibility | Requires HBS 3 extraction or QuDedup Extract Tool | Files are instantly openable via any SMB/CIFS explorer |
| Primary Use Case | Disaster recovery and long-term compliance archiving | Real-time file mirroring and active collaboration |
Since QNAP has been in the NAS game for quite a long time, they’ve built a complete ecosystem of applications to accompany their hardware solutions. One of those applications is Hybrid Backup Sync (HBS 3) which helps with the daily functions of QNAP NAS devices.
Hybrid Backup Sync is QNAP’s solution for creating data backups, restoring and recovering files in case of a disaster, and synchronizing data between computers, servers, and QNAP NAS devices. Your QNAP NAS will be able to store data and backup photos and videos much more efficiently.
How To Install Hybrid Backup Sync (HBS 3)?
To use these powerful QNAP NAS features, you must first install QNAP’s HBS 3 on your NAS device. The installation process is relatively straightforward and beginner friendly – if you own a QNAP NAS, you should be able to do it. Here’s how:
- Log in to your QNAP NAS.
- Open the App Center and search for Hybrid Backup Sync.
- Download and install HBS 3.
Remember that QNAP’s HBS 3 has particular system requirements for installing the software. Namely, you’ll need to run QTS version 4.5.1 or later to be able to install QNAP HBS 3.
How To Configure Hybrid Backup Sync (HBS 3) Settings?
After you install QNAP HBS 3, you’ll need to configure the application’s settings. That includes the initial settings that make HBS 3 play well with your QNAP NAS device. Here’s how to do that:
- Step 1: Launch Hybrid Backup Sync 3 on your QNAP NAS device.
- Step 2: Select the Three dot button > Settings.

- Step 2: Change and configure the HBS 3’s settings to how you want them > OK.
When you finish configuring the initial QNAP HBS 3 settings, you can create storage spaces, backup or restore jobs, and edit file synchronization settings. We’ve divided the guide into smaller in-depth guides with steps for each of these QNAP HBS 3 settings, which you can find below.
How To Start Up HBS 3 and Creating Storage Space
Before you’re able to create any backup, restore, or sync jobs inside QNAP’s HBS 3, you have to create storage spaces first. Here’s how to do that:
- Step 1: Select the bottom tab on the left side of HBS 3.
- Step 2: Click the Create button next to Storage Spaces in the top left corner > Remote CIFS/SMB Server.

- Step 3: Give it a name, enter the IP address of your server, input your Username and Password, and select the Destination folder > Create.

- Step 4: When you’re done, you should be able to see your new storage space server.

💡 Pro-Tip for 2026: Resolving CIFS/SMB Destination Folder Dropdown Lockups
When configuring remote storage spaces via CIFS/SMB, the target directory dropdown may sometimes hang or show up blank. This happens when the remote server's firewall blocks NetBIOS name resolution or when the QNAP user account lacks explicit Read/Write permissions on the root share.
To bypass this, manually type the absolute path in the folder field using forward slashes (e.g., /BackupShare/TargetFolder), and ensure SMB v2/v3 is enabled on both devices to maintain stable data pipelines.
There’s a possibility that the dropdown menu won’t work when you try to select the Destination folder, which is something to keep in mind.
How To Create a Backup Job in HBS 3 on QNAP NAS
The first thing you’ll need to do is create a backup job inside QNAP HBS 3. That includes setting up files and folders to back up automatically to the QNAP NAS device. Here are the steps to follow to create your first backup job:
- Step 1: Launch the Hybrid Backup Sync 3 on your QNAP NAS.
- Step 2: Select Backup & Restore on the left side of the app > Back Up Now > New backup job.

- Step 3: Choose which folders to back up > Next.

- Step 4: Select the NAS type (Local or Remote NAS) > select your NAS device > Select.

- Step 5: Choose where you want to back up to > OK > give it a name and description > Next.

- Step 6: At this point, you can schedule your backups by clicking Scheduler > +.

- Step 7: Select how often you want it to run, choose days, and set up the schedule’s time > OK.

- Step 8: Edit Version Management options by checking the “Enable Version Management” box > choosing “Simple or Smart Versioning” > selecting options > Next.

- Step 9: Select Data Integrity Check > Set up integrity check options > Next.

- Step 10: You can select backup Rules, including backup Methodsand Policies. We’ll leave Methods to default settings.

- Step 11: For this tutorial, we’ll check the “Use client-side encryption” on the Policies screen.

- Step 12: Enter the backup password > check the agreement box > OK.
- Step 13: When you’re done selecting options, click Next > Create.
Please note that the Version Management and Data Integrity Check steps are optional.
The first part lets you choose how many backups to keep, while the second step allows you to choose whether you want to check for corrupted data.
During the Rules step, selecting Policies and enabling Client-side encryption is an excellent way to secure your data, which reduces risks.
How To Create a Restore Job in HBS 3 to QNAP NAS
Backups are only a part of the QNAP HBS 3’s functionality, and the application is much more capable than that. You can also create a restore job to restore files inside QNAP HBS 3. Essentially, it’s an action opposite to backing up, and you can do it following these steps:
- Step 1: Launch HBS 3 on your QNAP NAS device.
- Step 2: Head into Backup & Restore on the left side of the screen.

- Step 3: Select the Three dot button in the top right corner > Restore.

- Step 4: Give the restore job a name and description > Select source.

- Step 5: Choose which folders you want to restore > OK.

- Step 6: By default, folders will restore to their original location, but you can also select a different location > Next.

- Step 7: We’ll leave the rest of the settings for this tutorial as is. You can change these settings to your liking. Hit Next > Next > Restore.

Remember that a restore job also has the option to run as scheduled. You can also apply rules to it, just like with the backup job. Refer to the backup part of this guide to see all the scheduling options and restore rules you can configure.
How To Create a Sync Job in HBS 3 on QNAP NAS
Finally, there’s also the option to create a sync job, which is similar to a backup job, but doesn’t alter your files in any way, essentially just duplicating them to a QNAP NAS. When you create a sync job, you can access all your files directly from the sync location without any software. Here’s how to do that:
- Step 1: Select Synchronization on the left side of the application > Create > One-way Sync Job.

- Step 2: Choose Remote CIFS/SMB Server > Select your server below > Select.

- Step 3: Select folders to sync > Next.


- Step 4: Choose the folder on your server’s side by clicking Add a paired folder > selecting destination folders > Next.

- Step 5: Select the scheduling options (Refer to the Backup scheduling steps for more details.)

- Step 6: For this tutorial, we’ll leave the options as is. However, you can change Sync Methods and Sync Policies under the Rules tab to fit your sync needs.
- Step 7: When you’re done, hit Next > Create.
In addition to giving you options like the backup job, creating a sync job will let you sync your files to other computers or SMB servers. However, unlike with the backup job, you won’t be able to encrypt your data on the fly with a sync job.
Using Wondershare UBackit as a Simpler Alternative to HBS 3
HBS 3 might be too complicated for beginners, but there is an alternative solution to backing up or restoring files to a NAS device – Wondershare UBackit. It’s the perfect backup and restore tool, as it has many incredible features and combines them in a well-designed, easy-to-use, and beginner-friendly interface.
You can use UBackit to create file, partition, disk, and Outlook backups, and you can back up to NAS devices or create disk clones. There are options for incremental, real-time, and scheduled backups, which you can also easily encrypt, making your files safe and secure and reducing the risk of unwanted access.
Wondershare UBackit offers a one-month free trial, so you can try the app and see whether you’d like it.
Capability Comparison: QNAP HBS 3 vs. Wondershare UBackit
Deployment Criterion |
QNAP Hybrid Backup Sync (HBS 3) |
Wondershare UBackit |
| Target Audience | Network administrators & power users | Creative professionals, home users, & beginners |
| Interface Complexity | High; requires network protocol & IP mapping knowledge | Very low; intuitive 3-step wizard layout |
| Platform Boundary | Tied exclusively to QNAP QTS/QuTS ecosystem | Universal; works with local drives, external SSDs, & any NAS |
| Backup Logic Varieties | Full, Incremental, Deduplicated (QuDedup) | Intelligent Real-Time, Scheduled, & Incremental |
| Specialized Backups | Cloud object storage (S3, Backblaze, Azure) | Native Microsoft Outlook, Partition, & Full Disk Clones |
Backing Up Your QNAP NAS With UBackit
Creating backups with UBackit is incredibly easy. Nevertheless, here’s a short guide with steps to follow:
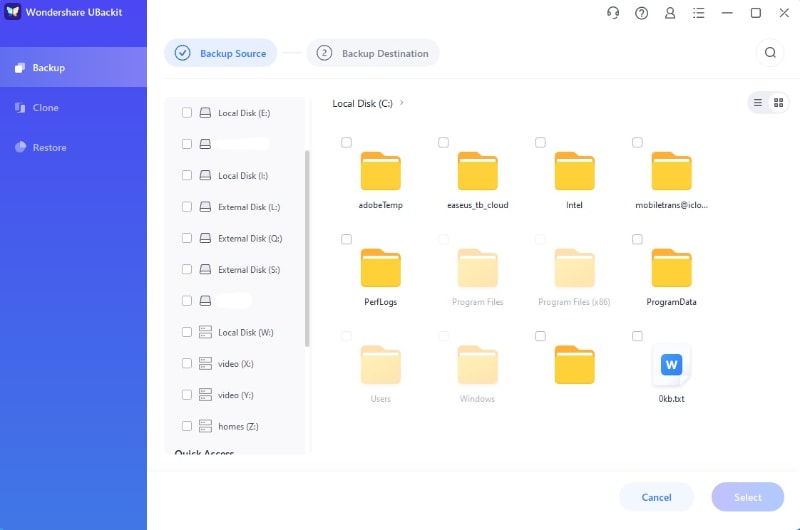
- Step 1: Open UBackit and select Backup on the left side of the screen.
- Step 2: Pick File & Folder Backup or Disk Backup, depending on what you want to back up.

- Step 3: Choose which files and folders to back up > Select. You can choose the files from your QNAP NAS that has been mounted to your computer or from any other storage media.
- Step 4: Select the device you want to back up to > Backup. Options to select here are internal or external drives, USB sticks, or NAS devices.

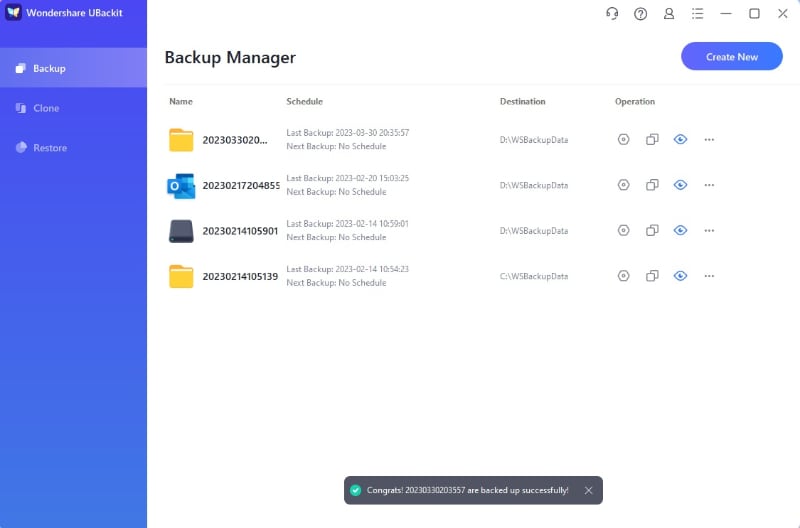
- Step 5: You can track the backup’s progress in the Backup Manager. You will receive a pop-up notification once the backup completes.
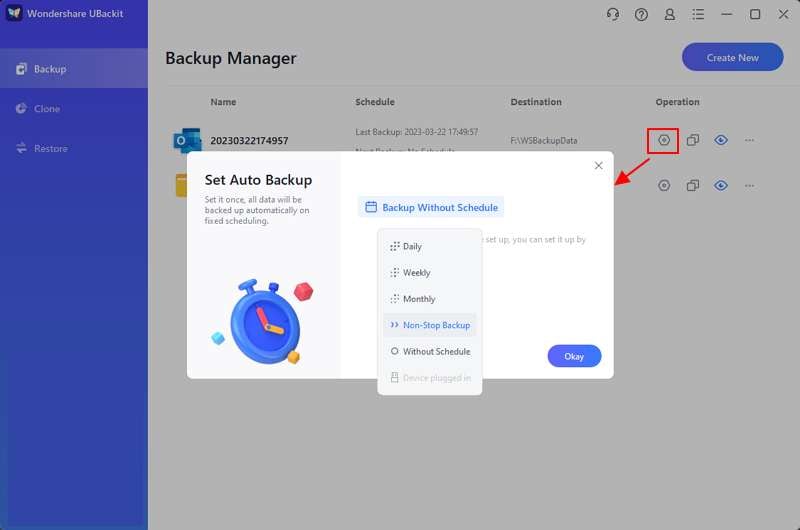
- Step 7: (Optional) Inside the Backup Manager, you can select the Schedule option under Operation to set up automatic backup.
Congratulations, you did it! It’s that simple, and anyone can do it. Remember that once you set up the automatic backup option, you won’t have to worry about backups again.
UBackit’s automatic backup is an incremental backup and only copies data that’s changed since the last backup. That’s why this alternative backup solution is intelligent, recognizing changes and only backing up those files instead of everything.
As the files are constantly syncing, the backup won’t take up a lot of computer resources as it runs in the background.
Post-Configuration Checklist: Verifying Your NAS Backup Health
- Verify Storage Status Active: Open HBS 3 Storage Spaces and confirm that your backup target displays a green "Connected" badge.
- Test a Dry-Run Restoration: Always run a sample 10MB test restore job to verify your decryption passwords work and data reads successfully.
- Check QuDedup Memory Thresholds: Ensure your QNAP resource monitor shows less than 85% RAM utilization during heavy backup windows.
- Audit Network Mount Permissions: Confirm that the Windows or Mac system running Wondershare UBackit has persistent read-write access to the mounted QNAP network shares.
- Review Version Retention Settings: Double-check your smart versioning rules to prevent historical backups from completely filling up your destination pools.
Conclusion
The Hybrid Backup Sync accompanying software for QNAP NAS devices is a powerful solution that can help you set up various backup, restore, and synchronization options for your QNAP NAS devices. However, the software has many advanced features and options and is challenging for beginners to navigate.
Fortunately, there’s an alternative solution to Hybrid Backup Sync. That’s Wondershare’s UBackit, which has all the options of QNAP’s HBS 3 but can also work with other NAS devices. The software has a much simpler, easier-to-use, and beginner-friendly interface that anyone can navigate.


