
Backing up the data on your iPhone is essential for preventing your vital information from being lost due to unforeseen situations. Backing up your data to a QNAP NAS (Network Attached Storage) device is one approach to ensure its protection. This guide will teach you how to back up your iPhone to a QNAP NAS.
Can You Backup an iPhone to QNAP NAS?
Your iPhone can be backed up to a QNAP NAS device. QNAP NAS devices make it simple and secure to back up your iPhone's data, including images, contacts, messages, and other vital information. You can secure the safety and accessibility of your iPhone's data by configuring a backup system on your QNAP NAS.
iPhones and QNAP NAS machines have been compatible since iOS 6 in 2012. Apple implemented support for the WebDAV (Web-based Distributed Authoring and Versioning) protocol with the release of the iOS 6 operating system, allowing users to link their iPhones to QNAP NAS machines and back up their data. QNAP has consistently updated its software and developed dedicated apps for iOS devices, such as the QNAP Qfile, Qphoto, and Qsync apps, which allow convenient access and backup of iPhone data to QNAP NAS equipment, since then.
Furthermore, QNAP NAS devices support various backup methods to back up iPhone data. Overall, iPhone compatibility with QNAP NAS devices has grown over time, making it an efficient and dependable alternative for iPhone backup.
Component |
Requirement for 2026 |
| iOS Version | iOS 12.0 or later (iOS 19+ recommended) |
| QNAP OS | QTS 5.1.x / QuTS hero h5.1.x or newer |
| Connection | Local Wi-Fi or Remote via myQNAPcloud |
| File System | HEIC (Photos) / HEVC (Video) supported |
Methods For Backing Up iPhone to QNAP NAS
Multiple methods for backing up your iPhone to a QNAP NAS device exist. Below, we will explore the different backup methods and guide you through the steps in setting up each method.
1. Backup iPhone to QNAP NAS via Qfile
Backing up your iPhone to a QNAP NAS device is easy, as QNAP provides several mobile apps for NAS management, including the Qfile app. The Qfile app allows you to set up an automatic backup system for your iPhone, so you have nothing to worry about backing up your data manually.
Follow the steps below to automatically back up your iPhone to QNAP NAS through Qfile.
- Step 1. Install the Qfile app on your iPhone.
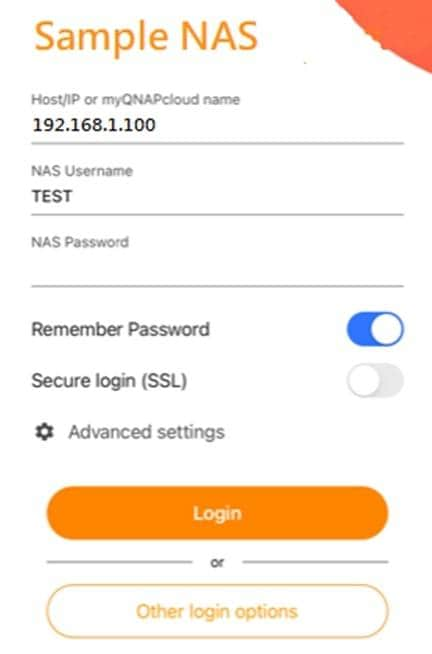
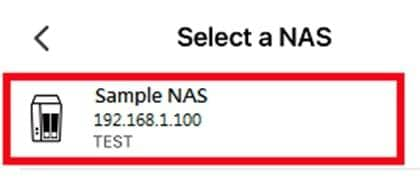
- Step 2. Use the Qfile iOS app to connect to the NAS.
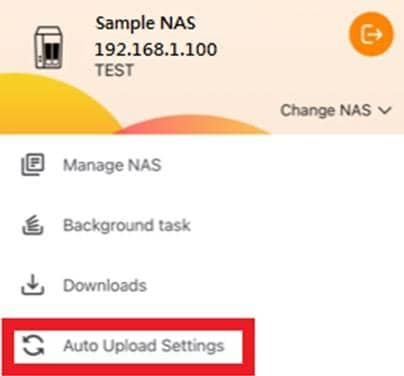
- Step 3. After logging into Qfile, click the three lines in the upper-left corner.
2026 Speed Tip: Leveraging Wi-Fi 7 and USB-C For users with an iPhone 15 Pro or newer, you are no longer limited to slow Lightning speeds. If your QNAP NAS is connected to a Wi-Fi 7 router, Qfile can backup 4K ProRes videos up to 4x faster than older models. If you have a massive library (over 500GB), we recommend using a USB-C to Ethernet adapter to plug your iPhone directly into your network switch for a "wired" NAS backup, ensuring zero data drops during large transfers.
- Step 4. Then, in the dashboard, go to the Auto Upload Settings section.
- Step 5. Set up the Camera Roll feature now.

- Step 6. Choose NAS as the backup destination.
- Step 7. After entering the destination NAS, please select a shared folder or a folder under the shared folder for the backup.
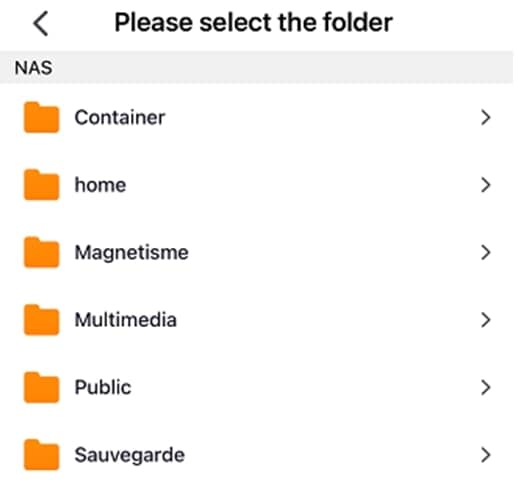
- Step 8. Click Set Location.

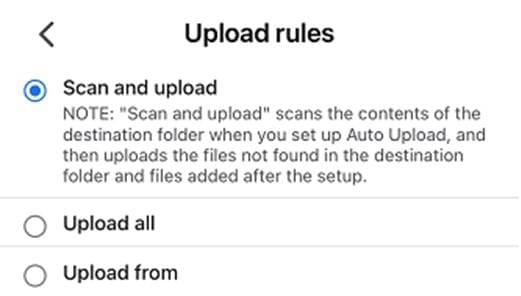
- Step 9. Select the Auto Upload Settings. There are choices available: Scan and Upload, Upload All, and Upload From. Select Scan and Upload.
- Step 10. Check the Duplicate file name option. Ignore the duplicated files and move on to the next file.

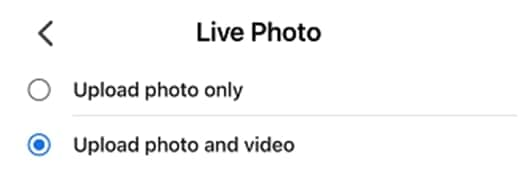
- Step 11. In the Live Photo options, click Upload Photo and Video.
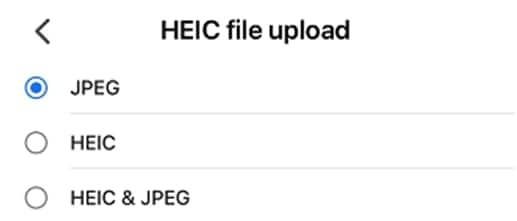
- Step 12. In the HEIC file upload options, click JPEG.
- Step 13. When all configuration options are correct, click Confirm to begin the backup process.

2. Backup iPhone to QNAP NAS via QPhoto
If you prefer a manual approach to back up your iPhone data to a QNAP NAS device, you can use the QNAP Qphoto app. QPhoto is a mobile app developed by QNAP Systems, Inc. that allows users to back up and access photos and videos from their iPhone to a QNAP NAS (Network-attached Storage). QNAP NAS is a storage device that can be connected to a network and used to store files, multimedia content, and backup data. With QPhoto, iPhone users can easily upload photos and videos from their devices to the QNAP NAS, ensuring a safe and secure data backup.
Here are the steps in backing up your iPhone data to a QNAP NAS via Qphoto.
Note: This article demonstrates how to utilize Qphoto on Android, but the process is the same when using iOS.
- Step 1. Install and open the Qphoto app on your iPhone. Then, select Add NAS. Choose a NAS device and enter your NAS's login credentials.
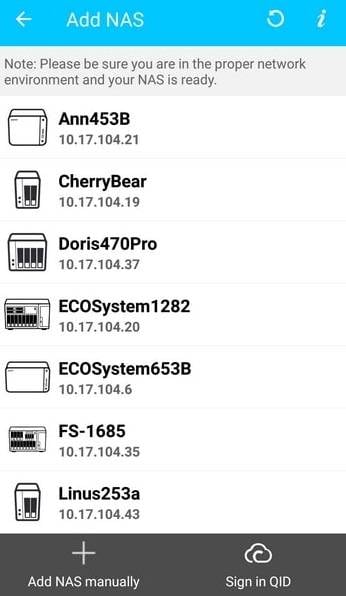
Note: Qphoto searches the network for all available NAS devices. If you changed the NAS's default port number (8080), specify the new port number.
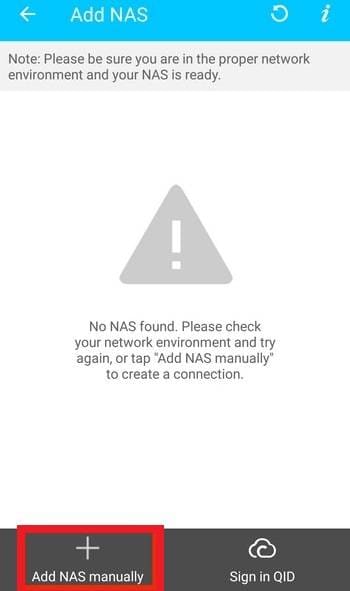
- Step 2. Choose the Add NAS manually button if you want to connect to the NAS on a different network. Then, enter your IP address or myQNAPcloud credentials.
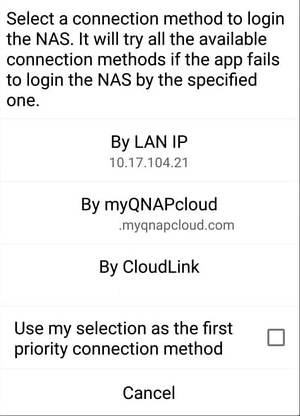
- Step 3. Qphoto remembers the first successful connection and makes it the default method. Tap and hold the NAS symbol to select a connection method to alter the default connection method. After connecting to it, you can explore images and movies stored on the NAS. Qphoto supports a variety of photo and video display options.
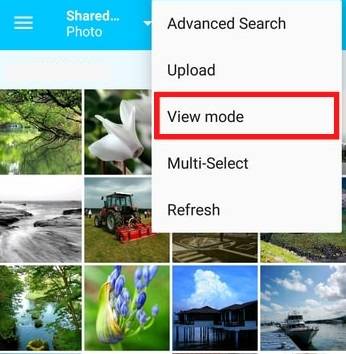
- Step 4. Select the iPhone photos or videos you want to back up by tapping the Select icon in the top right corner. Then, click the View mode to select a mode.
- Timeline: This mode displays and organizes photos chronologically on a timeline.
- Thumbnail: In this mode, photos are displayed as thumbnails.
- List: This mode shows specific information about your photos (color label, rating, etc.).
- Step 5. After selecting the photos or videos, tap the three-dot icon. Select Copy to Album or Copy to NAS from the menu.
- Copy to Album: Copy the specified items to an album after uploading them to the NAS.
- Copy to NAS: Upload the objects you've chosen to the NAS.
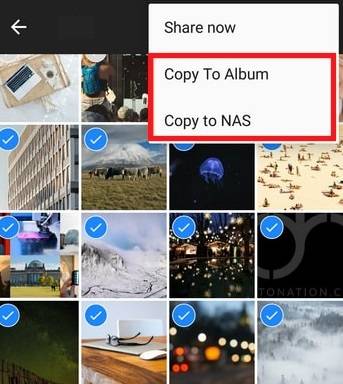
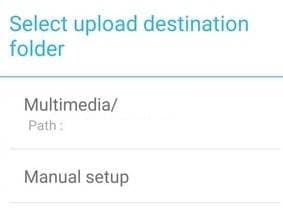
- Step 6. You can then choose the backup destination on your QNAP NAS.
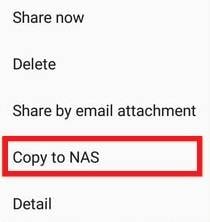
- Step 7. Open the multimedia viewer, hit the three-dot icon, and select Copy to NAS to upload files. After a photo or video has been uploaded to the NAS, the check icon appears next to it.
With the Qphoto app, you have complete control over which photos and videos to back up, allowing you to free up space on your iPhone by only backing up the necessary files.
3. Backup iPhone to QNAP NAS Using Acronis Mobile
Another method for backing up your iPhone to a QNAP NAS device is by using Acronis Mobile Backup. Acronis Mobile Backup is a third-party app that allows you to back up your iPhone data to a QNAP NAS device using a simple and user-friendly interface.
Acronis Mobile also offers a range of advanced backup options, including scheduled backups, incremental backups, and data compression. These options allow users to customize their backup settings to meet their needs and preferences. In addition to its backup features, Acronis Mobile also provides secure file transfer and sharing capabilities, allowing users to easily share their files and media with others.
Here are the steps in backing up your iPhone data to a QNAP NAS using Acronis Mobile.
- Step 1. Open the Acronis Mobile app from the App Store.
- Step 2. Choose NAS as the backup destination. Scan the QR code by tapping it and then pointing your camera at the QR code othe computer screen. Allow the mobile device to connect to the QNAP NAS.

- Step 3. Select the data categories to back up. Optional: Encrypt backup setting to password-protect your backup. If you do not want the app to ask for a password when you access the backup, enable the Remember password option. You can disable it later in Settings.
- Step 4. Select Back up. You may track the progress of the backup on your mobile device once it has begun.
When the backup is finished, your data is transferred to your NAS. Ensure the Continuous backup setting is enabled if you want data updates to be automatically backed up. If this option is disabled, new data is only backed up when you touch Back up.
4. Backup iPhone to QNAP NAS FoneTool
FoneTool, one of the best professional iPhone backup tools, enables users to back their iPhone data to a QNAP NAS. It is a user-friendly and powerful tool that can help users back up their contacts, photos, videos, messages, and other types of data from their iPhones to a QNAP NAS quickly and easily.
You can preview and select files on your iPhone before backing them to NAS. You can choose whether to back up certain items or all data on your iPhone. It works with most iPhone models, from the iPhone 4 to the iPhone 14/13/12/11, and is fully compatible with the current iOS 16/15.
Follow the instructions below to back your iPhone to QNAP NAS using FoneTool.
- Step 1. Download FoneTool. Connect your iPhone, then press Trust.
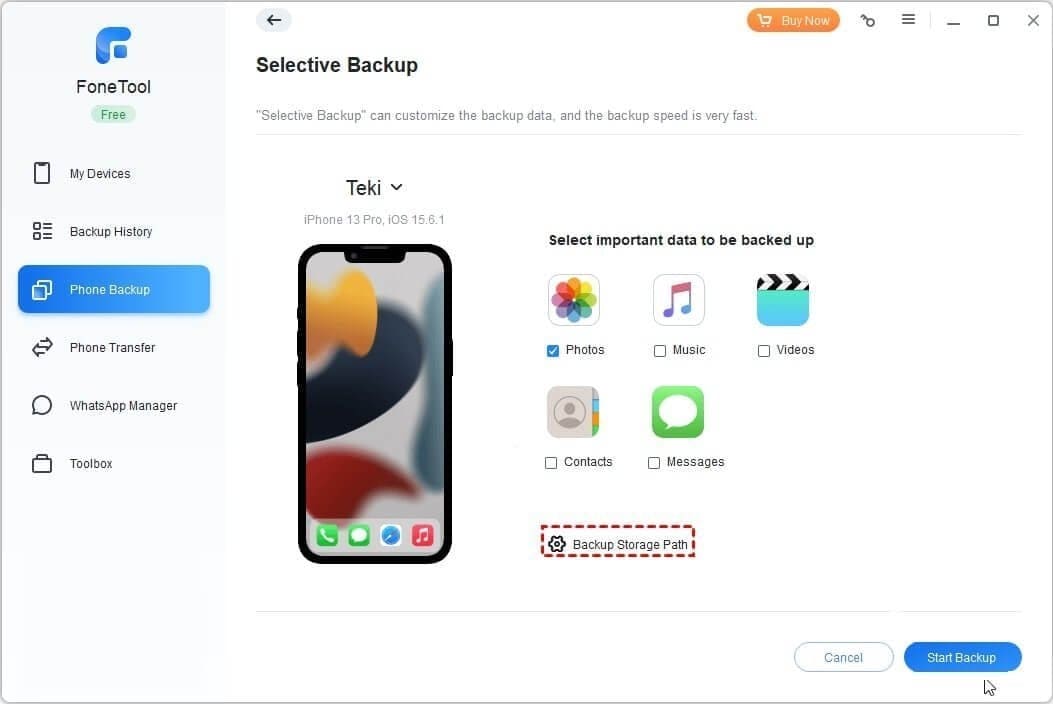
- Step 2. Launch FoneTool. Select Selective Backup from the Phone Transfer menu on the left.
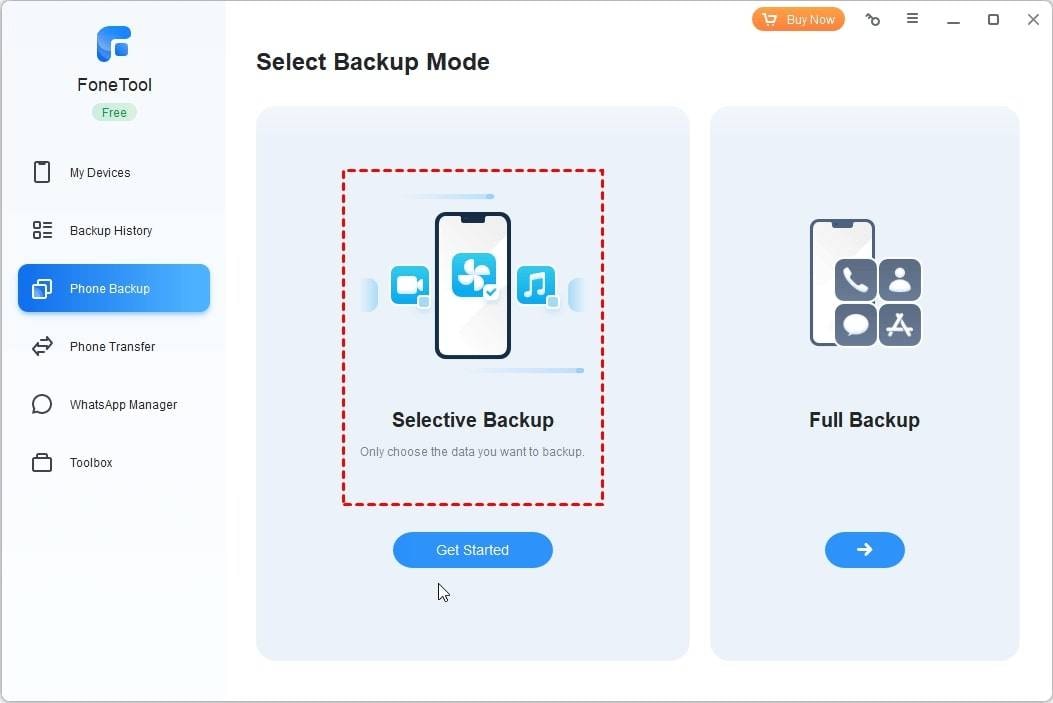
Note:
- Your information will be saved as a backup image. You can also choose Transfer to Computer to save the original data to the specified destination.
- Click Full Backup on the main interface to back up your iPhone completely.
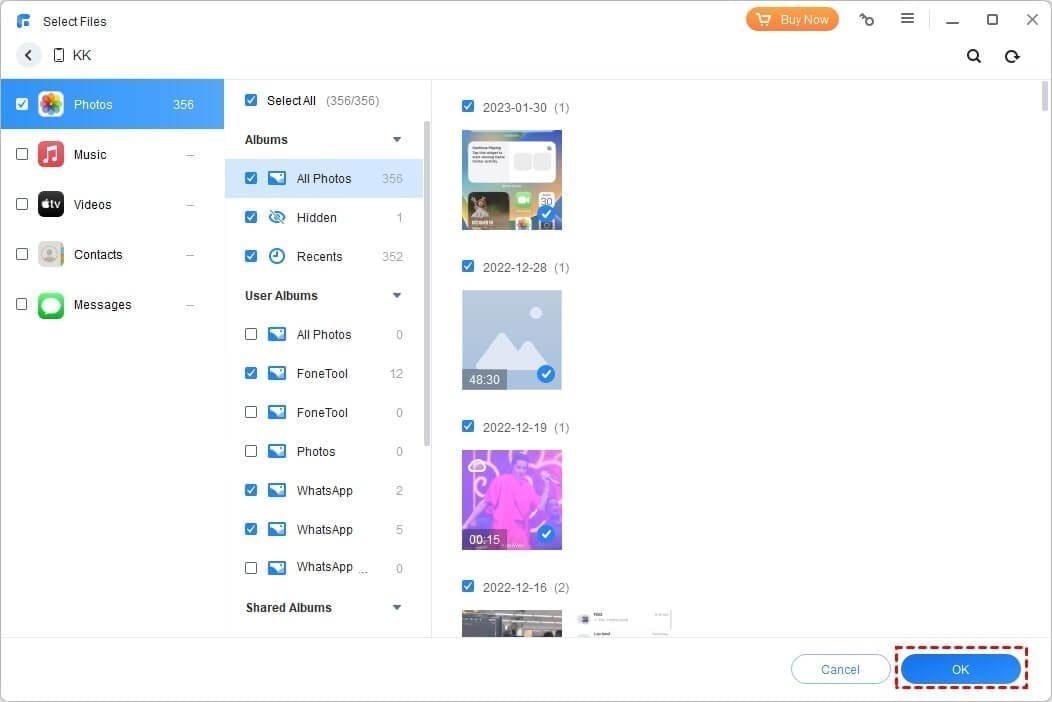
- Step 3. To preview and select files, click an icon. Then click OK to go back.
- Step 4. Select the NAS as the backup storage path by clicking the Backup Storage Path button. To finish the process, press the Start Backup button.
Method |
Best For... |
Transfer Speed |
Difficulty |
| QNAP Qfile | Automated Background Backup | Moderate (Wi-Fi) | Easy |
| QNAP Qphoto | Manual Media Management | Moderate (Wi-Fi) | Easy |
| Acronis Mobile | Encrypted/Professional Security | Fast (Wi-Fi) | Intermediate |
| FoneTool | Bulk/Initial 1TB+ Transfers | Ultra-Fast (USB) | Intermediate |
What To Do if Your Backup on QNAP NAS Gets Corrupted?
If you back up your iPhone to a QNAP NAS system and the backup file becomes corrupted, recovering it may not be easy. In this situation, it is important to take immediate action to try and recover your QNAP data. Here are some tips if your backup on QNAP NAS gets corrupted:
- Check Backup Integrity: The first step is to check the integrity of the backup file. You can do this by using the QNAP NAS software to verify the backup file. If the backup file is found to be corrupted, you may need to consider using a different backup file or contacting QNAP support for assistance.
- Data Recovery Services: If your backup on QNAP NAS gets corrupted, it may be necessary to seek QNAP data recovery services. QNAP data recovery involves recovering lost, damaged, or corrupted data from QNAP NAS devices. These services use specialized tools and techniques to recover data lost due to various issues, such as hardware failures, software errors, or accidental deletion.
- Contact QNAP Support: If you cannot recover your data using data recovery software, you may need to contact QNAP support for assistance. They may be able to provide additional guidance or recommend specialized data recovery services that can help you recover your data.
- Prevent Future Corruptions: Regularly update your QNAP NAS software and firmware to prevent future backup corruptions. Additionally, it is recommended to use reliable backup software or app and regularly test your backups to ensure they are working properly.
Pro Tip: Use QNAP Snapshots to Prevent Corruption Prevention is better than recovery. Before you start your iPhone backup, ensure Snapshots are enabled on your QNAP Storage Pool. A Snapshot records the state of your backup at a specific point in time. If your iPhone backup becomes corrupted during a mid-transfer crash in 2026, you don't need recovery software; you can simply "Revert" the folder to its healthy state from 24 hours ago using the Storage & Snapshots Manager in QTS/QuTS hero.
Conclusion
Backing up your iPhone to a QNAP NAS is an efficient way to protect your data, and it is highly recommended for anyone who wants to keep their files secure. The 4 methods to back up an iPhone to QNAP NAS are thoroughly explained here in this guide. Following the steps above, you no longer need to be concerned about backup storage space.
1. Qfile says "Connection Failed"
First, check if your iPhone is on the same 5GHz/6GHz band as the NAS. If you are accessing remotely, verify the SSL certificate status in myQNAPcloud settings to ensure the secure handshake is not being blocked.
2. Backup is extremely slow
The most common cause is iOS power management. Disable "Low Power Mode" on your iPhone, as iOS significantly throttles background data transfers and CPU cycles when this mode is active, leading to sluggish Qfile backups.
3. NAS is full, what now?
To prevent backup termination, you can enable VJBOD (Virtual JBOD) to utilize unused space on another QNAP NAS, or expand your local storage using an expansion enclosure like the TR-004. Always clear system logs and temporary snapshots to reclaim immediate space.


