


 TL;DR:
To maintain security and system stability before official support ends in October 2025, organizations must migrate from Exchange Server 2016 to Exchange Server 2019 by preparing the Active Directory, installing the new server environment, transferring mailboxes, and decommissioning the legacy 2016 system.
● Direct installations strictly require a host running Windows Server 2012 R2 or 2016, a 64-bit processor (Intel Itanium IA64 is explicitly unsupported), 128 GB of memory for the mailbox, and 64 GB for Edge Transport.
● The core mailbox migration can be executed manually via the Exchange Admin Center and Management Shell by experienced administrators, or automated using third-party tools like EdbMails for users requiring a streamlined, graphical approach.
● If migration complications result in data loss and no backups are available, administrators must utilize specialized recovery software, such as Wondershare Recoverit, that is capable of detecting and restoring Microsoft Exchange's proprietary EDB file format.
Ask AI for a summary
 ChatGPT
 Perplexity
 Gemini
 Claude
 Grok
Grok
One year from now, Microsoft will end all support for Exchange Server 2016. With no feature updates and security patches, your organization’s primary data management system will be completely exposed to bugs and attacks. Unless, of course, you migrate it to Exchange Server 2019.
The Exchange 2016 to 2019 migration is both necessary and beneficial. The newest version feels familiar but brings significant enhancements in terms of performance (Meta Cache Database), user experience (Sherable OneDrive Links), and security (Windows Core support).
If you think you’re ready for the next step in your Microsoft Exchange journey, we’re here to help you understand the migration requirements and show you the ropes. Let’s dive in.
In this article
Requirements for Migrating Exchange 2016 to 2019
To migrate Exchange 2016 to 2019, you must meet the requirements and set the environment for migration. First, only Windows Server 2016 (Standard and Data Center) and Windows Server 2012 R2 can be directly upgraded to Exchange Server 2019.
Other requirements for Exchange 2016 migration to Exchange 2019 include:
| Component | Requirement |
| Processor | 64-bit processor (Intel Itanium IA64 is NOT supported) |
| Screen Resolution | 1024×768 pixels or more |
| Memory | - 30 GB on the drive for installing Exchange 2019; - 200 MB of free space on the system drive; - 50 MB of free space for the message queue database; - 128GB of memory for the mailbox; - 64 GB of memory for Edge Transport; |
| Paging File Value | Paging file value as 25% of installed memory; |
| File System | Any 64-bit processor like the Intel EM64T or the AMD64 and above is supported. Intel Itanium IA64 is NOT supported. - System partition - Exchange binaries - Files generated by Exchange diagnostics logging - Transport database files ReFS: Supported on directories with the following types of files: - Mailbox databases - Transaction logs |
In addition to this, Exchange 2019 has the following network requirements:
| Component | Requirement |
| Active Directory Forest | Windows Server 2012 R2 or higher |
| Active Directory site | There must be at least one writable domain controller while also being a global catalog server. Removing the domain controller from the Active Directory site and installing the Exchange server is not possible. |
| Domain Controllers | All domain controllers need to run one of the following versions of Windows Server: - Windows Server 2019 Standard or Datacenter - Windows Server 2016 Standard or Datacenter - Windows Server 2012 R2 Standard or Datacenter |
| DNS Namespace | - Contiguous - Noncontiguous - Single label domains - Disjoint |
| IPv6 | IPv6 only with IPv4 installed and enabled on the server. |
How to Upgrade Exchange 2016 to 2019 – All Steps
The Exchange 2016 migration to Exchange 2019 is a complex technical procedure, so we will break it down into several phases. First, we will help you set the environment. Next, we will show you how to install Exchange 2019. Then, we will go through the Exchange migration steps.
Phase 1: Preparing the Environment
If your current version of Exchange is compatible with Exchange Server 2019, we can proceed with setting the environment. Here’s what you need to do before the installation:
- Upgrade to Skype for Business Server 2019;
- Update DNS, Active Directory, and Exchange;
- Download the latest Exchange Server ISO.
- Prepare the Active Directory and domains.
The computer used for the preparation procedure must meet the requirements needed for installing Exchange 2019 and have access to Setup.exe in the Exchange installation files. This means that you need to download the Exchange Server ISO before Phase 1. We recommend downloading the latest build from Microsoft’s list of Exchange Server build numbers and release dates.
After you download the Exchange 2019 installation files, you can start preparing the Active Directory Forest and its domains. There are two ways you can do this: 1) With the Setup wizard (recommended for smaller Active Directory deployments and consolidated management teams) and 2) Manually (best for larger Active Directory deployments and separate management teams).
The following steps show how to prepare the Active Directory and domains for the 2019 version of Exchange Server manually by running commands in the Windows PowerShell:
- In File Explorer, right-click the Exchange Server 2019 ISO and select Mount.

- Extend the Active Directory Schema by running this command in the PowerShell:
< Virtual DVD drive letter>:\Setup.exe /IAcceptExchangeServerLicenseTerms_DiagnosticDataON /PrepareSchema
- Prepare Active Directory by running the following command in the PowerShell:
< Virtual DVD drive letter>:\Setup.exe /IAcceptExchangeServerLicenseTerms_DiagnosticDataON /PrepareAD /OrganizationName:"< Organization name>"
- Prepare Active Directory domains with the following PowerShell command:
< Virtual DVD drive letter>:\Setup.exe /IAcceptExchangeServerLicenseTerms_DiagnosticDataON /PrepareAllDomains
For detailed guidance during this phase, please check Microsoft’s Learning Center.
Phase 2: Installing Exchange Server 2019
The Exchange Server 2019 Mailbox Server and Edge Transport are pretty easy to install by following the step-by-step instructions provided by the Setup Wizard. Microsoft’s official recommendation, approved by experts, is to install Exchange 2019 on Windows Server core.
Here’s what else you need to know before you run the installation wizard:
- The installation process takes about one hour to complete;
- You can’t change the server name after you install Exchange 2019;
- You need Enterprise, Schema, and Exchange Organization Management group membership permissions;
- The easiest way to migrate Exchange 2016 to 2019 is when both versions are in a single network;
- The target server must be a member of an Active Directory domain.
Follow these steps to install Exchange Server 2019 with the Setup Wizard:
- In case you have skipped Phase 1 of this article, please go back and prepare the environment for the installation. Phase 1 also includes instructions for downloading and mounting the Exchange 2019 ISO image file, which is a critical requirement for this installation process.
- After you successfully mount the Exchange 2019 ISO image file, right-click the Setup file. Then, choose the Run as administrator option.

- Select the Connect to the Internet and check for updates option to download security and product updates before you begin the installation.

- Now, wait for the Setup Wizard to copy the Exchange files to the local drive.

- Stay patient until the Setup Wizard finishes initializing the setup.

- Read the Introduction page and click Next. After that, the Wizard will prompt you to accept the Exchange Server license agreement. Check the I accept the terms in the license agreement option and hit Next.

- On the next page, choose the option to Use recommended settings and click Next.

- Under Server Role Selection, check the boxes next to Mailbox role and Automatically install Windows Server roles and features that are required to install Exchange Server. Then, click on Next.

- Click on Browse and choose where you want to install Exchange Server 2019. Then, click on Next.

- Under Malware Protection Settings, click on Yes if you use another product for malware scanning and you want to disable this option. If you want to keep this option enabled, click on No. Then, hit Next.

- After Readiness Checks, click the Install button and wait for the Wizard to complete copying files.

- When you see the confirmation message, click the Finish button to complete the process.

If you encounter any problems with the installation process, consult Microsoft’s step-by-step guide for installing Exchange 2019 Mailbox Servers and Edge Transport.
Phase 3: Migrating Exchange 2016 to 2019
There are two methods you can use to upgrade Exchange Server 2016 to 2019: 1) Manually, using the Exchange Admin Center and Management Shell, and 2) Automatically, with third-party software that specializes in mailbox migrations (recommended for beginners).
Migration Method 1: Exchange Admin Center and Management Shell
If you don’t want to pay for a third-party migration tool, you can follow this Exchange 2016 to 2019 migration step-by-step tutorial to manually complete the process:
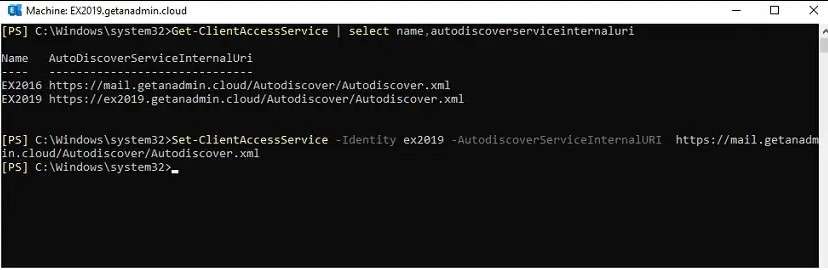
- First, you need to update the Service Connection Point, which is an object in Active Directory that directs users to the Exchange Server. Go to the Exchange Management Shell and run this command:
Set-ClientAccessService -Identity EX2019 -AutodiscoverServiceInternalURI
- Now, sign in to your Exchange Admin Center using the admin username and password.

- Before you start the mailbox migration, go to the servers section in the right sidebar to import Exchange certificates to the new server. Open the certificates tab. Right-click on each active certificate and select Export Exchange certificate.

- In the sidebar on the left, select the recipients category. Open the migration tab and click on the + icon. Choose Move to a different database.

- Click on the + icon to add user mailboxes you want to migrate to Exchange 2019.

- Select the Exchange 2016 mailboxes you want to migrate and click add > OK.

- The mailboxes will be added to the migration list. Click Next to proceed.

- Set a New migration batch name and click on Browse to choose the target database.

- Select the Exchange 19 database and click add > OK.

- Click on Next to continue after the Exchange 19 database has been added to the New Migration Batch window.

- Click Browse and choose the recipients receiving the migration report once the batch is complete. After that, click on new.

- You can track the migration status during the process. The status will read Syncing or Scheduled until the migration is complete. After that, you will see the total number of migrated mailboxes under Finalized.

Migration Method 2: Third-Party Software
One of the best third-party tools designed to facilitate mailbox data migration from Exchange 2016 to 2019 is EdbMails. Unlike the previous method, this one is almost fully automatic and doesn’t require direct experience with Exchange data migration. Follow this step-by-step guide:
- Download, install, and launch EdbMails.
- When you see the prompt that says Select one of the recovery, migration, backup option and proceed, pick Live Exchange Migration and click on Let’s Go!

- Set your preferred migration specifics in The Connect to Exchange Server (Source) window and click Next >.

- Select the mailboxes that you want to migrate from Exchange 2016 to 2019 and click on Migrate to Live Exchange to connect with the target server.

- Select your preferred Connection Option under Connect to Exchange Server (Destination) and click on Next >.

- When the connection with the target server is established, choose the mapping method. EdbMails automatically matches and maps mailboxes between the two servers. When you complete this step, click on Continue.

- Set the Action to Migrate to start the migration.

- When EdbMails is done copying your mailboxes, you will see a complete report of items that have been successfully migrated.
Phase 4: Decommissioning Exchange 2016
Now that the migration to Exchange 2019 is complete, it’s time to say goodbye to Exchange 2016. Decommissioning Exchange 2016 is a straightforward and automatic process:
- Go to Control Panel > Programs > Programs and Features.
- Select Microsoft Exchange Server 2016 and click on Uninstall.

How to Recover Any Data Lost During Migration
If you have completed your Exchange 2016 to 2019 migration without any issues, congratulations! Non-technical users who decide to do this themselves usually experience some kind of complication. Unfortunately, many of these users end up suffering catastrophic data loss.
Data loss could mean disaster for your organization, but there’s no time to panic. If you’ve just lost many important emails in migration to Exchange 2019 and don’t have backup copies, you can use a professional data recovery tool like Wondershare Recoverit.
Microsoft Exchange Server uses a special EDB file format that most recovery solutions can’t detect. Wondershare Recoverit is different. This powerful software has cutting-edge technology that can identify and bring back more than 1,000 file types, including Microsoft Exchange Server’s EDB.
Here is how to use Wondershare Recoverit to recover files lost during the Exchange 2016 migration to 2019:
- Download, install, and launch Wondershare Recoverit for Windows.
- Select a location for recovery, and Recoverit will start scanning it for lost data.

- When the scan is complete, you will see a list of all recoverable files. If there are too many scan results, use the File Type filter to narrow them down to EDB files. You can also filter results based on Time, File Size, and File Tag, or using a specific keyword.

- Double-click on any file to preview it before recovery.

- Select the files you want to keep and click the Recover button.
- Choose a safe location to recover files and click Recover again.

Bonus: The Benefits of Exchange 2016 to 2019 Migration
Now, many of you are wondering: Why go to all this trouble and risk losing vital data? As mentioned at the beginning of this article, October 2025 marks the end of official support for Exchange 2016. After that, it will become a liability to your data and the organization’s security.
But that’s not all. Exchange 2019 brings several improvements that are already proving to be beneficial to organizations that have migrated from 2016 to 2019:
- 🚀Exchange 2019 is faster: The new Exchange Server has a feature called Metachache Database (MCDB), which serves a twofold purpose – it enables support for larger drives and SSD drives. It helps them work together to ensure optimum speed and performance.
- 👍Better failover response: Thanks to the new Search Index and the Dynamic Database Cache (DDC), Exchange 2019 allows organizations to find and activate passive databases as soon as the failure in active databases is detected.
- 💁New Server Core support: If you were wondering why you should install Exchange 2019 to Server Core, here’s your answer. New support mechanisms ensure that Exchange consumes less memory and presents a smaller target for data breaches and attacks.
Even now, Exchange 2019 is the stablest and most secure version of Microsoft Exchange Server. It’s a good time for all organizations that haven’t migrated their mailboxes to make plans and carry out the upgrade as soon as possible. Better things await you on the new server.
Conclusion
If you’ve finally gotten around to upgrading your organization’s mailbox server, you need an Exchange 2016 to Exchange 2019 migration step-by-step guide to complete the 4 key phases: 1. Preparing the Environment, 2. Installing Exchange Server 2019, 3. Migrating Exchange 2016 to Exchange 2019, and 4. Decommissioning Exchange 2016.
You can upgrade Exchange Server 2016 to 2019 in two ways – from your Exchange Admin Center and the Exchange Management Shell or using a third-party migration tool. Since the first method involves using a command-line interface, it requires at least some technical experience. The second method is more suitable for beginners, as it automates a large part of the process.
However, trying to migrate Exchange 2016 to 2019 with no experience sometimes results in data loss. If this happens to you, you can rely on Wondershare Recoverit to bring your lost data back. Unlike most similar tools, Wondershare Recoverit can find and recover Exchange’s EDB files.
FAQ
-
Can we do an in-place upgrade from Exchange 2016 to 2019?
Yes, it is possible to do an in-place upgrade from Exchange 2016 to 2019. To do this, you need to meet the requirements and prepare the environment for the new version. Next, you need to install Exchange 2019, import authorization certificates, and migrate mailboxes from Exchange 2016. As a final step, you need to decommission Exchange 2016. -
What are the prerequisites for migrating from the Exchange 2016 server to 2019?
The essential prerequisites for migrating from the Exchange 2016 server to 2019 include:
1. Windows Server 2012 R2 Standard and Data Center, or a more recent version;
2. Any 64-bit processor except for Intel Itanium IA64;
3. 30 GB for the installation, 128 GB for the mailbox, and 64 GB for Edge Transport;
4. Screen resolution of 1024×768 pixels or higher. -
How long does it take to migrate from Exchange 2016 to 2019?
On average, it takes around 1 hour to complete the Exchange 2016 to 2019 migration.


