

 TL;DR:
To edit a Microsoft Word document stuck in Read-Only mode, you must disable the specific file's restrictive properties, bypass Word's internal security settings, or remove password protection.
● For individual local files, right-click the document, select Properties, and uncheck the Read-Only box under the General tab, ensuring your File Explorer's Preview Pane is also turned off to prevent background locking.
● For internet downloads or email attachments, open Word and navigate to File > Options > Trust Center > Trust Center Settings > Protected View to disable the default security restrictions.
● If a specific document is locked by another user, navigate to the Word Review tab, select Restrict Editing, click Stop Protection, and input the required password to enable modifications.
Ask AI for a summary
 ChatGPT
 Perplexity
 Gemini
 Claude
 Grok
Grok
Microsoft Word, by default, opens all the Word documents in Read-Only mode. This is done to ensure that safety standards are met. However, you will have to turn off read only in Word if you want to edit or make any changes to the file. Sometimes, the file may also open in Read Only mode if the device's default settings are set to that mode.
Now, you may be wondering, 'why is my Word file read only?', in that case, you must know that there are a wide range of reasons why this must be happening, security and safety being one of the main ones. This blog will help you understand all the potential ways to remove Word file Read Only mode.
Try Recoverit to Perform Word Document Recovery
 Security Verified. 3,591,664 people have downloaded it.
In this article

Part 1: Why Microsoft Word Opens Files in Read-Only Mode?
Microsoft Word files opening in Read-Only mode can be annoying as you won't be allowed to make any changes. Here are some of the key ways reasons why the document opens in Read-Only mode:
- Protected View
If the Word document is saved in a dangerous location, Microsoft Word will open the particular file in Read-Only mode. This is to ensure that the system isn't prone to any malware or virus attack due to the specific file. These are potentially corrupted files, so you'll have to enable editing unless you make some changes forcefully.
- File Properties and Read-Only Attributes
Sometimes, you may accidentally save a file with the Read-Only attribute checked. In that case, Word will be able to open the file in Read-Only mode. You must disable the Settings from the File Properties option.
Part 2: Methods to Fix Microsoft Word Opens Files in Read-Only Mode
Microsoft Word opening files in Read-Only mode will require you to make some changes in the Saving settings. This will help you to fix the problem. Some of the top methods to turn off Read Only in Word are as follows:
Method 1: Change File Properties
One of the easiest ways to fix Microsoft Word opens files in Read-Only Mode is to change the file properties. It is advisable to look into the properties and then make the changes accordingly.
Below are the steps you will have to follow to change the file properties to understand how to change Word from Read only:
Step 1: Visit the location where the file is stored. Right-click on the file in Read-Only mode and click on Properties. This will let you view the file's properties.

Step 2: The Read-Only section is under the General tab. Uncheck it. Then click on OK to exit the settings.
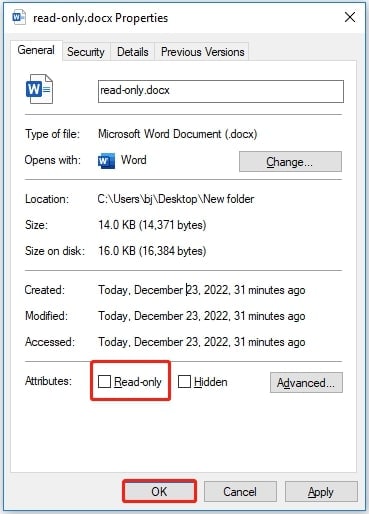
Step 3: Reopen the file. The Read-only method should be disabled by now.
Method 2: Turn off Protected View of Word Documents
Protected View is one of the most crucial parts of the Microsoft Trust Center, and it lets you manage the security and privacy settings of Microsoft Office programs. If Protected View is enabled on your device, Microsoft Word will open files in Read-Only mode.
It is important to note that Protected View is Microsoft Word's default setting. Therefore, it will open all files in a protected View to prevent malware from damaging them. Nonetheless, many users do not want Protected View enabled in their systems. Therefore, you may disable it from the Settings.
Follow the steps given below to disable Protected View to turn off Read Only in Word documents:
Step 1: Launch the MS Word software in your system.
Step 2: Navigate to File options and select Options.
Step 3: The Word Options window will open on your screen. Towards the left pane, click on the Trust Center tab to open it.
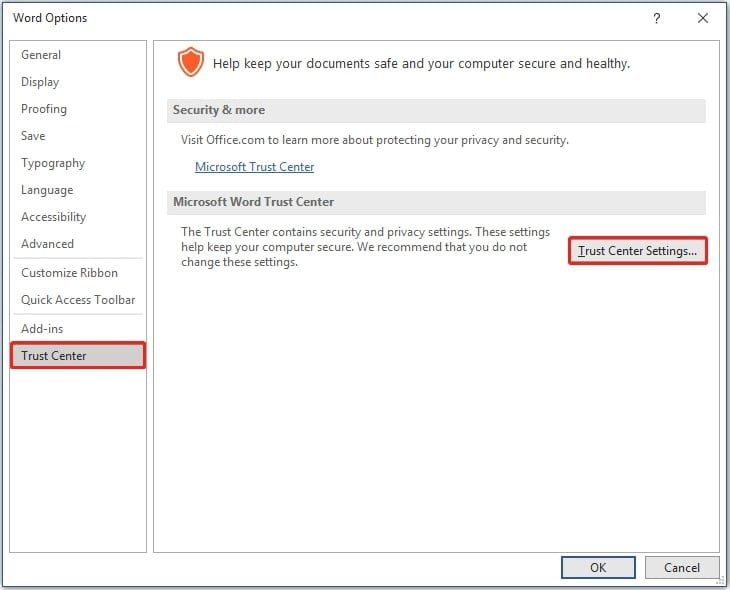
Step 4: Under the Microsoft Word Trust Center section, choose Trust Center Settings.
Step 5: The Protected View tab is enabled in the left pane. Click on it.
Step 6: In the right pane now, check if the following options are enabled. If yes, then disable them:
- Enable Protected View for files originating from the internet
- Enable Protected View for files located in potentially unsafe locations
- Enable Protected View for Outlook attachments
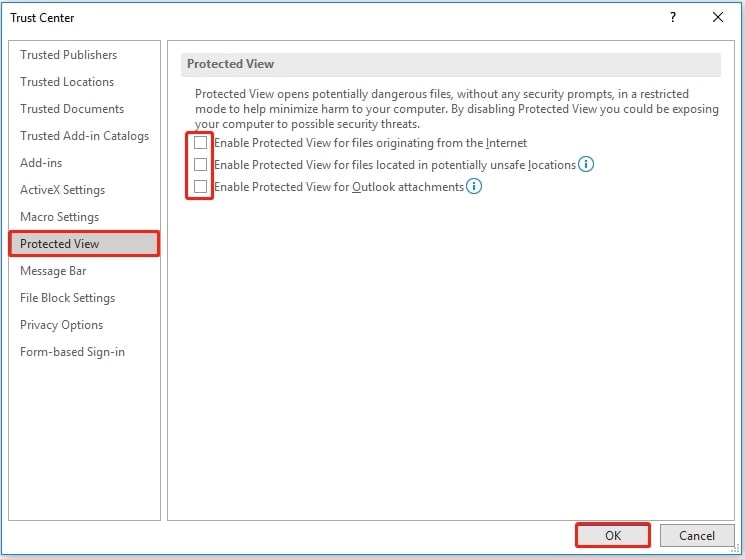
Step 7: Click on the Ok button to Save the Settings. Exit Microsoft Word.
Step 8: Open the Microsoft Word document again to check if it opens without any restrictions.
Method 3: Change a Startup Option for Word Documents
The Startup option on your device can often interfere with Word documents. You should consider this a startup problem if the e-attachments are also opening in read-only mode.
Here's how you can change the Startup option for Word documents to undo Read Only Word documents:
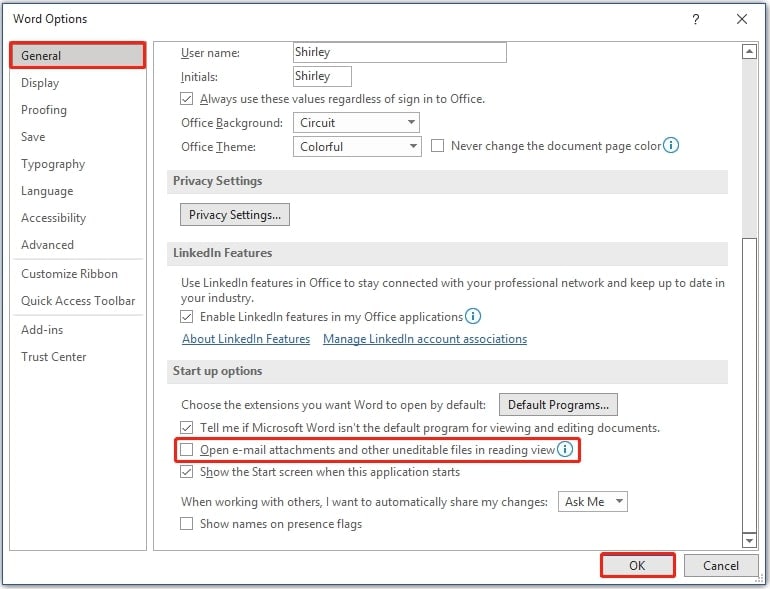
Step 1: Open the Microsoft Word document and visit the File tab. Then, select Options.
Step 2: The new box will open. Visit the General tab and look for Open e-mail attachments and other uneditable files in the reading view. If the box is checked, uncheck it and click on Ok.
Method 4: Change Restrict Editing in Microsoft Word
Microsoft Word has Restricted Editing features, which enable you to use a password to protect the document. This ensures that no sudden changes are made to the file without authorized permission. You must disable Restrict Editing to ensure that the document is removed from Safe Mode, and you can use it again to turn off Read Only in Word.
Below are the steps you will have to follow to change the restricted editing mode in Microsoft Word to understand how to turn off Read Only in Word:
Step 1: On your computer, open the Read-Only Word document.
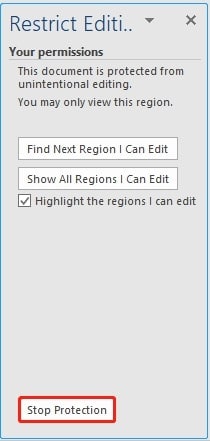
Step 2: Click the Review tab and then choose Protect. From the two available options, select Restrict Editing.

Step 3: In the lower right-corner of the screen, choose Stop Protection.
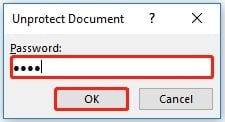
Step 4: In the input box, type the password for protecting the document. Click on the OK button now.
Step 5: The read-only mode is now disabled for the particular file, so exit it. Then, you can reopen the file and check if it is opening without any restrictions.
Method 5: Turn off Preview Pane in File Explorer
The Preview Pane in Microsoft Office documents shows only the selected files in preview mode in File Explorer. However, if you do so, Microsoft may end up locking all your files. In this case, you will have to turn off the Preview Pane feature in File Explorer to change a Word doc from Read Only.
Turning off the Preview Pane feature should help to fix the problem. Below are the steps on how to turn off Preview Pane in Windows 11:
Step 1: Launch File Explorer by pressing the Windows + E key on your keyboard.
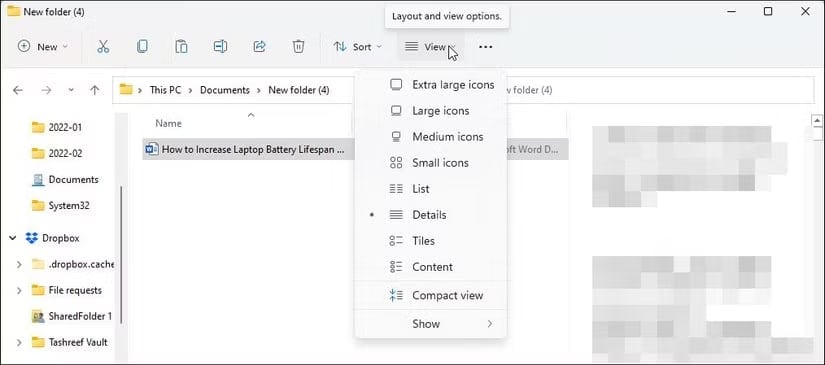
Step 2: Open the location where the file is stored. From the tabs section, select View to open the drop-down menu.
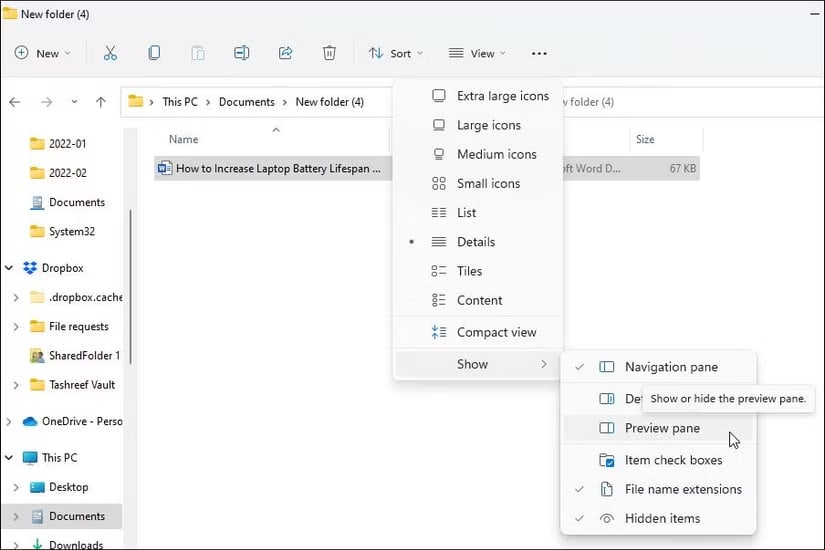
Step 3: Click on the Show option. Then, uncheck the Preview Pane.
Now that you know how to turn off Preview Pane in Windows 11, follow the steps given below to turn off Preview Pane in Windows 10 to turn off Read Only in Word:
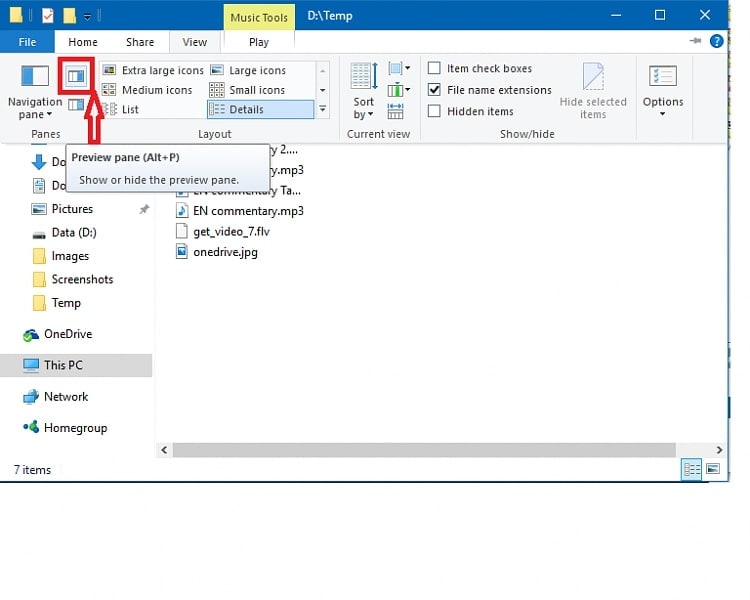
Step 1: Launch File Explorer in your system.

Step 2: The Open option will appear at the top of the screen. Click on it.
Step 3: Now, open the Preview Pane section. Turn it off.
Bonus Tip: How to Recover Deleted or Lost Read-Only Word Files?
In the process of fixing the Word file read only, there is a chance that the respective file can get lost or accidentally deleted. However, you must know that the file will still be on a hard drive. You will have to use advanced algorithm software, such as Wondershare Recoverit, to fix the problem.
Wondershare Recoverit is advanced software available for Mac and Windows devices. You can download the software for free and initiate the file recovery process. Wondershare Recoverit can play an important role in recovering all kinds of data, thereby ensuring 100% safety.
- Recoverit can recover unsaved, accidentally deleted, and lost files easily using the advanced algorithm.
- Recovery can help recover documents across different scenarios such as disk corruption, system crash, etc.
- Wondershare Recoverit supports different devices and can recover documents from over 2000+ devices, such as HDDs, SSDs, SD cards, USB drives, and more.
Once you have downloaded and installed the software in your system, you may follow the steps given below to recover the documents:
Step 1: Launch Wondershare Recoverit in your system. Under the Hard Drive and Locations section, select the hard drive from which you want to initiate the document recovery process.

Step 2: Recoverit will start scanning the hard drive to look for any lost or deleted documents.

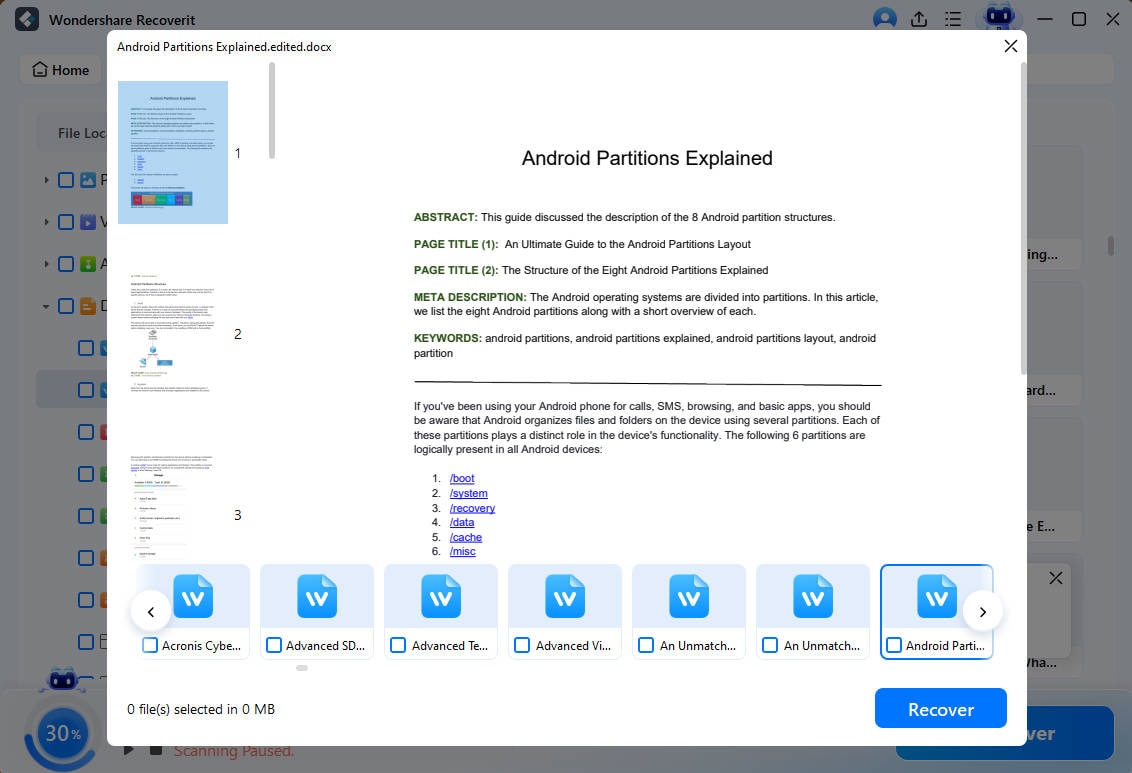
Step 3: Wondershare Recoverit will scan and recover all kinds of files. You may apply filters to narrow down your search. Under the File type option, you must choose Document so that the software only retrieves the lost document.

Step 4: Once all the respective documents are recovered, preview them. This will help you determine whether there are any issues with the file.
Step 5: Click on the Recover button and save the file in a safe location, where the MS Word file read-only will not be lost forever.

Conclusion
If you encounter Microsoft Word opening documents in Read-Only mode, you will have to disable it, especially if you want to edit the files. Now that you know the answer to how do I change a read only document in word, make sure to do that properly. Microsoft Word is one of the most commonly used platforms, and thus, it poses a lot of risks and threats. Integrating the safety features can play an important role in preventing any malware or damage to the system. However, you should be mindful of document safety. In case the document is lost in the process of fixing the problem, you may choose Wondershare Recoverit to resolve the issue.
FAQ
-
1. Why is my Word document opening in Read-Only mode?
Word will open in Read-only mode if it is saved in Protected View mode. The Word document may also show some specific file attributes (Read-only) where it will open in Read-Only more. -
2. How do I disable Read-Only mode in Word?
To disable Read-Only mode in Word, you can: 1) Change the file properties by right-clicking the document, selecting 'Properties,' and unchecking the 'Read-only' box; 2) Turn off Protected View by going to File > Options > Trust Center > Trust Center Settings > Protected View and deselecting the relevant options; or 3) Adjust the startup options for Word documents to avoid opening in restricted modes. -
3. How do I fix Read-Only issues with OneDrive or SharePoint?
To resolve Read-Only issues with OneDrive or SharePoint: 1) Log in to your account on the platform; 2) Locate the file in question; 3) Right-click the file, select 'Properties'; 4) Check if the 'Read-only' attribute is enabled. If so, uncheck the box, click 'OK,' and save the changes. This will remove the Read-Only restriction and allow editing.


