How to Fix Read Only Error of USB SD Card Hard Drive
Read-only is not an error. There are storage devices that do not allow writing of data through conventional methods. We know this memory as ROM, considered being more secure because of the writing restriction. For this reason, they are usually used to store the firmware of the devices. However, there is the possibility that a conventional storage device may not work correctly, and Windows considers it a read-only memory. In this post, I will explain why this happens and also show you how to fix it.
Part 1: Fix Read-Only Error of USB, SD Card and Hard Drive
Q: Two days ago, I got a USB with images to edit. However, I cannot save any changes to the file or add new files to the device. Is there a way to fix it?
When a device does not allow data writing, it is because of several reasons, but before solving this problem, it is essential to find out if your device is working as a read-only memory. In this post, I will explain how to know when your storage device is working as read-only memory, and in case it is, I will also show you how to fix it.
Part 2: What Is Read-Only Memory?
ROMs (Read-Only Memories) are storage devices that do not allow data writing, at least not through conventional methods, however, these memories allow data reading, often used for security to store firmware of the devices.
Part 3: Symptoms of Read-Only Mode
It is easy to distinguish a Read-Only Memory because Windows displays an error message when trying to delete or modify a file stored on the device; however, it is crucial to differentiate between the lack of administrator permissions for writing data and a Read-Only Memory. These two factors can cause very similar problems, but you will need to correct them differently.
The easiest way to find out which of these two factors is causing the problem is through the Disk Management tool. I will show you how to do it below.
Step 1: Open the Disk Management
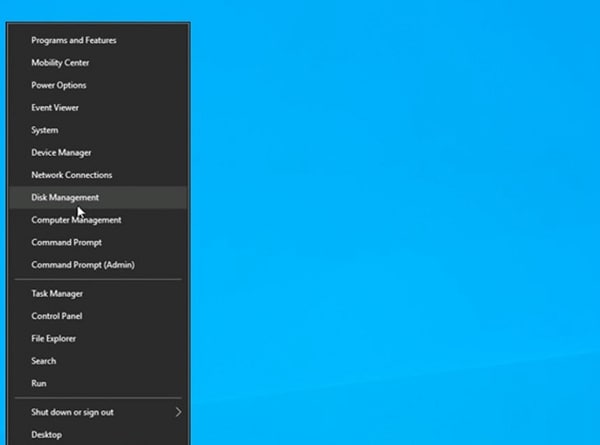
There are several ways to access Disk Management; the easiest is by right-clicking on the Windows icon in the taskbar. This action will display a menu from which you can select the Disk Management option.
Step 2: Look for a read-only status
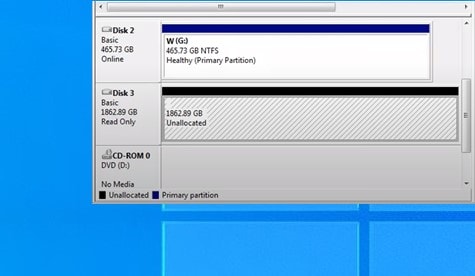
Within this tool you can see the storage devices connected to your computer, pay attention to the left panel, there you can see the status of the devices, and you should confirm if the device that causes problems has a Read-Only status.
Part 4: Why Did My Flash Drive Become Read-Only?
Some flash devices are previously configured as read-only to protect the integrity of the files on the device, but this does not usually happen. If there is no reason to think that you configured your flash drive this way, it may be due to a compatibility issue with the device's file system. This issue can happen when a flash device has an NTFS file system instead of the FAT standard. Later, I will show you how to change the file system of a storage device to correct this problem.
Part 5: How to Change Read Only Memory Card to Normal?
SD cards, in the same way as a flash drive or HDD / SSD, can become read-only memories. SD cards usually have a switch that allows them to restrict the writing of data to protect the integrity of the information they have stored. However, there are cases in which some other reason origins the problem, and therefore the solution does not will be the same. Below I will explain some methods that can help you change a read-only memory to normal mode.
Method 1. Check your SD card is locked
As I mentioned earlier, SD cards usually have a switch that allows restricting data writing. If this is the source of the problem, toggle the switch to enable writing to the device again.
Method 2. Fix USB drive Read Only error by reformatting
Earlier I talked about the file system problem on flash drives. The easiest way to solve this problem is to reformat the device to replace the NTFS file system with FAT. I will show you how to do it below.
Step 1: Click on Format…
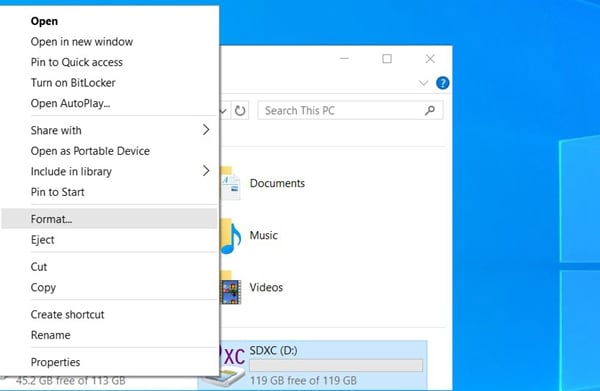
The first thing you should do is right-click on the device from the Windows file explorer. This action will display an options menu from which you must select the Format… option.
Step 2: Set the format preferences
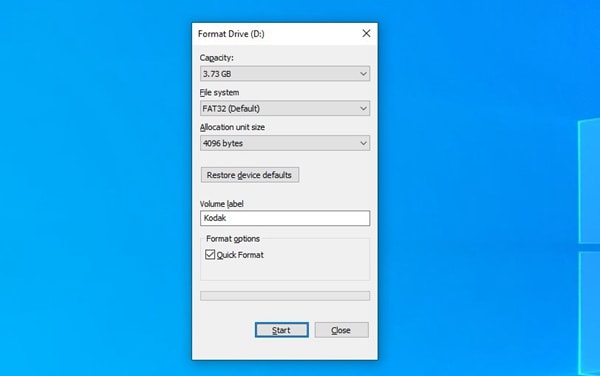
After opening the Format… menu, a window will appear where you can assign the file system, select FAT and assign the name you prefer to the device. When finished, click on the Start button.
Method 3. Use CMD command to fix Read-Only SD card or hard drive
This method comprises using the Command prompt to change the device parameters and thus disable read-only mode. Next, I will explain how to do it.
Step 1: Open Command Prompt
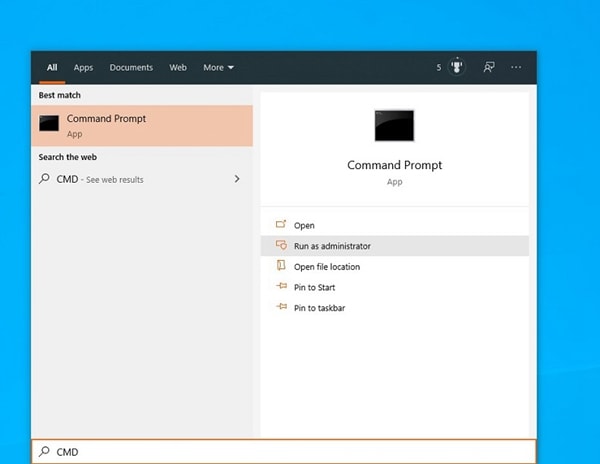
To use the DiskPart tool, you must first access the Command prompt. The easiest way to access this tool is by opening the Windows menu and typing CMD. Once you did it, you must click on the Run as administrator option that appears in the right panel.
Step 2: Run the DiskPart built-in tool
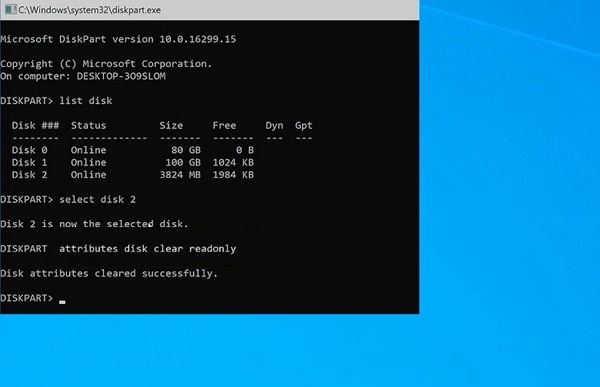
Once you have opened Command Prompt, you will have to type diskpart and press Enter. Now you will have to type list disk and then press Enter again. It will display the storage devices connected to your computer; then type select disk x (replacing x with the number that corresponds to the read-only device), and press Enter. Finally, type attributes disk clear readonly and press Enter.
Method 4. Adjust the registry key by using Registry Editor
If with the previous methods you could not remove the write restriction on your device, you can change the parameters of the Windows registry through the Registry editor. This process is straightforward to carry out; I will show you how to carry it out below.
Step 1: Open the Registry Editor
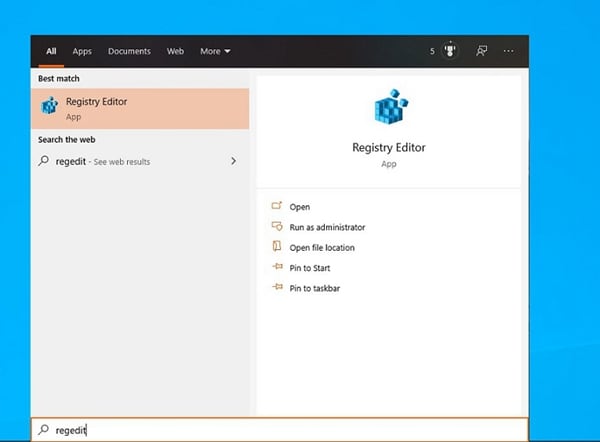
The easiest way to open the Registry Editor is by opening the windows menu and typing Regedit. Once done, click on the Run as administrator option that is located in the right panel.
Step 2: Find the WriteProtect file
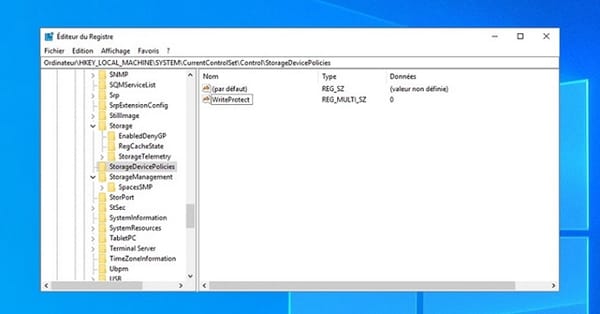
Within the Registry Editor, you can click on the button next to the name of the folders to display their content. Head to the following location.
Computer\HKEY_LOCAL_MACHINE\SYSTEM\CurrentControlSet\Control\StorageDevicePolicies
Step 3: Disable the Write Protection
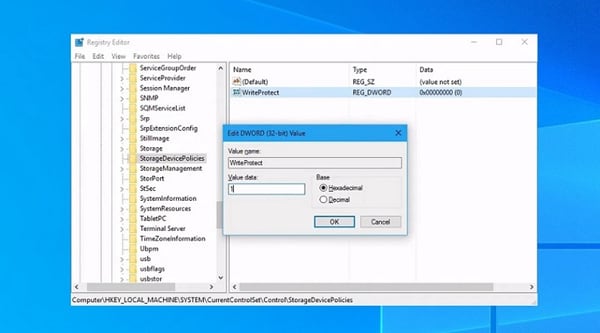
Now you must double click on the WriteProtect file and then you must change the Value Data to 0.
Part 6: How to Recover Inaccessible Stored Data from SD Card Is Read Only?
If the above methods failed to reverse the write restriction on your device or if you formatted your flash drive and want to recover or extract the data from the device, you can use a professional data recovery tool like Recoverit. This tool can safely extract information from a read-only device, and you can also use it to recover any information deleted from a device, including formatted devices. Below, I will show you how to use this software.
Step 1: Select a drive to scan

Once you have installed and opened the software, a window like the one displayed in the image will appear. On the External devices section, select your read-only or formatted device and click on Start, this will start a scanning process on the device.
Step 2: Wait until the scanning process is finished

Once the scanning process has started, you will be able to see all the files that have been found on the device listed and organized by format. You can see the progress of the process at the top of the window and stop it when you have found what you want to recover on the list.
Step 3: Set the filter preferences
To facilitate the search, I recommend you use the panel on the right to create a search filter; in this way, you can make the scanning process faster and more efficient.
Step 4: Preview the files

Digital cameras or phones often assign hard-to-recognize alphanumeric names to their files, so this software allows you to preview the files that it has found through the scanning process so that you can identify the files you want to recover or repair.
Step 5: Recover the files
When you find an image that you want to recover, check the box to the left of the file name. You can select as many files as you want and when you finished, click the Recover button. Now, all you have to do is choose a destination location where you want to save the information resulting from this recovery process. Just remember not to select your read-only device as the destination location.
Conclusion
As you may have noticed, correcting the problem of writing a conventional memory when it is shown as read-only memory is quite simple, but there are some cases in which it is necessary to format the device, and that means losing all the data that is stored on it. Fortunately, you can use Recoverit to recover data from any memory, including read-only ones, even if they have been previously formatted. Just make a couple of clicks, and you will have recovered all the information you need.
What's Wrong with Drive
- Recover Your Drive
- Fix Your Drive
- Format/Wipe Drive
- Know Your Drive


Theo Lucia
chief Editor