
![How to Erase Hard Drive on Mac [4 Proven Ways]](https://images.wondershare.com/recoverit/article/erase-hard-drive-mac.jpg)

 TL;DR:
To securely erase a Mac hard drive, modern Macs running macOS Monterey or later with Apple Silicon or T2 chips should use the "Erase All Content and Settings" feature for instant Cryptographic Erasure, while older Intel Macs require booting into Recovery Mode to wipe the drive manually via Disk Utility.
● When formatting the drive in Disk Utility, select the APFS file system for modern Macs running macOS 10.13 or later on SSDs, but choose Mac OS Extended (Journaled) if you are wiping an older mechanical HDD.
● Avoid using the 7-pass overwrite "Most Secure" option on modern SSDs equipped with FileVault or T2/Apple Silicon chips, as the built-in Cryptographic Erasure already provides military-grade security without causing unnecessary physical wear to the flash chips.
● If you accidentally wiped an APFS drive using a standard "Fast" erase method, third-party software like Wondershare Recoverit can still reconstruct the APFS B-Tree directory to salvage orphaned files, provided the drive was not wiped using the maximum security overwrite.
Ask AI for a summary
 ChatGPT
 Perplexity
 Gemini
 Claude
 Grok
Grok
This article guides you through the process of safely and effectively wiping your system. Whether you are preparing a device for sale, upgrading your storage, or simply troubleshooting a slow system, we have you covered. We will explore 4 proven methods to erase hard drive on Mac, providing tailored steps for both Intel-based models and the newer Apple Silicon (M1/M2/M3) computers.
Erasing a Mac Hard Drive Can Be Different Depending on Certain Factors
Erasing a hard drive on a Mac can be different for several reasons. First, the process can be different depending on the macOS version you're using. Different macOS systems have different steps for deleting a drive.
On the other hand, your Mac might have a different HDD or SSD from some other users, so the process can be very different. Apple introduced SSD drives in its devices in 2010 but still continued to offer HDD storage combined with SSD.
At the same time, they had devices with HDD only, and that's why there are so many different factors involved. In the end, it also depends on the type of processor you have. Apple CPUs and Intel CPUs are designed differently, and performing the same actions in both of them could be different.
Things to Know Before Erasing a Hard Drive on Mac
You should learn about your device before starting so you can select the right method for erasing your Mac hard drive. Here's what you need to know:
What Type of Hard Drive Does Your Mac Have?
To check what type of hard drive your Mac has, follow these steps:
- Click on the Apple icon in the top-left corner of your screen.
- Select About This Mac from the drop-down menu.
- In the About This Mac window, click on the Storage tab.
- You will see a visual representation of your hard drive(s) along with their capacity, type, and available space. The type of hard drive (HDD, SSD, or Fusion Drive) will be mentioned below the drive's name.
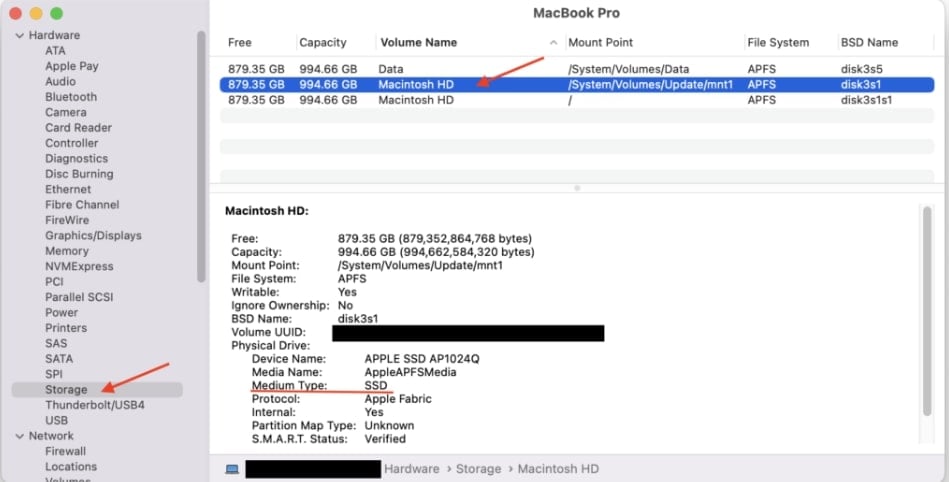
For more detailed information:
- Click on the System Report button in the About This Mac window.
- In the System Information window, click on SATA/SATA Express (for HDD or SSD) or NVMExpress (for NVMe SSD) under the Hardware section in the left sidebar.
- On the right side, you will see detailed information about your hard drive, including its type, model, size, and other specifications.
What Processor Chip Type Does Your Mac Have?
In the past, Apple exclusively used Intel processors to power up their devices. However, the company launched its M1 chips in 2020 to replace all Intel CPUs. Even though this is the case, many Mac users still have Intel processors. To see what kind of CPU you have, go to the Apple menu and click on About This Mac. You will see the chip type in the window next to other information.
Which macOS Version You're Running?
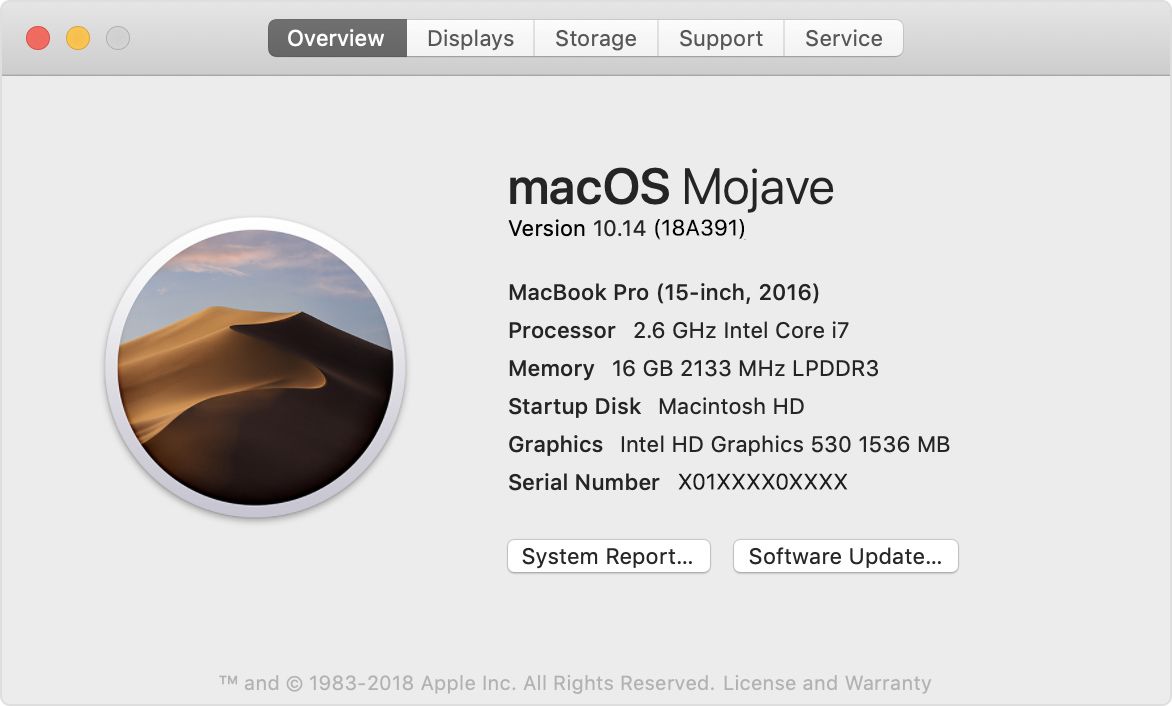
You can also find your OS version in the About This Mac menu. The version of your Mac is usually located at the top of the window.
Backup Your Data
Before you erase your Mac hard drive, it's essential to back up any important data. You need to go through your Mac and see if you have any sensitive data stored you might need in the future. All Apple devices have the Time Machine backup tool you can use to back up your data. You can use many third-party data backup tools if this doesn't work for you.
| Mac Hardware | macOS Version | Recommended Method | Key Advantage |
| Apple Silicon (M1-M4) | Ventura, Sonoma, or later | Erase All Content & Settings | Fastest; maintains OS integrity. |
| Intel (T2 Security Chip) | Monterey or later | System Settings Reset | Securely wipes keys without 7-pass. |
| Legacy Intel (Non-T2) | Any | Disk Utility (Recovery Mode) | Total partition control. |
| External Drives | Any | Disk Utility (Standard) | Custom file system (APFS/ExFAT). |
Try Wondershare Recoverit to Perform Lexar Memory Card Recovery
 Security Verified. Over 7,302,189 people have downloaded it.
How To Erase an HDD on a Mac
Wipe a Mac Hard Drive Using System Settings (MacOS Ventura or Later)
Wiping a Mac using system settings means you will delete all the data, Apple logins, iCloud data, Mac settings, profiles, Bluetooth pairings, and Apple wallet information. Your Mac device will be reset to factory settings with a completely clean drive.
Here are the steps for MacOS Ventura or later Mac Versions:
- Go to your Apple menu and click on System Settings.

- Click General in the left sidebar and then click Transfer or Reset on the right windows.

- Select Erase all Content and Settings.

- Provide your administrator credentials and backup data using Time Machine if you haven't yet.
- Click Continue on the next window.

- Click Erase All Content & Settings to complete the process.

- Your Mac computer will restart automatically after deleting your hard drive.
Erase a Mac Hard Drive Using System Settings (MacOS Monterey or Earlier)
The steps for deleting your Mac HDD using system settings on Monterey or earlier OS versions are similar but different:
- Go to Apple Menu and click System Preferences.
- When you reach the System Preferences window, click on the dropdown menu at the top and click Erase All Content and Settings.

- Give your administrator credentials and back up your data using Time Machine if you haven't already.
- Click Continue on the next Window.
- Confirm the wipe by clicking Erase All Content & Settings.
Erase a Mac Hard Drive Using Disk Utility (Apple CPU)
Disk Utility is a Mac system app designed for various disk management and storage volume operations. However, you can also use Disk Utility to erase your Mac internal HDD or an external hard drive. Here are the steps you need to take:
- Start your Mac. Quickly press and hold the power button until the startup window shows.
- The Startup Manager will usually display three operations. Select Options and click Continue.

- Do it if you're asked to provide your Apple ID or administrative password.
- In the next windows, click on Disk Utility and then Continue.

- Select the drive you want to delete in the sidebar.
- Click Erase, select a new name, and select a file system for the drive. You can only use the APFS with M1 chips.
- To securely wipe your Mac hard drive, click the Security Options. Four secure erase levels are available, ranging from Fastest to Most Secure. The Most Secure option will erase the data and overwrite the cleared space 7 times, making data recovery impossible. Select one secure level according to your need, and click OK.

- Click the Erase button to confirm the disk clearing process, and wait for your computer to complete it.
Erase a Mac Hard Drive Using Disk Utility (Intel CPU)
You should follow these steps when you're looking to delete your Mac hard drive on an Intel-based Mac. Keep in mind that the process is the same for Fusion Drives.
- Press the power button on your Mac and hold the (.) and . keys until the Apple logo is displayed on the screen.
- Enter your account password or Apple ID.
- When you reach the recovery screen, select Disk Utility and click Continue.
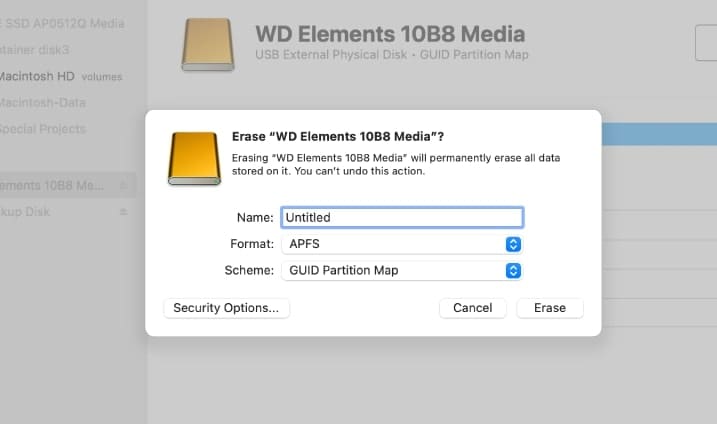
- Select your drive in the sidebar and click Erase.
- Select the format for your drive and name it. You can use the APFS and macOS extended file system format. Security Options are also available for Intel-based Mac to help you wipe the drive completey.
- Select Erase Volume Group or Erase.

- After erase the drive, you can quit Disk Utility to return to the utility window and restart your device.
How To Securely Erase the Drive if Your Mac Comes Equipped With an SSD
If your Mac also comes with an SSD drive, you must use the Terminal to erase all the data on it safely. Here's how to access Terminal and use it to delete your SSD drive on Mac:
- Open Finder and select applications, then find the Utilities folder and double-click it.

- Find the Terminal icon in the utilities folder and double-click it.

- Type this in Terminal in the command line: diskutil secureErase freespace 2 /Volumes/(Your SSD drive name).

- Wait until the process is complete.
- If this option doesn't work, try changing the values after "freespace" from 1 to 4.
How To Recover Data if You Accidentally Erased Important Files on a Mac Hard Drive
If you've accidentally deleted critical data while wiping your hard drive or simply forgot to check your entire drive, don't worry - you can recover data from an erased hard drive on a Mac with Wondershare Recoverit. As long as you didn't use the Most Secure option to wipe the drive, there's a possibility of restoring the deleted files.
Apple’s APFS (Apple File System) uses a "Space Sharing" container system that makes traditional recovery difficult. If you accidentally erased your Mac drive using the "Fast" method, Wondershare Recoverit is uniquely capable of reconstructing the APFS B-Tree directory. It can identify "orphaned" file nodes that the macOS Disk Utility marked as empty, allowing you to pull back photos and documents even after a system reset has been initiated.
The first thing you need to do is download and install the software for free. Once you've done that, follow these steps:
- Start Wondershare Recoverit. Click on Hard Drives and Locations on the sidebar and select the drive you've deleted data from.

- Wonderhsare Recoverit will start scanning the drive for wiped files automatically. Wait until the process is completed.
- Click on Preview to see which files are your desired ones.

- If you've found the right file, click Recover and select a path to save it.

Conclusion
The best two options for erasing a hard drive on a Mac are to use Disk Utility or System Settings. However, take the time to figure out what CPU you have so you can use the right steps. Remember that you can also delete your SSD drive via Terminal by following the same times regardless of your OS. Remember to back up your data before erasing your hard drives.
FAQ
-
Why is the "Erase" button grayed out in Disk Utility?
If the option to erase hard drive on Mac is grayed out, you are likely trying to wipe the startup disk while currently logged into it. To fix this, you must boot into macOS Recovery Mode (Cmd+R or hold Power on Apple Silicon) to perform the format operation safely from outside the main OS. -
Which format should I choose: APFS or Mac OS Extended?
When you format mac disk volumes, choose APFS for modern Macs (macOS 10.13+) running on Solid State Drives (SSDs). Select Mac OS Extended (Journaled) only if you are using an older Mac with a mechanical HDD or need compatibility with older macOS versions. -
Does erasing the hard drive permanently delete my data?
A standard erase removes the file directory, making data hard to access. However, for total security before selling, click "Security Options" in Disk Utility. This performs a multi-pass mac computer data cleanup, writing zeros over your data to ensure it is unrecoverable. -
Can I erase my Mac hard drive without a password?
Yes, but it requires entering Recovery Mode. If you have forgotten your admin password, you can use the Erase Mac assistant in Recovery (on newer models) or reset the password via Apple ID. This allows you to proceed with the wipe mac data process to factory reset the device. -
What do I do if Disk Utility shows an error while erasing?
Errors during formatting often indicate file system corruption. Try running "First Aid" in Disk Utility before attempting to erase hard drive on Mac again. If that fails, restart your Mac and enter Internet Recovery Mode to bypass local partition issues and download a fresh system.


