

 TL;DR:
Diagnosing an "internal hard disk drive not found" error requires identifying exactly where detection fails—BIOS/UEFI, Windows Disk Management, or File Explorer—to determine if the issue stems from hardware failure, missing storage drivers, or volume configuration.
● Never initialize, format, or repartition a previously used drive that appears as RAW or unallocated in Disk Management, as this overwrites partition metadata and severely compromises data recovery.
● If the drive is missing from BIOS/UEFI, verify your SATA or Intel VMD/RST configuration and run manufacturer preboot diagnostics; if it appears in BIOS but not Windows, you may need to assign a missing drive letter, bring an offline disk online, or install the correct Intel VMD/RST driver.
● Data recovery software like Recoverit can only retrieve files if the system still physically detects the drive, and success may be blocked by active SSD TRIM features, physical mechanical failure, or a missing 48-digit BitLocker recovery key.
Ask AI for a summary
 ChatGPT
 Perplexity
 Gemini
 Claude
 Grok
Grok
“After restarting pc the Hard drive was not to be found. Not in the usual play, did not show up in disk managment either not even in Bios…”-Rocrie
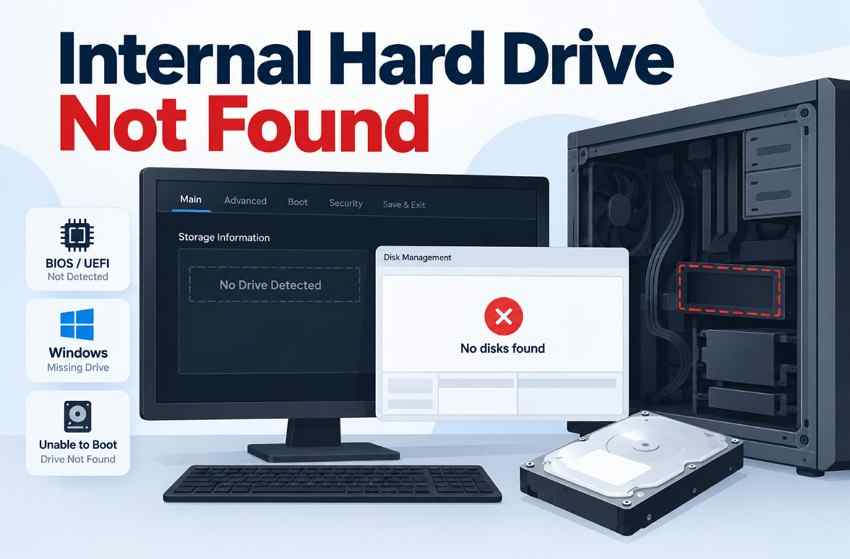
When the system stops seeing an internal HDD or SSD normally, it may report internal hard disk drive not found. The disk may be absent from BIOS/UEFI, missing only in Windows, or detected normally while the operating system still fails to boot. Identifying where detection stops helps determine the correct fix.
Avoid initializing, formatting, or repartitioning a previously used drive before protecting important files. If the drive remains detectable but important files are inaccessible, Recoverit can help recover them before further disk changes.
In This Article
Part 1. What “Internal Hard Disk Drive Not Found” Actually Means
An internal hard disk not found error can occur at different points in the storage-detection process. Checking where the drive disappears helps narrow the cause, so start with BIOS/UEFI, continue to Disk Management, and then check File Explorer:
| BIOS/UEFI | Disk Management | File Explorer | What It Means | Go To |
| Not listed | Not listed | Not listed | Connection, controller, or hardware | Part 3 |
| Listed | Not listed | Not listed | Storage driver or controller mode | Part 4 |
| Listed | Listed, no letter | Not listed | Drive letter or volume state | Part 4 |
| Listed | RAW or unallocated | Not listed | Lost/damaged partition or file system; recoverable data may remain | Part 6 first |
| Listed | Healthy | Visible | Detection is fine, but boot has failed | Part 5 |
A previously used drive shown as RAW, unallocated, or not initialized may still contain recoverable data. Avoid formatting, initializing, or repartitioning it before recovery. Microsoft also advises against formatting a RAW volume during recovery.
An Offline disk is different. Windows may keep a disk offline because of storage policy, a disk-signature conflict, or another storage configuration issue. Signature collisions commonly occur after cloning, so resolve that condition in Disk Management before assuming the drive itself is damaged.
Part 2. Protect Your Data Before Troubleshooting
Before troubleshooting an internal hard drive not found error, protect existing data because several repair steps can modify storage.
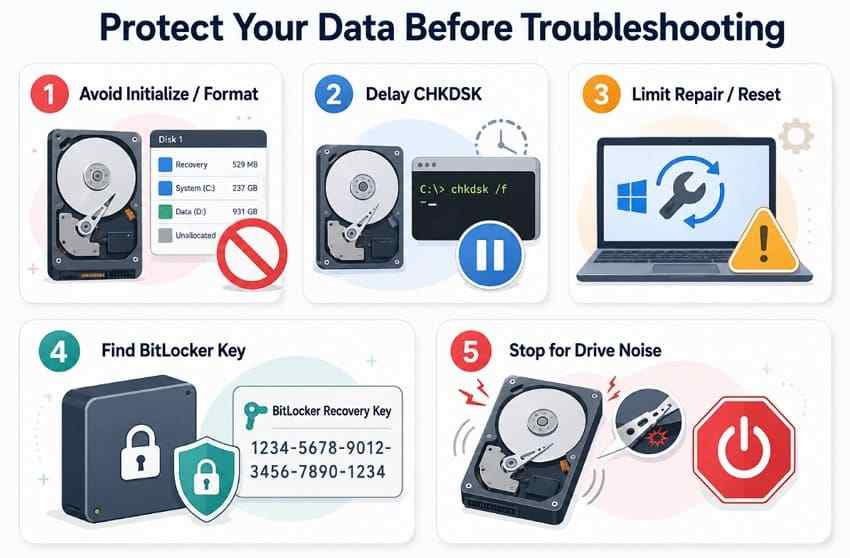
- Avoid Initialization, Formatting, or New Volumes: Microsoft recommends initialization for new disks. On a previously used drive, initializing or creating new volumes can overwrite partition metadata and make recovery more difficult.
- Delay CHKDSK Repairs: CHKDSK can modify file-system structures while correcting errors. If important files are missing, recover or image the drive first, then consider repairs.
- Limit Boot Repair and Reset Attempts: Protect important data before repeated recovery operations. Startup Repair can modify boot-related files, while Reset or reinstall options can cause broader system changes.
- Locate Your BitLocker Recovery Key: Hardware, firmware, or boot changes can trigger BitLocker recovery. Keep the 48-digit recovery key available before moving or troubleshooting an encrypted drive.
- Stop for Mechanical Failure Signs: Clicking, grinding, liquid damage, unusual heat, smoke, or burning smells can indicate physical or electrical failure. Power the drive down and seek professional recovery rather than repeatedly restarting it.
Part 3. If the Drive Is Not Detected in BIOS or UEFI
If “No internal hard disk drive found” appears in BIOS or UEFI, use these six checks to identify the cause:
Check 1. Confirm the Drive Appears in System Information
Check firmware detection directly, since a drive missing from the boot menu may still appear under System Information or Storage. Use the steps below to confirm whether BIOS/UEFI recognizes it:
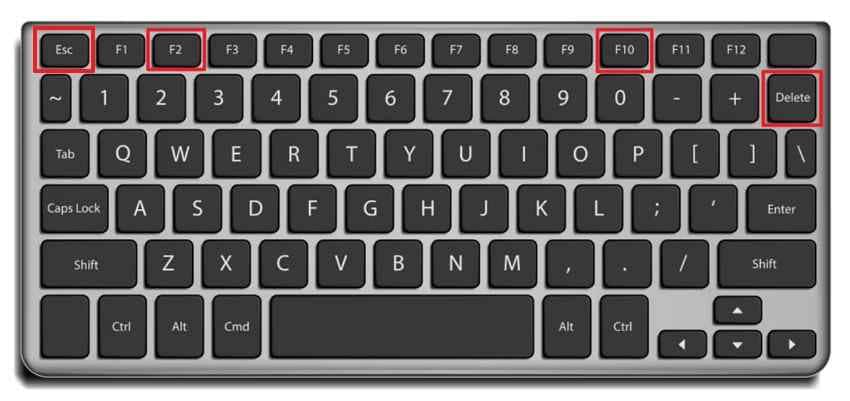
Step 1. Restart the PC and use the manufacturer-specific key to enter BIOS/UEFI, such as “F2, F10, Delete, or Esc” on supported models.
Step 2. Open the “Storage, Drive Information, or similar device-information section” and confirm whether the internal HDD or SSD is detected.
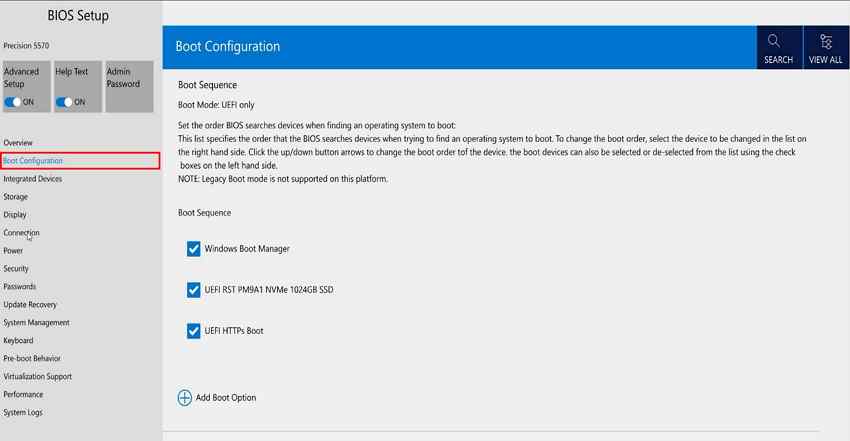
Check 2. Check Storage and Boot Settings for Your Model
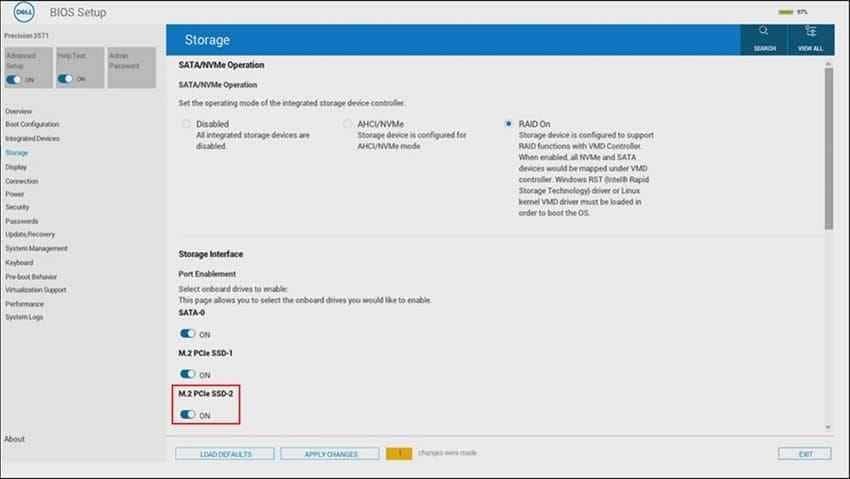
An internal hard disk not found error can follow firmware changes that disable a storage port or alter boot settings. On newer UEFI systems, check the Storage section for SATA/NVMe or VMD/RST settings and review the configuration for the current boot mode. Avoid changing controller modes unless you know the previous configuration. Use the following check to review the current settings safely:
Instructions. Enter “BIOS/UEFI > Storage” and confirm the relevant SATA or M.2 interface is enabled. Then review “Boot Configuration” for unexpected changes. Do not switch AHCI, RAID, or VMD/RST modes blindly.
Check 3. Run the Manufacturer's Preboot Diagnostic
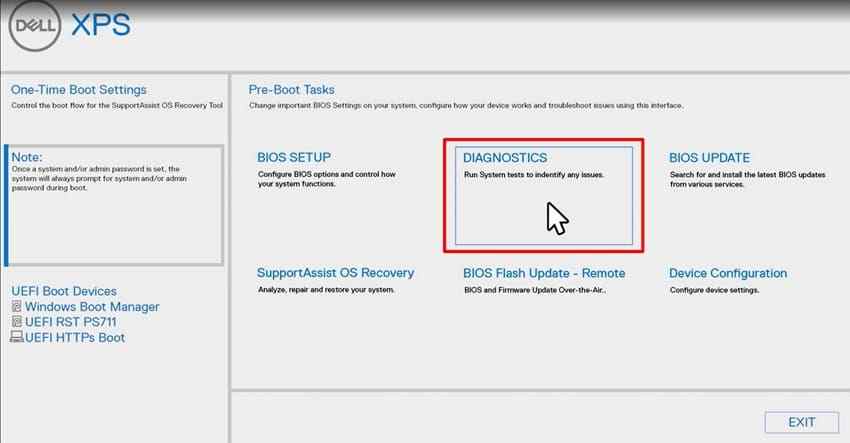
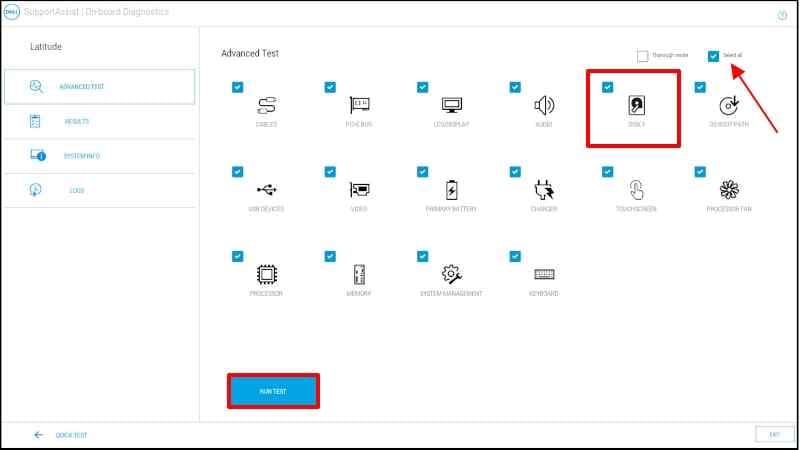
Preboot diagnostics test the HDD or SSD independently of Windows and can help identify hardware problems behind an internal hard disk drive not found error. The steps below show the current Dell SupportAssist On-board Diagnostics workflow:
Step 1. On a supported Dell PC, restart the computer and repeatedly press “F12.” Select “Diagnostics” from the One Time Boot Menu to start the hardware test.
Step 2. If you need to test the storage device specifically, open “Advanced Test,” clear “Select all,” select the installed drive, and choose “RUN TEST.” Record any errors and validation codes.
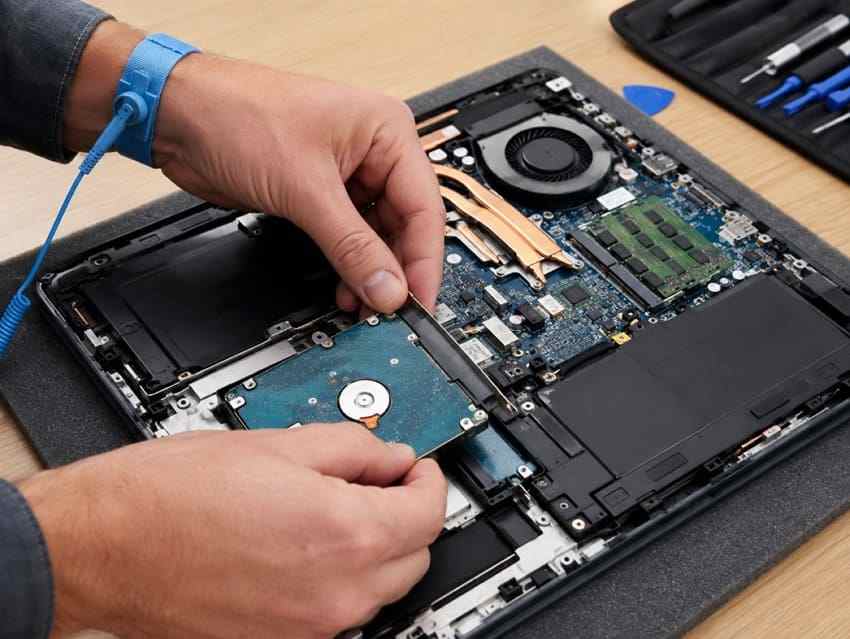
Check 4. Reseat a User-Serviceable Drive
Reseating can restore detection when a removable SATA or M.2 connection is loose. Follow the manufacturer's service instructions, disconnect power and the battery when required, and use anti-static precautions.
Check 5. Test Cables and Ports on a Desktop
Desktop drives depend on separate data, power, and motherboard connections. Swap each component individually, then test another compatible motherboard port or compatible computer when safe to do so.
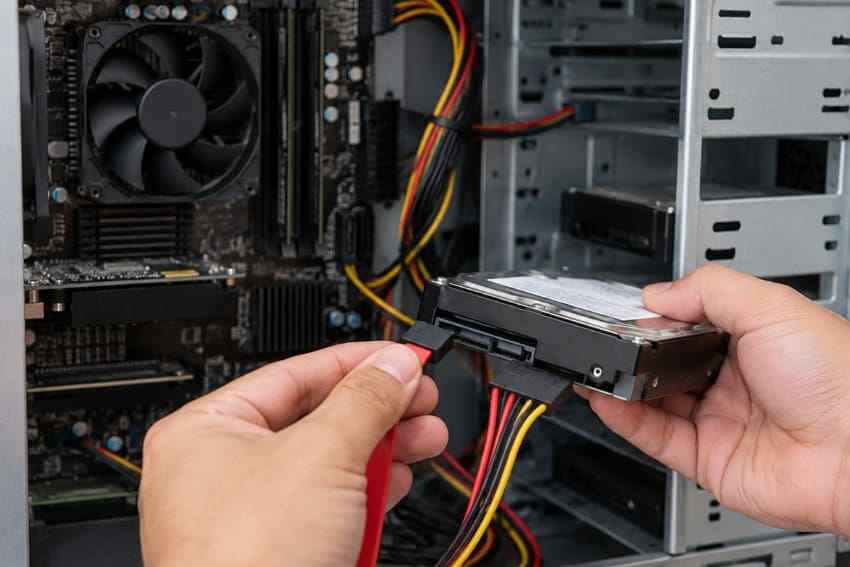
When Non-Detection Means Hardware Failure
If an internal hard drive not found issue persists across different cables, ports, or computers, the drive or controller may have failed. Software recovery cannot scan a device the system cannot detect. In that case, consider professional recovery; if the drive is detected again later, continue with Part 6 before making further changes.
Part 4. If BIOS Detects the Drive but Windows Does Not
If BIOS/UEFI detects the drive but Windows shows an internal disk not found error, the problem usually involves drivers, disk state, controller settings, or volume configuration. Use the 5 checks below to identify where Windows detection stops:
Check 1. Check Disk Management Before Changing Anything
Disk Management shows whether Windows detects the drive and its current state. A RAW, unallocated, or uninitialized disk may still contain recoverable data, so avoid making changes first. Microsoft specifically advises against formatting RAW or unallocated space when you are trying to recover files.
Try the checks below to identify the disk state before choosing any repair or recovery action:
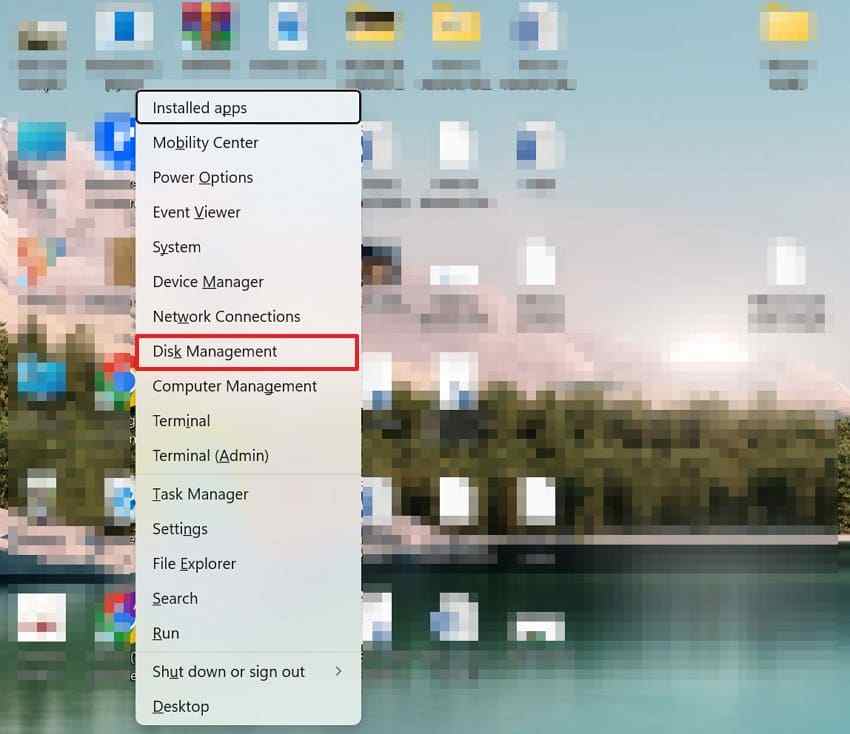
Step 1. Press “Windows + X,” > “Disk Management.”
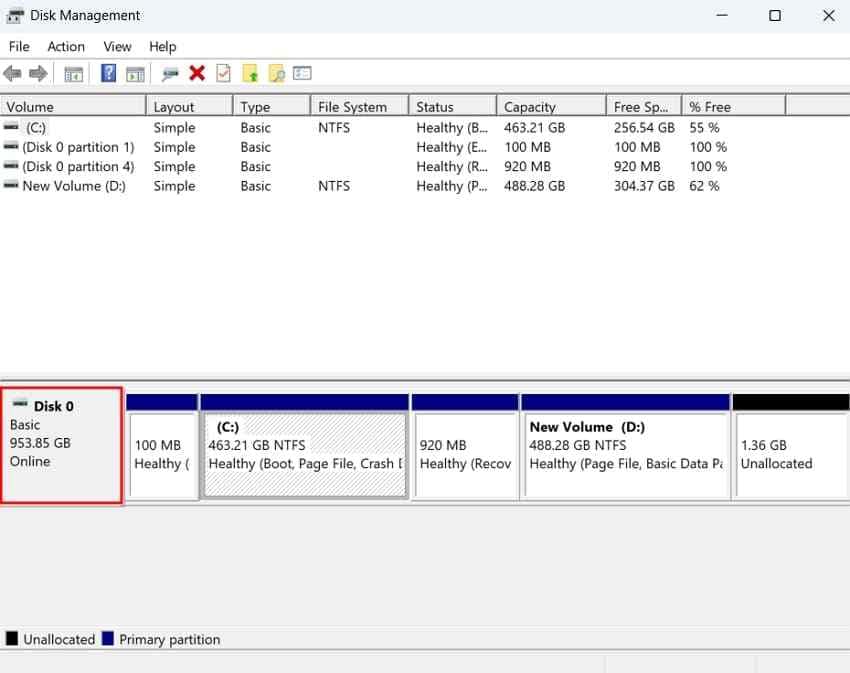
Step 2. Locate the affected internal drive, and check whether it appears as “Online, Offline, RAW, Unallocated, Not Initialized,” or without a drive letter.
Check 2. Bring an Offline Data Disk Online
Windows may detect a secondary disk but keep it Offline because of policy or identifier conflicts, causing an internal disk drive not found in File Explorer. If Disk Management shows a healthy secondary data disk as Offline, right-click its disk label and select Online. If the disk also shows unexpected partition damage or contains critical data, investigate that condition before making further changes as shown below:
Instructions. Right-click the disk name in the left column of Disk Management. Choose “Online” if that option appears.
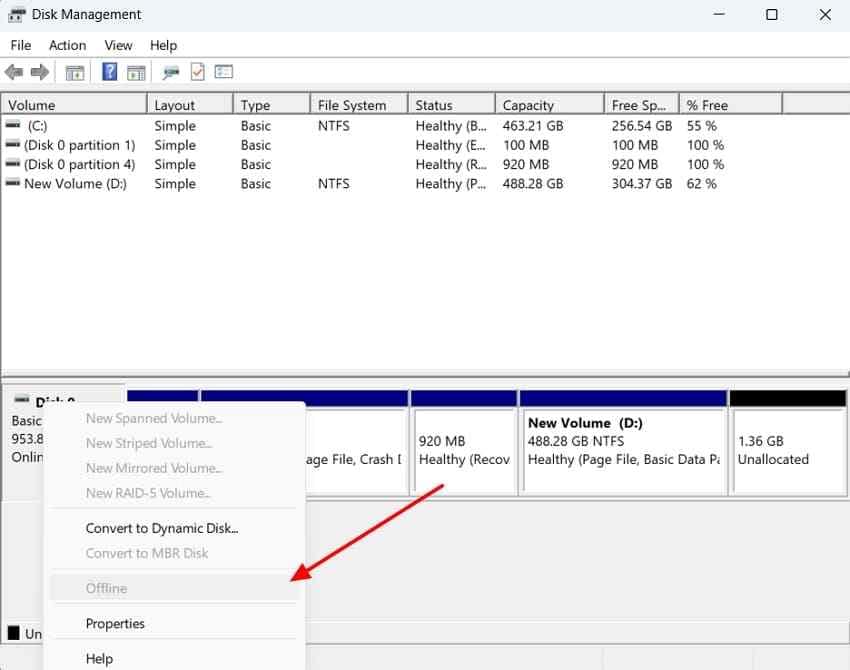
Note: If an important previously used disk unexpectedly became Offline after cloning, migration, or a storage fault, protect the data before making disk-state changes.
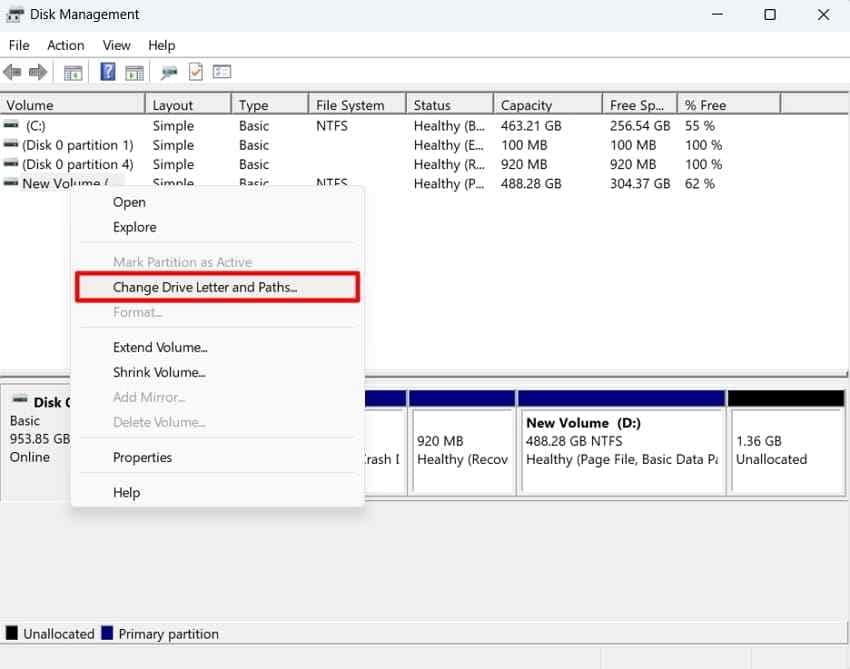
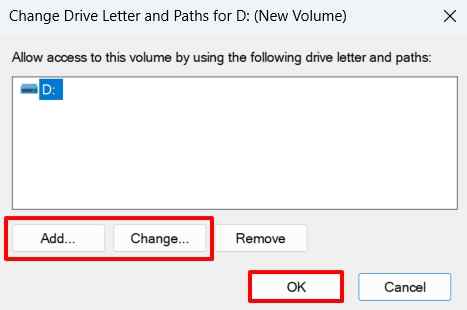
Check 3. Add or Change a Missing Drive Letter
A healthy volume can remain hidden from File Explorer when no drive letter is assigned. Adding one is generally non-destructive and can resolve an internal disk drive not found issue without altering stored files. To make the volume accessible in File Explorer, assign an unused drive letter:
Step 1. Right-click the volume and select “Change Drive Letter and Paths.”
Step 2. Click “Add/Change,” choose an unused drive letter, and select “OK.”
Note: Use this method for a healthy data volume. Do not change the letter of the Windows system volume, EFI partition, recovery partition, or application volume without a specific reason.
Check 4. Handle RAW, Unallocated, and Not Initialized States Safely
A previously used drive shown as RAW, Unallocated, or Not Initialized may still contain recoverable data. Avoid formatting, initializing, repartitioning, or creating a new volume before protecting important files. If Windows still detects the physical drive, Recoverit can scan it for recoverable files before further disk changes.
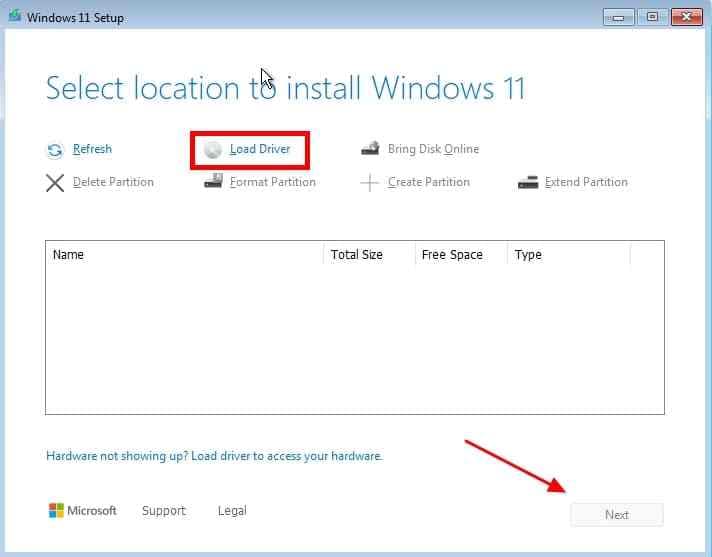
Check 5. Install the Correct Storage Driver
Some Intel VMD/RST systems require a manufacturer-provided storage-controller driver when Windows Setup cannot detect the NVMe drive. Loading the correct manufacturer driver can make the missing disk appear. Use the extracted storage driver during Windows installation when no drive appears, as shown below:
Step 1. Download the Intel RST/VMD driver for your exact computer model from the manufacturer. Extract the driver files and copy the extracted folder to a USB drive.
Step 2. In Windows Setup, click “Load Driver > Browse,” select the extracted driver folder, choose the compatible storage driver, and click “Next.” The internal drive should then appear if the missing driver was the cause.
Part 5. If the Drive Is Detected But the PC Will Not Boot
If BIOS/UEFI detects the drive but Windows will not start, the internal hard drive not found issue may actually be a boot failure. Windows Boot Manager, startup files, recent updates, or storage-controller settings can prevent startup even when the drive remains detected.
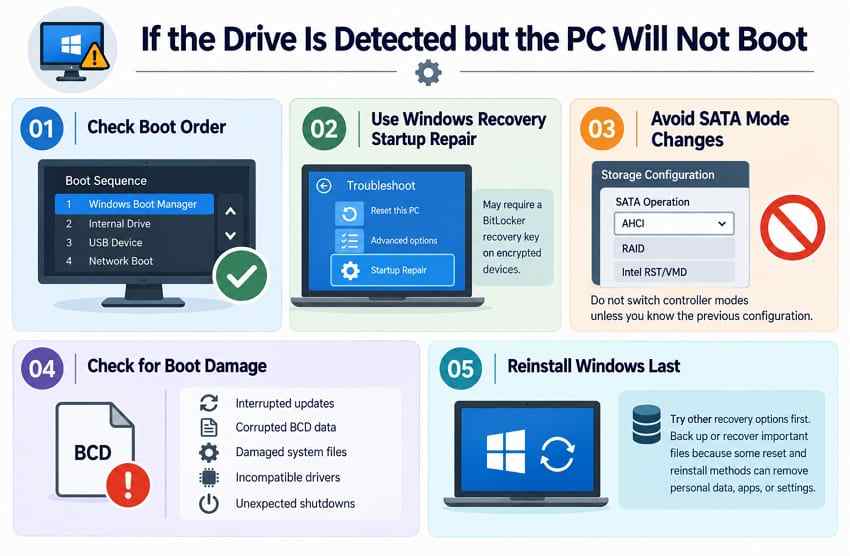
- Check Boot Order: Confirm Windows Boot Manager for the intended Windows installation is present and correctly prioritized in the UEFI boot sequence.
- Use Windows Recovery Environment: After protecting important data, open “Troubleshoot > Advanced options > Startup Repair > Restart.” Startup Repair can fix damaged system files and boot configuration errors. A BitLocker recovery key may be required on encrypted devices.
- Avoid SATA Mode Changes: Do not switch AHCI, RAID, or Intel RST/VMD modes blindly. Changing the controller configuration can prevent an existing Windows installation from starting.
- Check For Boot Damage: Interrupted updates, corrupted BCD data, damaged system files, incompatible drivers, or unexpected shutdowns can stop Windows without making the drive disappear.
- Reinstall Windows Last: Try less disruptive recovery options before reinstalling Windows. Back up or recover important files first because some reset and reinstall methods can remove personal data, apps, or settings.
Part 6. Recover Files From a Detectable Internal Drive
Several fixes above focus on restoring drive access, but protecting important files should come first when an internal hard disk drive not found error appears. If the drive opens normally and folders remain accessible, copy the required files to external storage before attempting repairs. Normal file copying is the safest option when the drive is still readable.
Recoverit Hard Drive Recovery becomes useful when Windows still detects the drive, but normal file access is unavailable. A RAW or unallocated drive may remain visible in Disk Management even though File Explorer cannot access its files. Recoverit can scan the detectable drive for recoverable data, while bootable recovery media can help when Windows will not start. Recovery success depends on the drive's physical condition, later writes, BitLocker access, and SSD TRIM.

Note: On supported SSDs, TRIM may make deleted blocks unavailable for software recovery. Recovery depends on whether the required data remains readable.
Key Features
- Drive-Level Recovery Scan: Scans a detectable internal drive for recoverable files when normal access is unavailable, including RAW or damaged volumes.
- Unbootable PC Access: Creates bootable recovery media so an unbootable computer can still scan a detectable internal drive.
- Lost Partition Recovery: Detects lost partitions and helps recover files from them when the storage device is still readable.
- AI Search and Filters: Uses AI-powered natural-language search with filter criteria to help locate specific files within scan results.
- Separate Recovery Target: Writes results to a second drive, leaving the source untouched throughout.
How to Recover Files From a Detectable Internal Drive
Before starting recovery, connect an external drive with enough free space and install Recoverit on a drive other than the affected disk. Then follow the steps below to scan and save recoverable files safely.
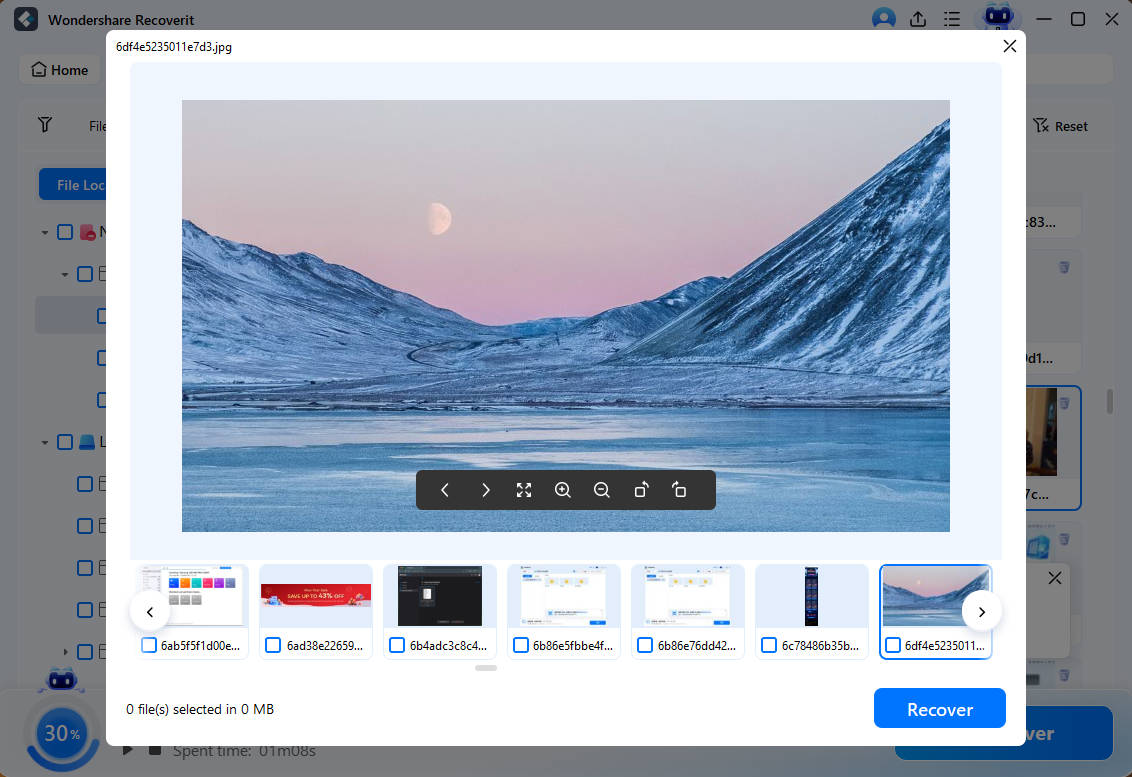
Step 1. Scan the Problematic Drive
Navigate to “Hard Drives and Locations,” select the affected internal HDD or SSD, and let the software scan for recoverable data.

Step 2. Review the Recovery Results
Browse the discovered files by location or type, and use “Filter” or “Search File” to quickly find specific items.

Step 3. Verify and Save the Files
Preview important files, select the ones you want, and click “Recover.” Store them on another drive to avoid overwriting data on the affected disk.
Recover Files From a Detectable Internal Drive
 Security Verified. Over 7,302,189 people have downloaded it.
Part 7. Replace the Drive or Use Professional Recovery
Once important files are protected, the next step depends on whether the internal hard disk not found issue points to confirmed hardware failure, physical damage, or a drive replacement. Here are the outcomes to decide what to do next:
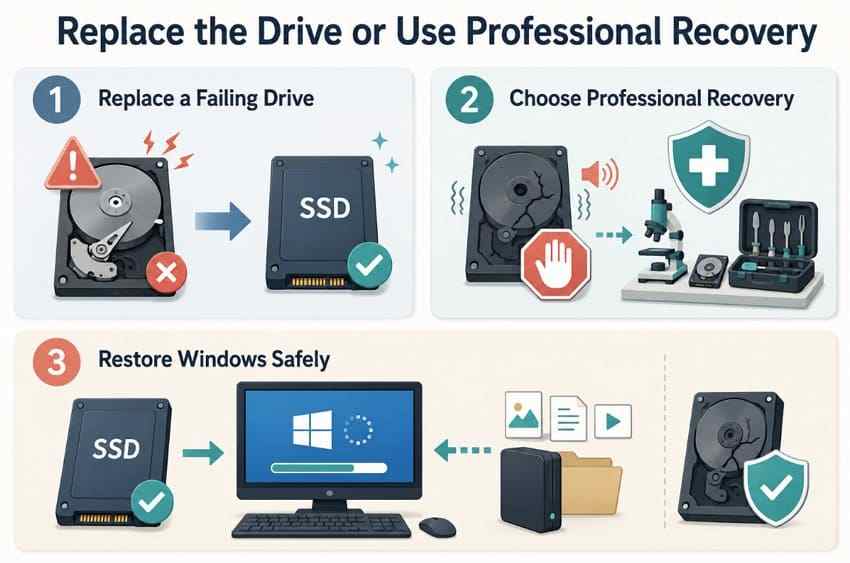
- Replace a Failing Drive: Replace the drive if it fails manufacturer diagnostics, reports recurring errors, or repeatedly disappears despite safe connection and configuration checks.
- Choose Professional Recovery: If the drive remains undetected after safe hardware checks, or it clicks, grinds, overheats, or shows electrical damage, stop DIY attempts. Consider professional recovery when important data is at risk.
- Restore Windows Safely: After installing a replacement drive, reinstall Windows and restore the recovered files. Keep the original drive unchanged until you confirm the new installation and file transfer are complete.
Conclusion
To conclude, an internal hard drive not found error should be diagnosed by checking BIOS/UEFI, Disk Management, and File Explorer. Persistent firmware-level non-detection can indicate connection, controller, or drive failure, while RAW or unallocated storage may still contain recoverable data. Avoid initializing or formatting the drive first, and use Recoverit only when the device remains detectable enough for software recovery.
FAQ
-
Why is my internal hard drive not showing in BIOS?
BIOS non-detection can result from a loose connection, disabled storage interface, controller issue, or failed drive. Check model-specific BIOS settings and diagnostics first. Test cables, ports, or another compatible computer only when the drive is safely user-serviceable. -
Why is my internal hard drive detected in BIOS but not Windows?
BIOS detection means the firmware can identify the drive, but it does not prove the drive is fully healthy. Windows may still fail to access it because of drivers, disk state, file-system damage, or volume configuration. -
Should I initialize an internal disk that suddenly shows as not initialized?
No. Initialization is intended for a new disk. On a previously used disk, it can replace important partition metadata and complicate recovery. Protect or recover your files before initializing it. -
Can data be recovered if the internal hard drive is not detected?
It depends on where detection stops. A RAW drive that remains physically detectable may be recoverable with software. A drive completely absent from BIOS/UEFI may require hardware diagnosis or professional recovery.


