

 TL;DR:
A 4TB hard drive typically shows only 2TB because the older MBR partition system hard-caps visible storage at 2TB, requiring a conversion to the modern GPT format to unlock the full capacity.
● Converting the drive via the Windows Diskpart tool requires running a "clean" command that permanently erases all partitions and data, making prior data backup essential.
● If the extra capacity remains invisible, it is sitting as unallocated space that must be manually assigned to a new or existing partition using Disk Management.
● Booting Windows from a GPT disk requires enabling UEFI mode in the BIOS settings, whereas data-only GPT drives can be read without UEFI enabled.
Ask AI for a summary
 ChatGPT
 Perplexity
 Gemini
 Claude
 Grok
Grok
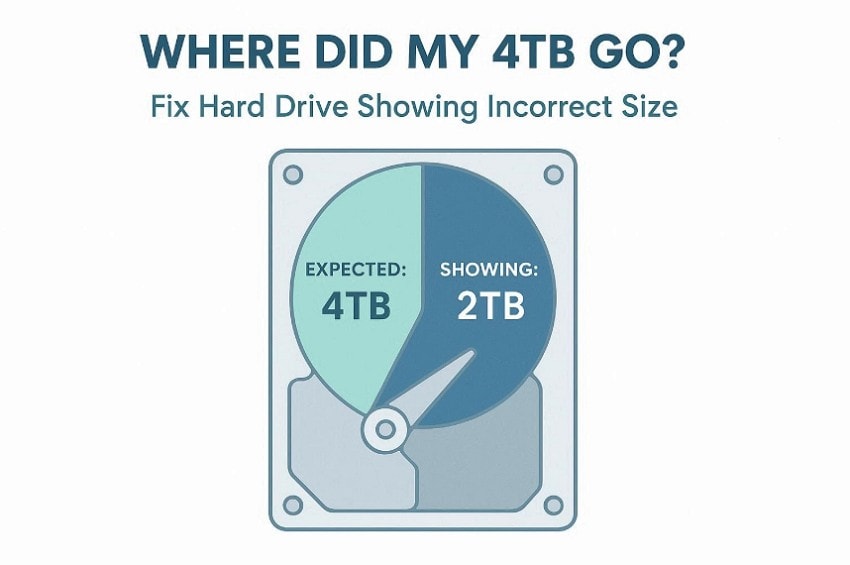
Many people plug in a new hard drive expecting full storage instantly. Instead, the computer shows much less space than promised on the packaging. This situation feels confusing and raises fear about lost data. However, this issue is common and usually easy to fix.
Sometimes, a "4TB drive only showing 2TB" appears due to system limits. The missing space is not gone but hidden by the settings. This guide breaks the cause down so anyone can understand it. So readers can see where the missing storage actually went.
Try Recoverit to Perform Partition Recovery
 Security Verified. 3,591,664 people have downloaded it.
In this article

Part 1. Why a 4TB Hard Drive Shows the Wrong Capacity
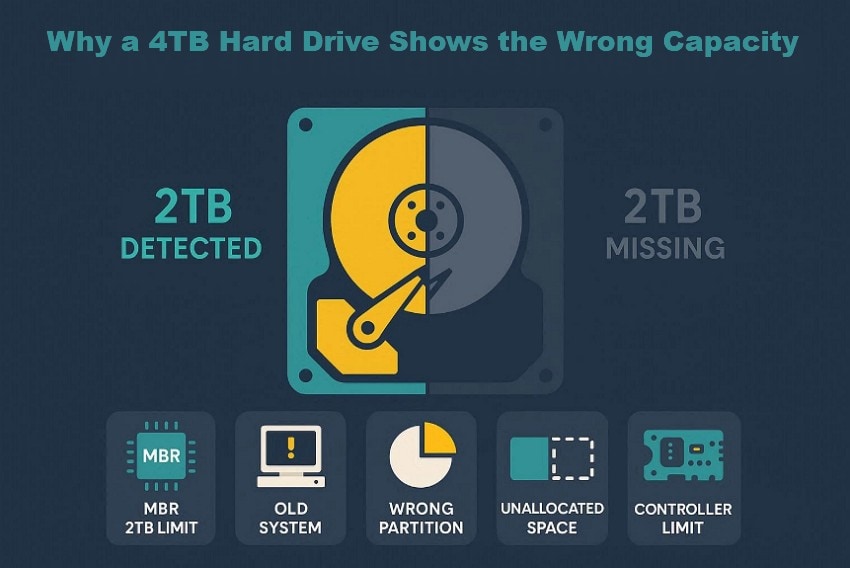
Before fixing anything, it helps to understand why a "4TB hard drive only showing 2TB" occurs.
- MBR Limitation: MBR uses an older address system that cannot count beyond 2 terabytes. Any space above this limit becomes unreadable to the operating system.
- System Age: Some operating systems were designed before large-capacity drives existed. They fail to recognize newer storage sizes due to built-in design limits.
- Partition Format: The drive may be initialized using an incompatible partition table format. This causes the system to incorrectly calculate available storage.
- Hidden Allocation: A portion of the drive remains outside visible partitions after setup. The system ignores this area because it lacks proper structure information.
- Controller Design: Certain disk controllers cannot process large storage addresses correctly. This limitation causes the drive to report a smaller usable size.
Part 2. MBR vs GPT: The Real Reason Behind the 2TB Storage Limit
Many people feel confused when a hard drive shows the wrong capacity after connecting a large disk. This usually happens because of the partition system used on the drive. MBR is an older method that was created when large drives did not exist. This limitation causes MBR drives to stop displaying storage beyond 2TB.
While GPT is newer and was designed to handle modern, high-capacity drives properly. That is why GPT can see and use the full storage without cutting space off. Now, have a look at the table below to see the differences between MBR and GPT:
| Feature | MBR (Old System) | GPT (Modern System) |
|---|---|---|
| Maximum size | Limited to 2TB only | Supports very large drives |
| Technology age | Very old design | Newer and modern design |
| Capacity handling | Cannot read space beyond 2TB | Reads full drive size |
| Compatibility focus | Older systems and hardware | Modern systems and devices |
| Storage accuracy | Causes missing storage issues | Shows the correct full capacity |
Part 3. How to Check Disk Type and Capacity in Windows
Windows includes simple tools that help users check disk type and capacity. So, understanding this information first prevents mistakes before attempting to fix a "4TB drive only showing 2TB" issue.
Method 1. Check Disk Type Using Task Manager
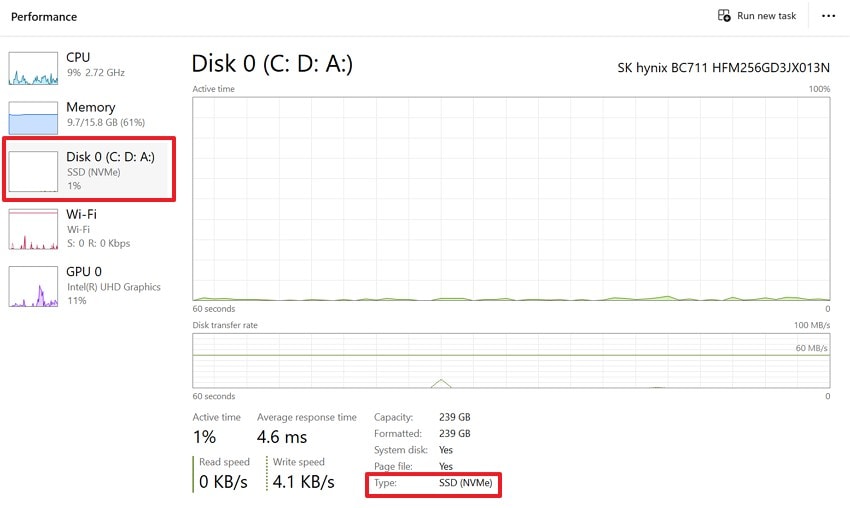
Windows provides built-in tools that help users verify disk type. Checking this detail matters when a hard drive shows the wrong capacity. Task Manager displays how the system recognizes each connected storage device. This quick check prevents confusion before deeper troubleshooting steps begin later. It helps confirm whether partition style contributes to missing storage space. Now, follow the steps below to perform this check using Task Manager:
- To start, simply press the "Ctrl + Shift +Esc" to access the "Task Manager" to proceed. After entering the Task Manager, choose the "Performance" option from the left sidebar to continue.
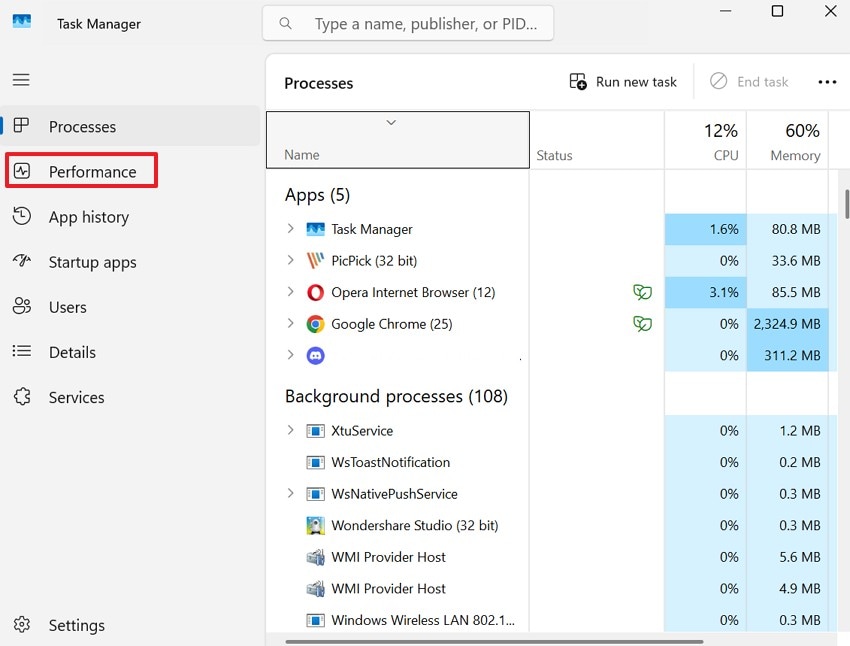
- Next, select the "Disk" option from the left panel list and look for the "Disk Type" to check.
Method 2. Check Disk Capacity Using Disk Management
Disk Management shows how much storage the system actually detects. This tool is useful for understanding why large drives appear smaller. It displays total disk size, partitions, and any unallocated space clearly. Seeing this layout helps identify capacity mismatches without changing drive settings. Many users rely on it before deciding next troubleshooting action steps. Let's walk through the guide below to check disk capacity using Disk Management:
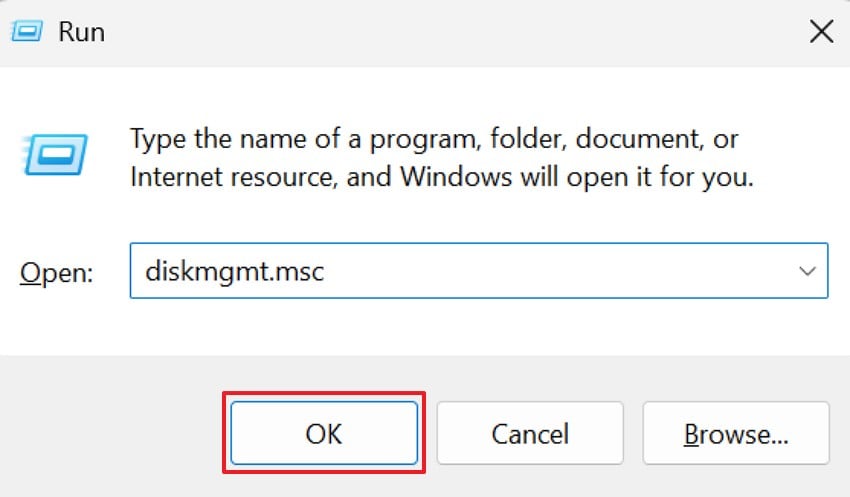
- First, press "Windows + R" to open the Run dialog box. After that, type the command "diskmgmt.msc" into the field and click "OK".
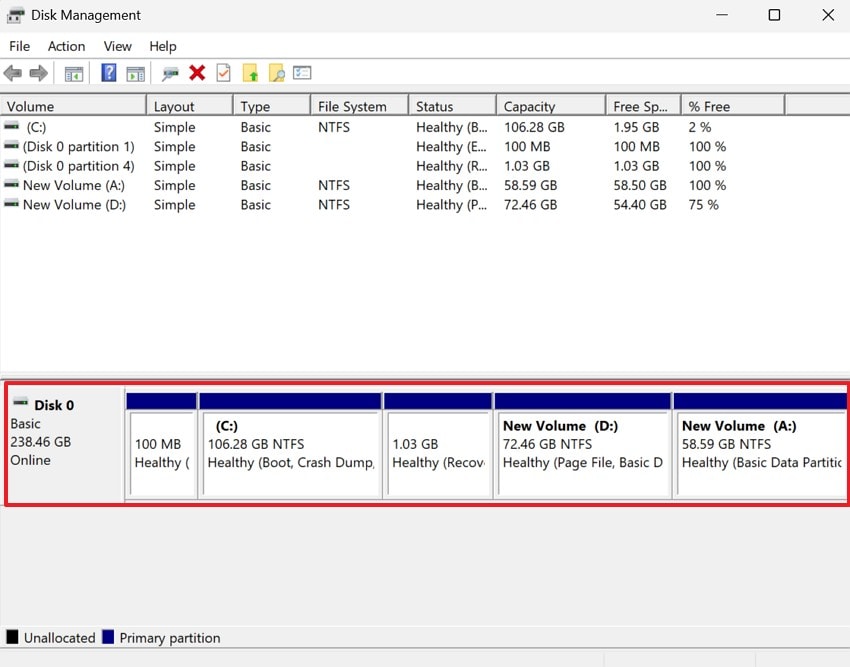
- Later, look at the lower section showing Disk 0 and its partitions. Now, check the total disk size shown next to the disk label.
Part 4. 3 Fix: 4TB Hard Drive Showing Wrong Capacity on Windows
Once the cause is clear, the next step is applying the correct fix. Each solution below targets a specific reason why large drives appear smaller. These fixes are commonly used on Windows systems and work reliably. Thus, follow only the method that matches your situation to avoid data issues.
1. Convert MBR to GPT to Unlock Full Drive Size with Diskpart
When a drive uses MBR, storage beyond 2TB cannot be accessed. Converting the disk to GPT removes this technical limit completely. Windows includes Diskpart, a built-in command tool for this conversion. This fix directly addresses the root cause of the 4TB drive only showing 2TB issue. Adhere to the steps below to try this method with ease:
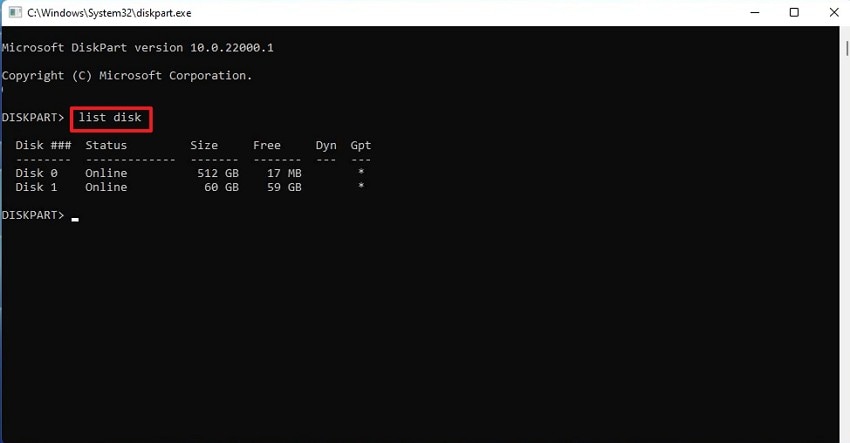
- Here, press "Windows + S", type Command Prompt, then choose "Run as Administrator." After that, in the command window, type "diskpart" and press "Enter" to launch Diskpart. Then type "list disk" and press "Enter" to display all connected disks.
- Next, run the command "select disk 1," replacing 1 with your correct disk number. Then type "clean" and press "Enter" to remove resisting partition information.
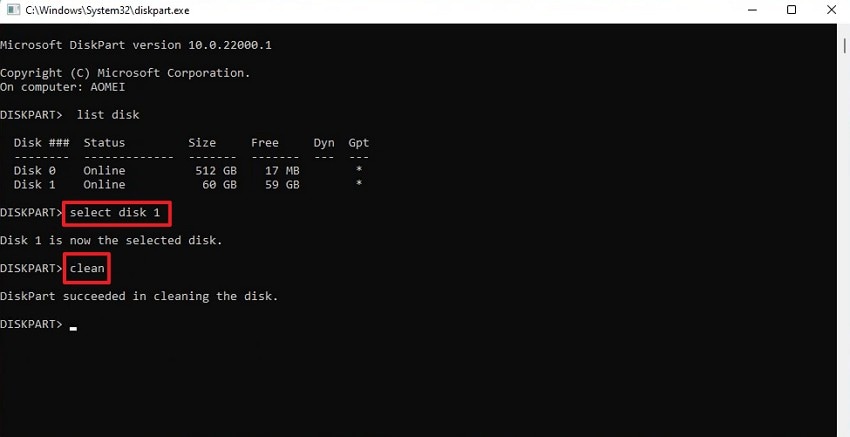
- After cleaning completes, type "convert gpt" and hit the "Enter" key. Wait for the confirmation message showing the disk converted successfully.
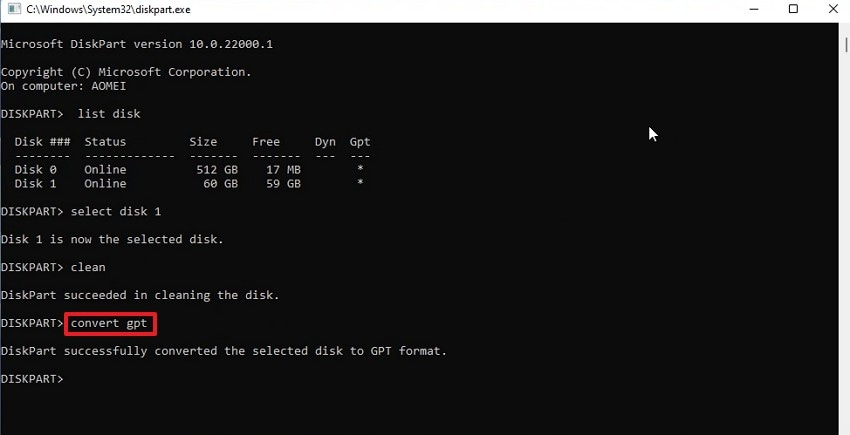
Note: This method permanently erases data by deleting all partitions with the clean command, so always back up or recover files beforehand.
2. Create or Extend Partitions to Use Unallocated Space
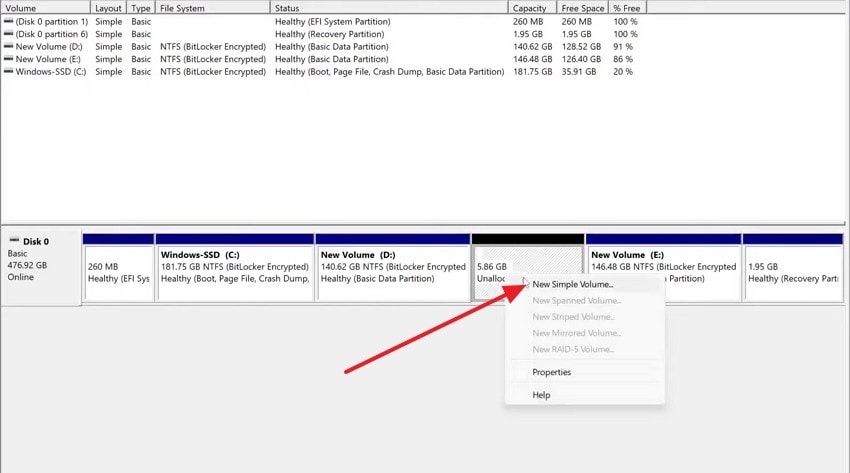
Sometimes the full drive size exists but is not assigned to any partition. This makes part of the storage invisible inside File Explorer. Creating a new partition or extending an existing one solves this issue. Disk Management is used to make unallocated space usable again. Follow the steps below to try this fix to create or extend partitions to use unallocated space:
Create a New Partition
- To start, access the "Disk Management" by pressing "Windows + X." After entering the Disk Management, choose unallocated space to select "New Simple Volume" from the right-click menu to proceed.
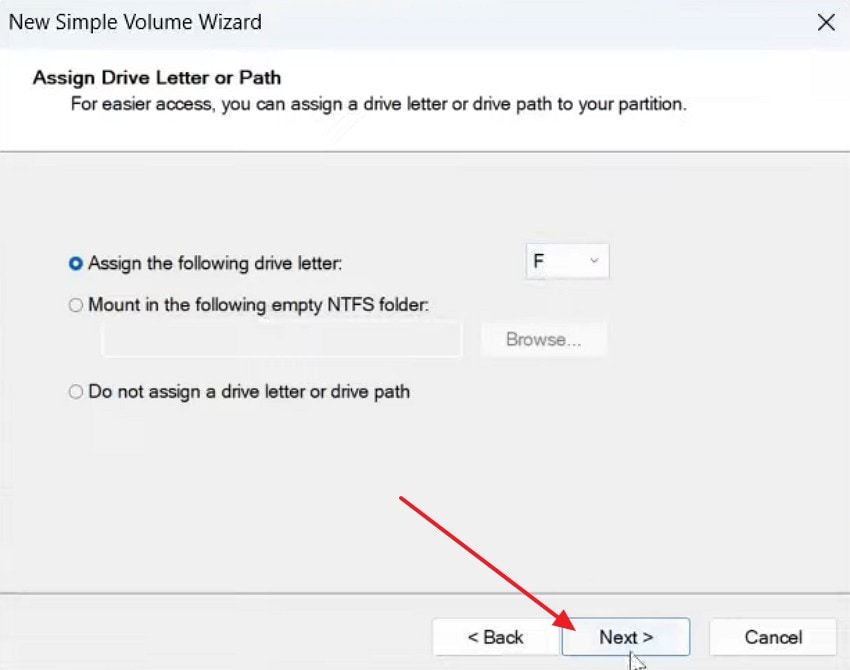
- When the "New Simple Volume Wizard" opens, click "Next" to continue. Now, set the volume size or keep the default maximum value shown. Then, assign a drive letter, and click "Next" to proceed further.
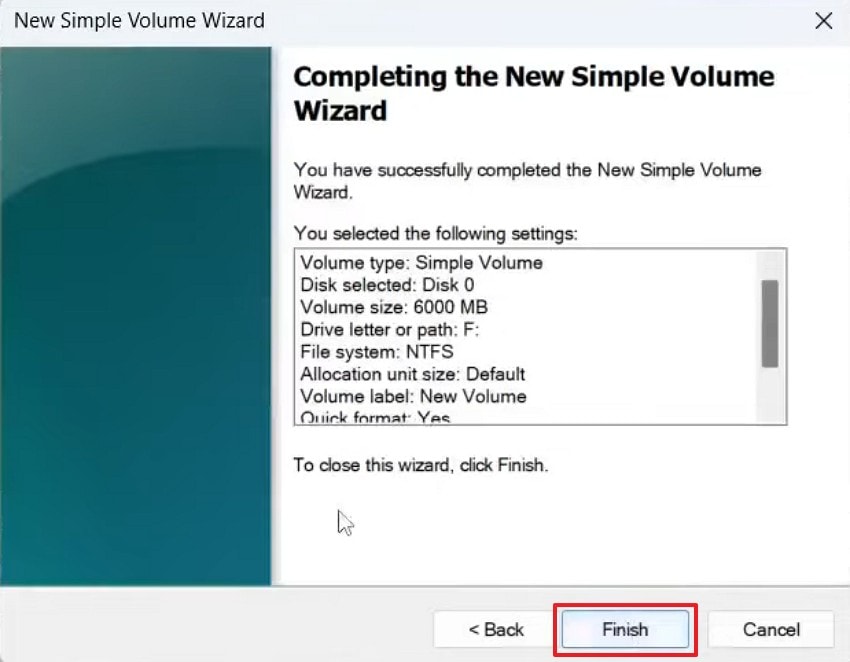
- Lastly, choose the file system and click "Finish" to create the partition.
Extend an Existing Partition
- Now, in Disk Management, right-click the existing partition next to the allocated space and select "Extend Volume" from the context menu option.
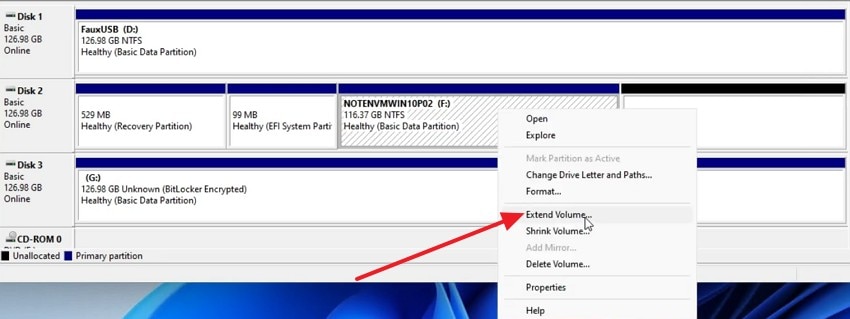
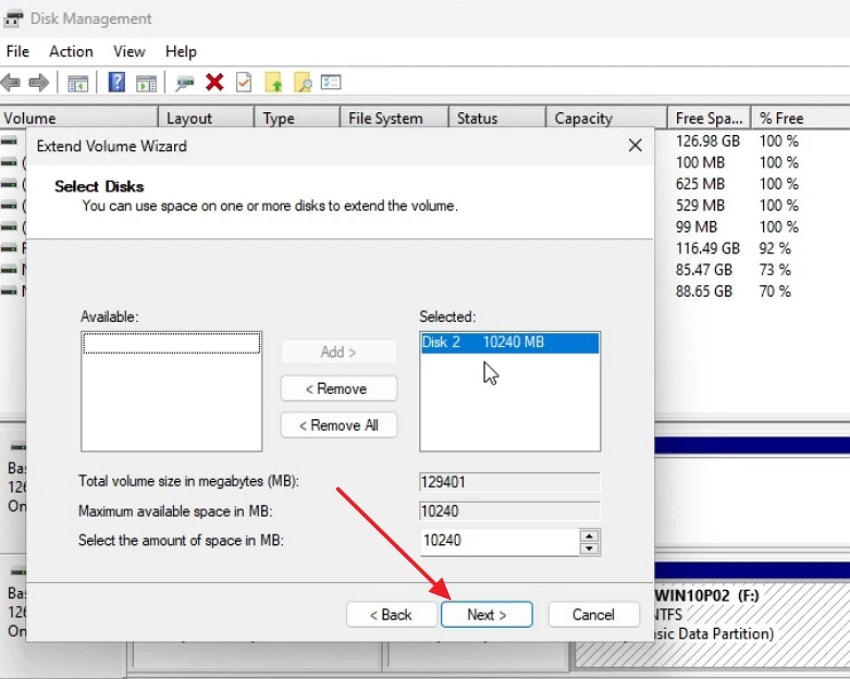
- In the "Extend Volume Wizard," confirm that the selected disk shows unallocated space, then click "Next" to continue.
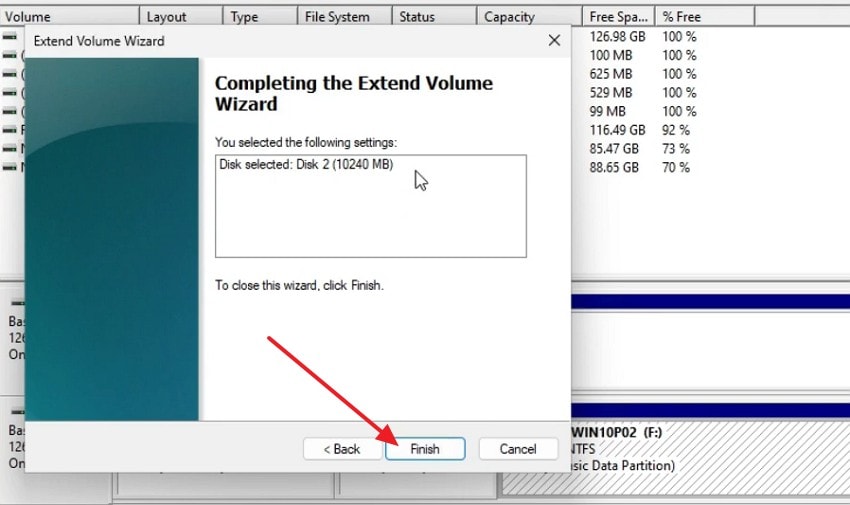
- Lastly, review the summary details carefully, then click "Finish" to apply changes successfully.
3. Enable UEFI Mode or Update BIOS Settings
Older BIOS modes may fail to boot Windows from large GPT drives. UEFI mode is required only when the GPT disk is used as a system boot drive. For data-only drives, Windows can read GPT disks without enabling UEFI. Outdated BIOS firmware can still misreport drive capacity in some systems. Updating BIOS improves hardware compatibility with modern high-capacity drives. Now, to try this method with ease, follow the steps below:
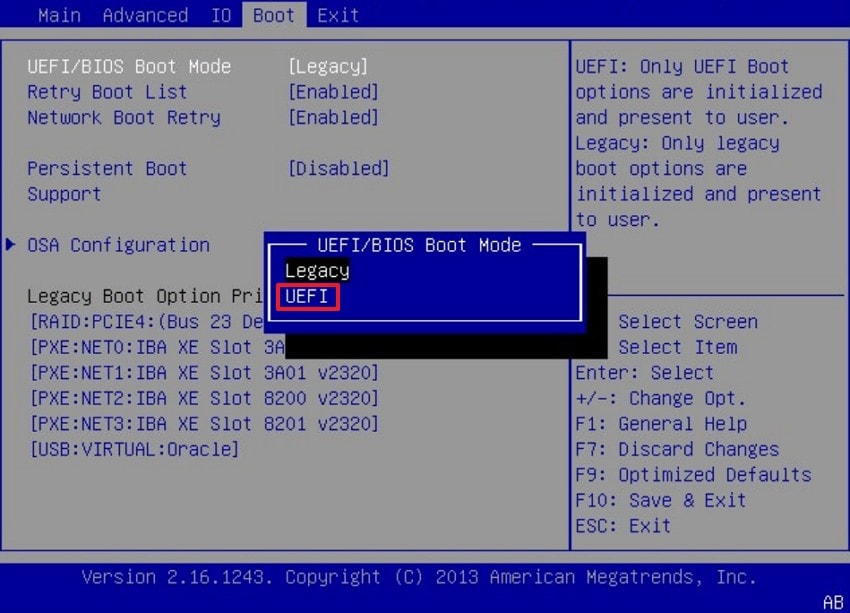
Enable UEFI Mode
Instructions. To enable UEFI Mode, restart the computer and press "F2," "Delete," or "F10" during startup. Now change the "UEFI/BIOS Boot Mode" from "Legacy" to "UEFI" and press "F10" to save changes and exit the firmware menu.
Update BIOS Settings
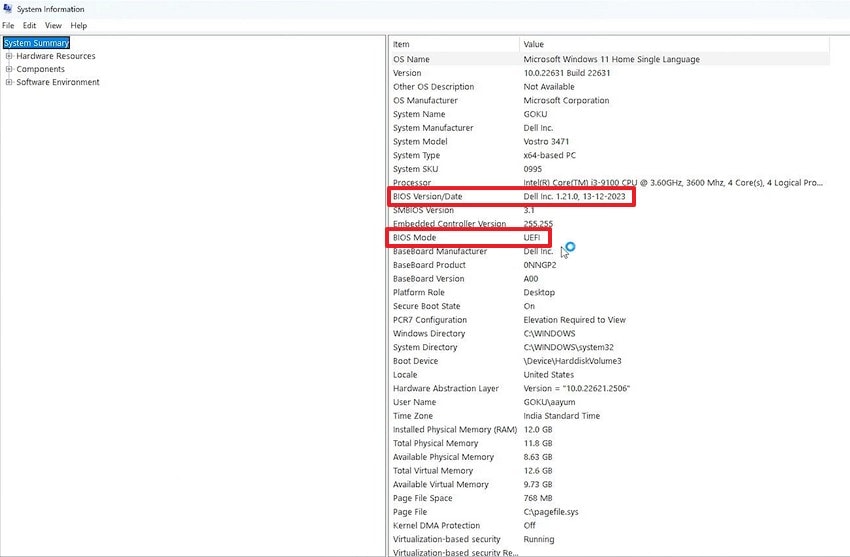
- First, to check the current BIOS version in Windows, press "Windows + R", type "msinfo32," then press "Enter." Now Look for "BIOS Version/Date" and "BIOS Mode" in System Information.
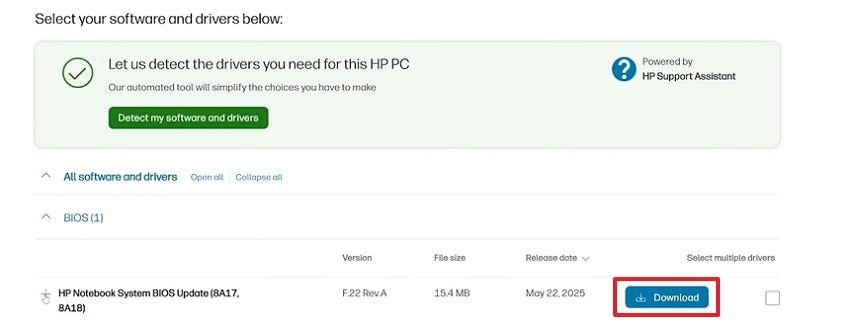
- Next, if the BIOS is not updated, then visit the official manufacturer support page, such as HP or Dell. Then locate the BIOS update section and click "Download" for the latest version.
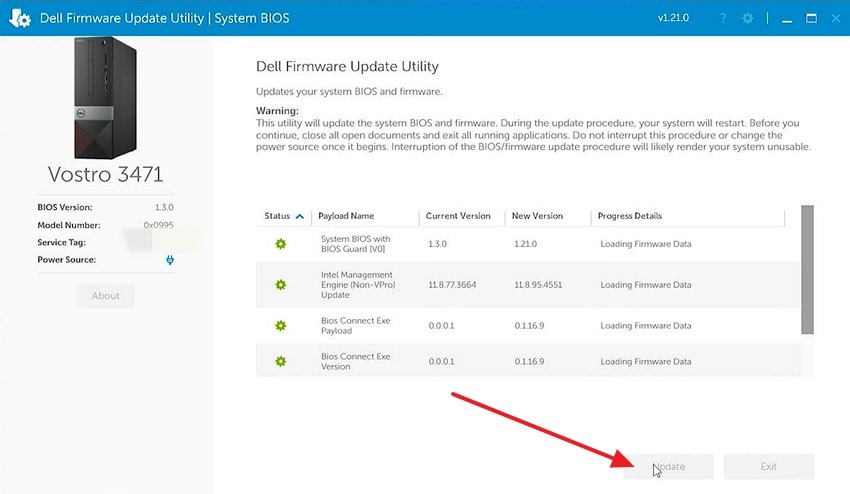
- Afterwards, run the downloaded firmware update utility inside Windows. Then click "Update" and wait for the process to complete. Also, do not power off the system during the update process.
Part 5. 5 Common Mistakes That Cause Hard Drives to Show the Wrong Size
After checking settings and applying fixes, problems still happen because of common mistakes. These mistakes directly cause a hard drive shows wrong capacity issue on systems.

- MBR Format: Older partition methods restrict usable storage beyond 2TB automatically. Extra disk space remains inaccessible because address limits stop proper detection.
- Outdated Windows: Some operating systems were created before very large disks became common. Disk size is misreported because modern storage rules were never supported.
- Incomplete Setup: During first use, disk configuration may stop before completion finishes. Missing setup steps prevent the system from recognizing the entire drive.
- Hidden Space: When storage lacks partitions, it does not appear in file browsing tools. Only allocated and formatted sections count toward visible disk size.
- Legacy Mode: Booting in older firmware modes conflicts with modern disk structures. This conflict causes incorrect capacity detection during system startup.
Pro Tip: Recover Lost Data with Recoverit Before Disk Changes
If a large hard drive suddenly displays less space, confusion and panic often follow quickly. Many users immediately attempt fixes without realizing the risks to important data beforehand. When a "4TB drive only showing 2TB" appears, partition changes can silently remove stored files, unexpectedly. One incorrect step during troubleshooting may erase photos, documents, and work without warning signs.
Before attempting size corrections or disk reconfiguration, it is wise to secure files first. Performing a recovery scan early helps reduce risk if something goes wrong later. Recoverit provides a read-only scan option and supports recovering up to 500 MB of data for free. This gives users a safe way to confirm and save important files before making permanent storage changes.
Key Features
- Deep Scan Technology: Retrieves files from inaccessible areas created by partition changes or formatting errors safely.
- Selective Recovery: Let users choose specific file types without restoring unnecessary data during troubleshooting processes or experiments.
- Read Only Recovery: Provides a read-only recovery process to avoid overwriting existing data while thoroughly scanning affected drives for safety assurance.
Guide to Recover Lost Data with Recoverit Before Disk Change
Let's walk through the steps below to retrieve lost data with Recoverit:
- Select Drive or Location to Start Recovery
Upon launching Recoverit, access the "Hard Drive and Location" interface. Then select the affected internal disk or external drive from the displayed list.
- Scan Drive and Locate Recoverable Files
After that, Recoverit automatically scans the selected drive for lost data. Now, recoverable files appear organized by location and file type categories.
- Preview Files and Complete Recovery Process
Lastly, preview files to verify integrity before recovery begins, select the required files, and click "Recover" to proceed safely.
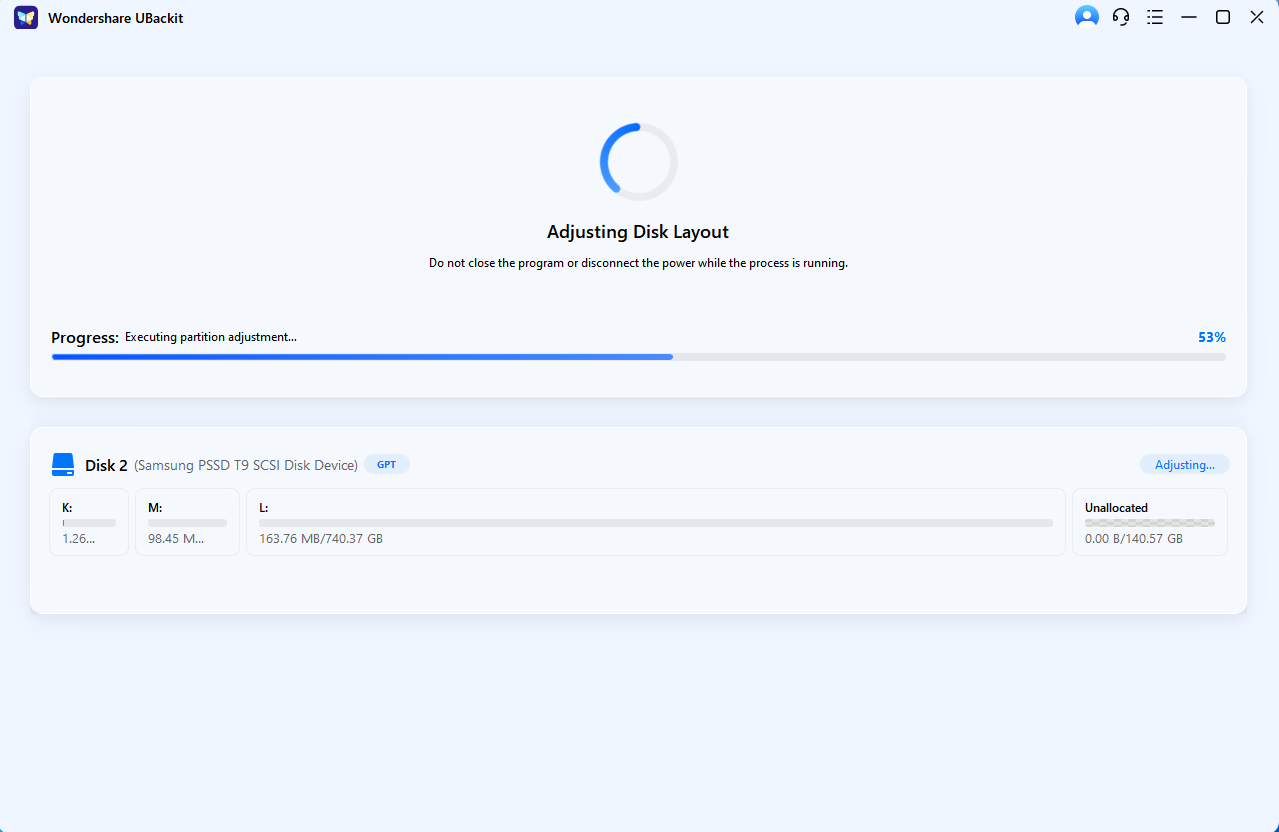
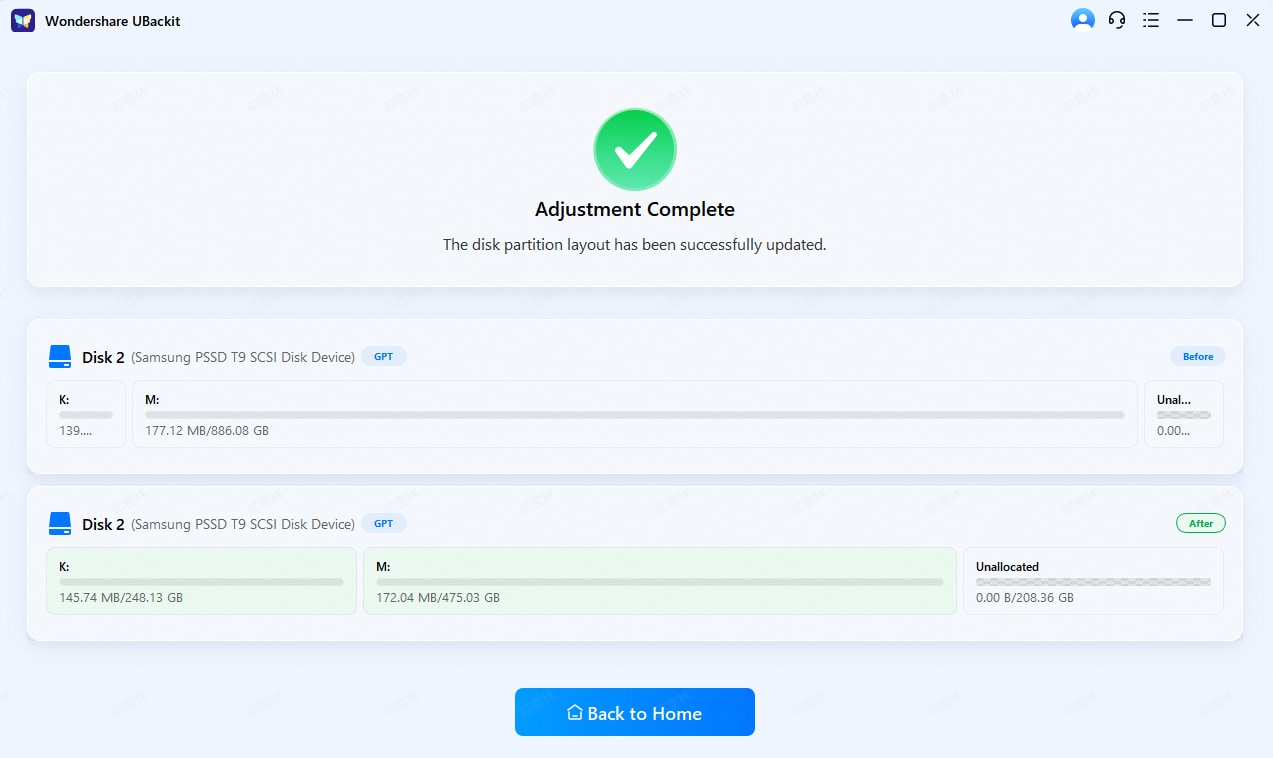
Part 6: Dynamic Partition Management:How to Adjust Your Disk Layout
When your C Drive is clogged with system files and "Low Disk Space" warnings appear, UBackit allows you to intelligently borrow unused space from other partitions (like your D Drive) to balance your disk layout.
Step 1. Identify and Select Disk
Launch UBackit and navigate to the Partition Management tab. Select the physical disk you wish to modify. Double-click the disk or click the Adjust Disk Layout option from the right pane to continue.

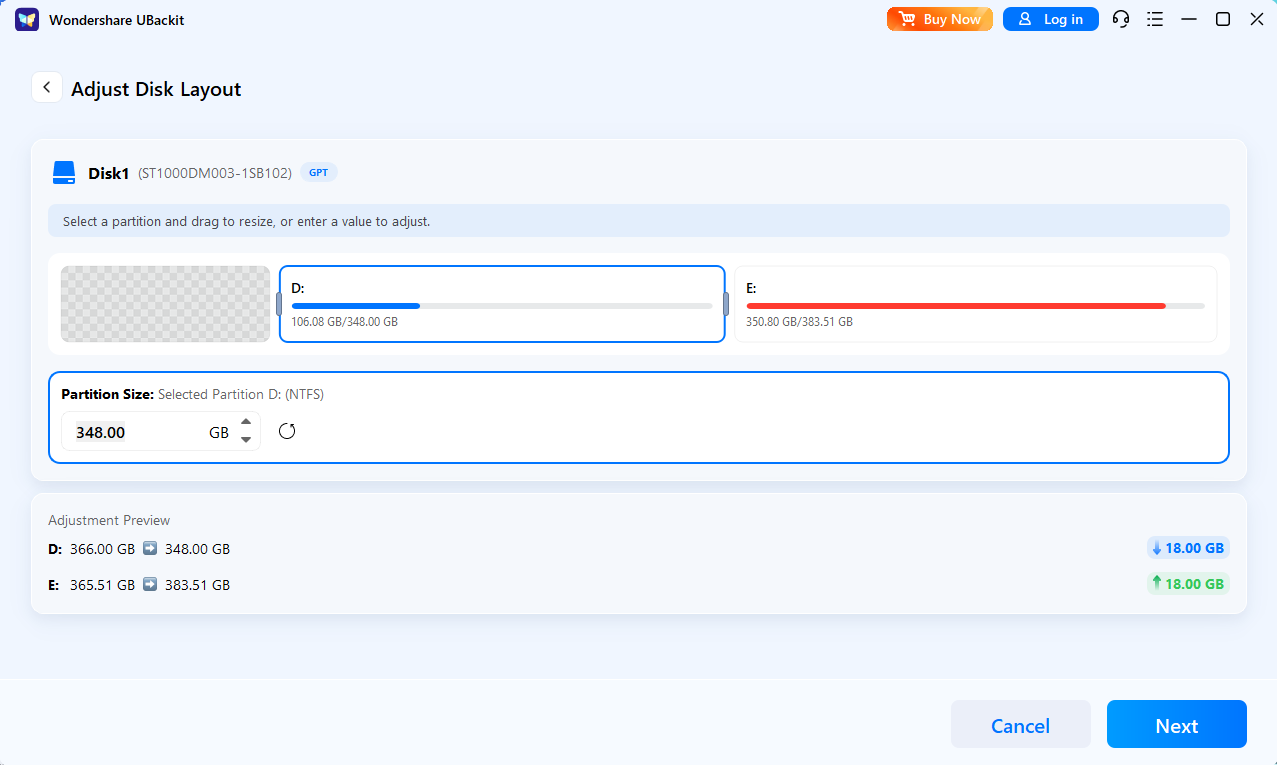
Step 2. Adjust the Disk Layout
Use the intuitive visual interface to drag the edges of your partitions. Alternatively, enter specific GB/MB values to precisely reallocate unallocated space from one volume to another.
Step 3. Initiate the Process
Review and confirm the partition layout. Once confirmed, click Next to execute the operation.
Step 4. Complete Management
Wait for the process to finish and view the updated disk layout. UBackit will safely move data blocks to accommodate the new boundaries. Once the progress bar reaches 100%, your disk will reflect the updated capacity instantly.
Conclusion
To conclude, a missing hard drive space issue feels alarming, but the cause is usually technical, not permanent. Understanding partition limits, system settings, and firmware support helps resolve the problem safely. By following the correct checks and fixes, even a 4TB hard drive only showing 2TB can be restored fully. Before making changes, protect your files first by using Recoverit for reliable data recovery.
FAQ
-
1. Why does a 4TB hard drive sometimes show less storage space?
This usually happens because older partition styles or system settings limit visible storage. The space still exists but remains hidden until the correct configuration changes are applied properly. -
2. Is my data lost when a hard drive shows incorrect capacity?
Your files are safe because incorrect capacity reporting does not delete stored data. They become inaccessible temporarily due to partitions, firmware limits, or system configuration problems. -
3. Can converting MBR to GPT fix incorrect hard drive size issues?
Converting MBR to GPT removes the two 2TB addressing limitation completely from systems. This allows Windows to recognize full disk capacity without hiding usable storage space. -
4. Should I use Recoverit before fixing hard drive capacity problems?
Recoverit helps secure important files before disk changes risk accidental data loss occurring. It scans drives safely without modifying existing data structures during recovery operation processes.


