

 TL;DR:
Prevent sudden NVMe SSD data loss by monitoring for early hardware warning signs like random system freezes or disappearing drives, and proactively verifying the drive's condition using native OS utilities, SMART monitoring software, or motherboard firmware.
● Evaluate critical SMART health metrics directly to gauge stability: plan for drive replacement if the remaining life drops below 80% or total host writes (TBW) exceed 70%, ensure "Media and Data Integrity Errors" remain at exactly 0, and maintain operating temperatures under 60–65°C.
● Select the diagnostic method that fits your system's current state: use Windows Disk Management for basic partition checks, CrystalDiskInfo or brand-specific software like Samsung Magician or WD Dashboard for detailed lifespan diagnostics, or the BIOS/UEFI interface if Windows fails to boot.
● Maximize SSD longevity by keeping 20% of storage capacity free and ensuring TRIM is enabled, but if the drive already exhibits severe failure symptoms or broken partitions, immediately extract critical files using TRIM-aware recovery software like Wondershare Recoverit.
Ask AI for a summary
 ChatGPT
 Perplexity
 Gemini
 Claude
 Grok
Grok
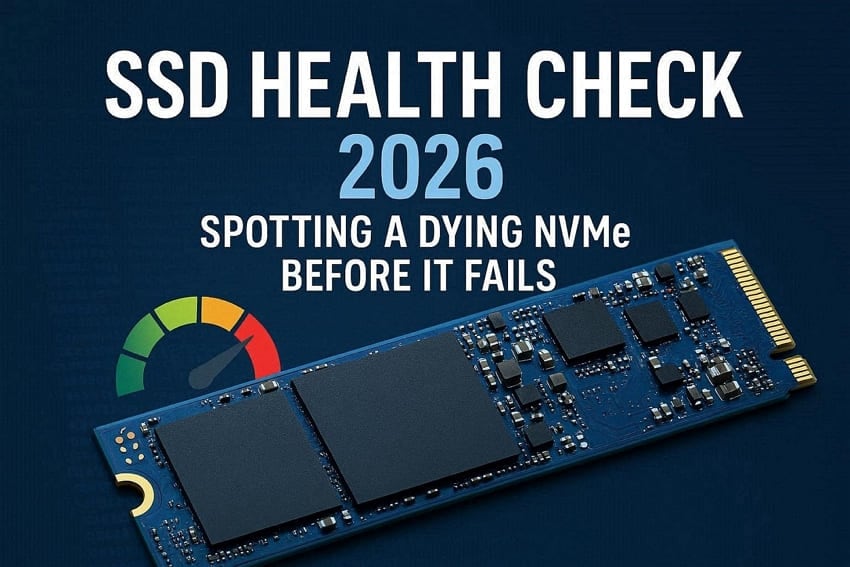
When your NVMe SSD starts acting strange, it can quietly put important personal data at risk. Subtle issues like random freezes, delayed file access, and sudden errors may signal deeper hardware problems. Ignoring early warning signs greatly increases the chances of data corruption and unexpected drive failure.
Identifying a weak or worn-out NVMe SSD early helps protect files and avoid sudden downtime. This guide walks you through a focused SSD health check so you can catch problems early. As a bonus point, this guide also includes a recovery tip to recover data before the SSD fails.
Try Recoverit to Perform Data Recovery
 Security Verified. 3,591,664 people have downloaded it.
In this article
Part 1. What Is SSD Health and Why It Matters
SSD health is the overall condition and remaining lifespan of your solid-state drive. It shows how much safe usage is left before the drive becomes unstable or fails. Knowing SSD health helps users protect important data and avoid sudden, frustrating system problems. With this information, users can decide when to back up and keep using the drive. Having discussed what SSD health means, let’s look at the key health details:
SSD health shows the remaining lifespan of NAND cells and how much they have been used.
Manufacturers measure SSD usage with TBW and the internal wear level.
Poor SSD health often results in slow performance, longer load times, and more frequent system issues.

Why SSD Health Really Matters
SSD health helps protect important files from unexpected loss and frustrating system failures. Before learning how to check NVMe SSD health, let us understand why monitoring it matters:
- Data Protection: Healthy SSDs lower the risk of sudden file corruption and permanent data loss. Monitoring SSD condition early gives time to back up files before serious problems appear.
- Performance Stability: Drives with good health keep apps responsive and file transfers smooth. Worn SSDs often cause freezing and delays that interrupt normal work.
- System Reliability: A healthy SSD reduces random crashes, blue screens, and failed Windows. Stable storage also keeps updates and everyday tasks running smoothly without disruption.
- Replacement Planning: Watching health levels helps decide when a drive is too risky for important data. Planned replacement avoids emergencies and rushed choices when the SSD finally dies.
What Happens When an SSD Fails
If an SSD starts failing, the system may freeze and show confusing blue screen errors. Corrupted files, very slow opening of folders, and disappearing documents often warn about drive trouble. In many cases, the SSD suddenly disappears from File Explorer and from BIOS. When Windows is installed there, the computer may stop booting and endlessly restart or hang.
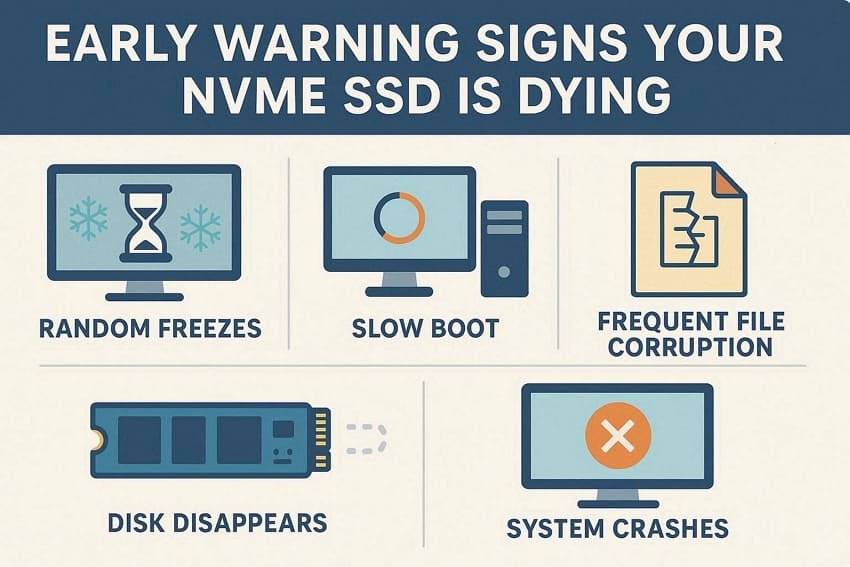
Part 2. 5 Early Warning Signs Your NVMe SSD Is Dying
When problems start, many users miss the early NVMe SSD failing signs completely. So, let’s quickly walk through clear, real‑world symptoms you should actually watch for:
- Random Freezes and Stutters: The PC suddenly hangs for a few seconds during light tasks and browsing. These freezes become more frequent over weeks during file operations. And the SSD temperature may consistently exceed safe operating limits.
- Slow Boot and App Loading: Windows takes much longer to start, even though an SSD was originally installed. Games and programs that once opened now crawl, with progress bars lagging badly.
- Frequent File Corruption: Messages appear like “File is Corrupted,” and copy operations fail without clear reasons. Extracting archives and installing games throws unexpected errors after multiple redownloads.
- Disk Disappears and Disconnects: Sometimes the SSD disappears from Windows and File Explorer, but it comes back after restarting. In worst cases, the drive does not show in BIOS, then reappears later.
- System Crashes: Random blue screens or sudden restarts happen, often under disk‑heavy workloads or gaming. After rebooting, Windows sometimes runs automatic disk checks or reports problems with storage.
Part 3. How to Check NVMe SSD Health in 2026 - 4 Ways
Checking NVMe SSD health is important to avoid slow performance, crashes, and sudden data loss. The same basic tools used for regular SSDs also work for NVMe drives on Windows. Now, we will explore different methods to learn how to check NVMe SSD health on Windows.
Way 1: Use Built-in Windows Tools
This method uses built-in Windows tools to help users avoid installing extra software. Task Manager helps quickly check if the NVMe SSD is active and overloaded. However, Disk Management lets users confirm the drive is detected, online, and showing healthy partitions. These tools give beginners a simple first look at basic SSD health information.
Check the NVMe SSD in Task Manager
Now, look at the steps below to check how your NVMe SSD behaves:
- First, open the Task Manager and click the “Performance” tab at the top.
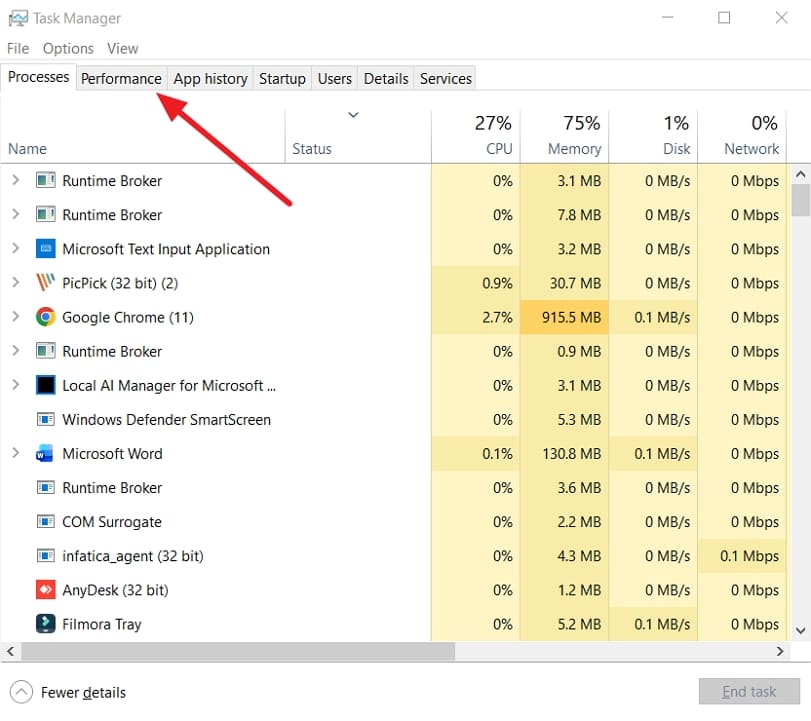
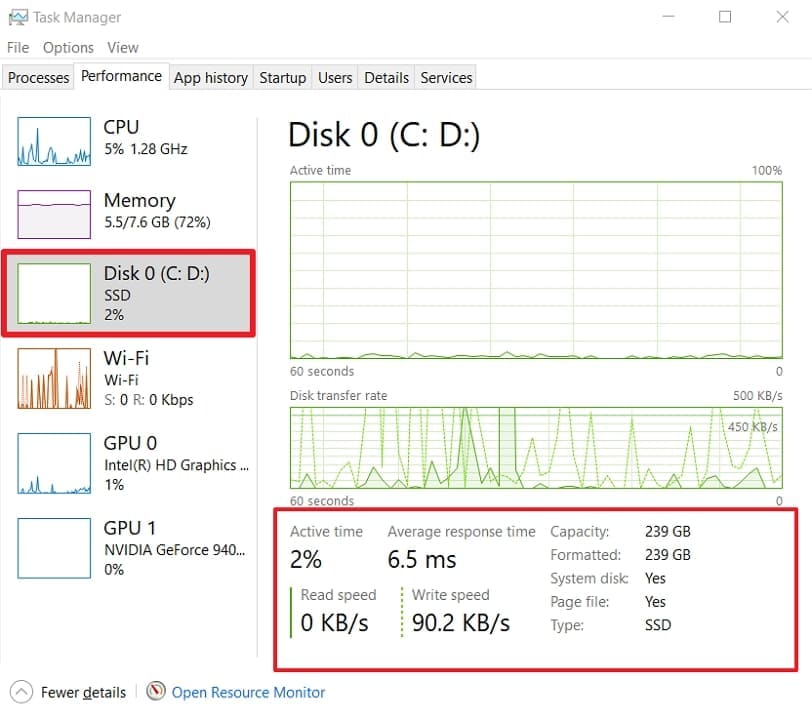
- Once you enter the “Performance” interface, locate and select the SSD labeled as “Disk” or “SSD”. Watch active time, read speed, and write speed while using apps normally. Treat constant 100% usage, very low speeds, or repeated freezes as health warning signs.
Check the NVMe SSD in Disk Management
Having learned how to spot basic NVMe SSD failing signs in Task Manager, go through the steps below to review its status using Disk Management:
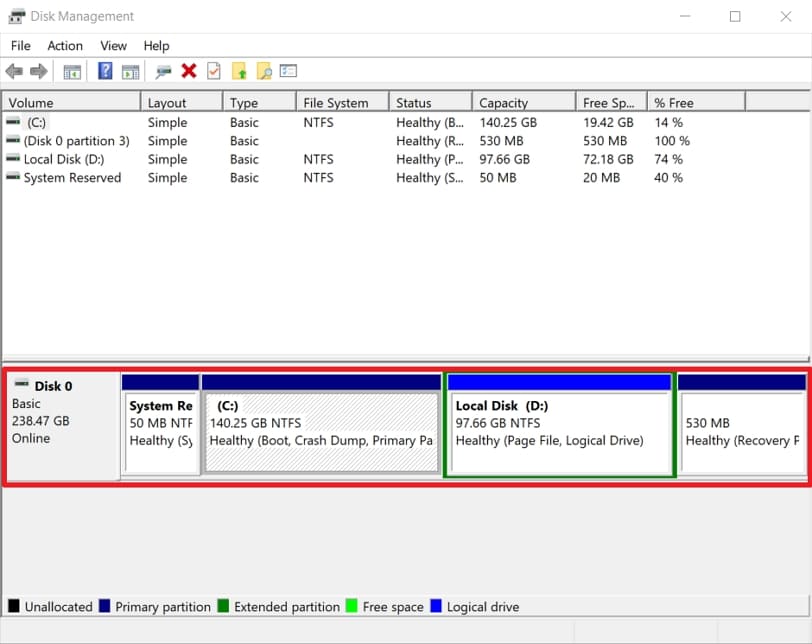
- Open the Disk Management window and check if your NVMe SSD appears in the lower list as “Disk 0/Disk 1” and that it shows as “Online” with healthy partitions.
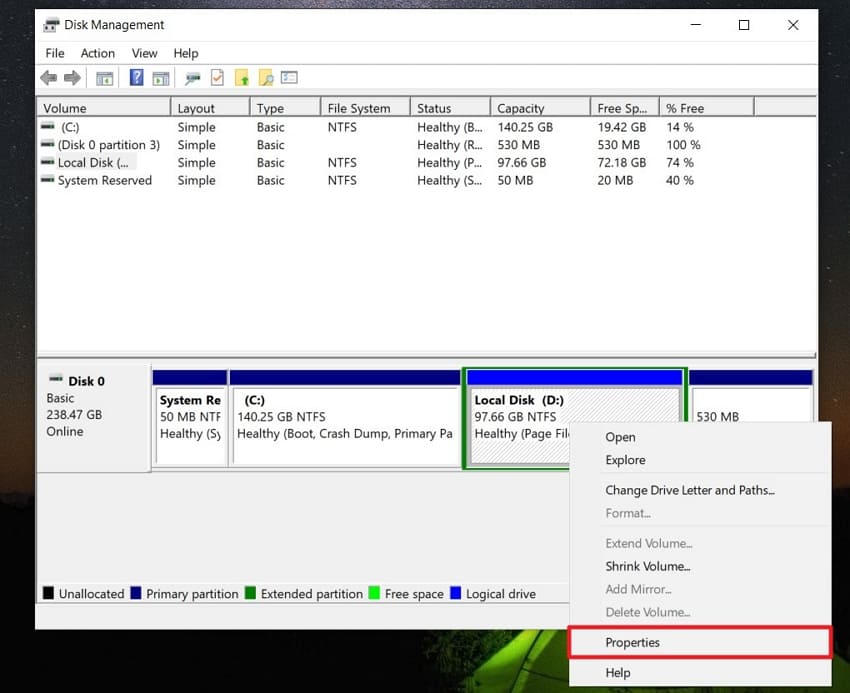
- Then, right‑click it and choose “Properties” to open a pop-up window.
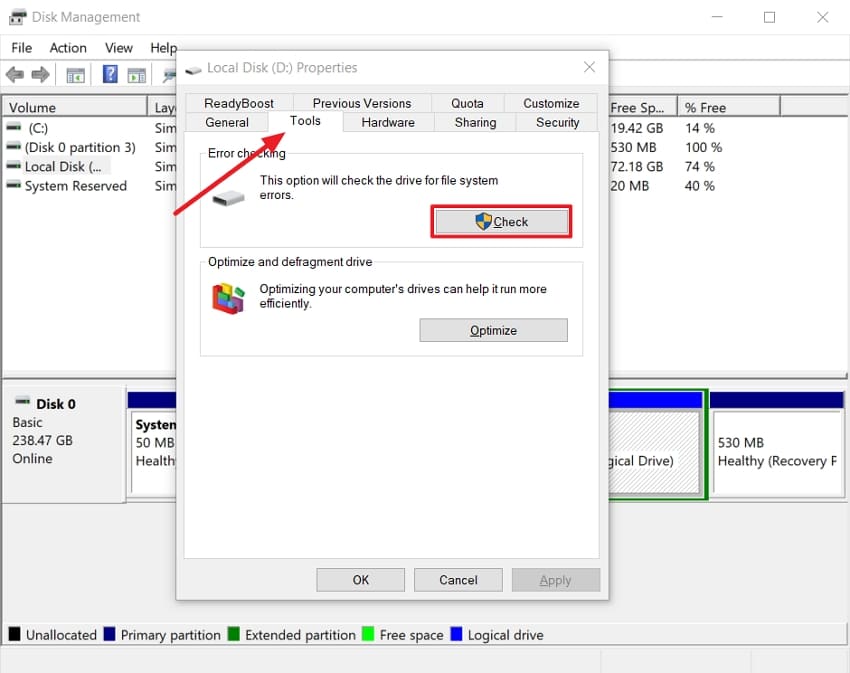
- Next, click the “Tools” tab in the “Properties” pop-up and press the “Check” button under the “Error Checking” section.
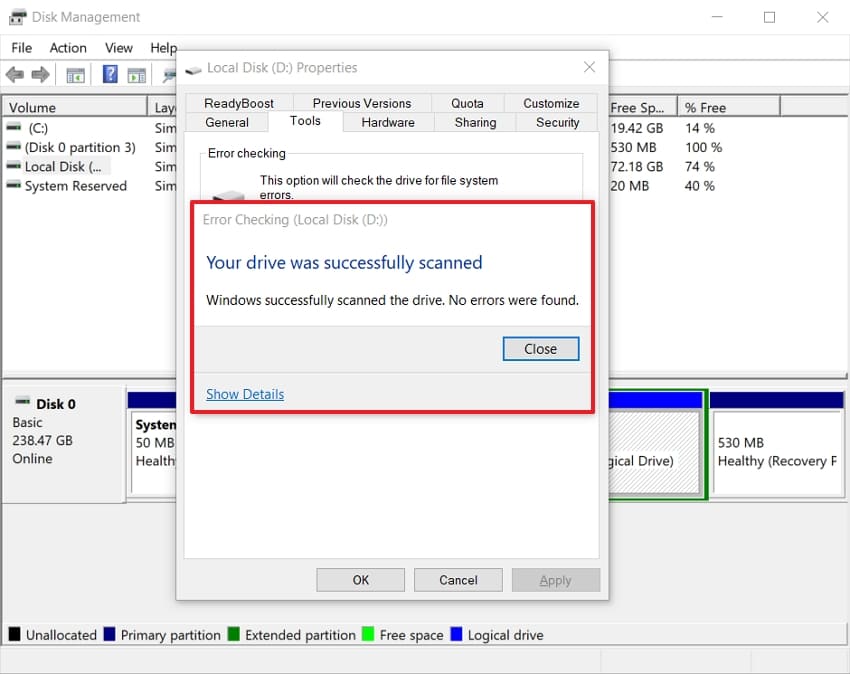
- Once scanned, check the error status of your SSD in the small pop-up.
Way 2: Use SMART Monitoring Software
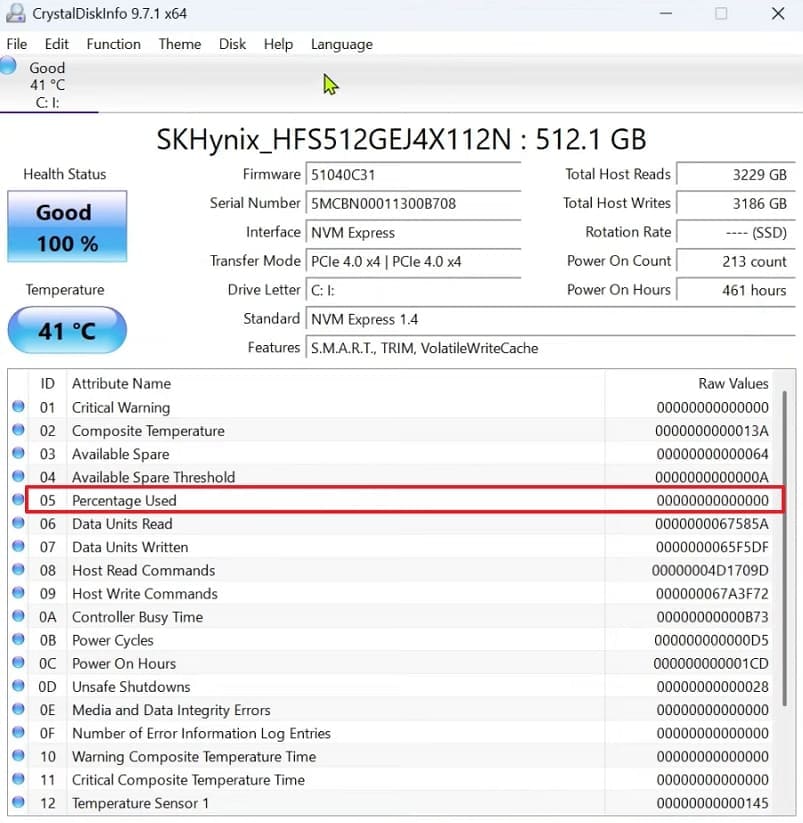
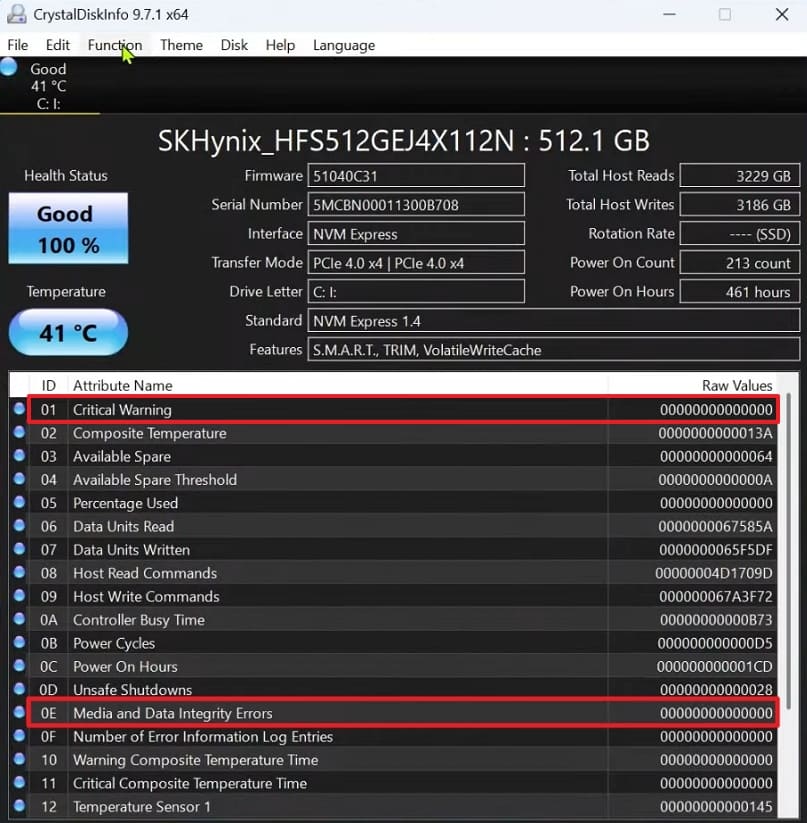
SMART tools like CrystalDiskInfo read the SSD’s internal health data and show status. You install CrystalDiskInfo and select your SSD from the drive list. It helps anyone who wants early warning before slowdowns or data loss. This tool also shows temperature and lifetime stats to gamers and heavy users. Next, follow the steps below to check your SSD’s SMART health status:
- Once you install and launch the CrystalDiskInfo tool, note the Health Status and Temperature of your SSD.
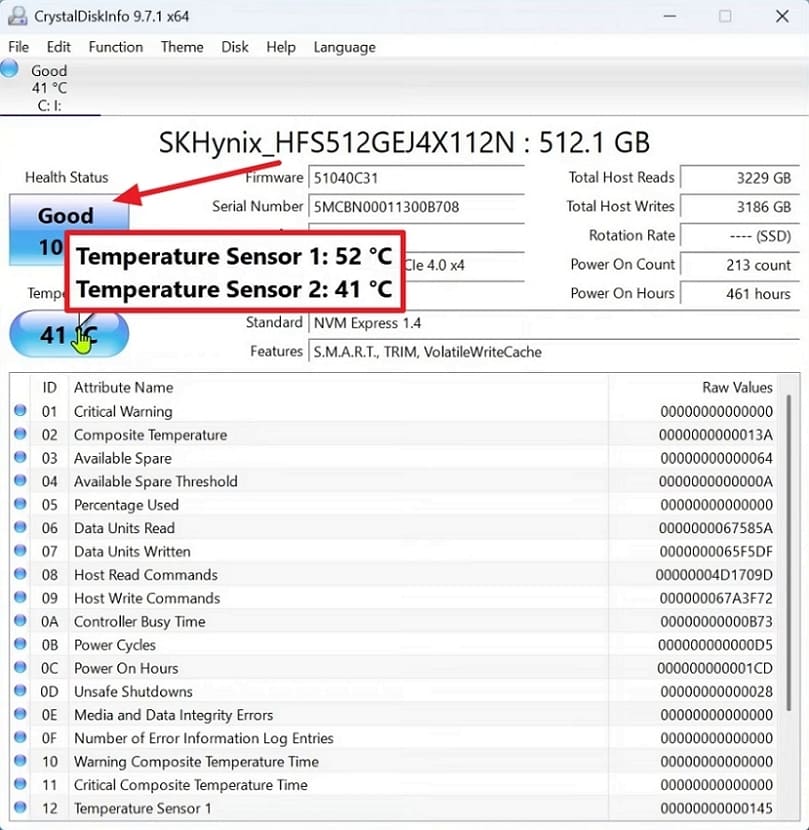
- In the table below, find the “Percentage Used” line and read its “Value” column. A low “Percentage Used” means your SSD still has plenty of life left.
- Next, look for the “Media and Data Integrity Errors” and “Critical Warning” and check that both show 0. If these stay at 0 and the temperature is normal, your SSD has no bad blocks or serious SMART errors right now.
Way 3: Manufacturer Tools
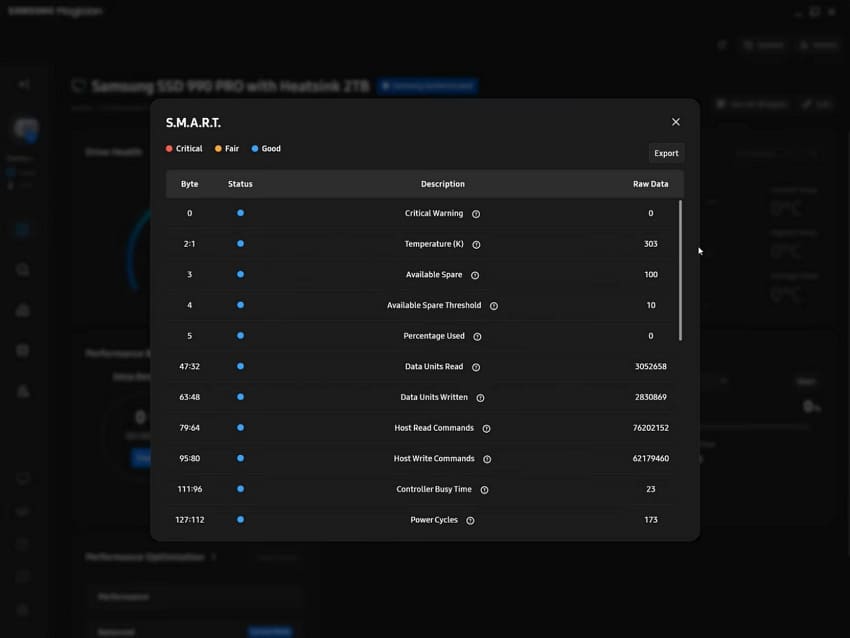
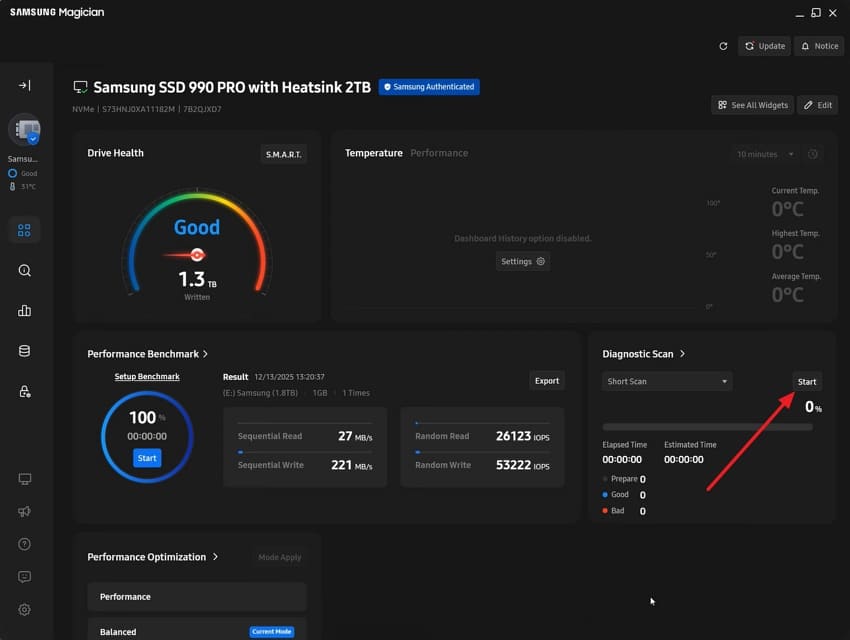
Brand tools like Samsung Magician or WD Dashboard are made for their own SSDs. These apps show clear health status, temperature, and sometimes lifespan, simplifying how to check NVMe SSD health. They are great for beginners who want official guidance and easy, one‑click diagnostics. Now, adhere to the steps below to use the Samsung Magician for health checks:
- First, download and install the Samsung Magician tool. Once installed, select your NVMe drive from the left side panel and check the “Drive Health” section to see its condition.

- Next, click the “S.M.A.R.T” option to review detailed health information for your SSD and see any warnings or abnormal values.
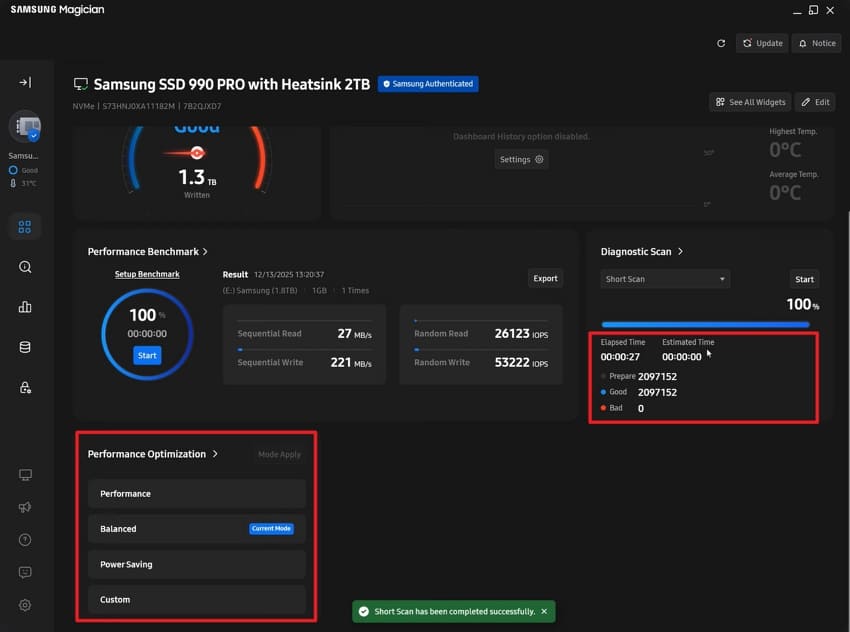
- To check the functional errors and spot a problem with your SSD, click the “Start” button under the “Diagnostic Scan” option to begin scanning.
- Once the drive is scanned, review the test result to see whether any errors or issues were detected with your SSD.
Way 4: BIOS/UEFI Health Check
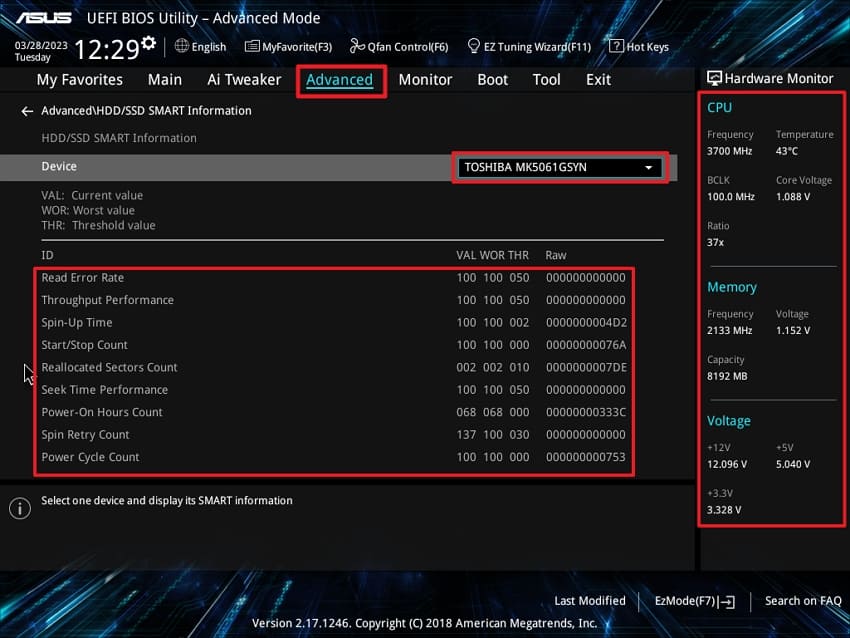
Many users ask, “Is my SSD dying?” and want a low‑level check. You enter your BIOS or UEFI during startup and open the storage section. There, you can confirm the drive is detected properly and see its current temperature. This method helps when Windows won’t boot or when software tools seem unreliable. Follow the instructions below to check basic SSD health, using an ASUS BIOS as an example:
Instructions. First, restart your PC, enter the UEFI BIOS screen, and then click the “Advanced Mode” button. Next, go to the “Advanced” tab and open the “HDD/SSD SMART Information” section there. Afterward, choose your drive from the “Device” dropdown list and review the SMART values shown. Finally, check the right‑side “Hardware Monitor” panel to confirm SSD temperature and readings stay within normal ranges.
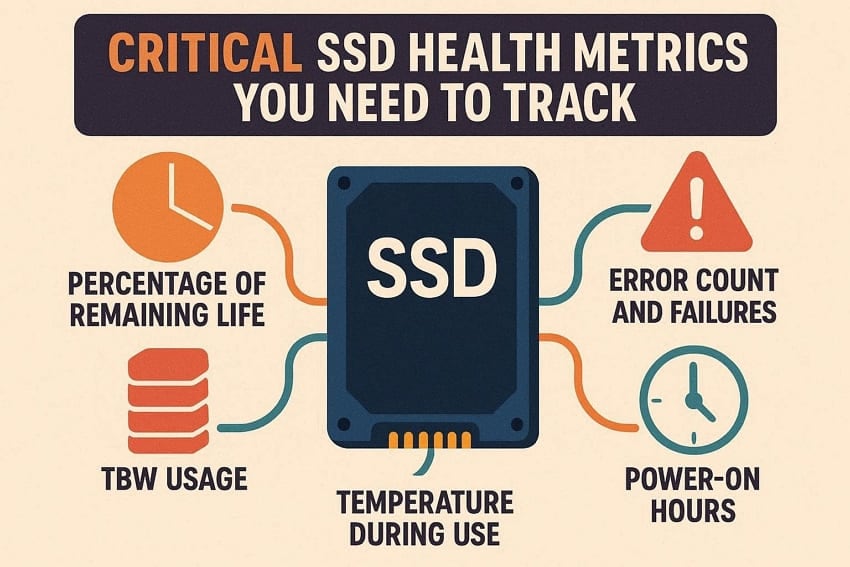
Part 4. 5 Critical SSD Health Metrics You Need to Track
When we look at SSD health, numbers only make sense with some context. These numbers help us determine whether the drive is working properly or needs attention. Once we learn how to check NVMe SSD health, we will share the essential metrics with rough target ranges you should watch:
- Percentage of Remaining Life: Keep the remaining life above 80% because lower values mean the drive wears faster. If the percentage used goes past 30%, start planning backups and replacements soon.
- Total Host Writes (TBW usage): Try to stay under around 70% of the drive’s rated TBW value. When total writes approach that limit, expect a higher risk of problems.
- Error Count and Failures: Best case, media or uncorrectable error counters always remain at 0 for years. If these numbers slowly rise, treat that drive as unsafe for important data.
- Temperature During Use: Normal loads should keep SSD temperature below 60–65°C for safer long‑term use. Regular temperatures above 70°C often mean poor airflow and possible throttling issues.
- Power‑on Hours: A drive with low hours and low writes usually has a long life ahead. Very high hours plus heavy writes mean watch health closely and back up often.
Pro Tip: Use Wondershare Recoverit Before The SSD Fails Completely
When NVMe SSD failing signs appear, many users panic because precious files suddenly vanish. This is where Wondershare Recoverit comes in to give you a safety net for lost data. It specializes in SSD data recovery and works even when partitions look broken or missing. The tool understands modern SSD behavior and handles TRIM‑related challenges better than manual tricks.
Moreover, it supports almost all SSD types and brands, including SATA, NVMe, and M.2 drives. You can scan, preview, and selectively restore only the files you actually still need. Quick and deep scanning modes, plus pause and resume options, make long recoveries much less painful.
Key Features
- Wide Device Support: Recovers data from 1M+ devices, including SD cards, USBs, drones, cameras, HDDs, and SSDs.
- Data Loss Coverage: Handles 10,000+ loss situations like deletion, formatting, card damage, crashes, viruses, and system errors.
- AI-powered Engine: Uses advanced AI to boost scan accuracy, recover more files, and speed up the whole process.
Ultimate Guide to SSD Recovery with Recoverit
When your SSD starts acting up, many users start worrying about backups and SSD health check results. Now, follow the steps below to recover lost data safely and avoid further damage:
1. Choose The File Location to Start Scanning
Once you enter the interface, click the “Hard Drives and Location” tab from the left side menu. Next, select your NVMe SSD to start the scanning process.

2. Use Advanced Search Filters
Afterward, head to the top and press the “Filter” icon to access a drop-down menu. Next, select filter types, like “File Type” and “File Size,” to narrow down the process.

3. Preview and Recover Desired Files
After the scanned SSD files start appearing in the “File Path” panel, see them on the “Preview” screen. If the scanned data is correct, click the “Recover” button to save it.

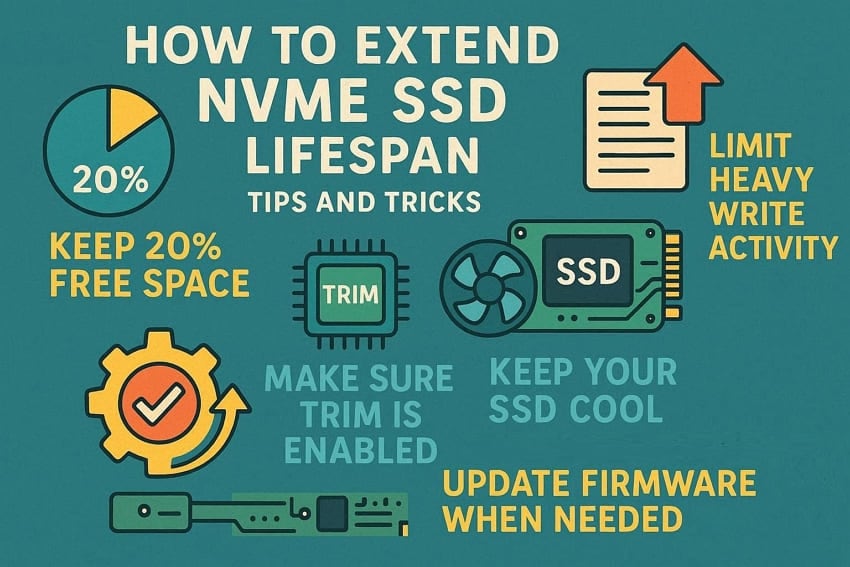
Part 5. How to Extend NVMe SSD Lifespan - 5 Tips and Tricks
When you keep asking, “Is my SSD dying?,” small habits can actually slow that day. Next, let’s walk through a few simple tips to help your NVMe SSD last longer.
Keep Some Free Space
Your SSD works better when it always has some free room to breathe. Try not to fill it completely and keep roughly 20% space free when possible.
Limit Heavy Write Activity
Constant large downloads, file moves, or video exports can wear flash cells faster. Whenever you can, move very write‑heavy tasks to another drive or external disk.
Make Sure TRIM is Enabled
TRIM helps your system tell the SSD which blocks are free for reuse. With TRIM on, the drive can clean itself better and keep performance more stable.
Keep Your SSD Cool
High temperatures stress SSD components and can slowly shorten the drive’s usable life. Good airflow, clean fans, and no blocked vents help keep temperatures under control.
Update Firmware When Needed
Manufacturers release firmware updates to fix bugs and improve stability. Check the official tool and website sometimes and only install trusted releases.
Part 6. When to Replace Your NVMe SSD?
At some point, every SSD reaches a stage where replacement becomes the safer option. You should think about replacing the drive when problems become frequent, not just rare glitches. Watch for repeated crashes, disappearing drives, or serious slowdowns that keep coming back. These patterns, combined with clear NVMe SSD failing signs, mean the drive is no longer trustworthy.
Health tools also matter when deciding if it is time to move on. If remaining life drops low and error counts rise, start planning a new drive. Very high power‑on hours plus heavy writes are another clue your SSD is tired. In all these cases, keep good backups and schedule a replacement before a sudden complete failure.
Conclusion
To conclude, regular SSD health check habits help you catch weak drives before serious trouble. This guide gives you clear warning signs, simple tools, and practical tips to stay ahead. With that knowledge, you can back up in time and replace risky drives calmly. If you lose files during checks or replacement, we recommend using Wondershare Recoverit to rescue everything safely.
FAQ
-
1. Does leaving my PC on all the time hurt the SSD?
Simply staying powered on does not wear cells if few writes are happening. Frequent large downloads, updates, and background syncs cause most wear, not quiet idle hours. -
2. Is it bad to defragment an NVMe SSD like a hard drive?
Traditional defrag is unnecessary on SSDs and only adds extra, pointless write cycles. Use built‑in optimization tools that send TRIM instead of heavy defragmentation passes. -
3. How often should I run an SSD health check?
Once every few months is enough for normal users with light everyday workloads. Heavy gamers or editors can check monthly, so NVMe SSD failing signs never sneak up. -
4. Is securely erasing my SSD harmful to its lifespan?
Modern secure erase or sanitize commands cause some wear but are generally considered safe. You just should not run them repeatedly for no reason, especially on older drives.


