

 TL;DR:
To diagnose and repair macOS performance issues or crashes, utilize built-in utilities like Disk Utility First Aid for basic file checks, or run terminal commands like fsck in Recovery mode for deeper structural repairs.
● Run Disk Utility First Aid directly from Launchpad to safely resolve minor app slowdowns, or use the Console app to isolate specific crash sources by reviewing live system log timestamps and red warning icons.
● Both fsck (File System Consistency Check) and csrutil require booting the Mac into Recovery mode; use fsck to repair disks when macOS fails to start, and run the csrutil status command to verify that System Integrity Protection (SIP) is actively securing core files.
● If native diagnostic tools cannot fix the underlying issue or system data is already missing, third-party software like Wondershare Recoverit can be used to scan internal drives, external devices, and Trash to retrieve vanished files.
Ask AI for a summary
 ChatGPT
 Perplexity
 Gemini
 Claude
 Grok
Grok
Your Mac depends on many important files. These files help your system start. They help apps open. They guide many tasks. When these files work well, your Mac feels smooth. It starts fast. It stays stable. You feel safe while you work.
Sometimes, these system files face problems. The files may get damaged. They may become corrupt. You may see strange errors. Your apps may freeze. Your Mac may crash without warning. These signs are not easy to ignore.
Learning how to check Mac system files helps solve these issues with care. It also teaches how to check system files on Mac in safe steps. It supports users who need a simple Mac system file check, who want to view system report data for review, who want to search for specific system files, or who need to view hidden system files to confirm deeper issues.
Table of Contents
Part 1: Why Check Mac System Files?
Here are the main reasons to check system files.
- Fix slow start: When your system files are weak, your Mac slows down. The boot may take time. Apps may open late. Checks help find these issues so you act early.
- Stop crashes: Sudden crashes can waste time. They may risk your data. A careful check helps locate the source. It tells you what changed.
- Spot malware: Bad apps can change important files. You might not see them. Checks help reveal such changes before harm spreads.
- Remove junk: Old system data may stay. It takes space. It may cause odd behavior. Clean checks help clear it.
- Learn about your Mac: A check helps you learn. You know what files support your Mac. You know where to find trouble.
- Better file search: Sometimes you need a deep look. You learn where files hide. You get clues.
- Find hidden files: Some files are not visible. They support your Mac in quiet ways. Safe checks reveal them.
- Keep files safe: When you scan, you protect data. You make sure your Mac stays strong.
Part 2: How to Check Mac System Files
Your Mac includes tools to help. They are simple. They are safe when used with care. It is smart to learn them before trouble starts. If you learn now, you can act fast later. Many people first learn how to check Mac system files. Later, they learn how to check system files on Mac with deeper tools.If your mac sparse bundle is encrypted, refer to: APFS Encrypted Sparse Bundle Recovery Methods.
A Mac system file check can show where a problem starts. You can view system report pages. You can search for specific system files. You can even view hidden system files if you need extra detail.
You do not need to fear these steps. Many are as simple as a click. Others need a little typing. Many users try more than one method. No harm there. When one tool fails, another tool helps. All tools aim at safe checks.
Method 1: Use Disk Utility First Aid
Disk Utility is part of your Mac. It comes by default. Many users try this first. It is safe and easy. It runs simple checks. It repairs small issues. New users can follow the steps with no stress. Many users think of this tool when they first learn how to check Mac system files. This method gives a calm way to understand how to check system files on Mac when the issue seems light. It supports the basic form of a Mac system file check.
Disk Utility First Aid scans your disk. It finds errors. It repairs them. You may see messages that explain what changed. Sometimes, it tells you that nothing is wrong. That is fine too. This tool is useful after a small crash. It is also helpful for slow apps. It is safe to try at any time. You do not risk data.
Steps:
Step 1. Open Disk Utility from Launchpad.
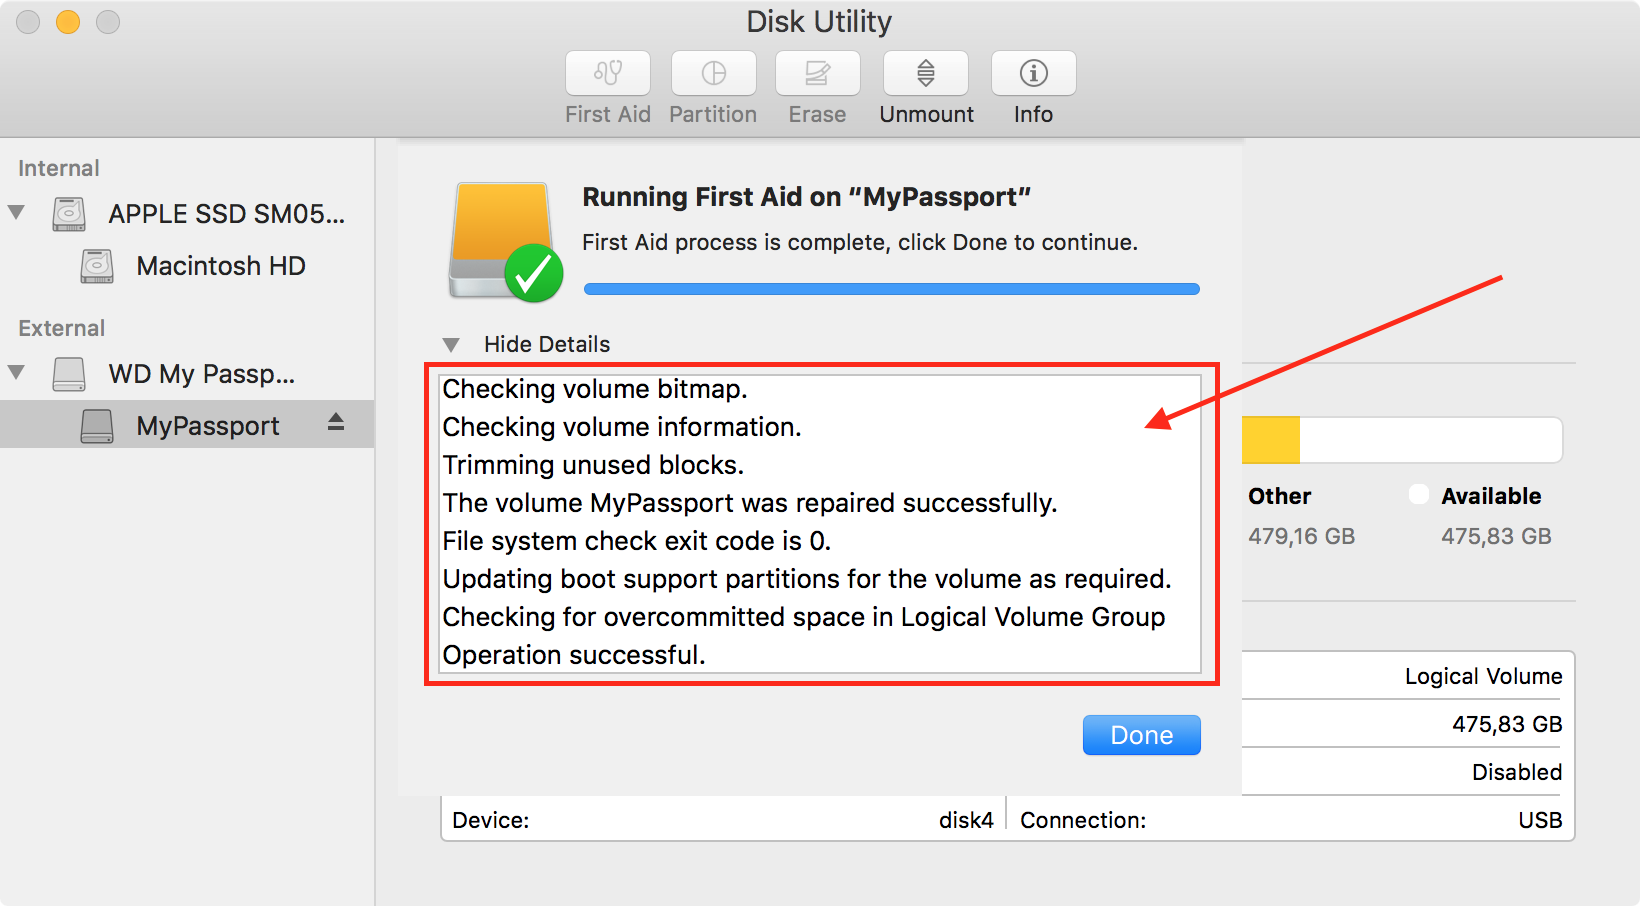
Step 2. Select your main disk and run First Aid.
You can repeat this step later. A quick check keeps your Mac healthy. It is a good habit. Use it when something feels odd.
Method 2: Use Terminal with fsck (File System Consistency Check)
Terminal gives deeper checks. It is like a gateway. You can type commands. The system responds. fsck is one such command. It checks disk structure. It repairs issues. It works even when your Mac fails to start. This makes it helpful when you learn how to check Mac system files under stress. It can guide how to check system files on Mac when other tools fail. It helps a deeper Mac system file check.
You need to enter Recovery mode for this. It looks stronger than Disk Utility. It may fix deep issues. It may take time. Be patient. It reads your disk in detail. It tries to protect your data. It helps when many things break at once.
Steps:
Step 1. Enter Recovery mode.
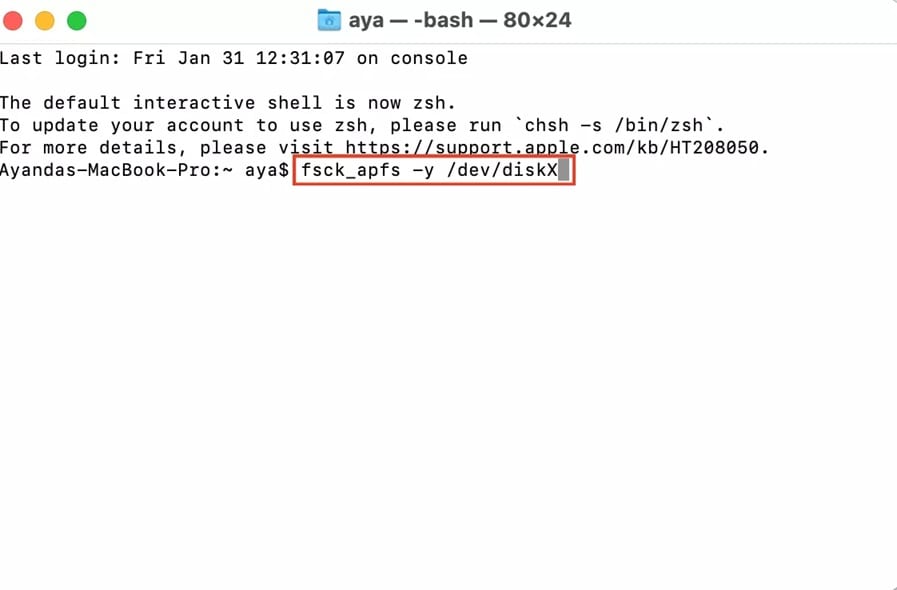
Step 2. Open Terminal and run fsck.
The command runs and shows progress. You may need to run it more than once. It gives messages to help. It guides what changed. It prepares your Mac to start again.
Method 3: Use csrutil to Check System Integrity Protection (SIP)
SIP protects core files. Many bad tools try to change these files. SIP blocks them. It keeps your Mac safe. csrutil checks SIP. It shows if SIP is on. This tells you if core files are safe. Many users want to learn how to check Mac system files with a focus on core safety. It helps users understand how to check system files on Mac under strong rules. This supports a stronger Mac system file check.
You must open Recovery mode to run csrutil. It is a simple command. It does not change things if you only check. If you see that SIP is off, you may want to turn it on. SIP protects many system paths. It helps stop deep errors. It limits what bad apps can touch.
Steps:
Step 1. Enter Recovery mode.

Step 2. Run csrutil status command to show SIP status.
If SIP is on, you stay safe. If it is off, you can enable it. That helps your Mac remain stable.
Method 4: Use Console App to Monitor System Logs
Console shows live messages. These messages tell what your Mac does. They tell what apps do. A warning here may show what caused a crash. A message about power may tell you why the battery falls fast. These logs help many people learn how to check Mac system files with real signs. The logs give small clues. They guide how to check system files on Mac when an app fails. They help shape a Mac system file check path.
Console helps before bigger scans. It shows if a file failed to load. It shows if an app sent warnings. It shows parts of the system that acted wrong. You may find the source of the problem. The logs give both value and detail. You get to think clearly.
Steps:
Step 1. Open Console.
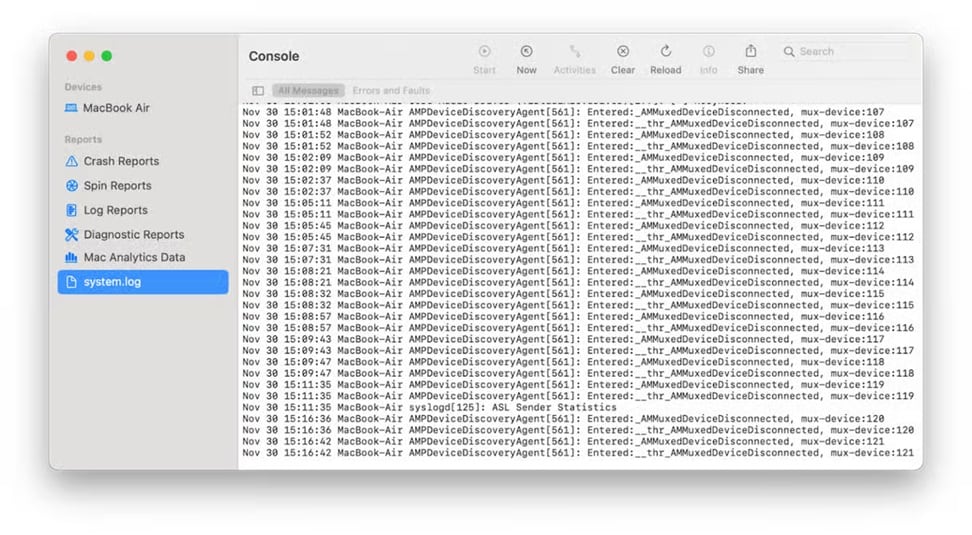
Step 2. Read recent system logs.
You may not understand every line. That is fine. Look for red icons. Look for repeated notes. Look for time stamps. They help you match events. You can then try a fix.
Part 3: Smart Alternatives for File Recovery and System Repair: Recoverit for Mac
When files vanish, stress follows. You need a way to bring them back. Recoverit helps when files are gone. It supports many file types. It finds files on old drives. It works with new disks too. It looks deep. It finds data you thought lost. It is simple to handle. You can use it if basic checks fail. If you learn how to check Mac system files and still cannot fix things, you can turn to this tool.
If you learn how to check system files on Mac and find missing data, you can use this tool. It blends with a Mac system file check path. If you choose to view system report pages and see bad signs, this tool guides next steps. If you choose to search for specific system files and see missing parts, use it. If you view hidden system files and see trouble, this tool can help.
Many people worry when they lose photos. Some lose work files. Some lose videos. This tool gives hope. It scans your disk. It finds many items. It offers a clean view. You mark the files you want. You bring them back. This helps after a crash. It helps after delete. It helps after a power cut.
What makes it strong is its reach. It checks many zones. It checks devices outside your Mac. It checks file systems that act strange. It supports many shapes of data. It helps when your Mac will not start. It helps when you feel stuck. It gives a clear path.
Steps:
Step 1. Install and open Recoverit on your Mac. Choose the drive or location where you lost your data (e.g., internal hard drive, external device, Trash). Click the Start button to begin scanning.

Step 2. After the scan completes, preview the recoverable files.

Step 3. Select the ones you want and click Recover to save them to a safe location.

Take your time. Look at the files found. Check sizes. Check dates. Restore only what you want. You keep control. You keep calm.
Conclusion
You now know many ways to check system files. You learned about simple tools. You learned about deeper tools. You saw how easy it is when steps stay small. You can act when your Mac slows down. You can act when apps freeze. You can try tools that fix issues. You can try tools that guide you. You learned how safe habits keep your Mac strong.
A steady check keeps files healthy. If you feel stuck, take a break. Then try another method. If checks seem hard, ask for help. If damage seems deep, use a recovery tool. A good habit today saves you time later. You protect your work. You protect your Mac.
Try Recoverit to Recover Lost Data
![]() Security Verified. Over 7,302,189 people have downloaded it.
Security Verified. Over 7,302,189 people have downloaded it.
FAQs
-
1. Will these steps harm my Mac
No. Basic checks are safe when followed. They help find and fix small issues. They do not harm normal use. -
2. Can I check files without tools
Yes. Your Mac has strong built-in tools. Disk Utility helps. Console helps. Terminal helps. Many users start here. -
3. Should I use Recovery mode
Some checks need Recovery mode. fsck often needs it. csrutil needs it. Follow the steps and you stay safe.


