

 TL;DR:
Backing up your Mac via Apple's built-in Time Machine is the most recommended method to safely secure your entire system and prevent irreversible data loss before upgrading to macOS 26.
● Format an external NAS or RAID drive using the macOS Disk Utility to create a large-capacity offline backup, which is ideal if you lack the reliable internet connection or storage space required by iCloud.
● For immediate system recovery if the update fails, use third-party cloning software like DoYourClone to create a complete bootable replica of your startup disk on an external drive.
● If a system glitch wipes your disk during the upgrade and you lack a prior backup, you will need to utilize data recovery software like Recoverit to scan the drive and retrieve missing files.
Ask AI for a summary
 ChatGPT
 Perplexity
 Gemini
 Claude
 Grok
Grok
The latest update of macOS 26 brings many more exciting features, performance improvements, and improved security. However, without proper planning, it may also present risks. For instance, you went ahead and installed the new update, only to find out later that you had lost important photos or work documents.
Unfortunately, it is a common situation to be stuck in, which is why it's essential to backup mac before upgrading to macos 26. This article will delve into the importance of backups, the reasons why they should be done, and provide safe and reliable ways to back up your Mac.
In this article

Part 1. Why Backing Up Is Crucial Before Upgrading to macOS 26?
Before we start discussing the different techniques you can use to create a backup of your macOS data, you need to understand the reason behind the backup. In this section of the article, we will be discussing the main reasons why you need to backup mac before upgrade:
- Prevent Irreversible Data Deletion: System glitches, broken installations, or even damaged updates may erase all your data and make it hard to restore the files.
- Protect Against Update Failures: macOS sometimes cannot install updates and will wipe the disk clean, then reinstall macOS, and this will cause the loss of all data stored.
- Protect Against Compatibility Problems: There are chances that the applications or files may not operate properly after the upgrade, and a backup will allow you to revert to the older version.
- Secure Business Continuity: Data loss is a major inconvenience that can be avoided by professionals who save files of their clients or project files in a proper backup.
- Fast System Recovery: If your macOS becomes stuck or crashes during the upgrade process, you can have your system restored within a short time, eliminating the need for troubleshooting.
- Peace of Mind: A backup will guarantee that in case of any problems that occur during the upgrade, the memories, files, and settings will be preserved and can be easily restored.

Part 2. How to Back Up Mac Before Upgrading to macOS 26 - 5 Ways
Now that you are clear on the reasons behind the importance of backing up data, let us discuss the ways of how to do a backup on mac:
Way 1. Use Time Machine (Recommended)
Time Machine is an in-built backup feature provided by Apple that assists in securing your data before an upgrade to the new macOS 26. It automatically transfers the entire system, making it easier to get your Mac back to the original state. You can schedule backups so that you can have frequent backups to prevent unintentional data loss. To build a time machine backup, you will need to do these steps:
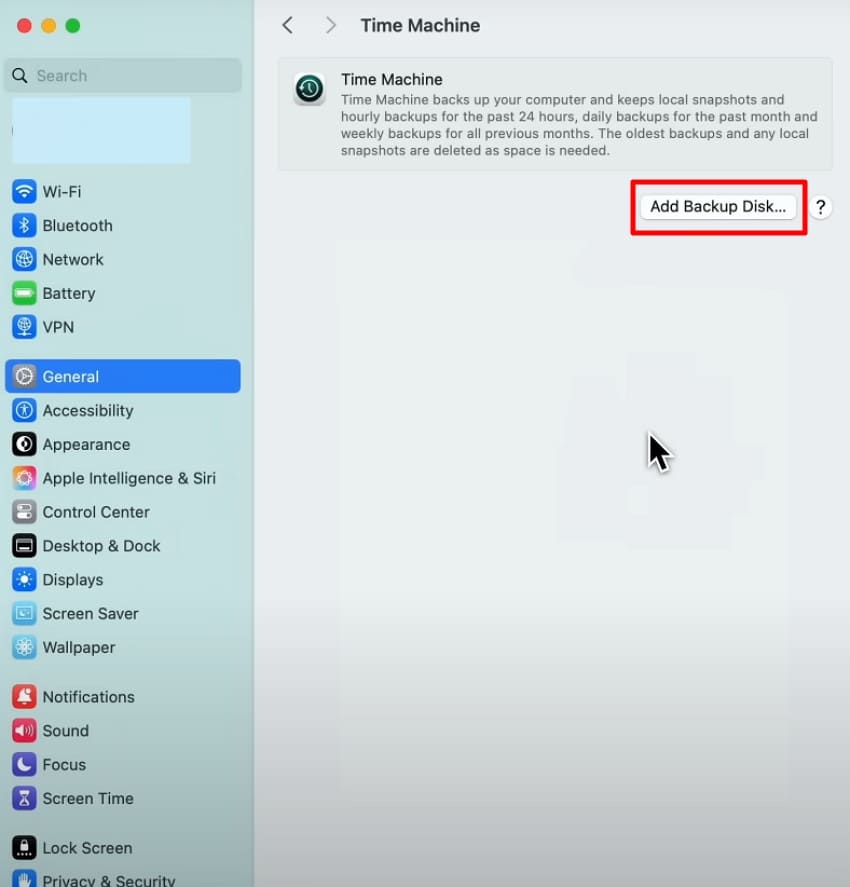
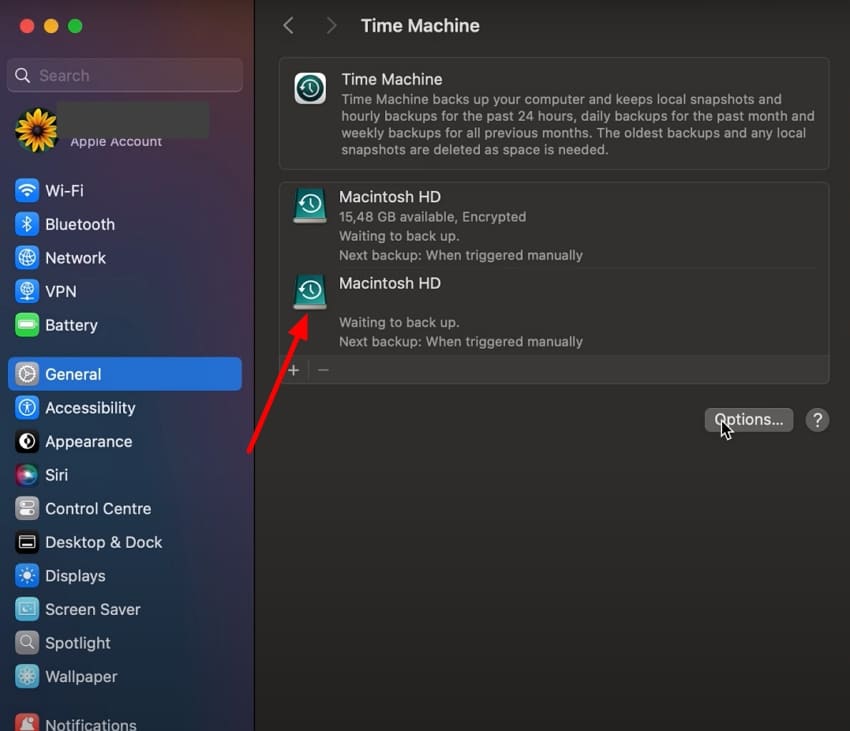
- Connect an external device and access "System Settings" from the "Apple" icon on your macOS. Pick the "General" option and choose the "Time Machine" option from the list.

- Click on the "Add Backup Disk" button and select the disk you want to save the Mac data to. Once this is done, Time Machine will start creating a backup of all your data into the external drive.
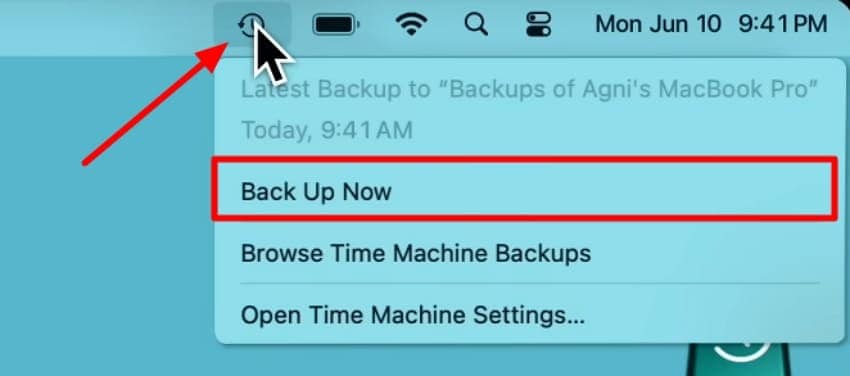
- To manually start the backup on your Time Machine Mac, click on the "Time Machine" icon at the top right and hit the "Back Up Now" button.
Way 2. iCloud Backup
Saving to iCloud makes sure that your valuable files, photos, and documents are not lost and are stored within a limit. It gives you the ability to access your data on any Apple device, since it supports all Apple ecosystem devices. This is a safe and easy method as it's available online and has a built-in function in Mac devices. Built a cloud backup for mac through the steps below:
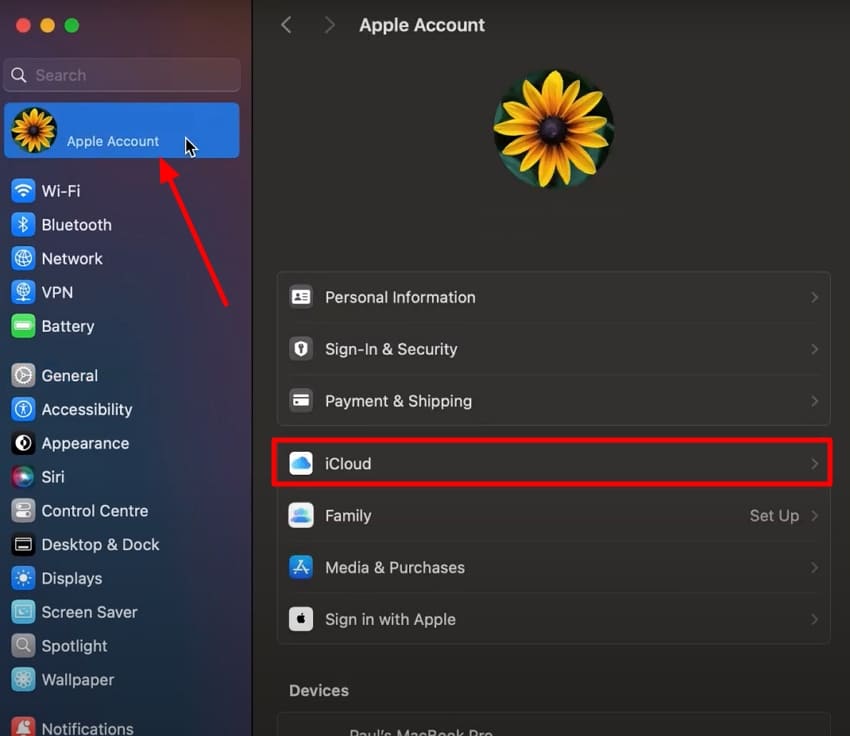
- Once you access "System Settings" on your MacBook, click on your "Apple ID" and choose "iCloud" from the menu list.
- Then, at the "Save iCloud" section, click on the "See All" button to move to the next step.
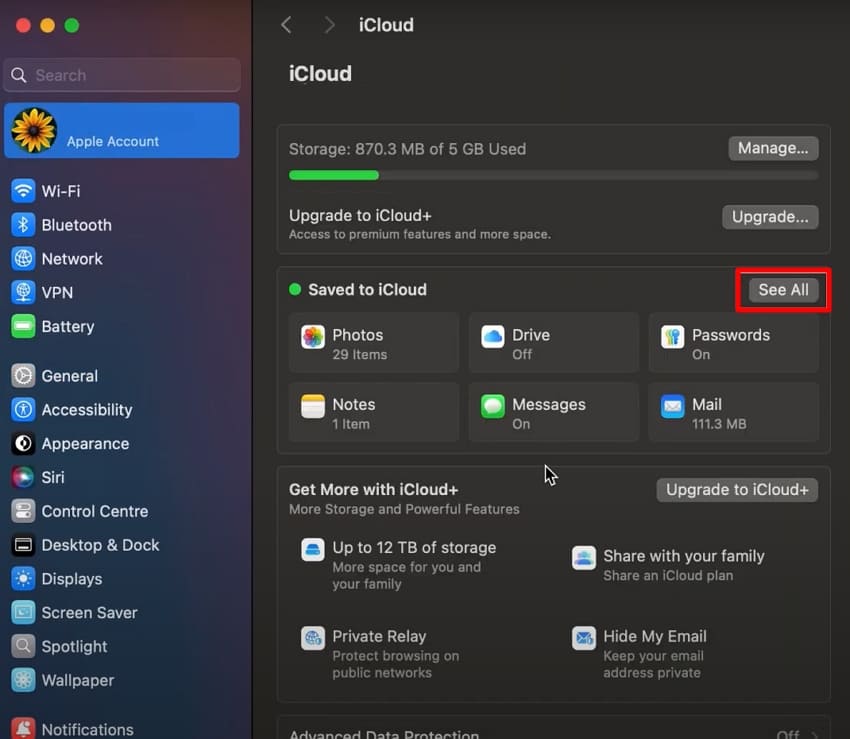
- This will open a "Saved to iCloud" pop-up window. Here, turn "ON" the tabs for each file type you want to create a backup for and hit the "Done" button.

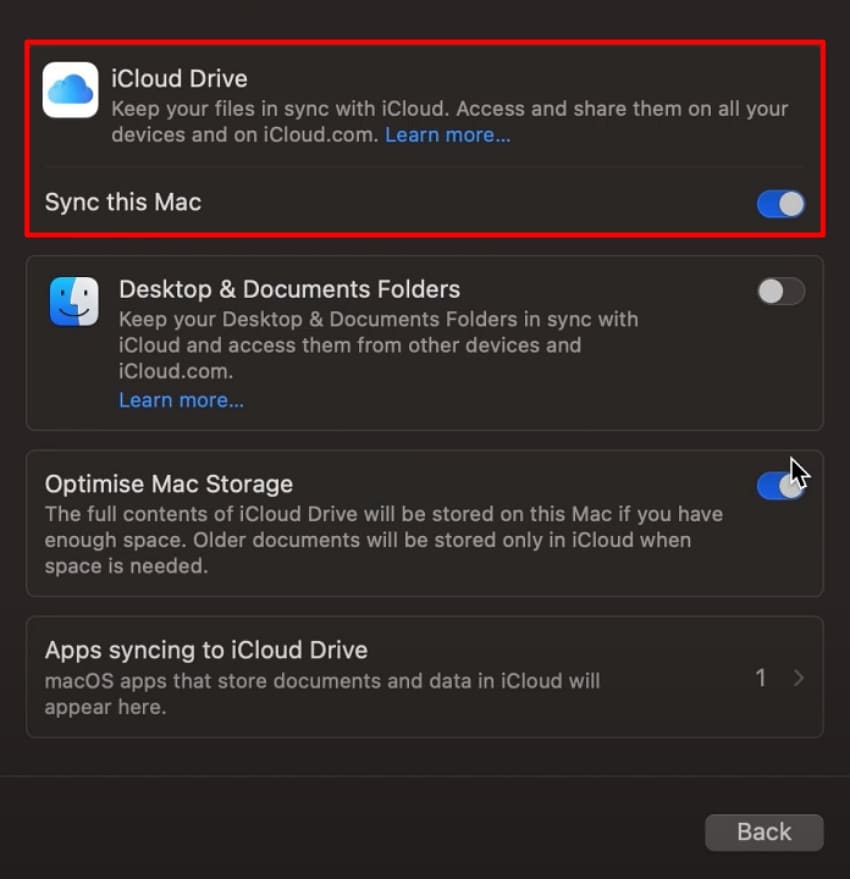
- Finally, turn on the toggle for the "Sync This Mac" button to start the backup procedure to your iCloud.
Way 3. Manual Backup to External Storage (e.g., NAS and RAID)
Physical backup to an external storage device, such as a hard disk, NAS, or RAID drive, helps users secure a way to save their data offline. Unlike other methods, it does not require a stable internet connection to transfer the data. It allows you to save a large amount of data. If you are wondering how to backup mac data using an external storage device, then read the steps below:
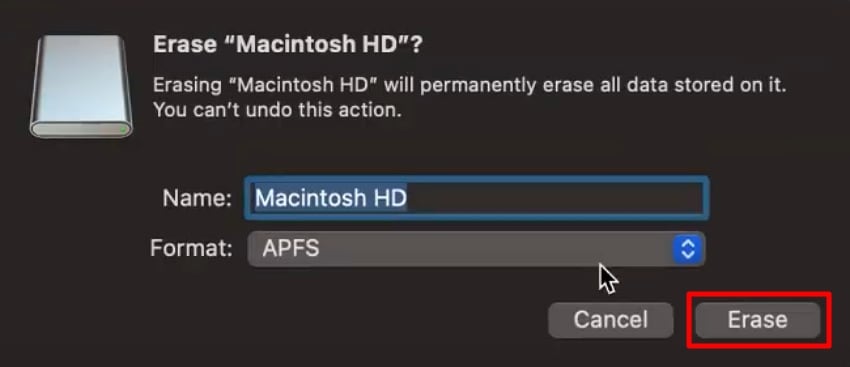
- Access the "Disk Utility" App on your macOS and click on the "External Device" RAID storage device that you have attached. Then, hit the "Erase" button to format the device.
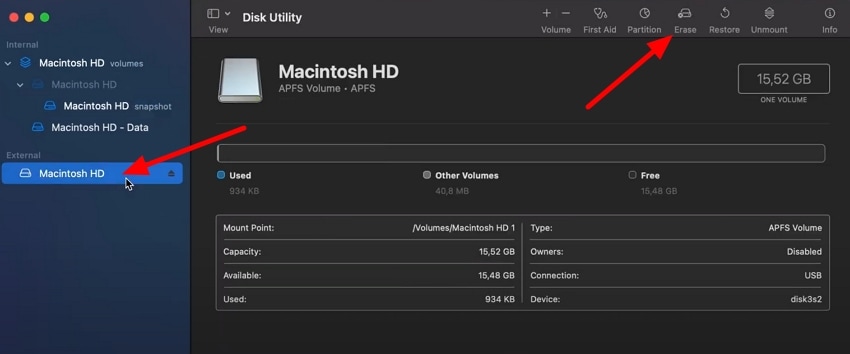
- Next, set the details of the RAID external device and hit the "Erase" button to prepare the device to save the current macOS data.
- From the "System Settings," jump to the "General" section to pick "Time Machine" from the list. Click on "Add Device" and choose the RAID storage device that you just formatted in Disk Utility. Once you click the device, Time Machine will begin creating a backup of it.
Way 4. Create a Bootable Clone (Advanced)
A bootable clone is a full copy of your Mac's startup disk that enables you to boot your Mac from a different external drive. This gives you a safety net during the event of an upgrade failure, as you get to keep the apps and settings. It provides you with a complete system replication, fast recovery, and breaking through system errors. Jump into the steps to backup mac before upgrade:
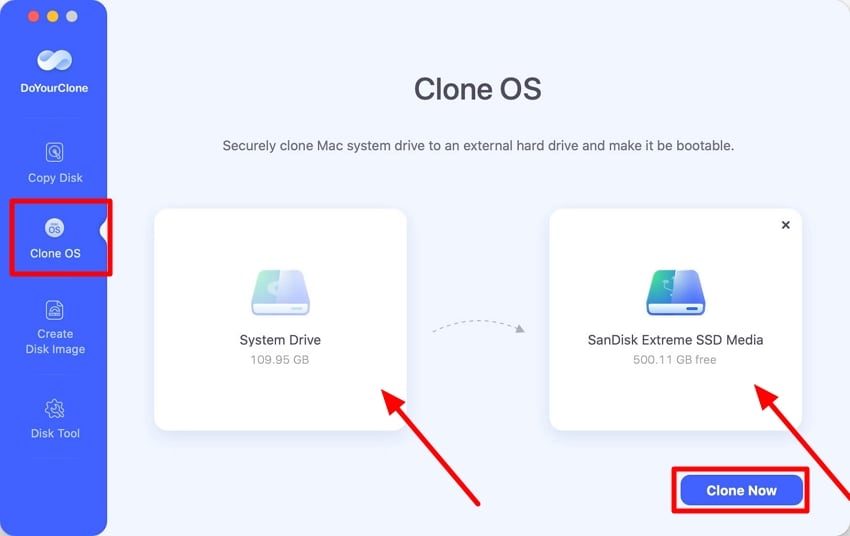
Instructions. Start by connecting a hard drive disk to your Mac and formatting it using the Disk Utility App through the "Erase" option. Install a cloning software like DoYourClone for Mac and select the "Clone OS" option. Here, set your "Internal System Drive" and select the "External Drive" you have connected to your Mac. Next, start the process by clicking on the "Clone Now" button, making your external disk into a bootable clone for your Mac.
Way 5. Use Third-Party Backup Software
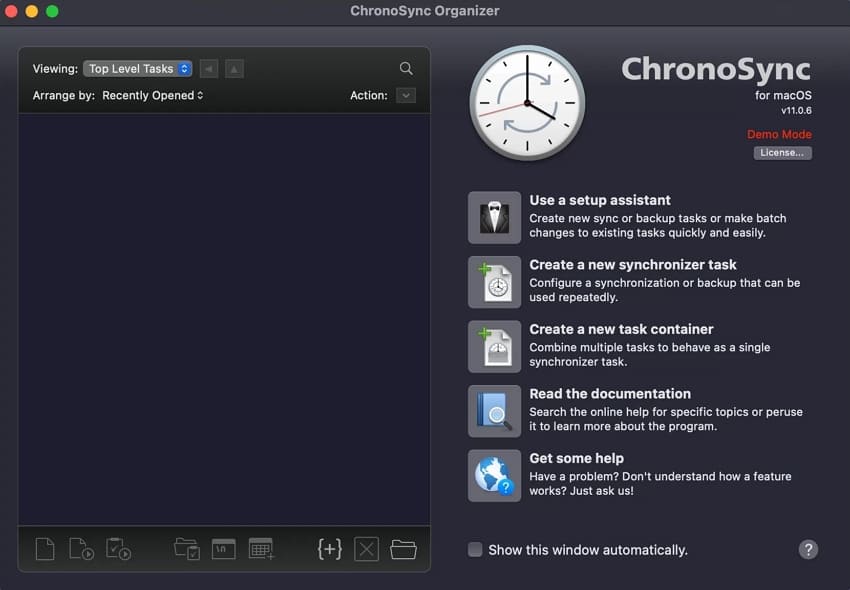
Compared to native systems, third-party backup, including Acronis True Image, ChronoSync, or Backblaze, is less rigid and has more customization capabilities. They may also be deployed to give scheduled backups and to incorporate cloud storage. It also has advanced encryption features to protect sensitive data. To backup mac before upgrading to macos 26 through a third-party backup software like ChronoSync can be beneficial, as it is reliable.
Pro Tip. Restore Lost Files Before or After Upgrading with Recoverit
In case you have forgotten to create a backup and have ended up losing all your data after the macOS 26 upgrade. Being stuck in such a situation can be frustrating; you can use an advanced recovery tool, like Recoverit. With the help of this tool, you get the ability to recover over 1000 file formats, so that you do not have to depend on other tools.
Moreover, you preview the recovered documents and files to ensure that the integrity of the files is maintained. Recoverit ensures that it repairs any corrupted files before recovery. You can work on internal or external macOS storage devices, as Recoverit supports over 1 million storage media devices. If you did not backup mac before upgrade, then you can use Recoverit's deep scan feature to locate all the missing files with ease.
Key Features of Recoverit
- Batch File Recovery: Users get the ability to restore multiple documents in one go to avoid wasting time and effort.
- Filter Out Files: With the help of this tool, you can use the File Type and File Path filter options to make sure you find the exact missing file.
- Supports Different Data Loss Scenarios: Recoverit supports over 10,000 data loss scenarios, such as Mac system crash, virus attack, and even an upgrade OS data loss.
Guide on Restoring Files Before or After Upgrading macOS with Recoverit
With the help of this guide below, you will get a better understanding of how Recoverit helps macOS users restore lost files:
1. Select Device or Location on Recoverit
Start by launching Recoverit on your macOS, click on the "Hard Drives and Locations" option, and select a location to start the recovery process.

2. Scan the Location and Filter Out Lost Files
Then, start the "Quick Scan" process and use the "File Path" and the "File Type" options to locate the exact missing files.

3. Preview the Lost Files and Hit Recover
Use the preview option to check the quality and integrity of the file. Finally, once you are satisfied with the file, hit the "Recover" button to save the file to its original location.

Conclusion
In conclusion, this article has looked into the multiple reasons why it is crucial to backup mac before upgrading to macos 26. We then looked into the 5 ways you can try and back up your macOS data safely and reliably. With each detailed guide, you can easily choose which backup mode can help you save data.
Moreover, we have discussed an additional note on what you need to do in case you lose your data without a backup. In such cases, using the most recommended recovery tool, Recoverit, can help you retrieve the lost data easily.
FAQ
1. Is it safe to back up to iCloud?
Yes, there is no danger in storing files in iCloud because Apple encrypts files during transit as well as storage. However, you must ensure that you will have enough storage and two-factor authentication as a security feature.2. Is my Mac too old to update?
Macs that are more than 7-8 years old will not support the latest versions of macOS, including macOS 26. Apple tends to phase out older hardware after several years to extract the best out of it in regards to performance and security. You can check compatibility before upgrading at the official Apple page on the macOS.3. Why can't I update my Mac to the latest version?
The reasons include, but are not limited to, a lack of storage space, a poor internet connection, or your Mac is not compatible with the new version. Old firmware / sometimes corrupted system files can also block the update.4. What is the most recent macOS?
The latest release is macOS 26 Tahoe. With the help of annual updates, Apple releases new macOS versions, typically announced in June and implemented in the fall. Users must remember to check the official Apple website to make sure that they are viewing the newest version.


