

 TL;DR:
To successfully install macOS 26 Tahoe and access its new Apple Intelligence integration and liquid glass design, verify your device compatibility, secure a minimum of 25GB of free system storage, and initiate the upgrade directly through your System Settings.
● Hardware compatibility is restricted to MacBook Pro and Mac Pro models from 2019 and later, along with MacBook Air, iMac, and Mac mini models from 2020 and later.
● The Mac App Store no longer hosts the direct macOS 26 installer download; standard users must rely on the Software Update menu, while advanced users can utilize specific Terminal commands or a bootable USB drive for a clean installation.
● The entire upgrade process requires 30 to 90 minutes to complete, and a full backup via Time Machine or iCloud is highly recommended beforehand to prevent data loss in the event of an installation freeze or incompatible third-party software issue.
Ask AI for a summary
 ChatGPT
 Perplexity
 Gemini
 Claude
 Grok
Grok
Apple has introduced macOS 26 Tahoe with new features, security patches, and performance enhancements for Mac users. The newest OS of Apple provides you with access to improved tools and leaves your Mac a reliable one to use in everyday life. Nevertheless, it is important to be prepared in order to avoid the possible upgrade problems.
Completing essential checks before installing can lower risks like data loss, unsuccessful upgrades, or system errors. This guide shares everything users must know about how to upgrade to macos 26, from checking device compatibility and creating backups to exploring all installation methods.
Try Recoverit to Perform MacOS 26 Data Recovery
 Security Verified. 3,591,664 people have downloaded it.
In this article

Part 1. What's New in macOS 26? Should You Upgrade to macOS 26 Tahoe?
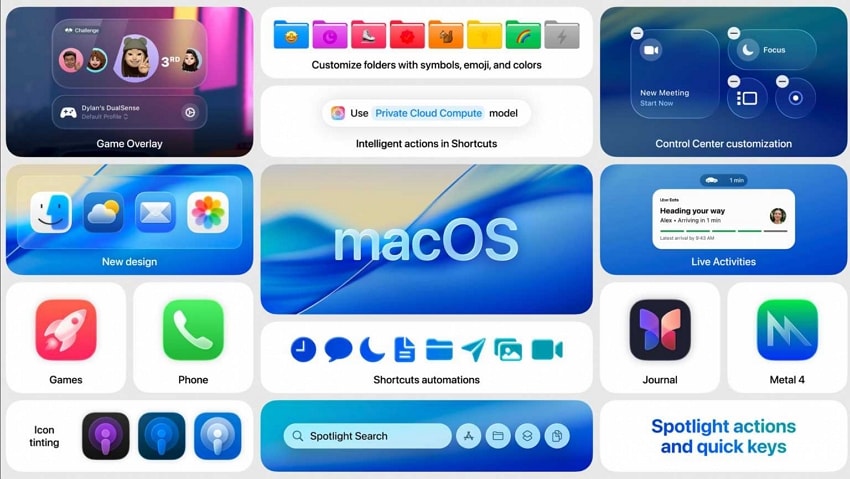
What seems to the user whose query is what is macos tahoe, it is macOS 26 that has a liquid glass design with a transparent UI experience. It was released on September 15, 2025, and it introduces a number of improvements to the last version of macOS.
- Custom Control Center: The user can rearrange, add, or delete a control, including the controls of third-party applications, and pin them to the menu bar to access with ease.
- Better Spotlight: Gives users faster search results with smarter suggestions and enhanced accuracy of searches across apps, files, documents, and web content.
- Folder Customizations and App Icons: Under the new version of macOS, one can add colors and emojis to folders and desktop icons to make them easier to recognize and add a personal touch.
- Live Translation: With Apple Intelligence, it translates messages, FaceTime audio, or live captions in real time on the same device to keep conversations confidential.
- Apple Intelligence and Siri: macOS 26 allows users to customize their Mac with AI, automate, and easily manage favorite applications.
- New Phone App: It enables the user to make and receive phone calls, see contacts that are synced, and control iPhone live activities from the Mac.
Should You Upgrade to macOS 26 Tahoe?
In case you are not sure whether to upgrade or not, consider your needs and the device model you are using. If you have a compatible Mac and you want to test all the latest features and benefit from security updates, it's great to upgrade to macos tahoe. Once upgraded, you will have a new design, better control of applications, and privacy and security of your information.

Part 2. Preparations Before Upgrade to macOS 26
Before moving forward to how to upgrade to macos tahoe, let's highlight some preparations that have to be done before upgrading.
1. Check if Your Mac Is Compatible with macOS 26
First off, make sure that your Mac is compatible with the latest macOS 26 before upgrading. Only supported models can install and enjoy new features and updates. Check out the list below of devices and models that support the latest macOS version.
| Device Type | Supported Models |
|---|---|
| MacBook Pro | 2019 and later, M1/M2/M3/M4 series |
| MacBook Air | 2020 and later, M1/M2/M3/M4 series |
| iMac | 2020 and later |
| Mac mini | 2020 and later, M1/M2/M3/M4 series |
| Mac Studio | 2022 and later |
| Mac Pro | 2019 and later |
2. Ensure Your Mac Has Enough Storage Space
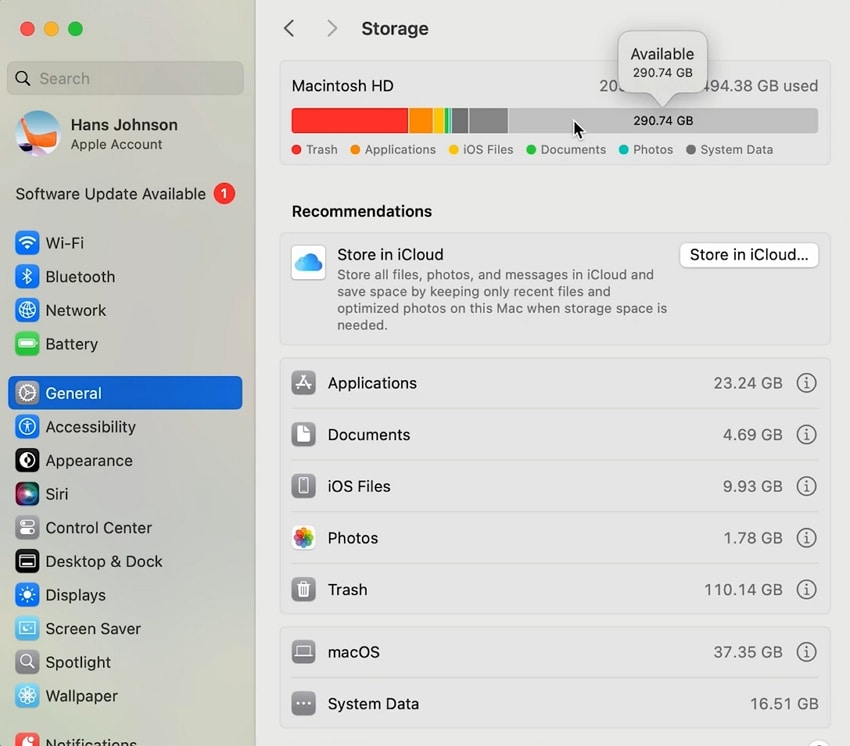
Once you know your Mac supports the latest macOS 26, then you've to check and ensure your device has enough storage for the upgrade. Insufficient space in your Mac can lead to installation errors and slow performance after an upgrade. Follow these simple steps to verify your Mac has enough space:
- First off, access the "System Settings" of your Mac and select the "General" section. Next, go to the "Storage" section to move forward.
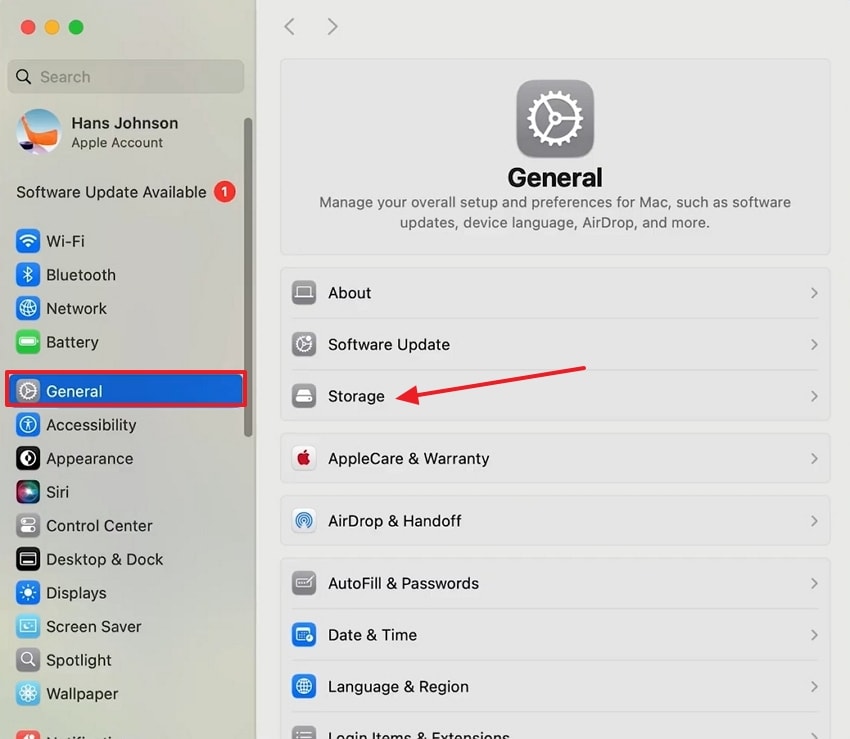
- Check your storage space and verify you have at least 25GB of free space to install the macOS 26 upgrade.
3. Back Up Your Mac
To ensure the safety of your files and easy recovery in case of any malfunction, you should back up your Mac before installing macOS 26. Before upgrading, a data backup is necessary to secure your precious files and facilitate the recovery of lost information. Follow these two guides to back up your data using Time Machine and iCloud.
Back Up via Time Machine
If you want to keep a backup of your files in a physical external drive, then using Time Machine is the best option. Let's look at how you can create a backup of your data using Time Machine:
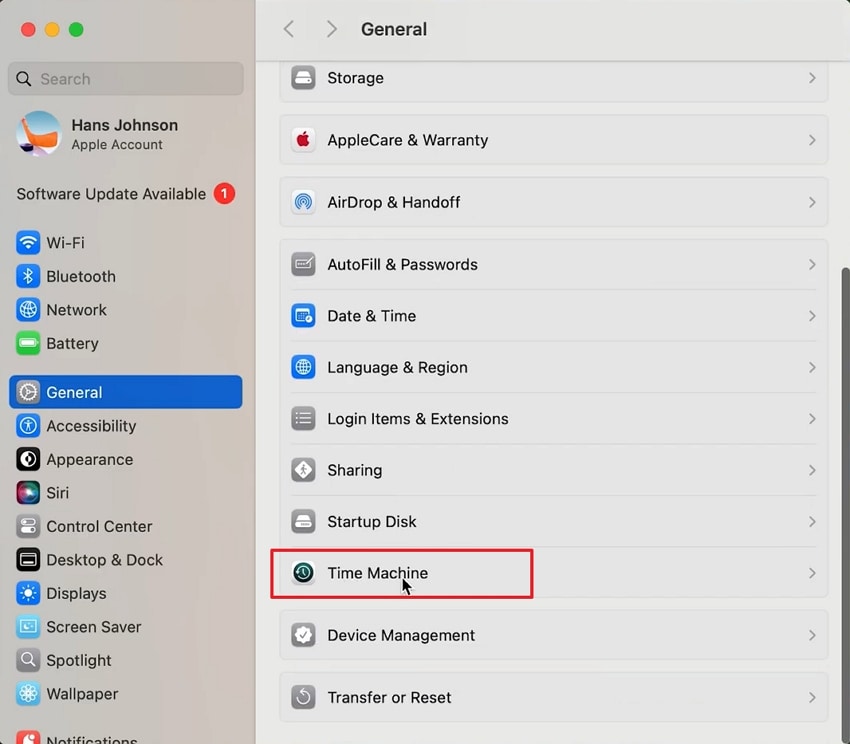
- First off, attach a formatted External Drive to your Mac. In the "System Settings" window, hit the "General" tab and scroll down to locate the "Time Machine" section.
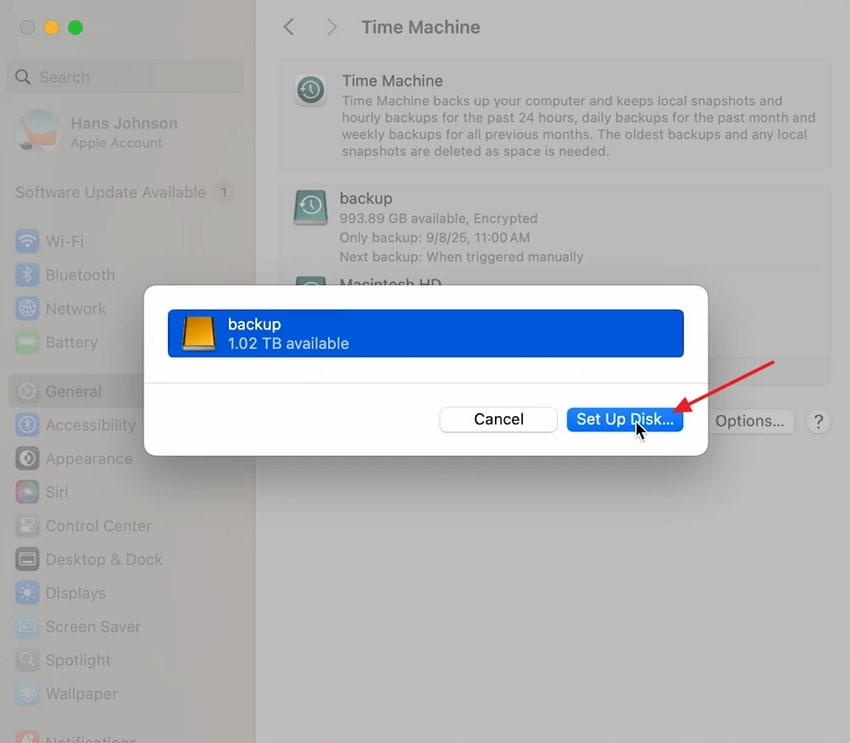
- Now, select your External Drive and press the "Set Up Disk" button to proceed further.
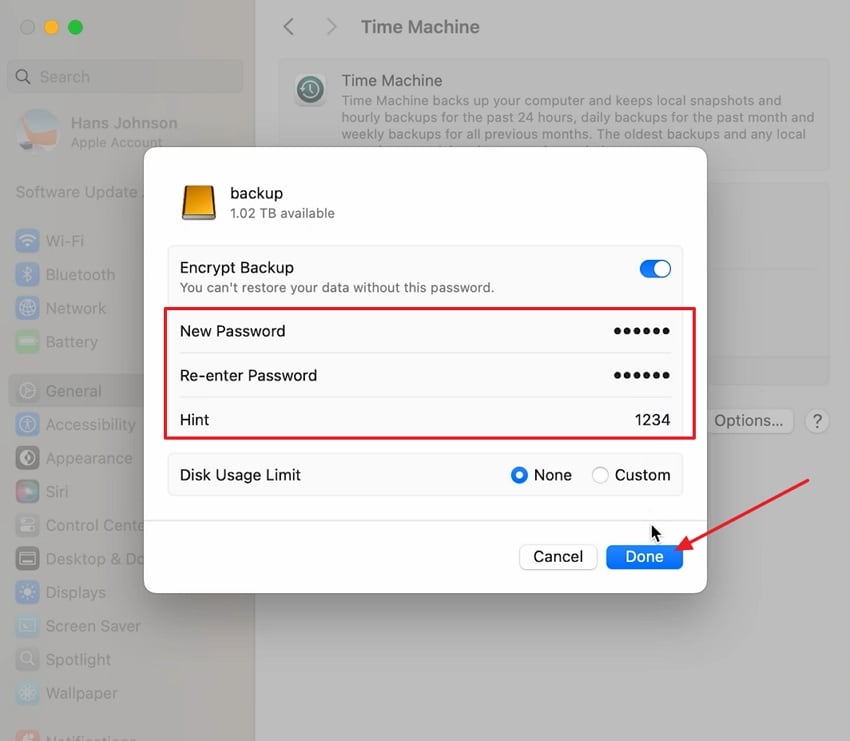
- Next, enter a new "Password" for the backup and hit the "Done" button to initiate the backup.
Back Up via iCloud
Backing up your Mac with iCloud is simple and keeps important files like documents, photos, and contacts safe in the cloud. Here's how to start syncing your data with iCloud before an upgrade:
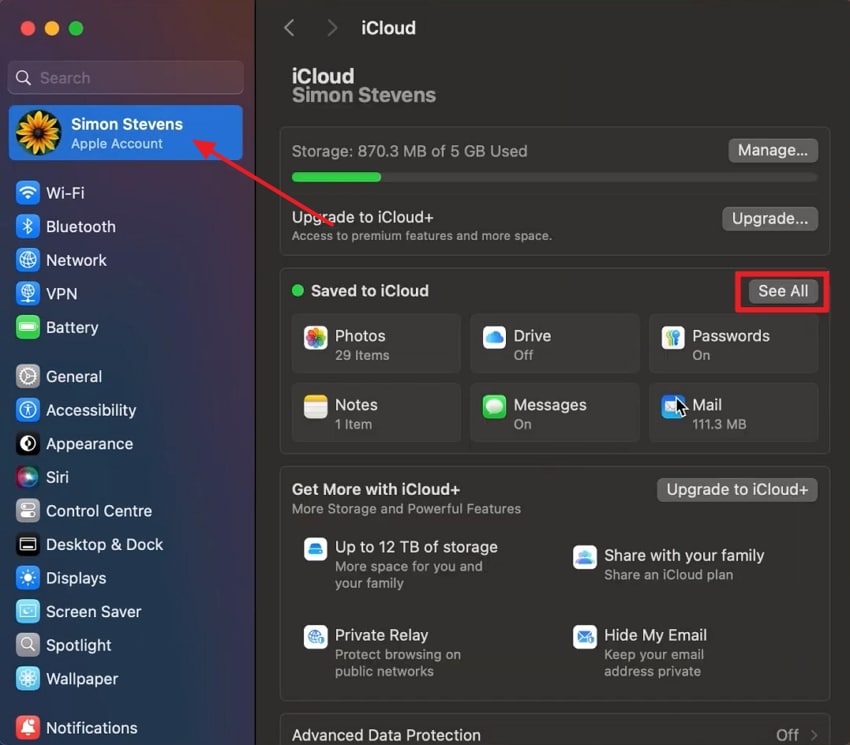
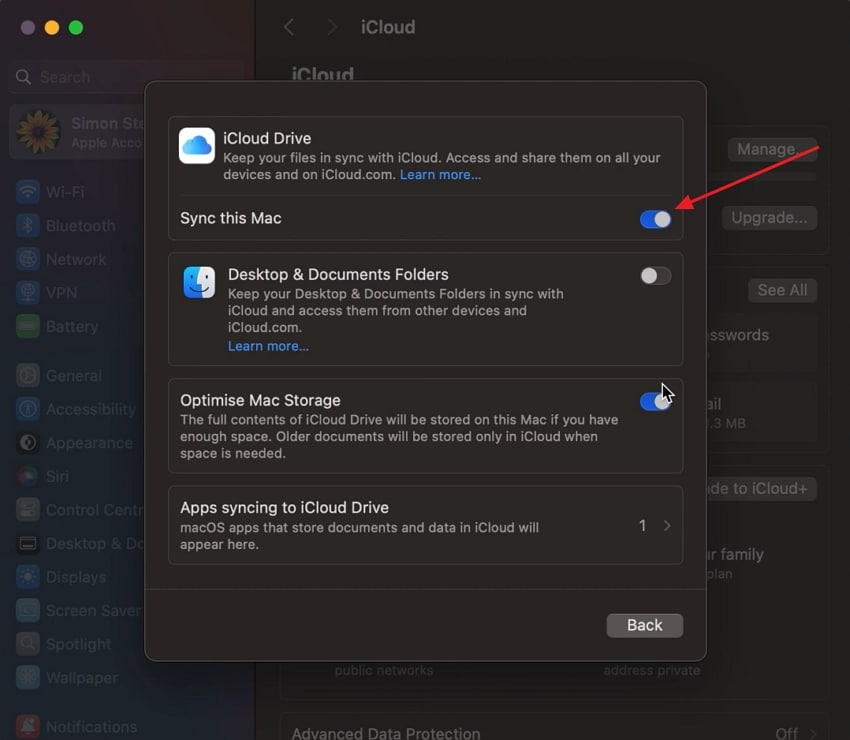
- In the "System Settings" window, access your "Apple Account," click the "iCloud" section, and press the "See All" button to move forward.
- Toggle the "Sync this Mac" option under the "iCloud Drive" section to back up your files to your iCloud.
Part 3. How to Upgrade to macOS 26 | 5 Ways to Try
Having discussed the preparations that have to be done before upgrading, let's move on to how to update macos 26. You'll see 5 ways to try for upgrading your Mac to the latest macOS version to enjoy a liquid glass design theme.
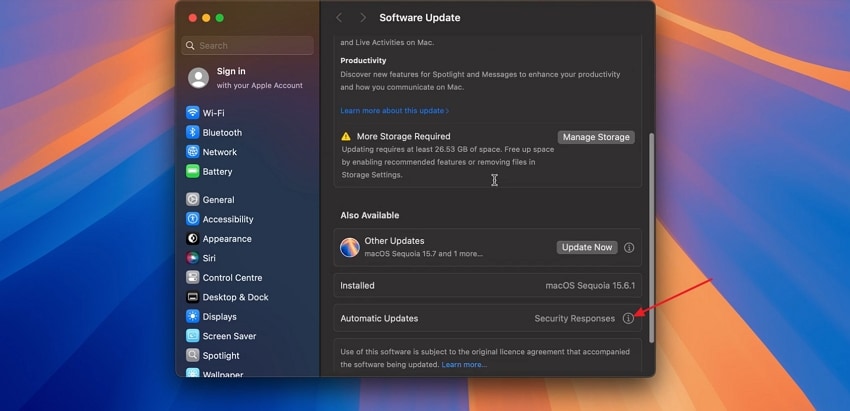
Way 1. Use Software Update in System Settings
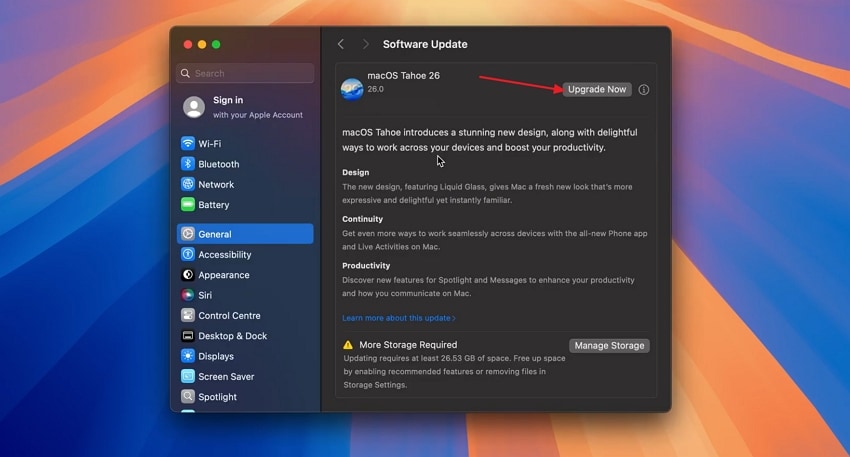
macOS 26 is the latest version and can be upgraded with the software update feature, which is the simplest method for a Mac. Follow these simple steps to upgrade your Mac to macOS 26 Tahoe:
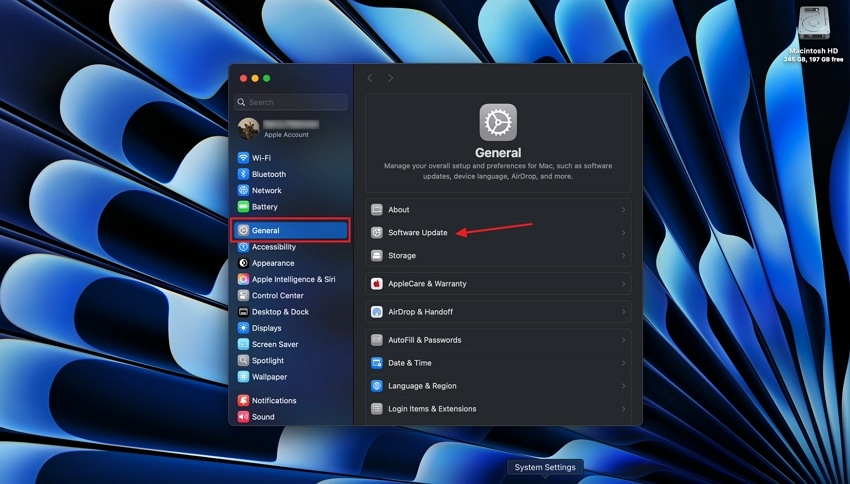
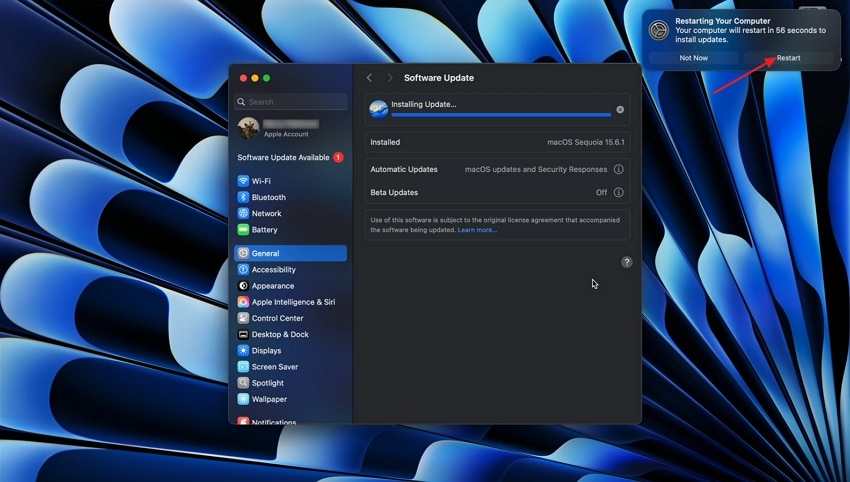
- Start by accessing the "System Settings" and clicking the "General" section. Next, select the "Software Update" tab to proceed further.
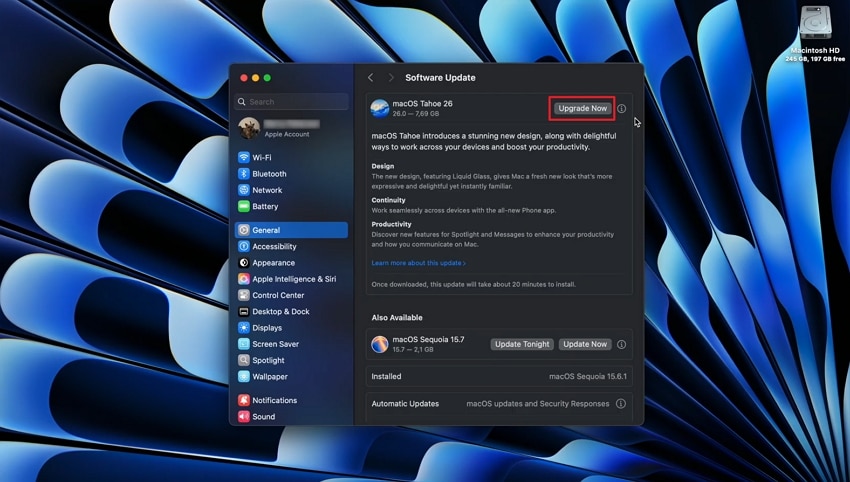
- Your Mac will start checking for updates and show the macOS 26 Tahoe update. Click the "Upgrade Now" button.
- Enter your device password to start the download process.
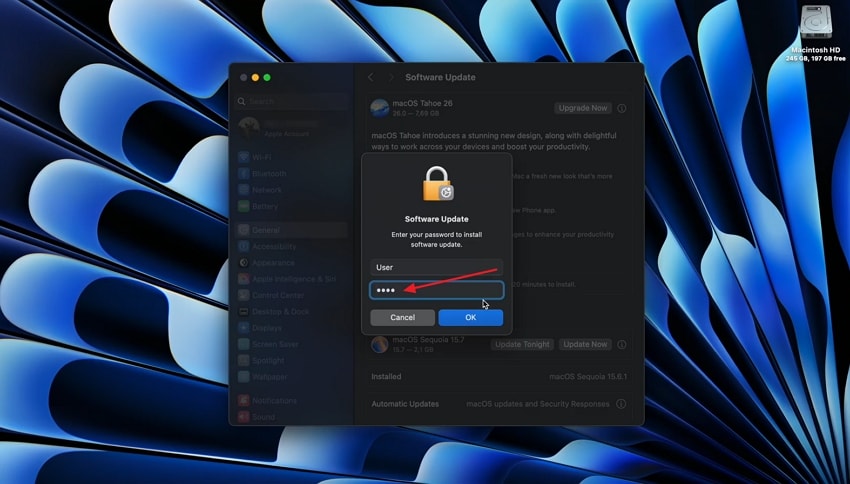
- Once the download is completed, the system will ask you to restart your Mac. Hit the "Restart" button to experience the new macOS 26 version.
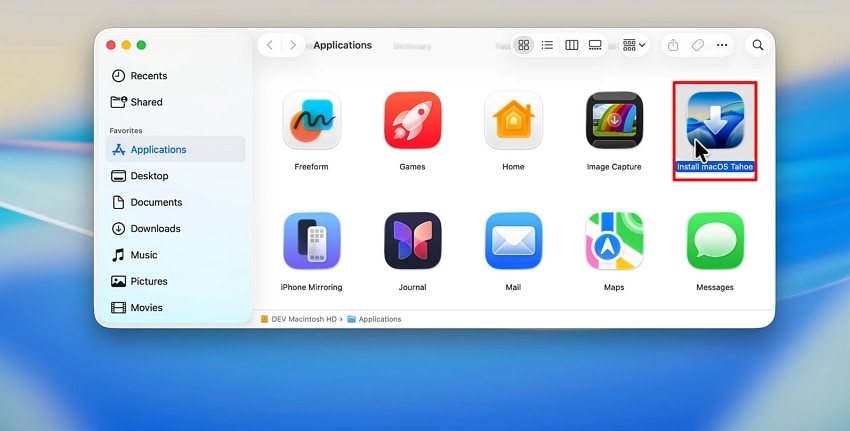
Way 2. Use the Mac App Store
With the case of the macOS 26 Tahoe with the Mac App Store, it does not offer an installer download on-site anymore. Rather, users are recommended to update using the Software Update option under system settings. Other, more complex means may be needed, like creating bootable installers or offline installation, including the use of Terminal commands.
Way 3. Via Terminal (Command Line)
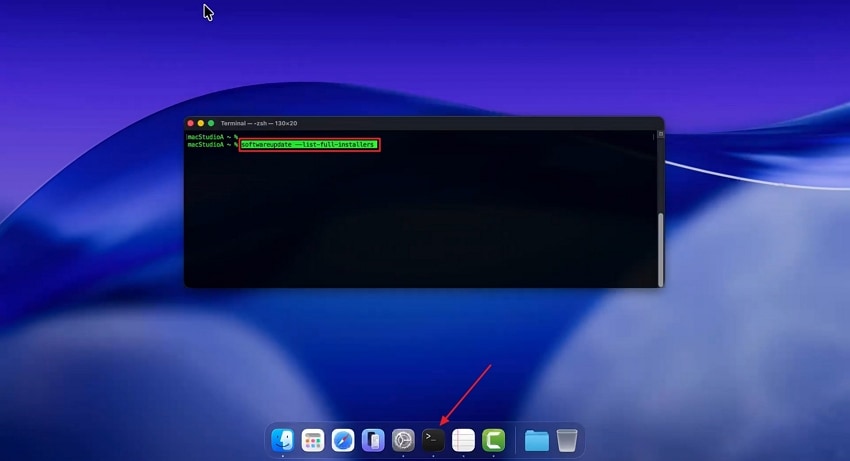
If you're comfortable with command-line tools, then follow these steps to upgrade to macos tahoe via Terminal for a direct and efficient approach:
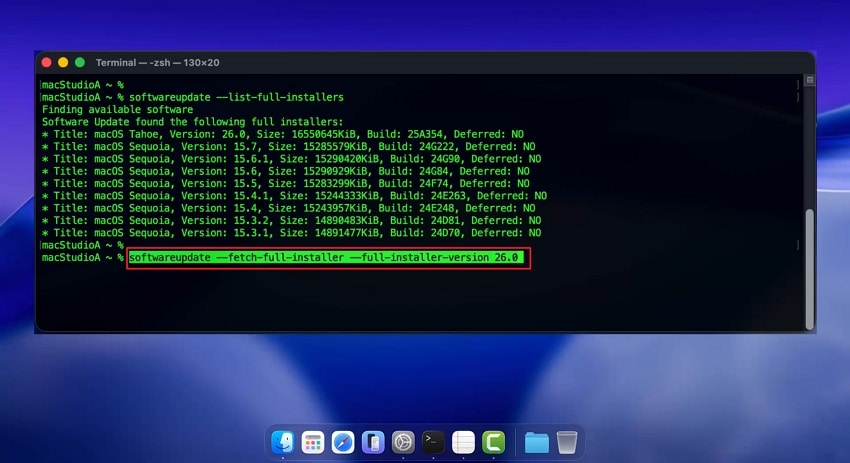
- Open the "Terminal" app in your Mac, then copy and paste the Terminal Command Line 1 "softwareupdate --list-full-installers."
- After a moment, all macOS versions available for your Mac will be listed. Next, enter the Terminal Command Line 2 with the macOS version you want to install "softwareupdate --fetch-full-installer --full-installer-version 26.0."
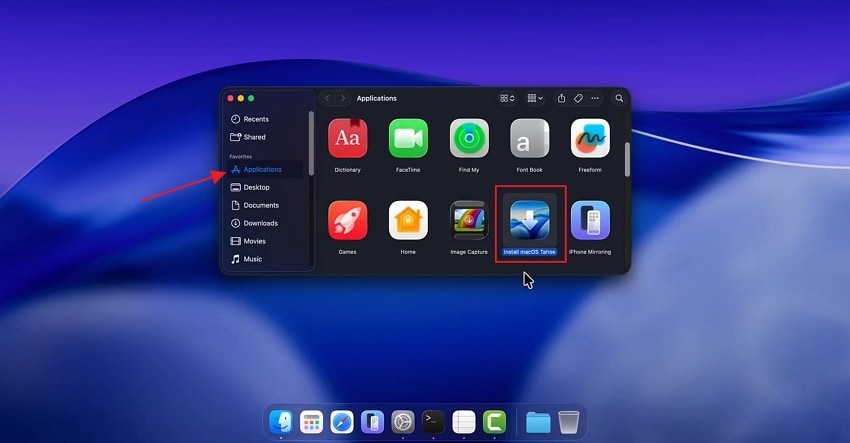
- Access the "Applications" folder and install the latest macOS version on your system.
Way 4. Clean Install via Bootable Installer (Advanced)
A clean install using a bootable installer erases old files, resolves persistent issues, and sets up macOS 26 as a fresh, ready-to-use system. Adhere to the steps below to upgrade macOS using the Automatic Updates feature:
- Attach the USB flash drive to your Mac and access "Disk Utility" from your system. Then, select your USB and press the "Erase" option to wipe all data.

- Next, download the macOS 26 Tahoe installation file.
- Now, go to the "Terminal" interface and paste the One Line Terminal Command "sudo /Applications/Install\ macOS\ Tahoe.app/Contents/Resources/createinstallmedia --volume /Volumes/USBName --nointeraction." Make sure to change the USB name in the command. Then, type your password before pressing "Enter."
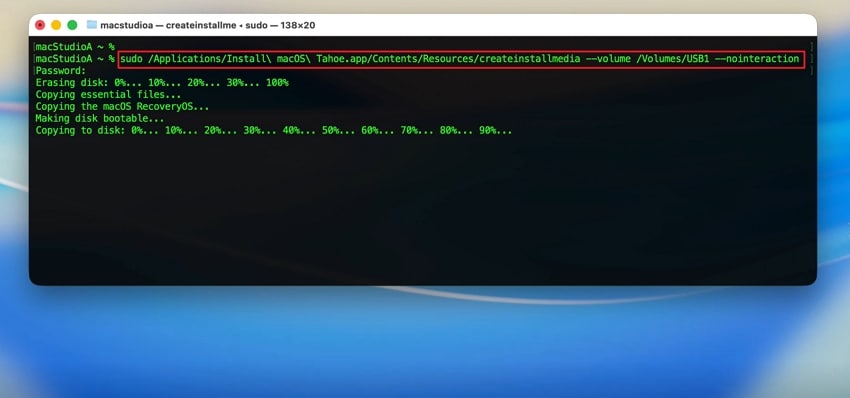
- Once a bootable USB drive is created, restart your Mac and hold the appropriate startup key to load the installer from the USB drive.

Way 5. Automatic Updates
If you want your Mac always to run the newest version without any effort, using automatic updates is the easiest way. Here's how to upgrade to macos tahoe with this simple "set it and forget it" option:
- Firstly, enter the "Software Update" section in the System Settings window. Now, press the "Automatic Updates" button to proceed further.
- Next, toggle the first 3 options that will automatically download the latest macOS version when available.
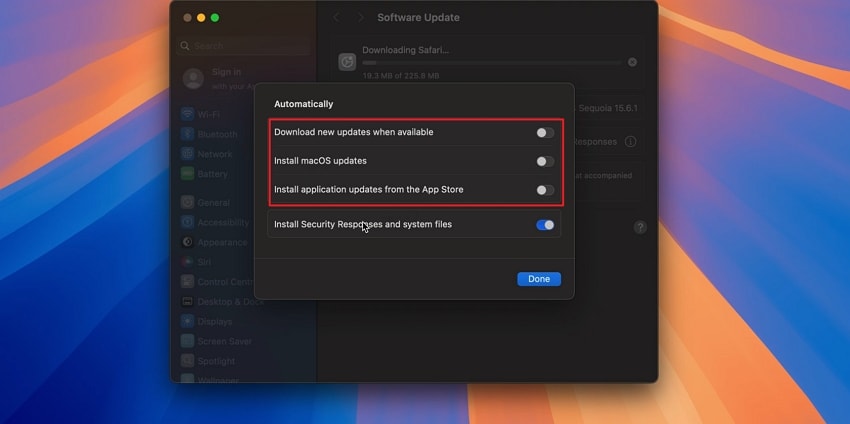
- Once the macOS version is downloaded, you'll receive a notification. Tap on the notification and press "Upgrade Now" to install the macOS 26 Tahoe.
More related: What to Do When macOS Installation Couldn't Be Completed.
Mac Keeps Crashing After Tahoe Update: How to Fix.
Pro Tip: Safeguard Your Data with Recoverit Before Upgrading
Now you know what is macos tahoe and how to upgrade your Mac to the latest macOS version. Before starting the upgrade, creating a backup of your Mac data is essential to prevent unexpected data loss scenarios. Even after creating backups via Time Machine and iCloud, there is still a chance of losing data due to accidental deletion, upgrade failures, or disk errors.
This is where users demand a data recovery tool, and Recoverit comes in with advanced recovery methods and solutions. Recoverit helps you recover 1000+ types of file formats from 1 million+ devices. It enables users to select a location, and this utility will search the disk of the selected location extensively. Furthermore, the scanning results can be saved by the users and exported to the desired directory.
Key Features
- Advanced Scanning: Allows users to perform a quick and deep scan in selected drive locations and restore them to a chosen drive.
- File Preview Mode: Users can see the scanned file in a preview window and save it to the Mac device.
- Cloud Data Recovery: The data recovery platform searches for lost or deleted files from iCloud or OneDrive and recovers them to your device.
- Multiple Search Filters: Narrows down the search process by including filters, like file type, status, file name, and more, to get quick search outputs.
Guide on How to Recover Lost Data on Mac
If you lost your critical data files while doing an upgrade to macOS Tahoe, follow the steps below to recover them with Recoverit:
1. Choose a File Location to Begin The Scanning Process
On the Recoverit's main interface, click the "Hard Drives and Location" tab from the left side menu, and choose a specific drive to proceed with the search.

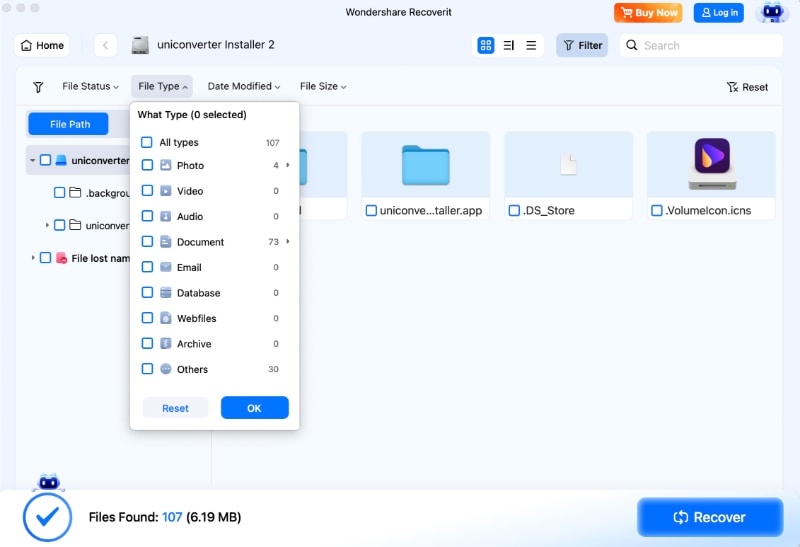
2. Use File Filters During Deep Scanning
After the scan process begins, hit the "Filter" option on the top menu, change the "File Type" and "File Size" to speed up the recovery process.
3. Preview The Scanned Files Before Exporting
Lastly, when the scanned files appear in the left "File Path" panel, and see them on the "Preview" screen. Once you preview the scanned file, hit the "Recover" button to save it to your Mac.

Conclusion
In this article, we discussed how to upgrade to macos 26 to access Apple's latest features, security improvements, and a refreshed liquid glass interface. We also highlighted some careful preparations to consider before upgrading to avoid expected data loss scenarios. However, if you lost a file during or after the upgrade, we recommend using Recoverit, which can help you quickly scan, preview, and recover lost data.
FAQ
-
1. Are third-party applications and hardware compatible with macOS 26 Tahoe?
Certain older applications or hardware might require updates so as to be completely compatible with macOS 26. Prior to the upgrade, you should confirm with your app vendors and peripheral manufacturers that they support and update to macOS 26 to prevent problems with functionality. -
2. What can I do when my Mac is stuck or malfunctions in the course of the upgrade process?
If the upgrade to macOS Tahoe freezes on your Mac, reboot into safe mode and once again attempt the upgrade on your Mac. In case of troubles, use the macOS Recovery to restore a backup or install the operating system. -
3. What happens to my Desktop and Documents files in the upgrade?
The Desktop and Documents files should also be maintained when upgrading to macOS 26. In case some files are lost and cannot be retrieved through backup, then you can recover them using Recoverit. -
4. How long does the upgrade process take for macOS 26?
The upgrade process usually takes 30 to 90 minutes, depending on your Mac model and internet speed. However, for older devices or those with a slow internet connection, the upgrade process may take longer than expected.


