

 TL;DR:
Recovering permanently deleted Mac files relies heavily on the original storage location, as internal Mac SSDs utilize TRIM to permanently erase hardware blocks within minutes, whereas external drives leave deleted data intact for third-party software recovery.
● Review Time Machine backups, 24-hour APFS local snapshots on the internal disk, or the Recently Deleted folders on iCloud.com and native apps like Photos and Notes, which natively retain deleted items for 30 days.
● Halt all saves, downloads, and software installations on the target volume immediately to prevent data overwriting, and strictly restore recovered files to a completely separate secondary drive.
● Utilize data recovery software such as Recoverit for missing files on external drives, USB sticks, and memory cards, keeping in mind that these tools typically fail on internal Mac SSDs due to hardware-level TRIM and FileVault encryption.
Ask AI for a summary
 ChatGPT
 Perplexity
 Gemini
 Claude
 Grok
Grok
Recovery on a Mac is decided almost entirely by where the file was stored. The same deletion stays reversible on an external drive a week later, yet can be irreversible on the internal SSD within minutes. The two handle freed space in completely different ways.
That makes how to recover permanently deleted files on Mac a question with several answers rather than one. This guide covers what macOS does when you empty the Trash and the backups and snapshots worth checking first.
Try Recoverit to Perform Data Recovery
 Security Verified. 3,591,664 people have downloaded it.
In this article
Part 1. Can Permanently Deleted Files Be Recovered on Mac?
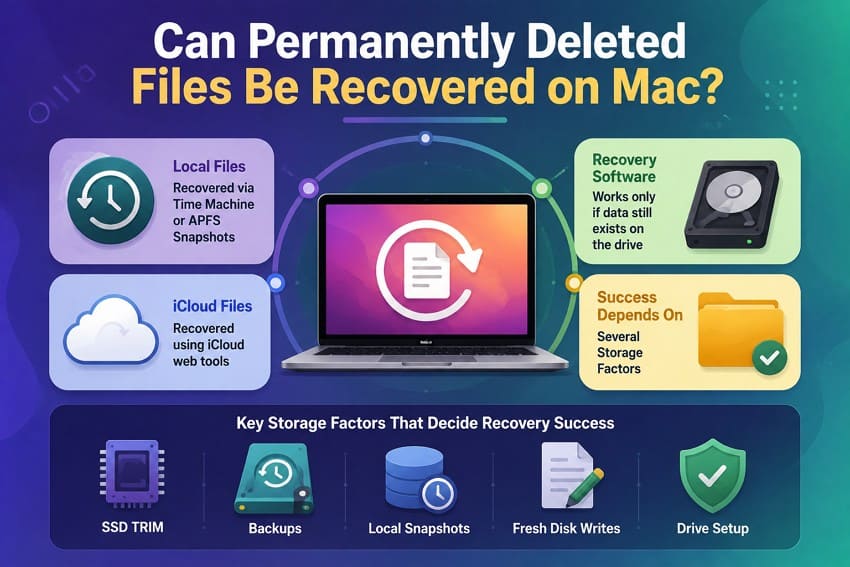
Permanently deleted Mac files often remain recoverable, but the ideal method depends on file location and subsequent disk activity. Local files rely on Time Machine or APFS snapshots, while iCloud items require built-in or data recovery tools. Recovery software helps only when data still exists on the physical drive.
Storage factors like SSD TRIM, backups, local snapshots, and fresh disk writes dictate overall success. Choose a restoration path tailored to your specific drive setup to know how to restore permanently deleted files on Mac.
What Counts as a Permanently Deleted File on macOS?
A file in the Trash stays easy to restore until you empty it. Once emptied or erased via Delete Immediately, macOS marks the item as permanently lost, removing it from normal Finder access. Finder also offers a setting to clear local Trash items automatically after 30 days.
Empty Trash vs Delete Immediately
Both reach the same result by different routes. Emptying clears everything waiting there, while Option with Command and Delete skips Trash entirely. Terminal commands such as “rm” do the same with no confirmation at all.
Local Mac Files vs iCloud Drive Files
iCloud Drive files follow an additional cloud-recovery path. On a Mac, deleting an iCloud Drive file moves it to the Trash. Apple also allows recently deleted iCloud Drive files to be recovered through iCloud.com for up to 30 days, unless they are permanently removed earlier.
Internal Mac Storage vs External Drive Recovery
Internal Mac SSDs use TRIM, which tells the drive to erase freed blocks at the hardware level rather than marking them available. That can happen within minutes, and no software reverses it. APFS compounds the effect by writing changes to new locations instead of editing files in place.
External drives, USB sticks, and memory cards are not managed that way, and deleted files there frequently survive for days. That is why one tool succeeds on a memory card and fails on the drive inside the same Mac.
When Permanently Deleted Files May Still Be Recoverable
Given the basics, review the table below before you learn how to recover permanently deleted files on Mac. Five common paths solve most cases, and location dictates the correct choice.
| Deletion Scenario | Original Location | Best Recovery Option | Main Limitation |
| Trash Emptied | Internal SSD | Time Machine, APFS snapshot, or recovery software | TRIM may make deleted data unrecoverable |
| Trash Emptied | External drive or SD card | Recovery software | TRIM or new writes may remove data |
| Deleted from iCloud Drive | iCloud Drive | Recently Deleted on iCloud.com | Usually limited to 30 days |
| Removed with Terminal | Any volume | Backup, snapshot, or recovery software | No Trash entry; TRIM may prevent recovery |
| Drive Erased or Reformatted | Any volume | Backup, recovery software, or professional lab | Depends on erase type and subsequent writes |
When File Recovery Is No Longer Possible
Data loss becomes permanent when TRIM clears blocks, new data overwrites space, or secure erasures wipe storage. Backups and local snapshots retain earlier file copies independently of disk state. These secondary copies preserve access even after direct drive recovery fails.
Part 2. What to Do Immediately After Permanently Deleting Files
Before exploring how to restore permanently deleted files on Mac, perform these immediate actions as soon as you notice the deletion:
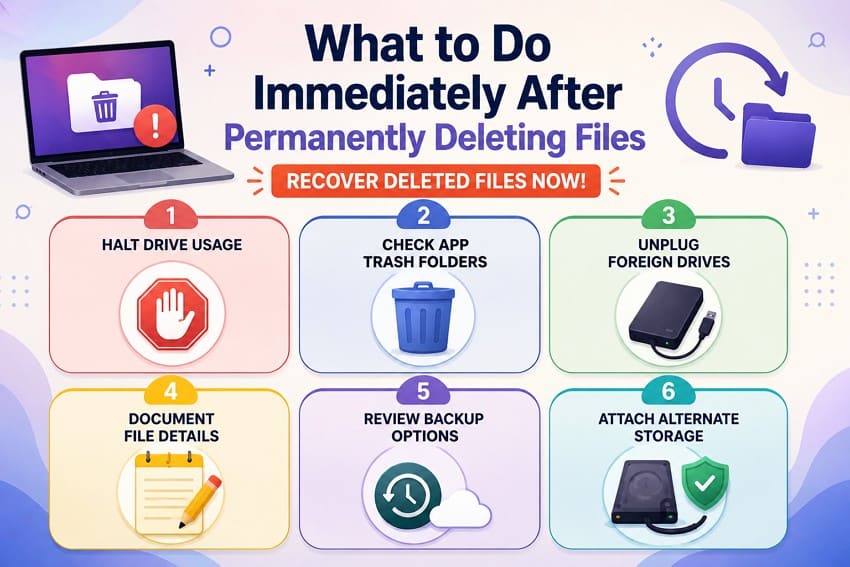
- Halt Drive Usage: Stop saves, downloads, and software installations on the target volume immediately. Minimize Mac use to reduce new writes that could overwrite recoverable data.
- Check App Recovery Folders: Photos, Notes, and Messages have Recently Deleted areas, while Mail generally uses Trash. Review these locations before permanently removing anything.
- Disconnect External Drives: Safely eject affected external storage immediately and leave it disconnected until recovery. This reduces the chance of new writes to the device.
- Document File Details: Record file types, names, locations, sizes, and approximate deletion dates before scanning. These details help narrow recovery results and locate relevant files faster.
- Review Backup Options: Check Time Machine, APFS snapshots, and cloud or synced copies before running recovery software. Backups may preserve original filenames, folders, and intact files.
- Attach Alternate Storage: Connect a separate drive for recovered files before starting recovery. Never restore recovered data to the same volume being scanned.
Part 3. Restore Permanently Deleted Files on Mac from Existing Copies
After the basic actions, try these 4 methods and learn how to recover permanently deleted files on Mac:
Method 1. Restore Files from a Time Machine Backup
When to Use: Applies whenever Time Machine runs on this Mac, with or without the backup drive.
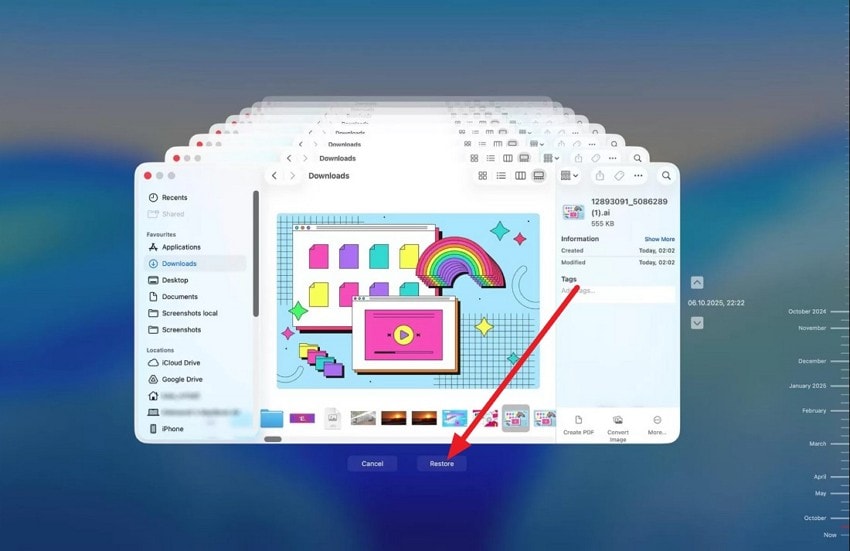
macOS keeps local snapshots on the Mac's own disk, usually covering the previous day. Apple says these snapshots are stored on the Mac itself and are generally retained for up to 24 hours or until storage space is needed. As for the guide, you can follow the simple steps given below:
Step 1. Go to the Finder window or location where the file or folder was last saved. Tap on the “Time Machine > Browse Time Machine Backups.”
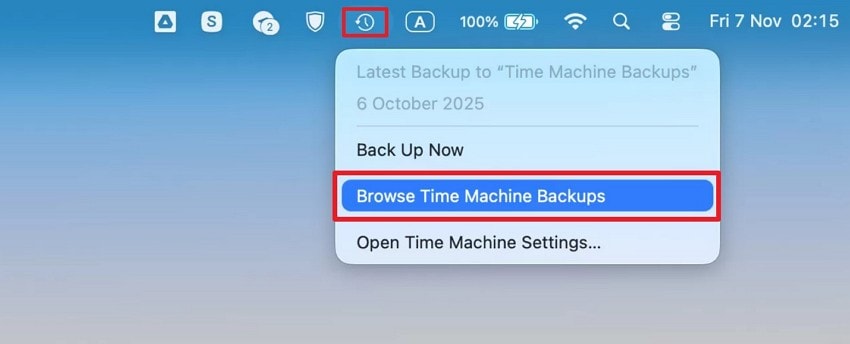
Step 2. Select the files and click “Restore,” which returns them to their original folder.
Method 2. Check iCloud Drive Data Recovery
When to Use: The file was stored in iCloud Drive and deleted within the last 30 days.
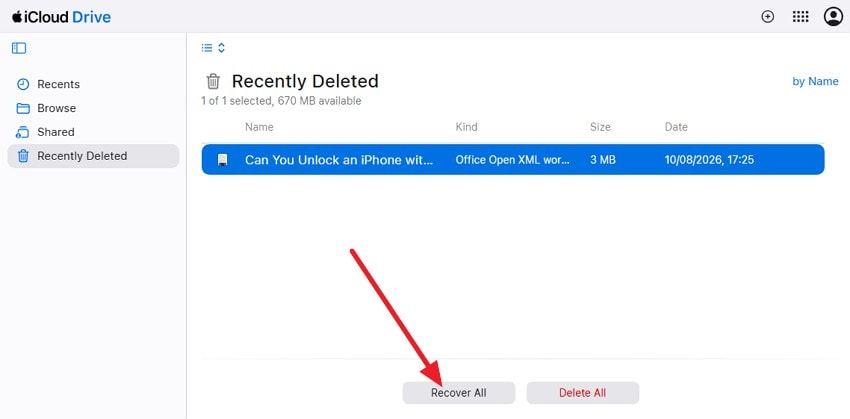
You only need a web browser and your Apple Account sign-in details. Restored files automatically return to the exact folders they came from. So, follow the mentioned steps and learn how to recover permanently deleted files on Mac:
Step 1. Sign in to iCloud.com > Navigate to the “Recently Deleted” folder.
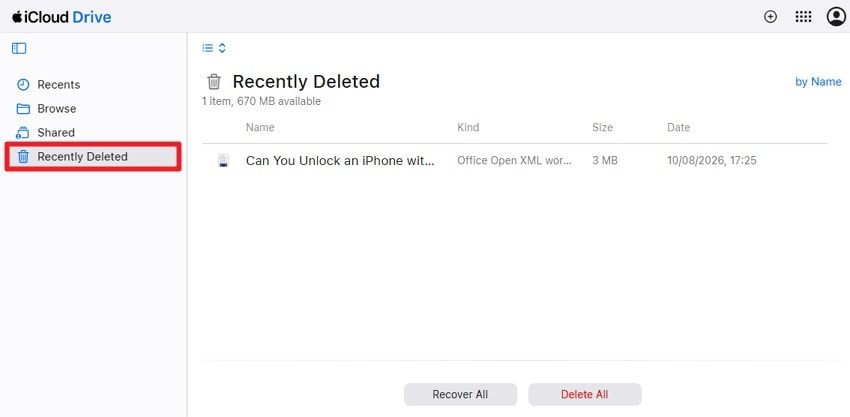
Step 2. Choose the file you want to recover and press the “Recover All” option.
Method 3. Check App-Specific Recently Deleted Folders
When to Use: You lost a photo, note, message, or email, not a manually saved folder file.
Several Apple applications maintain their own holding area, entirely separate from Finder's Trash. Photos keeps a Recently Deleted album for 30 days, reachable from the sidebar. Notes holds a folder of the same name on the same timer, and Messages keeps its own list under conversations.
Mail moves messages to a Trash mailbox whose retention you set per account. Anything that lived inside one of those applications should be checked there before any scan, because the copy is complete rather than reconstructed.
Method 4. Restore From Another Backup or Synced Copy
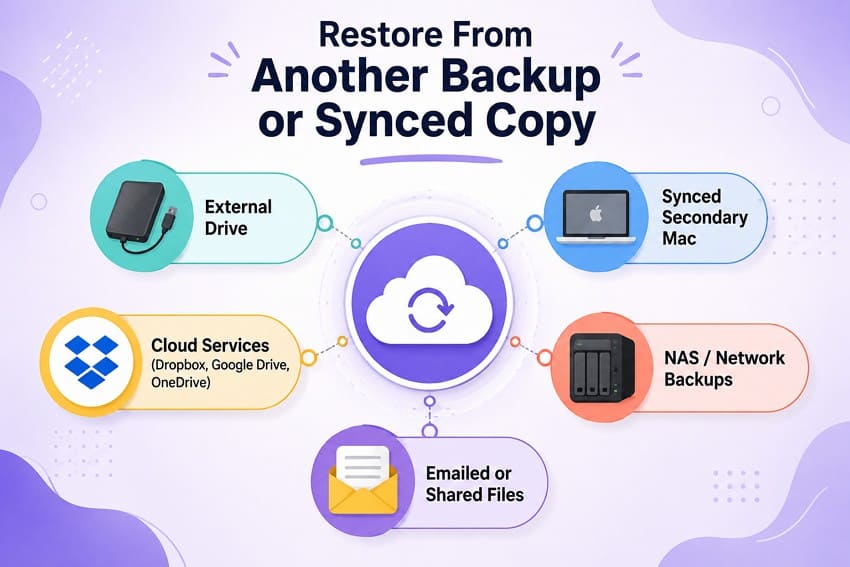
When to Use: Time Machine was never set up, but you may have copied, shared, synced, or sent the file.
An external drive or a synced secondary Mac may store a manual copy from months ago. Cloud services like Dropbox, Google Drive, and OneDrive also keep deleted items for 30 days or longer. Network backups on a NAS often retain scheduled snapshots as well. Finally, files emailed or exported to others remain safe, completely unaffected by local Mac events.
Part 4. Recover Permanently Deleted Mac Files Without a Backup
When to Use: No backup or copy exists; use Recoverit to scan external media or an internal drive for deleted files.
When none of those four turns up a copy, the drive itself is all that remains to search. So, if you still ask how to restore permanently deleted files on Mac, use Recoverit. The tool reads a volume at the block level instead of querying the file system. That is why it surfaces items macOS no longer shows anywhere. This Mac data recovery tool can restore basic data types and archives across over 1000 distinct formats.
In terms of compatibility, it can retrieve data from internal drives, external disks, USB sticks, memory cards, digital cameras, and network storage units. Recoverit can also repair damaged video files, broken photo files, and corrupted office documents during scan processes. For scanning, you can use Quick and Advanced scan options that you can easily pause or resume.
Key Features
- APFS and HFS Plus Volume Support: Reads both the modern Mac file system and the older one, including volumes sharing a single APFS container.
- Signature-Based Deep Scan: Identifies files by internal structure when directory records are gone, which is how a scan finds material the file system has forgotten.
- Folder Hierarchy Restoration: Rebuilds the original folder tree where the metadata survives, rather than returning a flat list.
- Scan Result Filtering by Date and Size: Narrows thousands of results to the day and approximate size you remember, which is faster than browsing by name.
- Smart Device Recognition: Uses automated detection to identify specific drive models and match them with custom recovery paths for better results.
How to Scan a Mac Volume for Deleted Files with Recoverit
Follow the guide provided below for this data recovery software and learn how to recover permanently deleted files on Mac:
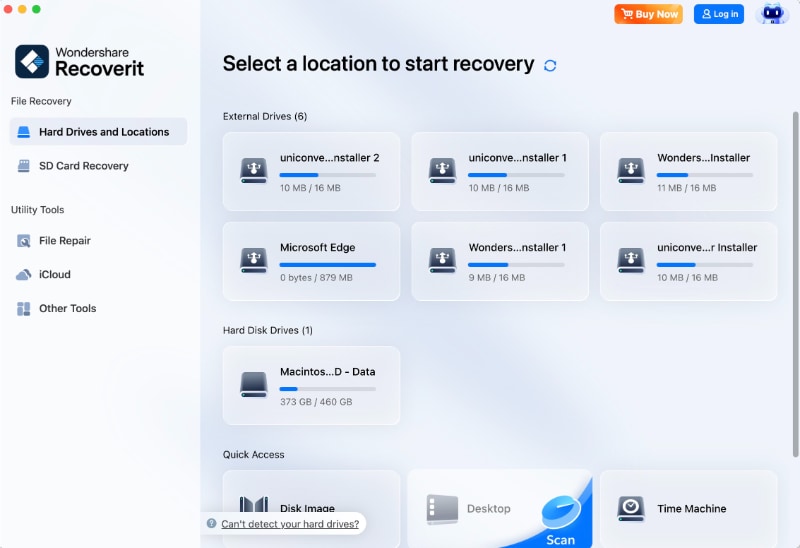
Step 1. Choose the MacBook Volume to Scan
Install Recoverit on the Mac, then select the drive holding the deleted files in the “Hard Drives and Locations” tab.
Step 2. Scan and Narrow the Results
Start the scan and let it run to completion on a drive of any size. Filter by file type and by date to reduce a long list to the material you actually lost.
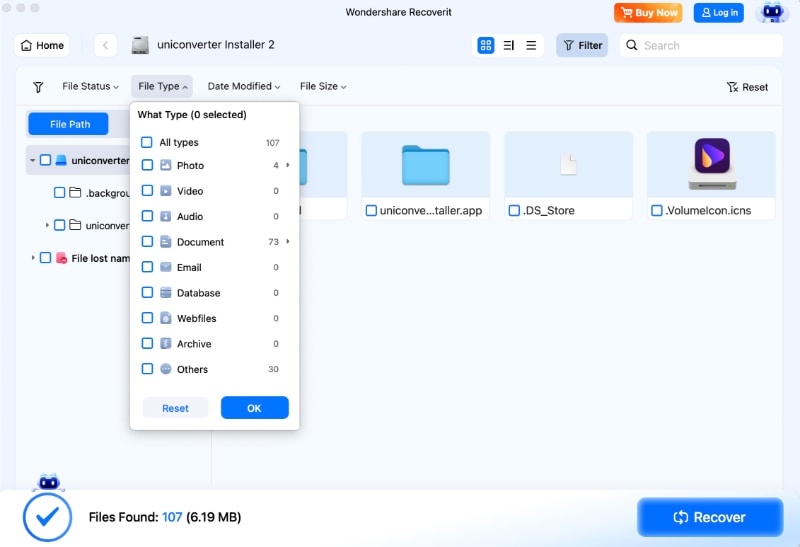
Step 3. Preview, Then Recover Elsewhere
Open several files to confirm they are intact before committing. Choose “Recover” and set the destination to your second drive, never the volume you just scanned.

When to Use a Professional Data Recovery Service
After you know how to restore permanently deleted files on Mac, you might need professional data recovery at some point. macOS must recognize a drive before recovery software can scan it. Hardware problems may require professional help when normal software access is unavailable. Drives missing from Disk Utility can have connection, power, enclosure, cable, or physical hardware issues.
Liquid or impact damage may require specialist repair, while opened hard drives need controlled cleanroom conditions. A drive that clicks, buzzes, disconnects repeatedly, or remains unreadable should not undergo repeated scans. For irreplaceable or business-critical data, consider a professional recovery service before making further recovery attempts.
Part 5. Why Permanently Deleted Mac Files May Not Be Recoverable
While learning how to recover permanently deleted files on Mac, learn why deleted files may not be recoverable via the mentioned details:
| Reason Recovery Fails | What Happens to the File | Recovery Outlook | Best Next Step |
| Original Data Was Overwritten | New data occupies some or all storage blocks previously used by the deleted file. | Very low to none | Check backups; overwritten portions generally cannot be recovered by software. |
| New Data Was Written After Deletion | Continued Mac use increases the chance that reusable storage blocks are overwritten or reclaimed. | Decreases with further activity | Stop unnecessary writes and check backups, snapshots, or recovery software promptly. |
| Storage Device Has Physical Damage | Hardware problems can prevent macOS and recovery software from reliably reading the storage device. | Software recovery may fail | Stop repeated scans and consider a professional data recovery service. |
| File Was Securely Erased, or Cloud Retention Expired | Secure erasure can make local data unrecoverable, while expired cloud retention removes the provider's recoverable copy. | Usually very low or none | Check backups, synced copies, or other available recovery locations. |
| No Backup or Recoverable Copy Remains | No backup, snapshot, cloud copy, or recoverable file data remains available. | Potentially impossible | Try recovery software where appropriate before concluding the file is permanently lost. |
Part 6. How to Prevent Permanent File Loss on Mac
Knowing how to restore permanently deleted files on Mac is the first step. After you get the files, follow the mentioned practices and learn how to avoid file loss in the future:
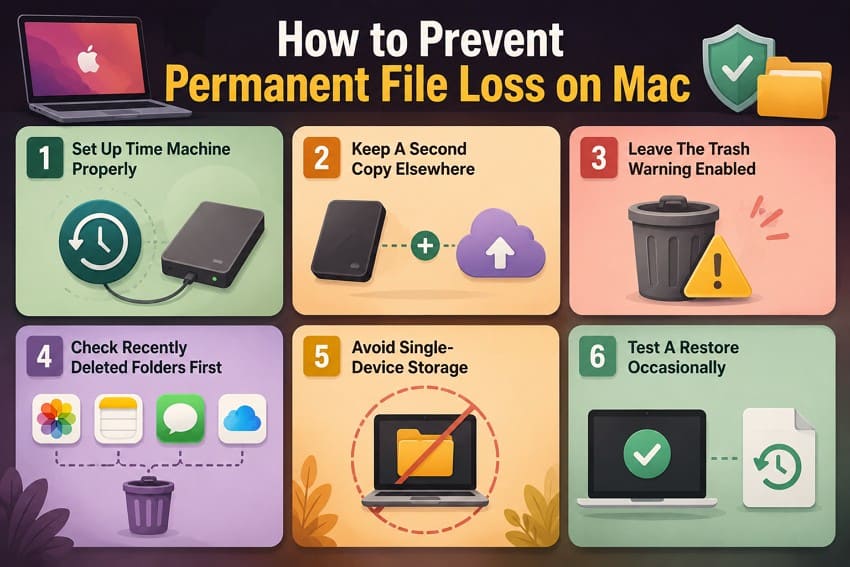
- Set Up Time Machine Properly: Connect an external drive for automatic Time Machine backups. On supported APFS systems, macOS can also maintain local snapshots when appropriate.
- Keep a Second Copy Elsewhere: Combine an external backup with cloud or off-site storage. Separate copies protect against drive failure, theft, damage, and accidental deletion.
- Leave the Trash Warning Enabled: In Finder settings, keep the warning before emptying the Trash enabled. This adds a confirmation step before files are permanently removed.
- Check Recently Deleted Folders First: Photos, Notes, Messages, and iCloud Drive provide recovery areas, commonly with 30-day retention periods. Review them before permanently deleting their contents.
- Avoid Single-Device Storage: Files stored in only one location remain vulnerable to hardware failure or accidental deletion. Keep important data on at least one additional storage location.
- Test a Restore Occasionally: Periodically restore a file from your backup to confirm it works correctly. A successful test verifies that your backup is actually usable.
Conclusion
Work out where the file lived before choosing a method. How to restore permanently deleted files on Mac users depends on that more than on anything else. External drives and memory cards respond well to scanning, while an internal SSD with TRIM active usually does not.
Check backups, snapshots, and Recently Deleted folders before reaching for software, since those return complete files rather than reconstructed ones. If scanning is the only option left, stop using the drive immediately and recover the data with Recoverit.
FAQ
-
Can you recover files deleted with Terminal commands on Mac?
Recovery may still be possible after using "rm." The command bypasses Trash, but Recoverit can scan the affected drive for recoverable data before TRIM or new writes reduce recovery chances. -
Does FileVault affect deleted file recovery?
Considerably, without the unlock key, scanning an encrypted volume returns nothing usable. Even with the key, deleted files are frequently unrecoverable because of how the encryption interacts with freed blocks. -
Can Apple recover permanently deleted files from a Mac?
No, Apple provides no file recovery service, and support will direct you to your backups. Files stored in iCloud are the exception, through the restore option on iCloud.com. -
Why do recovered Mac files sometimes lose their original names or folder structure?
File names and paths live in directory records rather than inside the file itself. When those records are gone, a scan identifies content by its internal signature and assigns generic names instead. Recovering from a backup avoids this entirely, which is one more argument for checking Part 3 first.


