

 TL;DR:
SD cards utilize non-volatile flash memory and a controller chip to expand device storage, but they require specific file system configurations like exFAT or NTFS for computers, FAT32 for car audio systems, or native on-device formatting for digital cameras and smartphones.
● Power down the Nintendo Switch before insertion to safely expand its 32GB internal limit, format cards directly within digital cameras to ensure file type compatibility, and utilize Android's "Format as Internal" storage setting to migrate phone content onto the card.
● Flash memory hardware supports an average lifespan of 10 years or up to 10,000 write-and-erase cycles, though improper ejection, frequent rewriting, and thermal damage significantly accelerate card failure and detection issues.
● Data lost to accidental formatting can be retrieved using Wondershare Recoverit by connecting the SD card to a macOS or Windows computer, executing a deep scan to preview the supported file formats, and saving the recovered files to a separate storage location.
Ask AI for a summary
 ChatGPT
 Perplexity
 Gemini
 Claude
 Grok
Grok
Have you ever faced that heart-stopping moment when your device says, “No more storage?” That could be a mood killer, but with SD cards at your service, you can save all your memories in one place. They pack a powerful punch, giving you extra space when your device is bursting at the seams. From cameras to mobile phones and tablets to drones, this little card unlocks a whole lot of freedom.
Now, you must be fascinated with this idea of having one and wondering how do SD cards work. If so, the following article is a complete guide for you because it contains tutorials regardless of what device you use. Plus, if the accidental formatting of an SD card made you lose important data, we have an ultimate savior platform. From definition to quick how-to guides, the following article is a valuable solution.
Try Recoverit to Perform SD Card Data Recovery
 Security Verified. 3,591,664 people have downloaded it.
In this article

Part 1. What is an SD card and How Does an SD Card Work?
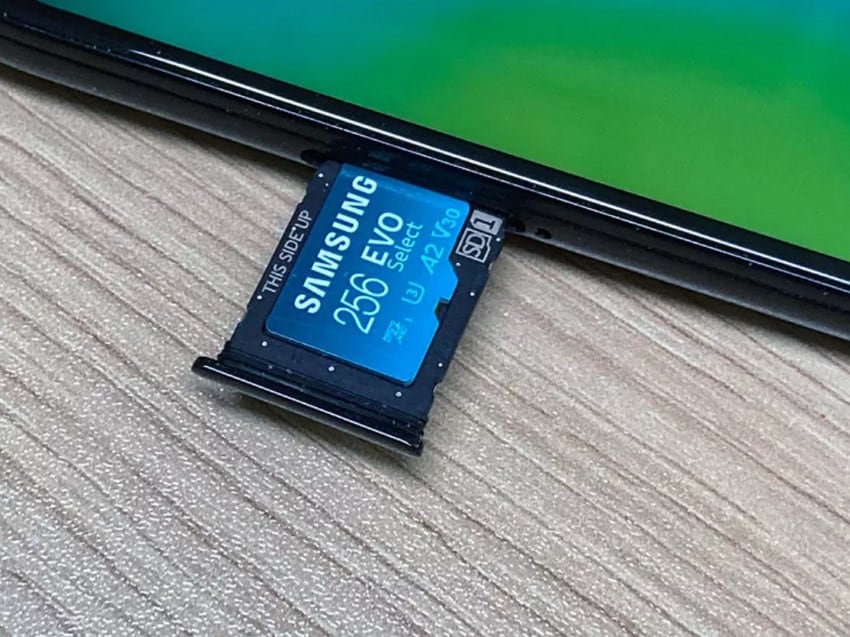
SD card is an abbreviation for Secure Digital Card, which is a small portable memory card used to store data and precious moments. You can find them in all kinds of devices, such as digital cameras, smartphones, tablets, and even gaming consoles. In addition, they come in numerous sizes, including SD, microSD, and miniSD. When their capacity is concerned, it ranges from a few gigabytes to over a terabyte.
Their ability to expand your device’s memory makes people wonder how does an SD card works. Inside that shell is a chip with flash memory, a type of non-volatile storage that keeps your memories intact. When you save a file, the SD card quickly writes the information onto the chip and reads back when you need it again. In the card, a small controller chip manages where data is stored and how it's accessed.
You may also want to know about different types of SD cards.
Part 2. [Fixed] How to Use SD Card on a Computer?
Once the memory card is inserted, the computer will detect it and treat it like a removable device. The inserted card is displayed under "Devices and Drives" and labeled by its brand or assigned name. For improved memory card usage, make sure it's formatted under exFAT or NTFS, depending on your needs. Manage data across devices by exploring the tutorial given on how do SD cards work on computer:
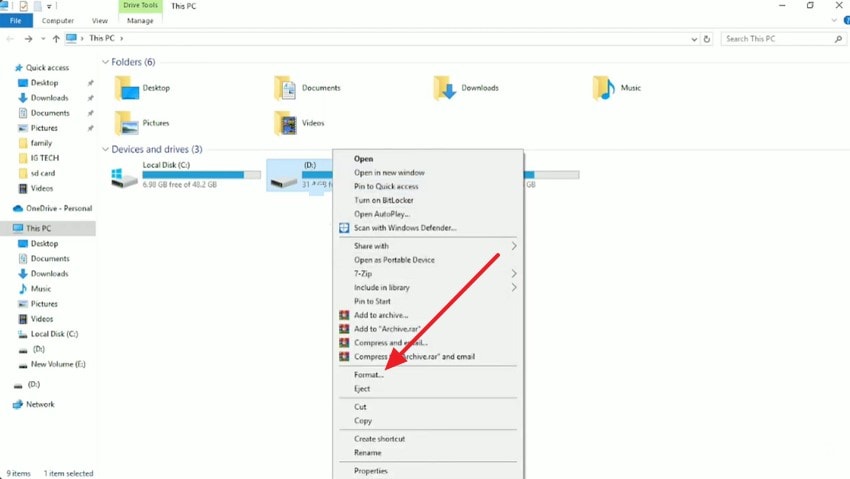
Step 1. Start by placing the memory card into the built-in slot on your computer and wait until it appears under “Devices and Drives.” Move ahead and right-click on the SD card to choose the “Format” option from the menu.
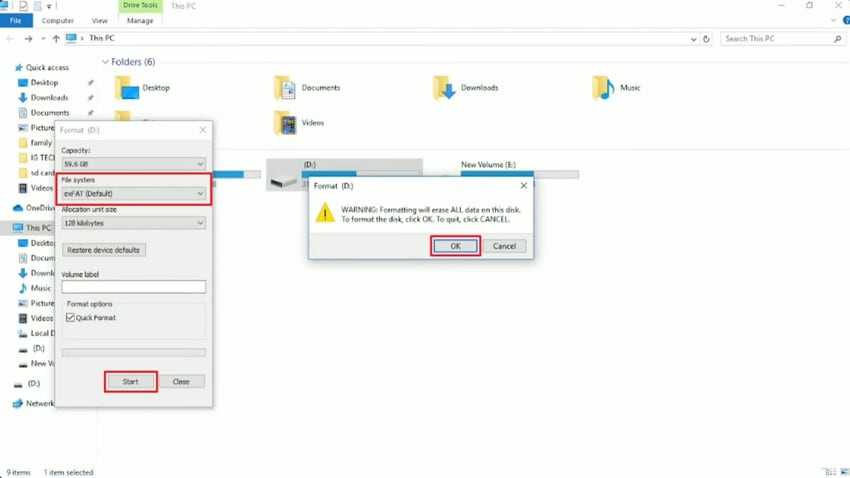
Step 2. In the “Format” window, extend the menu for "File System," and from the options, choose “exFAT." Now, navigate to the "Start" button and later press "OK" to confirm the quick format.
Part 3. Guide to Using SD Cards on macOS Devices
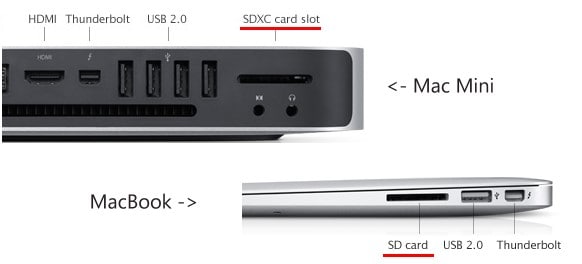
It is seen that most MacBooks either include an SD card slot or require a USB-C reader, depending on the model. The older MacBook Pro models come with a built-in SD card slot, and they generally support SD, SDHC, and SDXC cards. However, formatting can be altered through Disk Utility if you need to prepare the card for specific uses. How to use SD card on a Mac is explained through the instructions given below:
Instructions. Insert the card, and once it's placed, a little click should sound for its correct positioning. Conversely, connect your external SD card reader to a USB-C or USB-A port on your Mac when the SD card slot isn’t available. Insert the card into the reader to ensure its secure placement. Move ahead and access “Finder” and display your SD card content under the “Display” section.
Part 4. For Android Users: How to Use SD Cards
In Android devices, SD cards are helpful in managing limited internal storage and improving overall functionality. When inserted, it will recognize and prompt you to set it up with two options to use it as portable or internal storage. Besides this, you can format them to work as internal storage and move items from your phone. To learn how do you use SD card on Android, follow the guide provided below:
Step 1. Initially, locate the microSD card slot and insert the card carefully into your Android. After insertion, wait for your device to detect the card and display a notification.
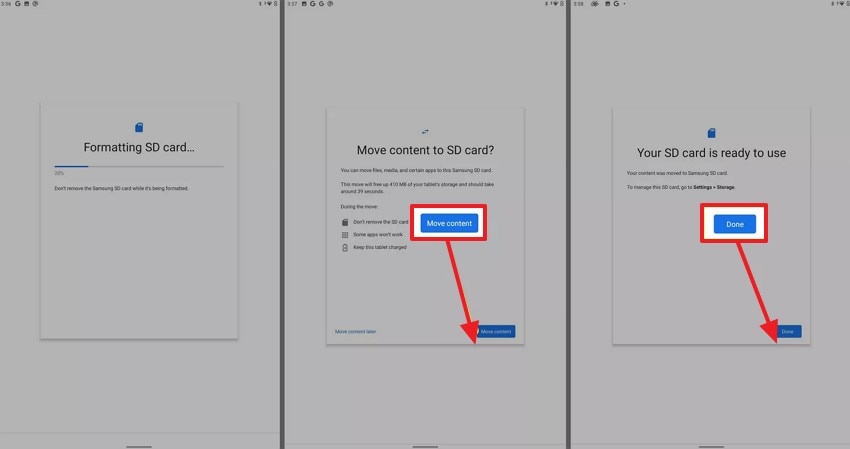
Step 2. To format, navigate to your phone's settings and access the "Storage" option. Now, tap on the Three Dots icon in the top right corner and choose "Storage Settings" from the menu. After this, press "Format as Internal" and tap on "Format" in the pop-up window.
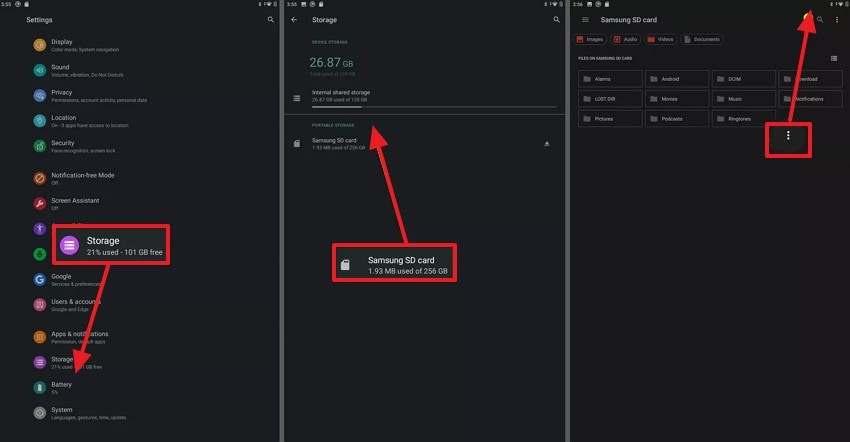
Step 3. Upon formatting, hit the "Move Content" button and press the "Done" option to use your card as internal storage.
Part 5. How to Use an SD Card on Switch?
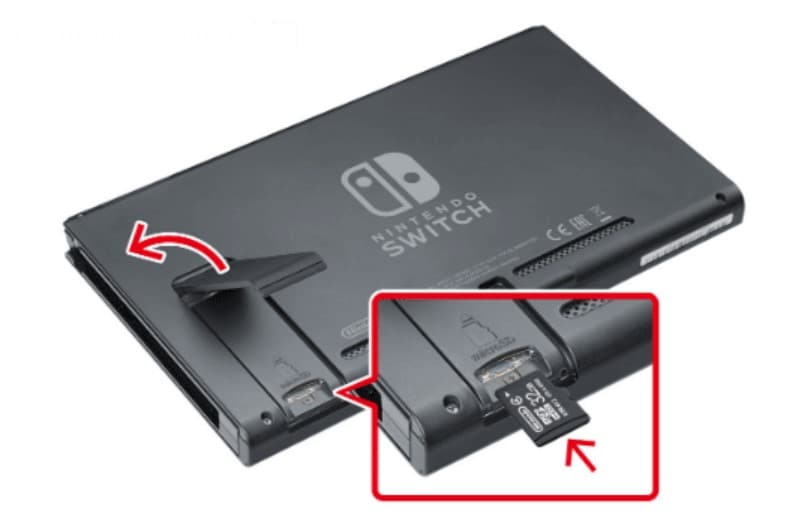
An SD on the Switch is important to expand your console’s storage when you need to download a lot of games. The Switch has limited internal memory of up to 32GB, so inserting a microSD card gives you flexibility to store more. When your SD is formatted, the system will use the card to save new downloads and game data. For how to use SD card on Switch, follow the given instructions:
Instructions. To begin the process, start by switching off the Switch by holding down the power button. Afterward, scroll down to the "Power option" and then choose "Turn Off." Gently open the bracket and reveal the microSD card slot so you can insert the card later. Slowly push it down until it clicks into place, and turn on the Switch again. Following this, new games or other data can be easily stored on the SD card.
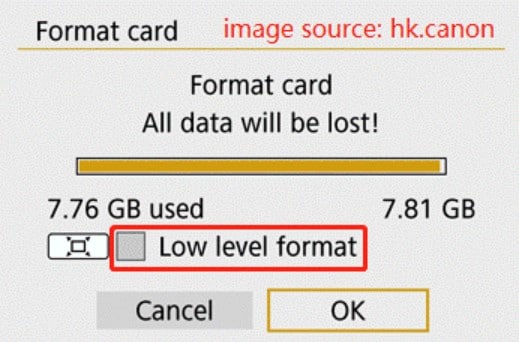
Part 6. How to Use SD Cards on Cameras?
To understand how does a memory card works in a camera, make sure that the SD card is compatible with your camera model. Once it's inserted into the camera, it will automatically save each shot you take with the ability to view, delete, or transfer images. The card should be formatted on camera to make it compatible with your camera's file type. Follow the instructions for the effective use of SD card on camera:
Instructions. First, check your camera manual to see the supported card type and minimum speed requirement. Turn off your camera and slowly push the SD card into the card slot. Once inserted, turn on your camera and navigate to options like “Menu” or “Preferences.” Next, find and choose the “Format” option to format the SD card. In the last, hit the “OK” button to confirm and wait for the process to finish.
Part 7. How to Use an SD Card in Cars?
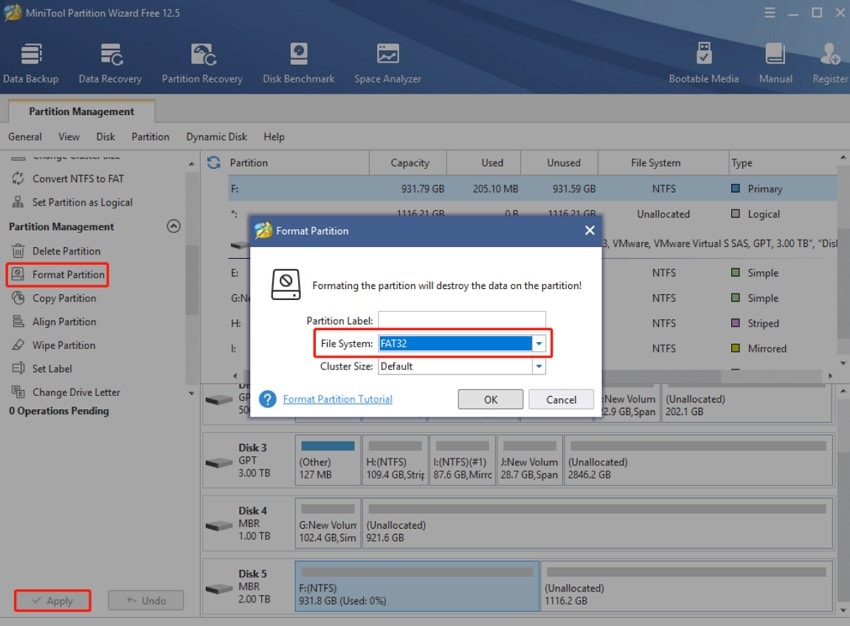
For cars, memory cards are a practical way to enjoy music, but formatting them is not strictly necessary every time. However, if your car doesn’t recognize the inserted card, formatting can solve compatibility issues. The majority of systems work best with FAT32 or exFAT file systems, entirely depending on the size of the card and system compatibility. To understand the memory card usage on cars, read the instructions provided below:
Instructions. Look for your vehicle’s manual and place the SD card into an appropriate slot. To format, install the MiniTool Partition Wizard and format an SD card to FAT32. After this, choose the SD card and select the "Format Partition" option from the left panel. In the revealing window, choose the FAT32 options in the "File System." menu. Press the "OK" button to confirm and hit the "Apply" button to connect the card to the car.
Bonus. Accidentally Formatted Your SD Card? Recover Your Lost Data via Recoverit
Although it's a very simple approach, many people overlook how to use SD card before it's too late. Just like that, a single click on “Format” can make you lose everything in the blink of an eye. Wondershare Recoverit, a data recovery expert for SD cards, claims to recover all the deleted files in no time. With a success rate of over 99%, it guarantees the recovery of all the deleted files.
The platform allows users to choose the SD card from which their data was lost and then runs the scanner for recovery. Not only this, but it facilitates one to preview files to satisfy themselves before proceeding to recovery. During the scan, if you find the lost file, you can pause or stop it to recover. When the files are retrieved, you can save them in a particular location.
Other Key Features of Recoverit
- USB Data Recovery: This software supports USB data recovery from more than 500 loss scenarios, including human error.
- Retrieval from Hard Drive: It's a reliable hard drive recovery software that enables you to recover data from Windows or Mac internal drives.
- NAS Data Recovery: With Recoverit, users can easily retrieve all file types from NAS drivers with a no-data, no-charge commitment.
Stepwise Guide to Recover Lost Data from SD Card Using Recoverit
Before we dive into the tutorial, remember that safe memory card usage is important to prevent loss in the first place. Anyhow, follow the given guide to recover all the lost data from your SD card through Recoverit:
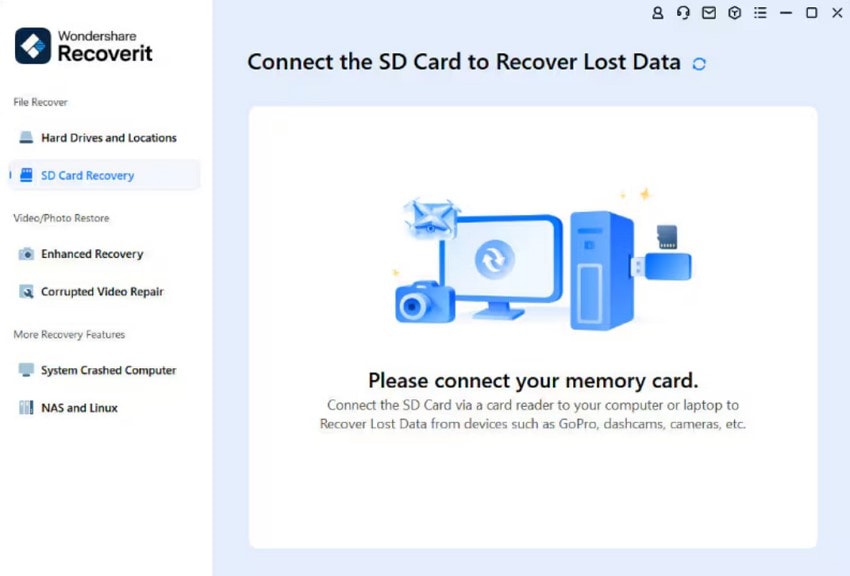
Step 1. Commence the Recoverit and Connect your SD Card
To inaugurate, commence updated Recoverit on your device and press the "SD Card Recovery" tab from the left sidebar. Connect the SD card to your computer and wait until the software recognizes and detects it.
Step 2. Run a Scanner on the SD Card
Later on, choose the SD card from which you lost the data and press “Scan” to run a scan. By doing so, the platform will perform a deep and comprehensive scan of the chosen SD card.
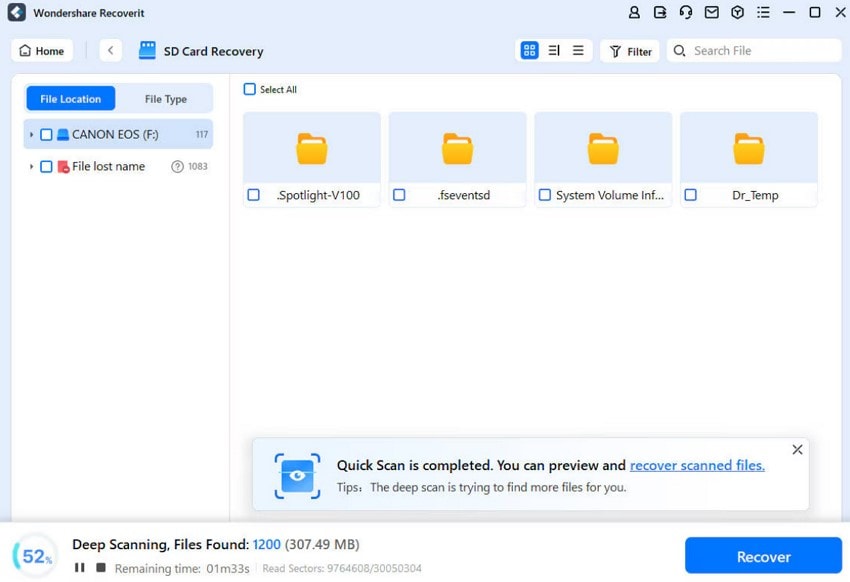
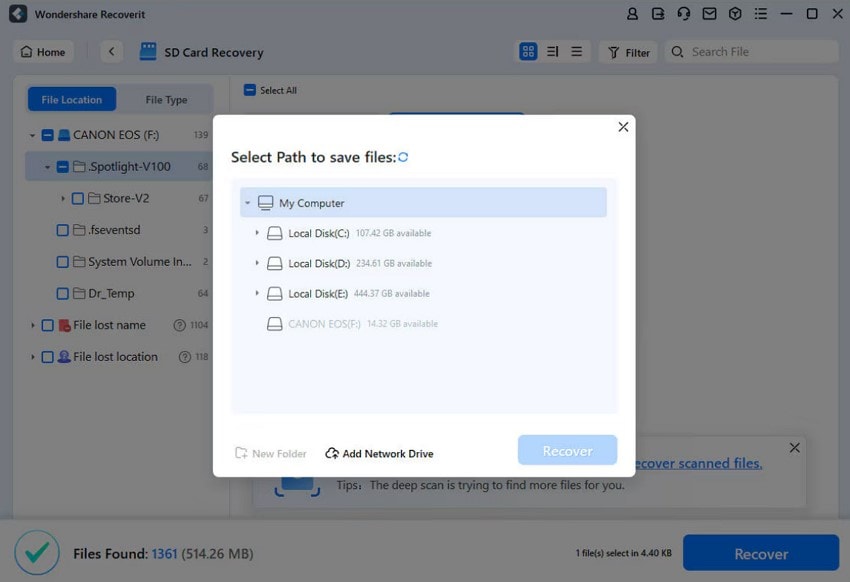
Step 3. Preview the Lost File and Recover it
After you discover the lost file, double-click it to preview and then select the files you want to save. Finally, proceed to the “Recover” button in the bottom right corner to retrieve and save simultaneously.
Conclusion
In summary, memory cards are small yet effective tools that play a role in managing the transfer and storage of data. Starting from computers and smartphones to gaming consoles and cars, their versatility makes them important for every user. Therefore, how do SD cards work with factors like formatting, compatibility, and storage capacity confirms smooth performance. When accidental formatting makes you lose a vital song or file, consider Recoverit as a guardian.
FAQ
1. What causes SD cards to fail?
To learn how to use SD cards, it is imperative to know that several causes can lead to their failure. These causes include improper removal, frequent rewrites, or any physical damage to the card. Therefore, practice safe memory card usage, like ejecting before removing and avoiding exposure to water or heat.2. Do SD cards have a lifespan?
SD cards store their information in flash memory, which is why they have an average lifespan of 10 years or more. However, it offers up to 10,000 cycles of write-and-erase, which leads to wear and tear, thus directly influencing its lifespan.3. Why is my device not detecting the SD card?
There might be many possible reasons, including card damage, format incompatibility, or a dirty card slot. Therefore, try the card on another device or reformat it after backing up to see if the device detects it.


