

 TL;DR:
Restoring a deleted Windows 10 recovery partition depends on its exact type: a missing Windows Recovery Environment (WinRE) can be manually rebuilt using command-line tools, while a deleted OEM factory partition requires official manufacturer media.
● Do not format the unallocated space, create new simple volumes, or run repair commands like CHKDSK, as these actions permanently overwrite the disk; recover lost personal files first using tools like Recoverit or TestDisk.
● Rebuild a missing WinRE partition by shrinking a drive to create at least 1 GB of unallocated space, formatting it as NTFS via DiskPart with correct GPT or MBR IDs, copying the Winre.wim file, and registering the image path using the reagentc /setreimage command.
● Verify the newly rebuilt environment by executing reagentc /info in an elevated Command Prompt to confirm the Windows RE status specifically displays as Enabled alongside a valid registered location.
Ask AI for a summary
 ChatGPT
 Perplexity
 Gemini
 Claude
 Grok
Grok
“I accidentally deleted my recovery partition. Is there an easy way to restore it? Title says it all….” - zhubiii
Recovery partitions can serve different purposes, while only some contain important personal files. Deleting one may require a quick system repair or complete data recovery instead. Handling a deleted recovery partition in Windows 10 starts by identifying its type.
This guide explains each partition type and shows how to rebuild the Windows Recovery Environment correctly. It also covers recovering files with Recoverit before making changes to affected disks.
Recover Lost Files With Recoverit
 Security Verified. Over 7,302,189 people have downloaded it.
In This Article
Part 1. What Was Deleted: Recovery Partition or Data Partition?
A deleted recovery partition Windows 10 issue may involve 3 different partition types. Look at the table below to identify which partition you have lost:
| Partition Type | Purpose | Holds Personal Files? | Best Next Step |
| Windows RE Partition | Runs Advanced Startup and repair tools | No | Rebuild it, Part 4 |
| OEM Recovery Partition | Restores the factory image | No | Manufacturer media, Part 5 |
| Data Partition | Your documents, photos, and installs | Yes | Recover files first, Part 3 |
Windows Recovery Environment Partition
This hidden NTFS partition stores Windows Recovery Environment files, including Winre.wim. Its size varies by Windows version and recovery requirements. Deleting it can disable local WinRE tools until the environment is restored or external recovery media is used.
OEM Factory Recovery Partition
Manufacturers may create a much larger recovery partition containing factory images, drivers, utilities, and bundled software. Rebuilding WinRE cannot restore this image, and DiskPart cannot recreate it either.
Normal Data Partition
This lettered volume contains personal documents, photos, applications, and other stored files. If it disappears, recover files through Part 3 before making disk changes.
Windows 10 Support Status
Standard support for most Windows 10 editions ended on October 14, 2025. Eligible PCs can use Extended Security Updates, while some LTSC editions follow separate lifecycle dates.
Part 2. Check the Current State of Recovery Partition
Before fixing a recovery partition in Windows 10, confirm what actually happened first. These 4 checks reveal the partition’s current state without changing anything on disk.
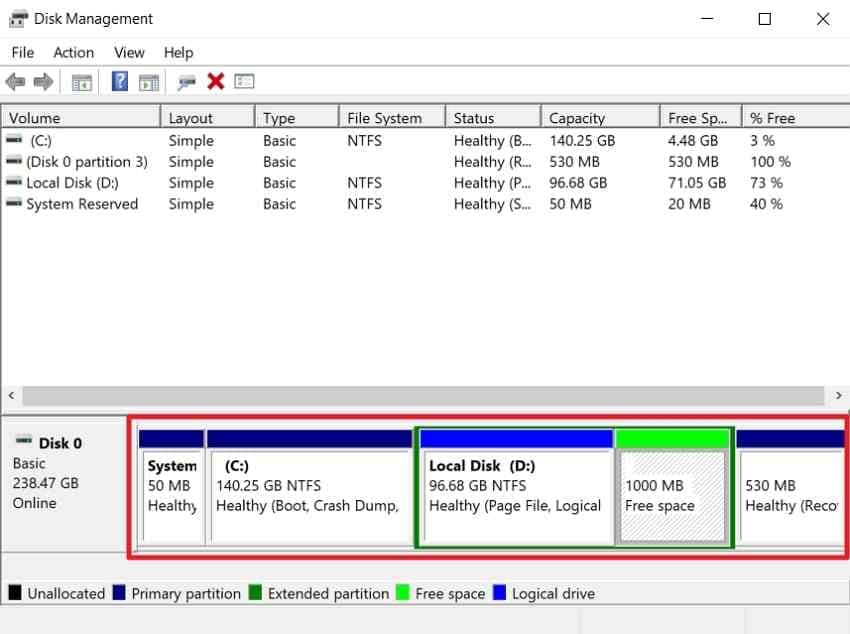
Check the Layout in Disk Management
Disk Management displays every disk partition, including hidden volumes missing from File Explorer. Use these instructions to check the layout:
Instructions. Open “Disk Management” using the “Windows + X” menu > Note each partition and its size > Look for unallocated space or a missing drive letter.
Check Windows RE Status
A Windows 10 recovery partition check confirms whether the recovery environment remains available. See the instructions below to check its current status:
Instructions. Open “Command Prompt” as administrator > Run “reagentc /info” > Check the Windows RE status > Note the Windows RE location path if one appears.
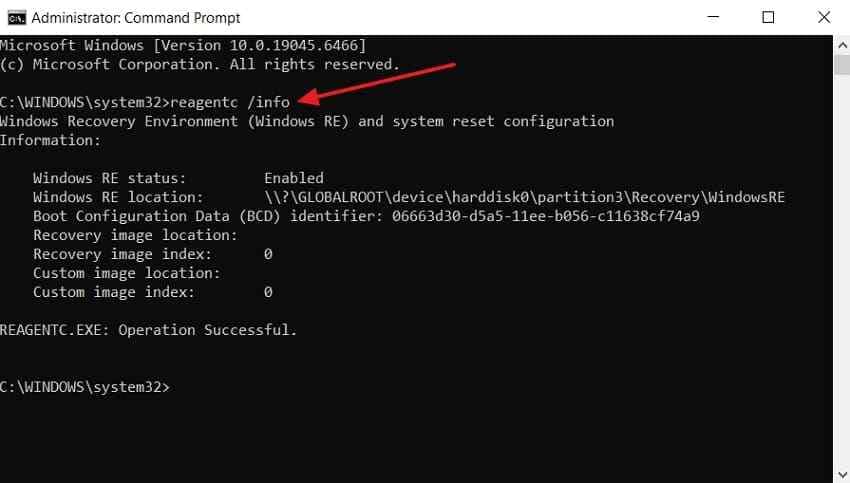
The Windows RE location identifies the registered WinRE path. Older ReAgentC output may show recovery-image fields, but these do not confirm an OEM factory partition.
Confirm Whether Windows Still Boots
Windows may still boot even after its recovery partition has been completely deleted. Check its recovery tools through Advanced Startup:
Step 1. First, access “Settings > Update & Security > Recovery.”
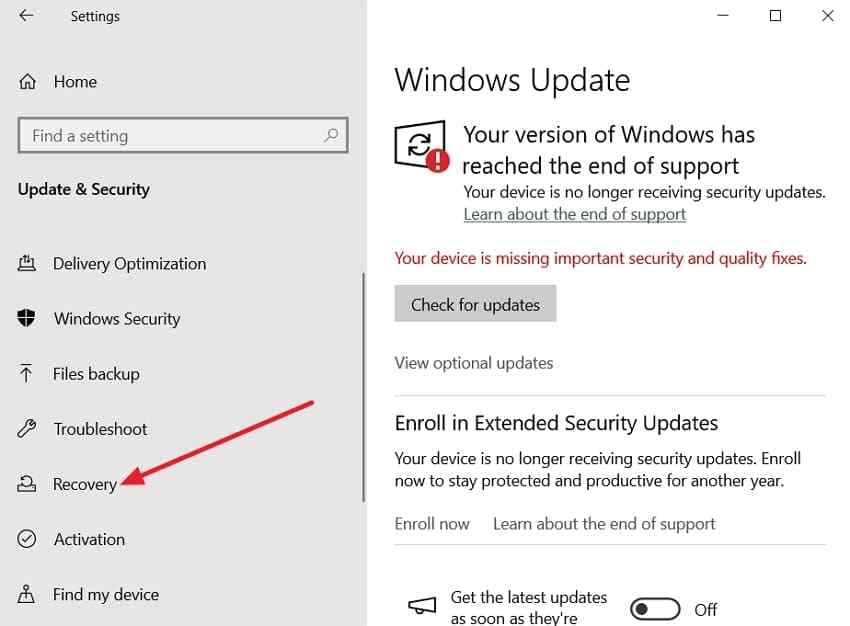
Step 2. Then, choose “Restart Now” under the “Advanced Startup” option.
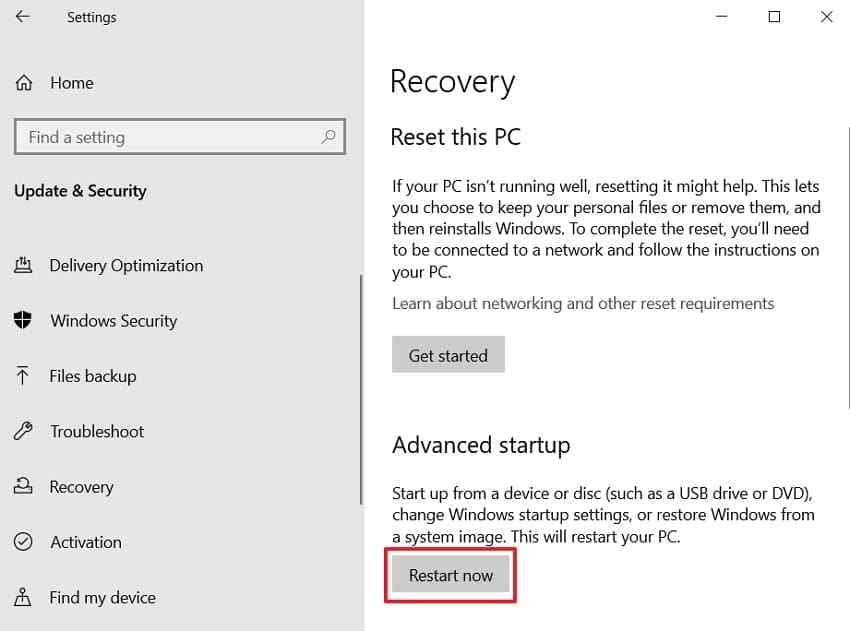
Step 3. Check whether the “Advanced options” screen appears.
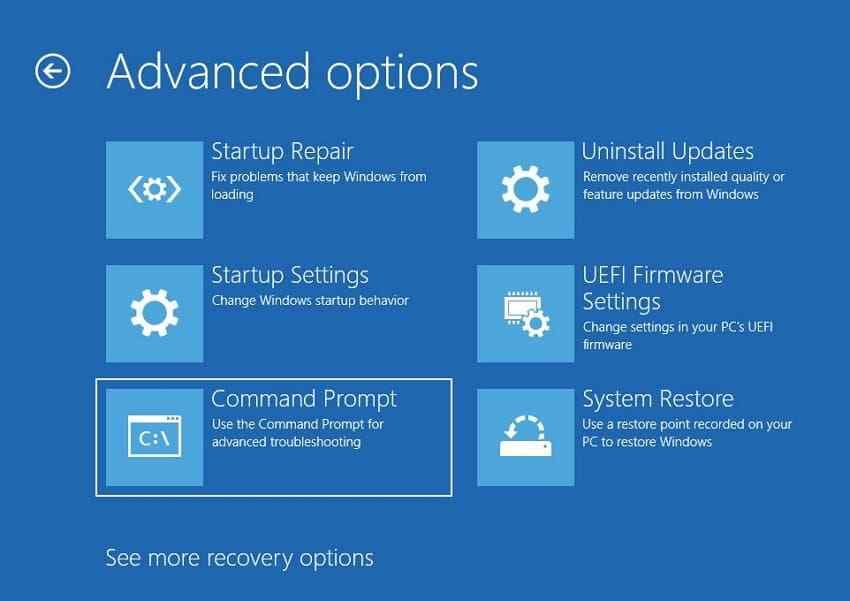
If “Advanced options” opens, WinRE is accessible, but this does not confirm that a dedicated recovery partition still exists. Check “reagentc /info” to verify its registered location.
Decide Which Job This Is
A deleted recovery partition Windows 10 issue requires choosing the correct path. The table below shows which recovery path matches your current partition issue:
| What the Checks Showed | Where to Go Next |
| WinRE Missing, Windows Boots Fine | Part 4, no data is at risk |
| A Lettered Data Volume Disappeared | Part 3 first, then repair |
| An OEM Recovery Partition Went | Part 5, manufacturer media |
Part 3. Recover Data Before Rebuilding or Repartitioning
Recover personal files before making any changes that could overwrite the missing partition. A Windows 10 restore partition attempt should begin after your important data is safe.
Method 1. Recover Lost Files With Recoverit

A deleted partition often leaves stored data intact until new information overwrites it. Only its partition table entry disappears, hiding where stored files begin and end. This is where Recoverit helps recover files before new data overwrites their space.
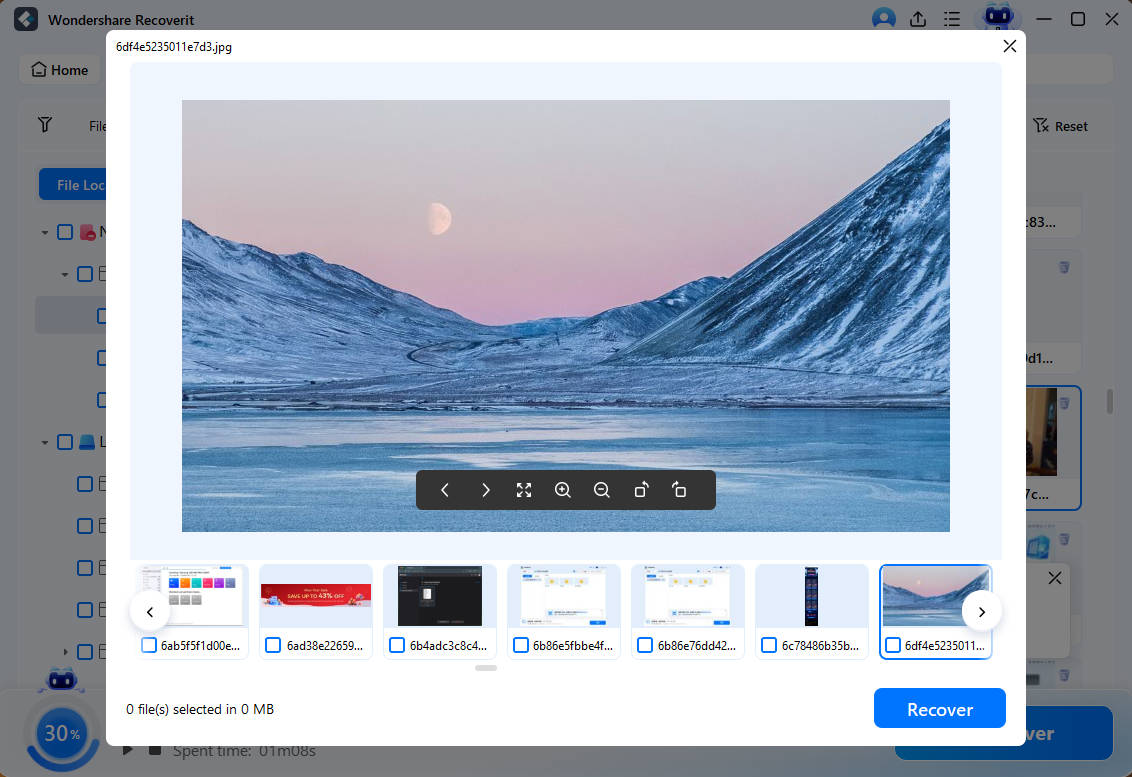
Its dedicated Partition Recovery tool finds missing volumes no longer shown by Windows. AI Search supports plain-language queries alongside file format and date filtering options available. File previews help confirm recovered content before exporting large numbers of files elsewhere.
Key Features
- Dedicated Partition Recovery Mode: Targets lost and deleted volumes instead of scanning everything without partition context.
- Deep Scan Recovery: Searches disk sectors deeper to locate files missed during standard scanning.
- Improved Preview Overlay: Shows recovered file contents clearly before users export them to another drive.
- exFAT Path Handling: Preserves file paths on exFAT volumes shared across different operating systems.
- Original Structure Recovery: Restores surviving folder hierarchies so recovered files retain their original organization.
How to Recover Files From a Deleted Partition
Install Recoverit on another physical drive before starting a restore partition Windows 10 recovery. Follow the steps below to recover files without overwriting the affected partition:
Step 1. Select the Deleted Partition for Recovery
Open Recoverit > Choose “Hard Drives and Locations” > Select the deleted or lost partition.

Step 2. Scan the Partition for Lost Files
Recoverit starts scanning the selected partition > Check the “Files” tab as results appear.

Step 3. Preview and Recover the Required Files
Preview the found files > Click “Recover” > Save the recovered files to a different physical drive.
Recover Lost Files With Recoverit
Security Verified. Over 7,302,189 people have downloaded it.
Method 2. Rebuild the Partition Table With TestDisk
TestDisk can recover deleted partition Windows 10 entries by restoring lost partition boundaries. It rebuilds the partition table without copying recovered files to another storage drive. This works best when partition records are damaged but stored data remains intact. Here is how to rebuild it with TestDisk:
Step 1. First, run TestDisk as administrator > Select “No Log.”
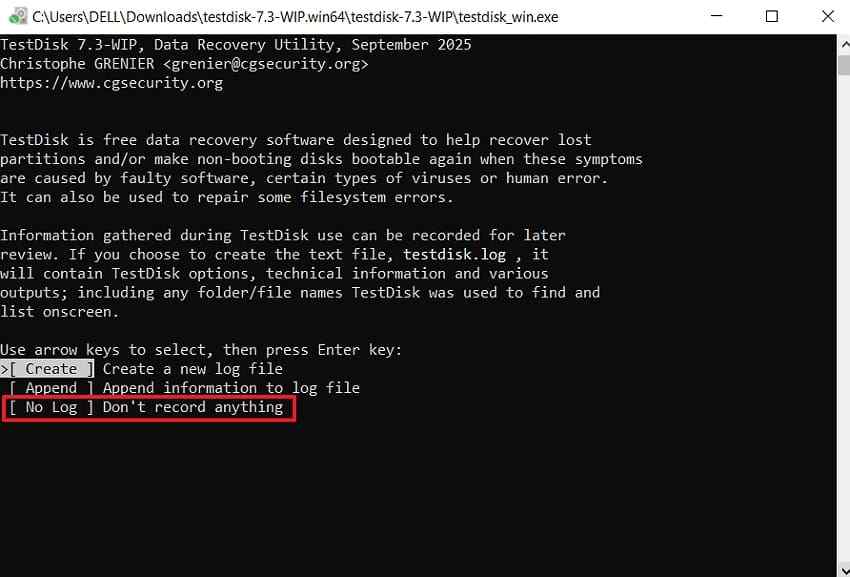
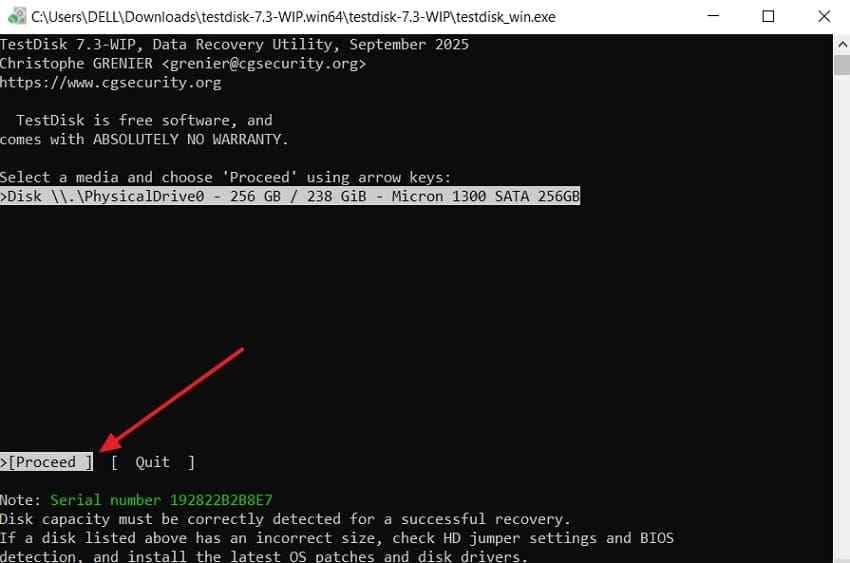
Step 2. Then, pick the drive and choose “Proceed.” Next, confirm the table type.
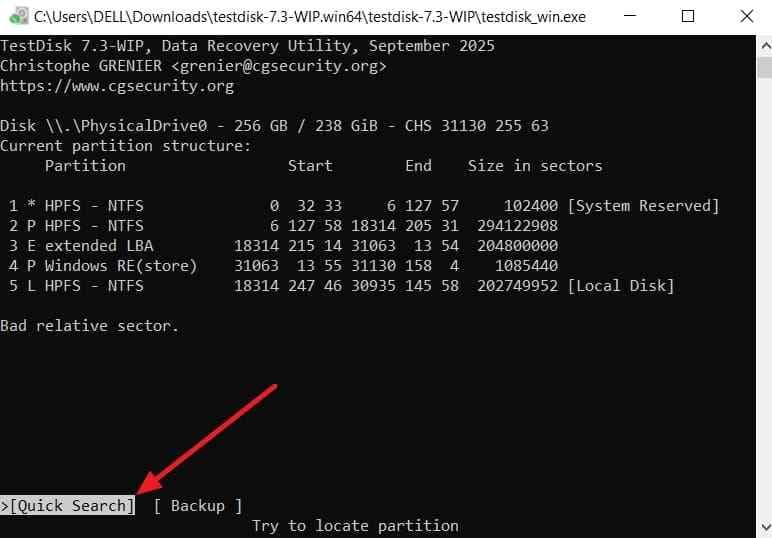
Step 3. Choose “Analyse” > Select “Quick Search.”
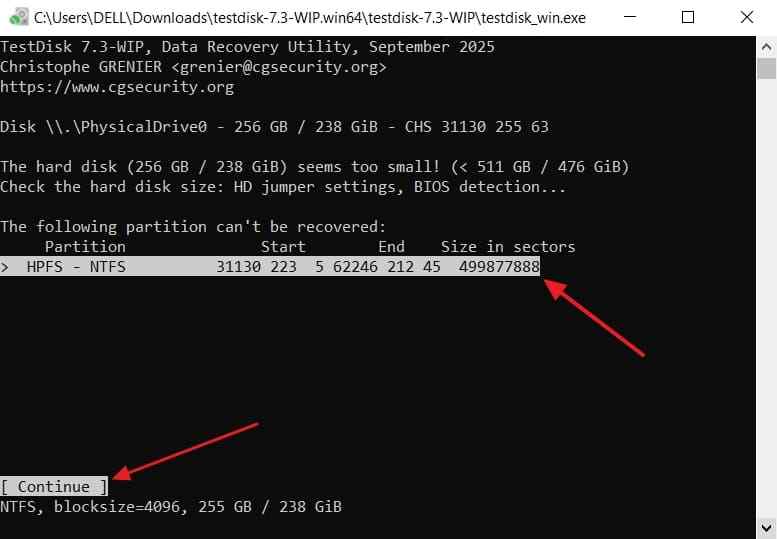
Step 4. Select the missing partition > Choose “Continue” to proceed with the recovery.
TestDisk commonly identifies “Intel/PC” for MBR partition tables and “EFI GPT” for GPT disks. Verify the detected table type before continuing.
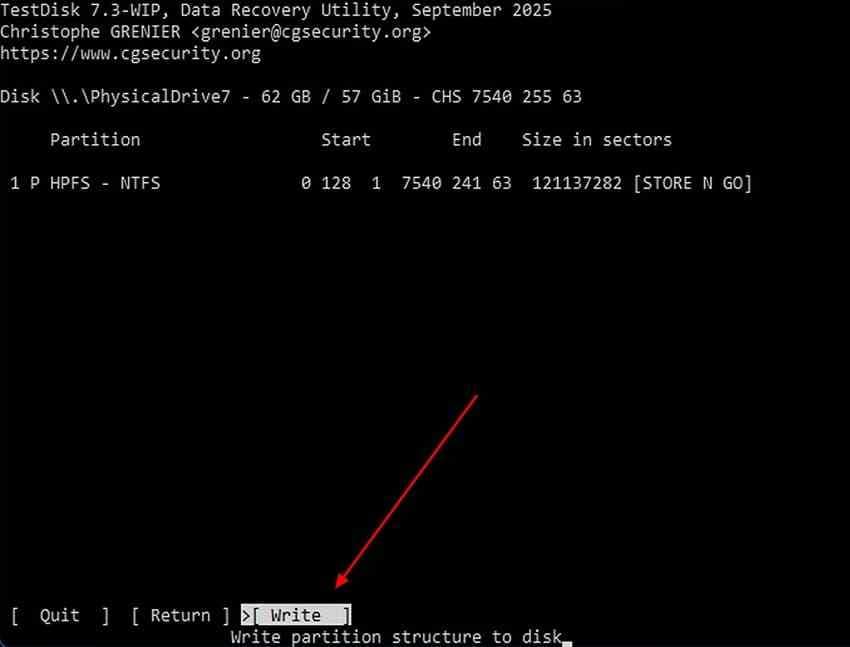
Step 5. After confirming the partition > Choose “Write,” > Restart Windows to confirm all changes.
Method 3. Check Backups and Cloud Storage
File History, OneDrive, and disk backups may contain copies of missing files. These backups can restore complete files without scanning the affected partition first. Check these locations before using recovery tools on your affected Windows drive. Let’s see how to check these backup options:
For Windows File History
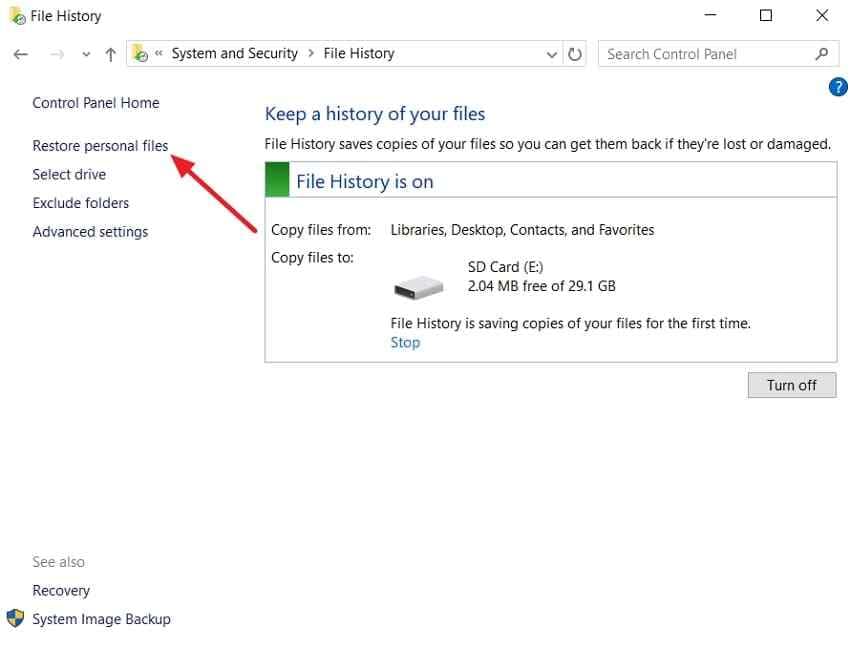
Step 1. Open “Control Panel” > Select “System and Security > File History.” Click “Restore Personal Files.”
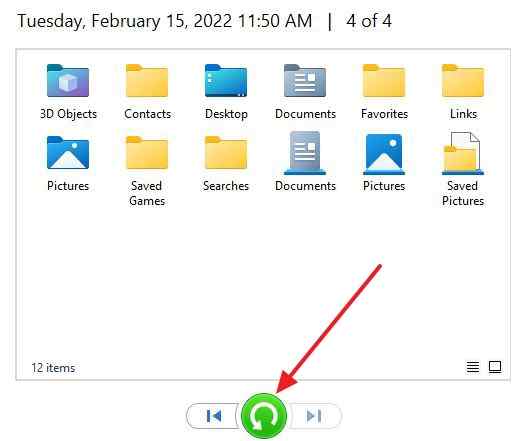
Step 2. Then, browse the available backups > Select the files you need > Press the “Green Icon” to restore them to another location.
For Cloud Backups
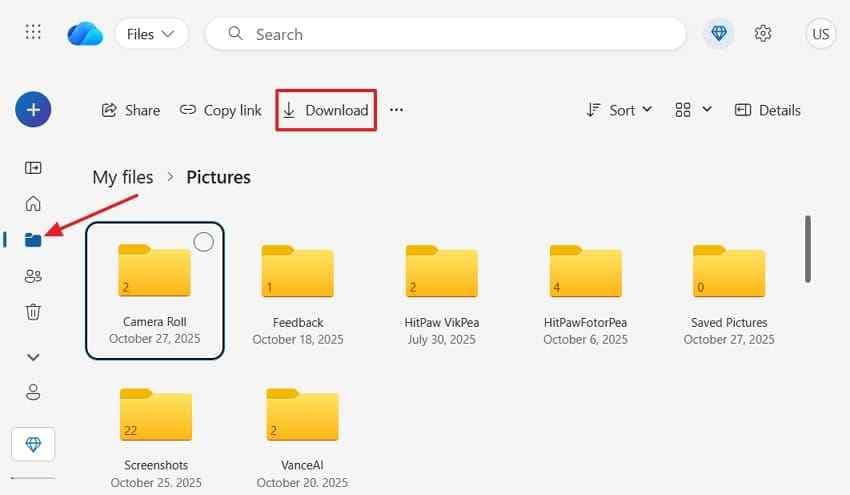
Sign in to your “OneDrive” > Access “My Files” > Choose your missing files > Press “Download” to save them.
Method 4. Set Up a Safe Destination Drive
If you recovered files using any of the 3 methods above, save them first. Keep them safe before starting any Windows 10 restore partition work afterward. Choose another physical drive because saving to the affected disk can overwrite recoverable data. Connect an external drive, create a folder, and save all recovered files there.
Part 4. Restore a Deleted Windows 10 Recovery Partition
After securing your data, rebuild the recovery partition in Windows 10 for WinRE. Follow the steps below to restore WinRE without restoring any factory recovery image:
Step 1. Confirm WinRE Is Missing
Check whether WinRE is missing using the instructions below to see its status:
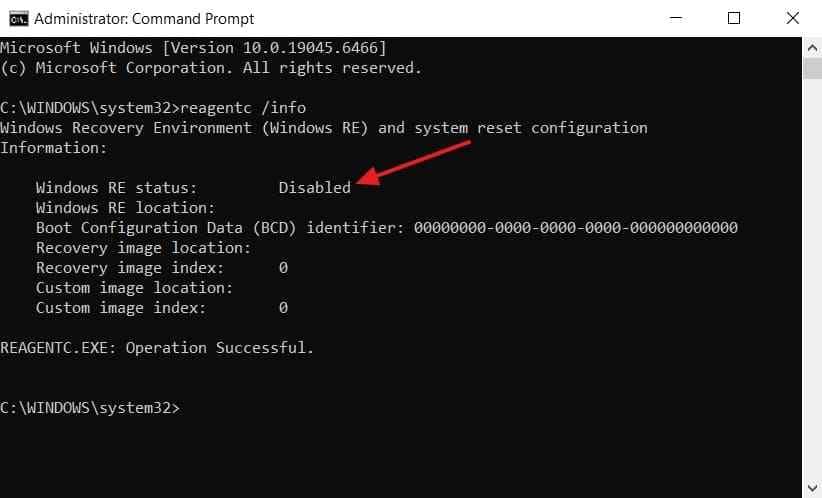
Instructions. In Command Prompt, use the “reagentc /info” result you checked earlier in Part 2. If Windows RE showed “Disabled” or no valid location, continue with the rebuild steps.
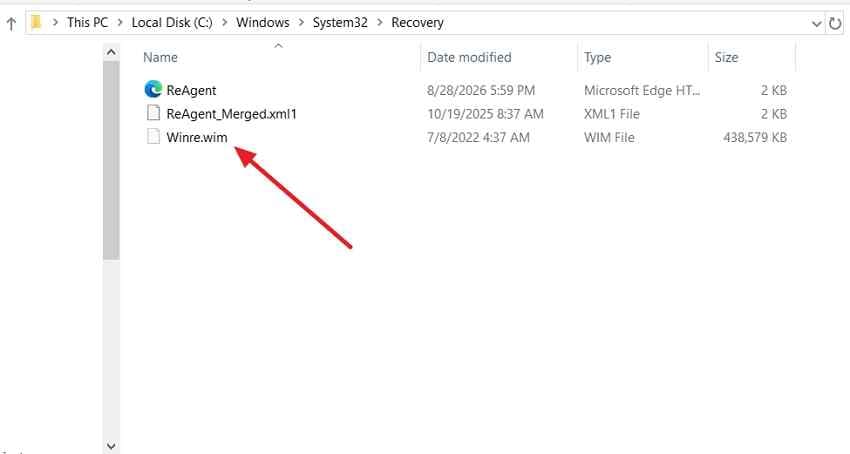
Step 2. Check Whether Winre.wim Still Exists
Check Winre.wim before starting the restore partition Windows 10 process using the instructions below:
Instructions. Open “File Explorer” > Go to “C:\Windows\System32\Recovery” > Enable hidden and protected files > Look for “Winre.wim” > If missing, extract a matching Winre.wim from the appropriate Windows 10 installation image before continuing.
Step 3. Create Space for the Partition
Create around 1 GB or more for a practical Windows 10 WinRE partition. Microsoft requires at least 300 MB overall, with sufficient free space for WinRE servicing and updates. Here is how you can create space:
Step 1. To create space for the partition, open “Disk Management” > Right-click a drive with enough space > Press “Shrink Volume.” Then, enter the shrink volume size > Press “Shrink.”
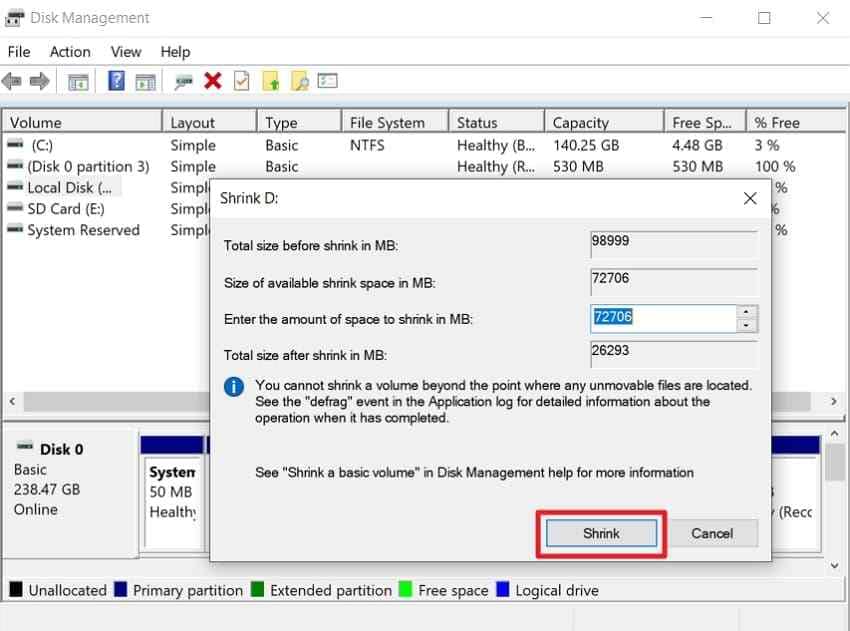
Step 2. Confirm the new space appears as “Unallocated.”
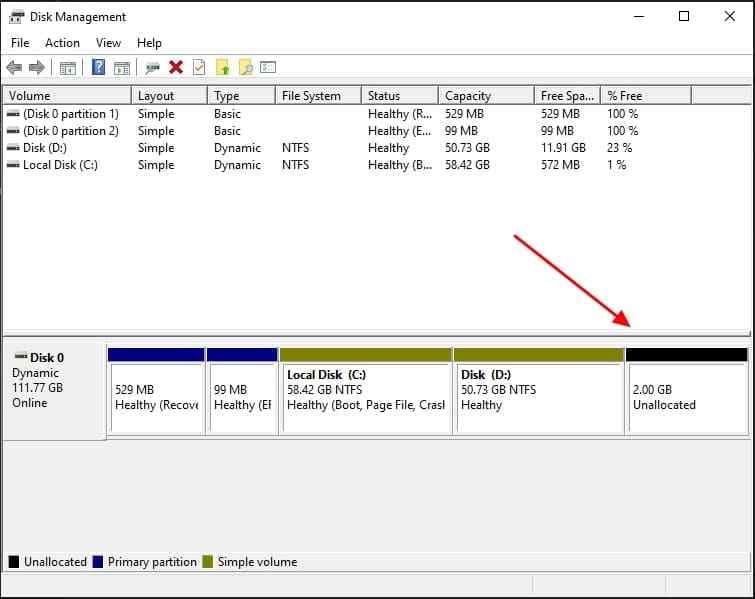
Note: If suitable unallocated space does not exist immediately after the Windows partition, shrink the Windows partition to create it.
Step 4. Create the Recovery Partition
Check the partition style first, then create the recovery partition using the steps below:
Step 1. In “Disk Management” > Right-click the correct Windows disk > Choose “Properties > Volumes” > Check whether the partition style shows GPT or MBR.
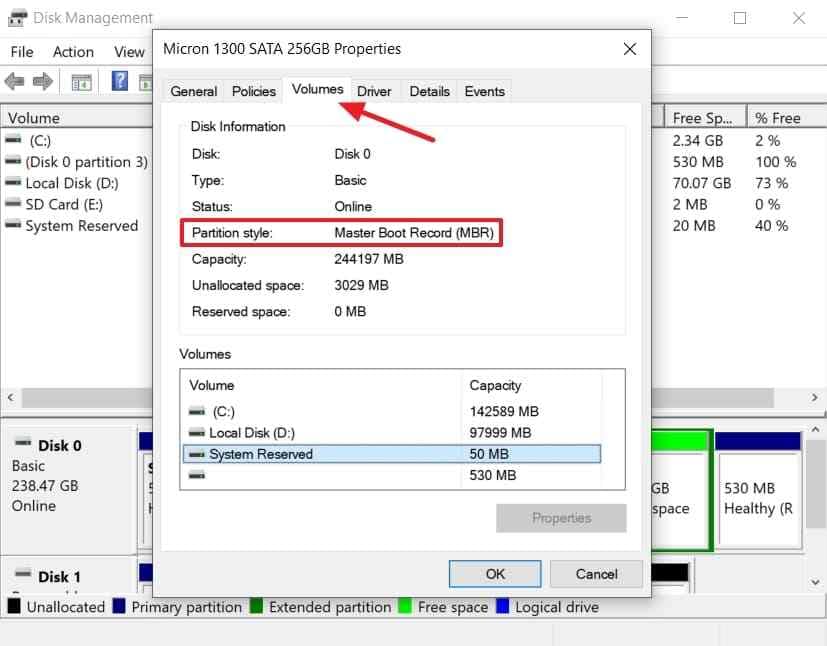
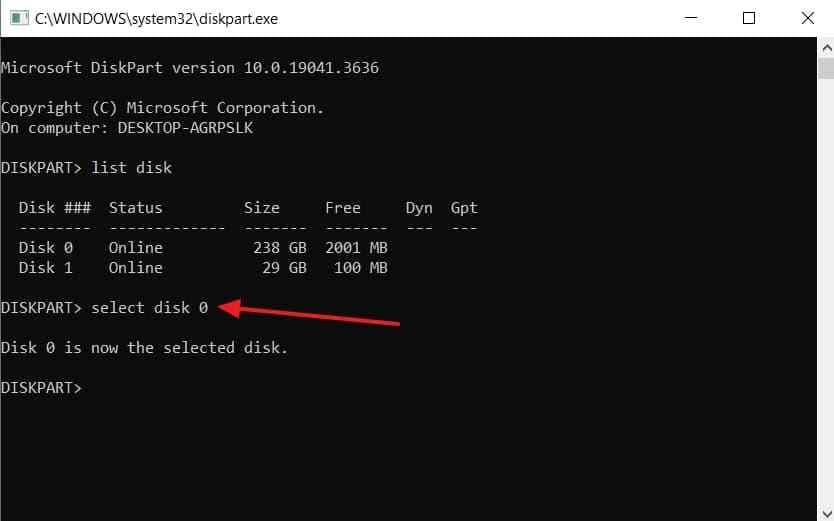
Step 2. Then, open CMD as administrator > Type “diskpart” > Run “list disk” > Select the correct Windows disk.
For GPT
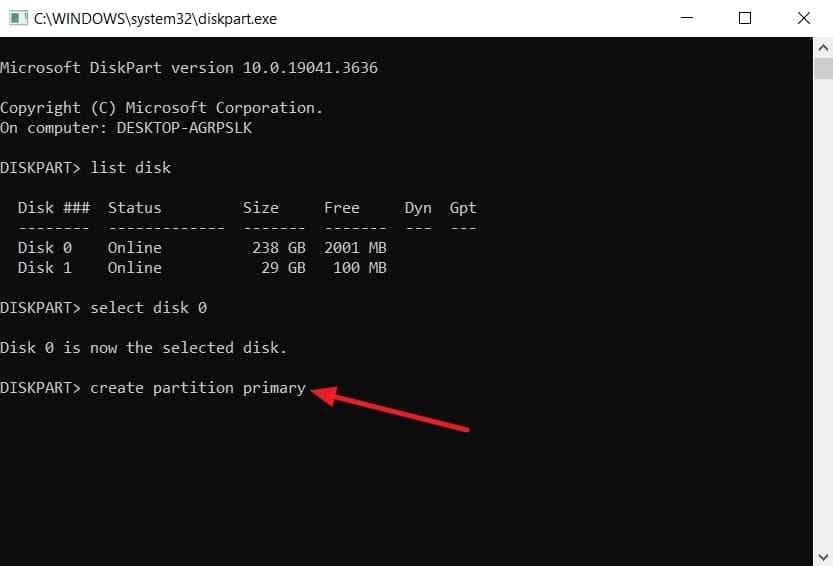
Run “create partition primary” > Format it using “format quick fs=ntfs label= “Windows RE tools”” > Run “assign letter=R” > Set the recovery type using “set id=de94bba4-06d1-4d40-a16a-bfd50179d6ac” > Run “gpt attributes=0x8000000000000001.”
For MBR
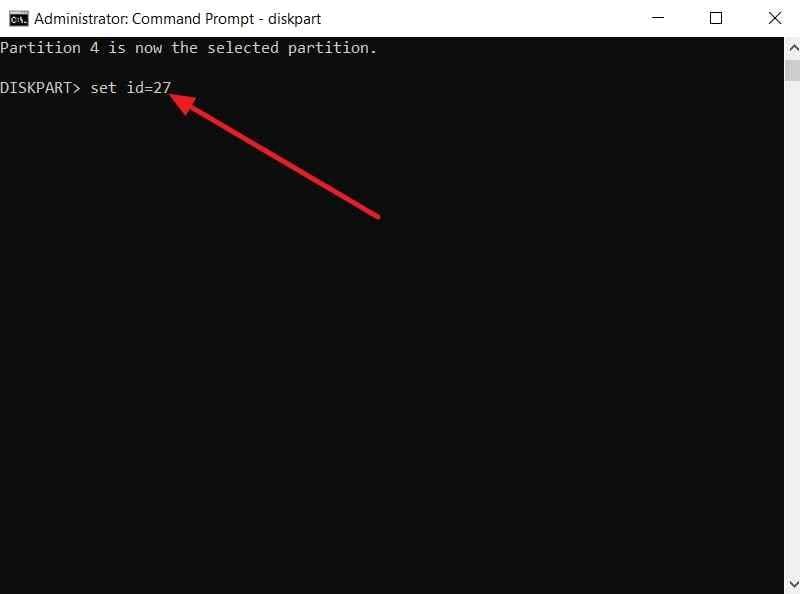
Follow the same partition creation and formatting steps above > Assign R: as the temporary drive letter > Run “set id=27” to mark it as a recovery partition.
Step 5. Register the Image With reagentc
Microsoft documents the ReAgentC options used to register the Windows recovery image location. So, follow the steps below to register the image:
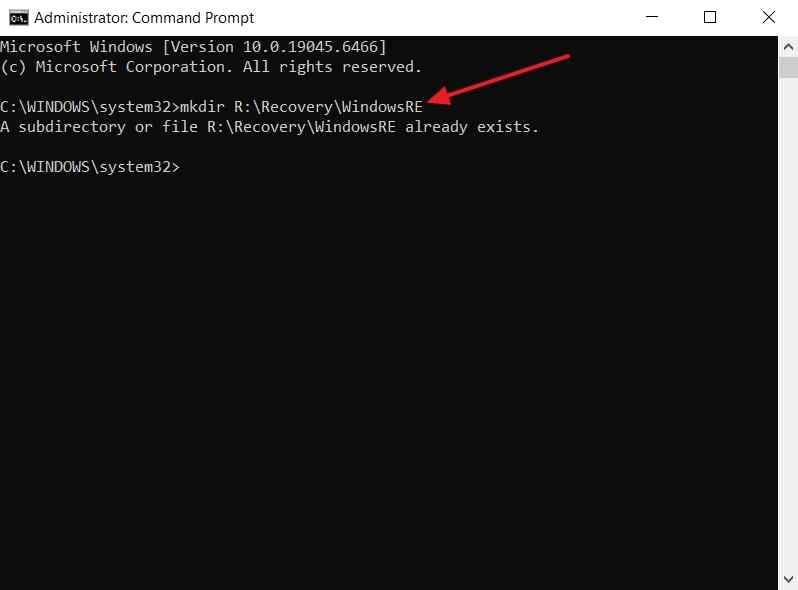
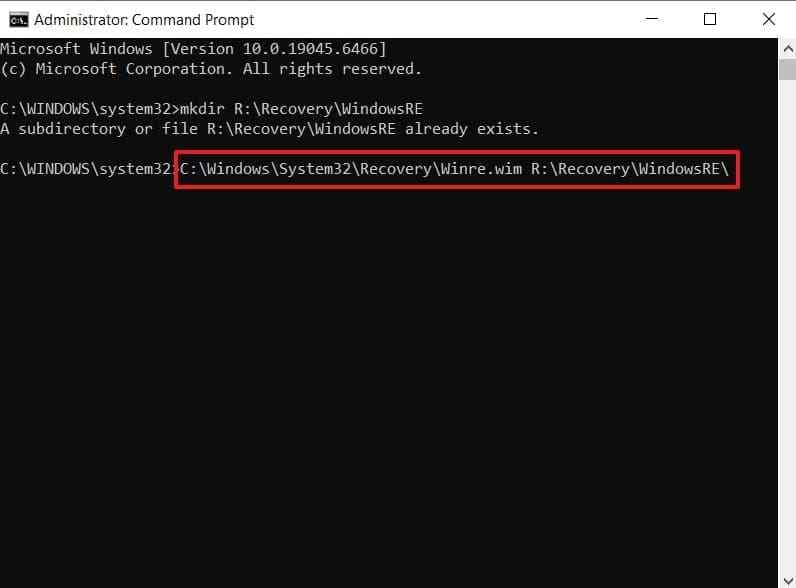
Step 1. Type “mkdir R:\Recovery\WindowsRE” and press “Enter.”
Step 2. Enter “copy C:\Windows\System32\Recovery\Winre.wim R:\Recovery\WindowsRE\” > If WinRE is enabled, run “reagentc /disable” > Type “reagentc /setreimage /path R:\Recovery\WindowsRE” and press “Enter” > Finally, run “reagentc /enable.”
Step 6. Remove the Drive Letter and Verify WinRE
Remove the temporary drive letter and verify Windows RE using the instructions below:
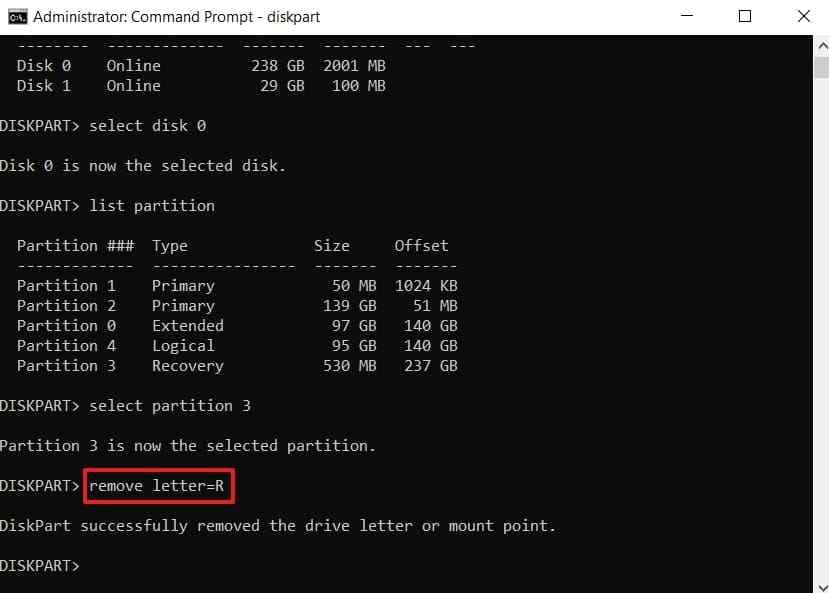
Instructions. Next, type “diskpart” in CMD as administrator > Select the correct disk and recovery partition > Enter “remove letter=R” > Type “exit” > Run “reagentc /info” > Confirm Windows RE status shows “Enabled,” and a Windows RE location appears.
Part 5. What if the OEM Recovery Partition Was Deleted?
Part 4 cannot restore OEM files during a restore deleted partition Windows 10 task. Now, let’s explore available sources for recovering the manufacturer recovery image:
- Check the Manufacturer Utility: Check the PC manufacturer's recovery utility or support portal. Dell, HP, Lenovo, and other vendors provide different recovery-media tools depending on the model and device eligibility.
- Use Recovery Media You Already Made: If you previously created OEM recovery USB media, use it to restore the manufacturer's original recovery environment or factory image where supported.
- Request Official Recovery Media: Some manufacturers provide downloadable recovery images or recovery-media creation tools for eligible models.
- Fall Back to Windows Installation Media: A clean Windows 10 install from Microsoft's own media works, though it arrives without the manufacturer's drivers and preinstalled software.
Part 6. What if the Partition Still Appears in Disk Management?
A restore partition Windows 10 task becomes easier when the partition still exists. The table below shows each partition status and the correct action required:
| Status Shown | What It Indicates | Risk to Data | Correct Action |
| No Drive Letter | The partition exists but is not mounted with a letter. | Usually low | Identify the partition first. Assign a letter only to a normal data volume. Keep WinRE and system partitions hidden. |
| RAW | Windows detects the partition but cannot read its file system correctly. | High | Recover important files first. Format only after recovery if you plan to reuse the partition. |
| Offline | Windows detects the disk, but it is currently unavailable for normal access. | Usually low | Check why it is offline. Bring it online only after confirming it is the correct disk. |
| Unallocated | No active partition currently occupies the space. It may represent the deleted partition. | High | Scan for recoverable data before creating, formatting, or extending any volume into the space. |
| Healthy Recovery Partition | A recovery-type partition exists, but this alone does not confirm WinRE is properly registered. | Low | Run reagentc /info. Leave the partition unchanged if WinRE is enabled and correctly registered. |
Unallocated space may still contain recoverable data from the deleted partition. Creating a new simple volume can overwrite data that recovery tools might otherwise find.
Part 7. What Not to Do After Deleting a Partition
Several actions can make a Windows 10 recover partition task harder. Avoid these 6 actions because each can overwrite data remaining on disk:
- Do Not Format the Unallocated Space: Formatting creates new file-system structures that can overwrite data still recoverable from the deleted partition.
- Do Not Create a New Simple Volume: Creating a new volume can write metadata over space that still contains recoverable partition data.
- Do Not Extend Another Partition Into It: Extending another partition can overwrite or claim space that may still contain recoverable files.
- Do Not Install Software on the Affected Drive: Installation writes new data to the disk and can reduce the chances of successful recovery.
- Do Not Run Repair Commands First: Commands such as CHKDSK can modify file-system structures that recovery tools may still need.
- Do Not Delete Hidden Partitions: Hidden partitions may contain WinRE, boot, system, or OEM files required for recovery or startup.
Part 8. How to Confirm the Recovery Worked
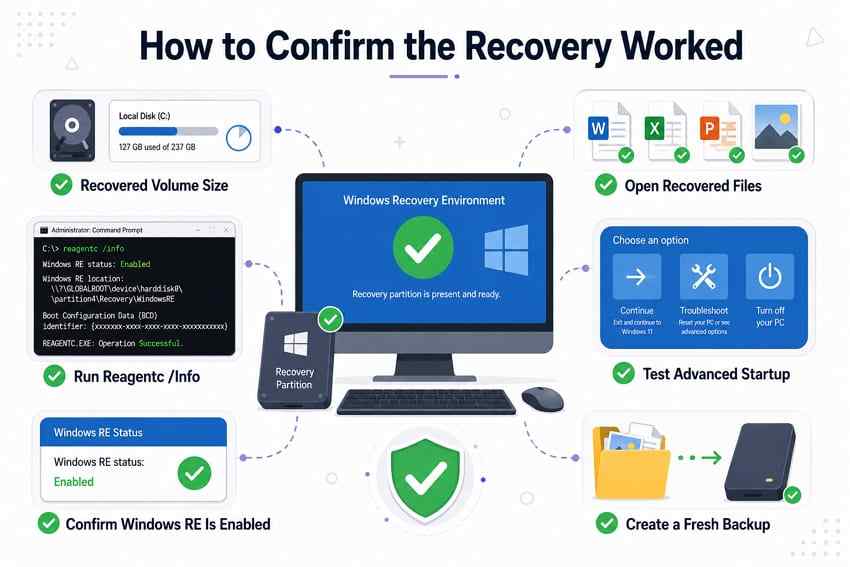
A Windows 10 restore partition task requires verification before considering recovery complete. Use these checks to confirm your partition and recovery environment work:
- Check the Recovered Volume Size: If you restored the partition itself, confirm its capacity and file system match the expected volume.
- Open Several Recovered Files: Open different recovered files to confirm they are accessible, complete, and not corrupted.
- Run reagentc /info Again: Check that Windows reports a valid registered Windows RE location.
- Confirm Windows RE Is Enabled: Verify that the Windows RE status specifically shows Enabled.
- Test Advanced Startup: Open Advanced Startup and confirm that Troubleshoot > Advanced options loads correctly.
- Create a Fresh Backup: Back up the recovered files after confirming the restored partition or recovered data works properly.
Part 9. How to Prevent Recovery Partition Loss
Good preparation can prevent another deleted recovery partition Windows 10 problem from occurring. Follow these 6 habits to protect partitions, recovery tools, and important data:
- Keep Files Backed Up: Store important files on separate storage so partition loss does not remove your only copy.
- Create Windows Recovery Media: Keep a USB recovery drive available in case the on-disk Windows recovery environment becomes unavailable.
- Check Disk Numbers Before Using DiskPart: Verify the correct disk number before running any command that changes partitions.
- Identify Hidden Partitions First: Run list partition and identify each hidden partition before deleting, resizing, or modifying it.
- Keep BitLocker Recovery Keys Accessible: Store recovery keys in a safe location before changing partitions on an encrypted drive.
- Back Up Before Resizing Disks: Create a current backup before resizing or repartitioning disks to reduce the risk of unexpected data loss.
Microsoft recommends creating a Recovery Drive because USB recovery media can restore Windows even after the hard drive is replaced or wiped.
Conclusion
To conclude, restoring a deleted partition in Windows 10 starts with proper identification. Missing WinRE requires rebuilding the recovery environment to restore Windows repair tools again. Deleted data partitions require file recovery before creating, formatting, or changing disk space. Recoverit Partition Recovery can scan deleted partitions and recover important files before rebuilding.
FAQ
-
Can Windows 10 work without a recovery partition?
Yes, Windows 10 can still work without its dedicated recovery partition. However, local WinRE features may be unavailable, requiring external Windows recovery or installation media for certain repair tasks. -
Is a WinRE partition the same as an OEM recovery partition?
No, WinRE provides repair tools while OEM partitions contain factory recovery files. Rebuilding WinRE does not restore the manufacturer’s original factory recovery image. -
Can Recoverit restore the recovery partition itself?
Recoverit can recover deleted partition Windows 10 data instead of rebuilding WinRE. Use the manual process in Part 4 to rebuild Windows recovery. -
Should you create a new volume on deleted partition space?
No. Avoid creating a new volume until important data has been recovered. Creating and formatting a volume can write new file-system structures into space that may still contain recoverable data.


