When your Mac does not recognize your iPhone, you may be unable to make a Finder backup, sync content, or import photos. Sometimes the phone charges but never appears in Finder. In other cases, your Mac detects the connection, but Photos cannot access the pictures you want. The right fix depends on which part of the connection is failing.
Start with a data-capable USB cable, an unlocked iPhone, and the permission prompts on both devices. If those checks do not help, work through nine troubleshooting methods for MacBook, iMac, and Mac mini. You can also use System Information to narrow down hardware problems without erasing your iPhone.
In This Article
-
- Fix 1. Check the USB Cable and Try Another Mac Port
- Fix 2. Unlock Your iPhone and Trust the Mac
- Fix 3. Allow iPhone Connections in Mac Privacy Settings
- Fix 4. Enable iPhone Visibility in Finder
- Fix 5. Reset Location and Privacy Settings on Your iPhone
- Fix 6. Restart Your Mac and iPhone
- Fix 7. Update macOS and iOS to Compatible Versions
- Fix 8. Check VPN and Third-Party Security Software
- Fix 9. Check iPhone Detection Through Mac System Information
Part 1. Why Is My Mac Not Recognizing My iPhone?
An iPhone can charge while its data connection is blocked. A cable may deliver power without transferring data, an unlocked phone may still need Trust approval, and a Mac laptop may require separate accessory permission. Finder visibility and Photos importing are different stages of the connection.
Use what you actually see to choose where to start:
| What you notice | Possible cause | Start here |
| No charging or connection response | Damaged cable, obstructed connector, or faulty USB port | Fix 1: test the cable and port |
| iPhone charges but is not accessible | Charge-only cable, locked iPhone, or unapproved accessory/Trust request | Fixes 1-3; then Fix 5 if prompts are missing |
| iPhone appears under USB in System Information, but not Finder | USB hardware detects something, but macOS authorization or Finder visibility may still be incomplete | Fixes 2-5 and 7-9 |
| Finder sees the iPhone, but Photos cannot import pictures | Photos permissions, iCloud-optimized originals, locked Hidden album, or limited Mac storage | Part 3: photo import checks |
A working connection should show your iPhone under Locations in Finder on macOS Catalina or later. You can then open its device screen and manage backups or syncing. Apple's computer recognition checklist also recommends checking cables, permissions, system updates, and conflicting software before seeking service.
Part 2. How to Fix Mac Not Recognizing iPhone: 9 Solutions
Try the checks in order and reconnect the iPhone after each one. None of these nine methods requires you to factory reset your phone. If a screen asks to erase or restore the device, stop unless you specifically intend to do that and already have a usable backup.
Fix 1. Check the USB Cable and Try Another Mac Port
When to try it: Your iPhone does not charge, charges intermittently, or charges but never establishes a data connection.
Step 1. Unplug the iPhone. Inspect the cable and both ports for obvious damage or debris. Do not insert metal tools or liquids into either connector.
Step 2. Connect the iPhone directly to another Mac port using a known-good Lightning or USB-C cable that supports both charging and data transfer. Bypass USB hubs, docks, and adapters where possible.
Step 3. Unlock the iPhone and open Finder. If the device appears, retry the backup or transfer. If it still does not appear, continue to the Trust and accessory checks.
Fix 2. Unlock Your iPhone and Trust the Mac
When to try it: The cable works, but Finder is empty or the iPhone displays a computer-access prompt.
Step 1. Unlock the iPhone using its passcode, disconnect it, and reconnect the cable. If you see a Finder prompt asking to trust the device, select Trust.
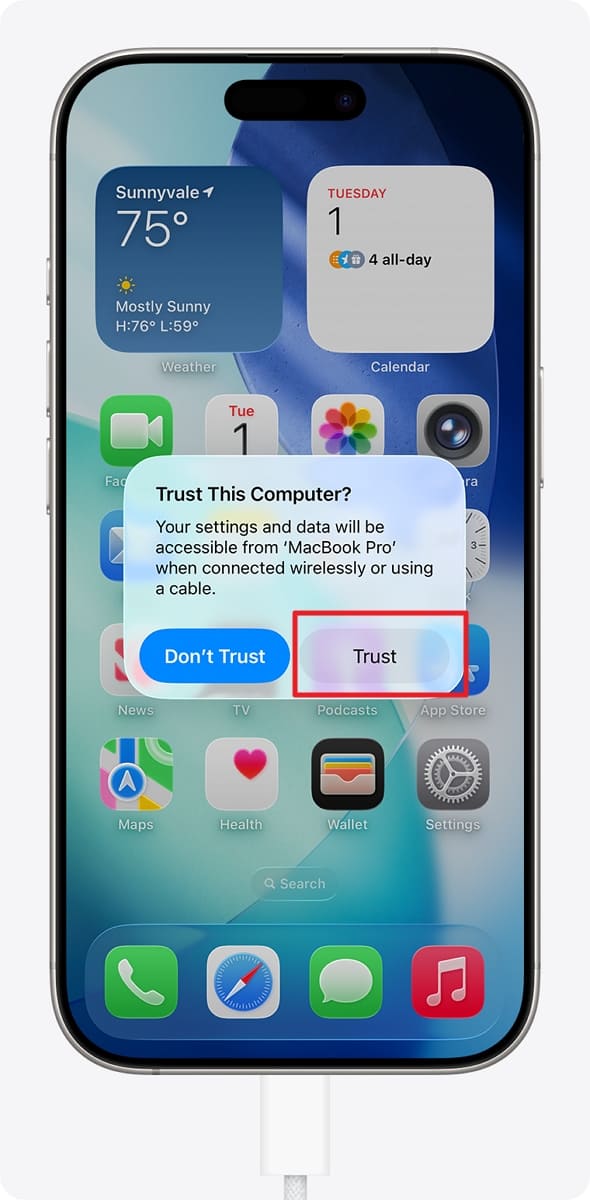
Step 2. On the iPhone, tap Trust when asked whether to trust this computer, then enter your passcode. Open Finder and look under Locations.
Step 3. On iPhones with a Wired Accessories setting, check Settings > Privacy & Security > Wired Accessories if a wired connection keeps being denied. Choose the normal permission setting appropriate for your needs and approve the next connection. Do not weaken your device's connection security unnecessarily.
If the Trust message never appears, try reconnecting or restarting both devices before resetting permissions. Apple explains the authorized connection process in its Trust This Computer guidance.
Fix 3. Allow iPhone Connections in Mac Privacy Settings
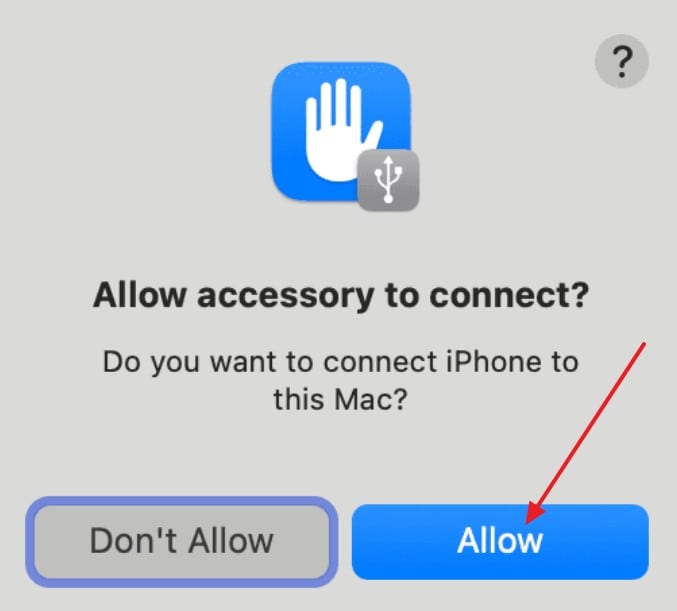
When to try it: You use a supported Apple silicon Mac laptop and dismissed or missed an Allow accessory to connect? alert.
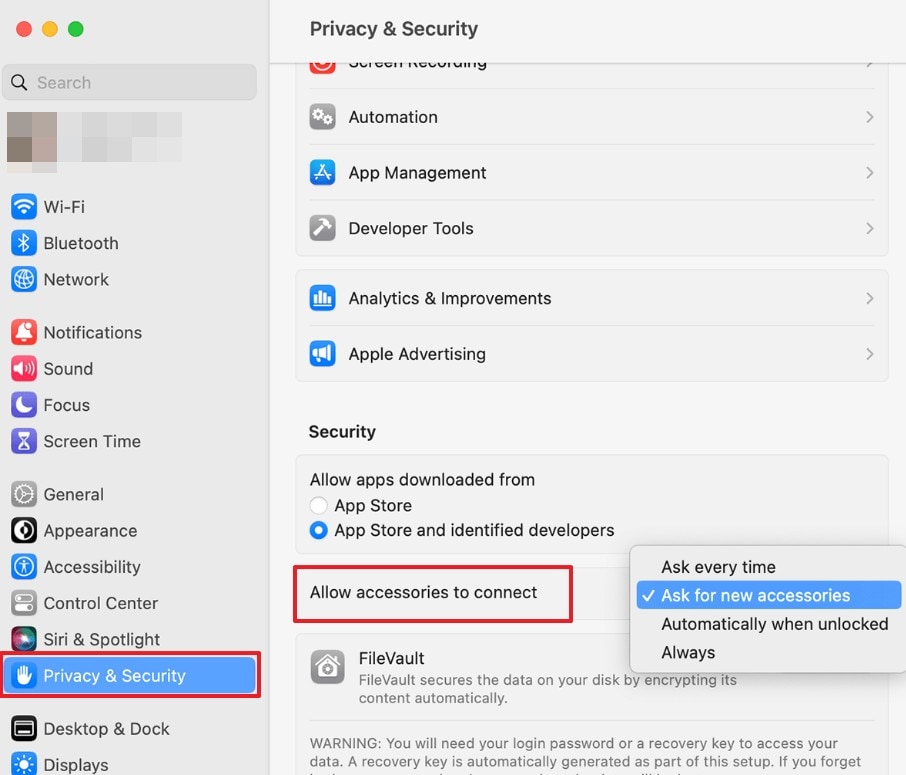
Step 1. On the Mac, open Apple menu > System Settings > Privacy & Security and look for Accessories. This section does not appear on every Mac model.
Step 2. Unlock your Mac, reconnect the iPhone, and click Allow if prompted. This permission is separate from tapping Trust on the iPhone.
Step 3. If you need to review the accessory policy, use the choices below. For everyday security, keep approval prompts enabled rather than setting every unknown accessory to connect automatically.
| Accessory setting | What it allows |
| Always Ask | You approve each accessory connection. |
| Ask for New Accessories | You approve an accessory the first time it connects; the Mac remembers it. |
| Automatically Allow When Unlocked | Accessories may connect without another prompt while the Mac is unlocked. |
| Always Allow | No approval prompt is required; use only when appropriate for your environment. |
Note: Apple's accessory security instructions apply specifically to supported Apple silicon Mac laptops. If your Mac has been locked for several days, unlocking it before reconnecting may also be necessary.
Fix 4. Enable iPhone Visibility in Finder
When to try it: The connection is approved, but you cannot find the iPhone in Finder's sidebar.
Step 1. Open Finder. If its sidebar is hidden, choose View > Show Sidebar from the menu bar.
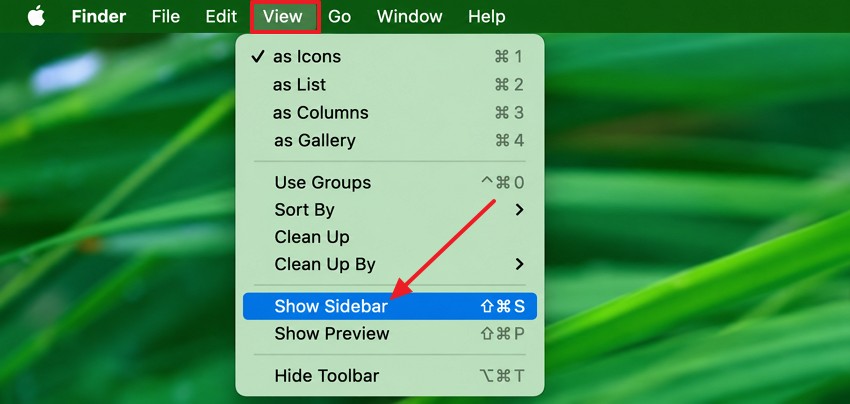
Step 2. Choose Finder > Settings > Sidebar. Under Locations, select CDs, DVDs, and iOS Devices if the option appears in your macOS version.
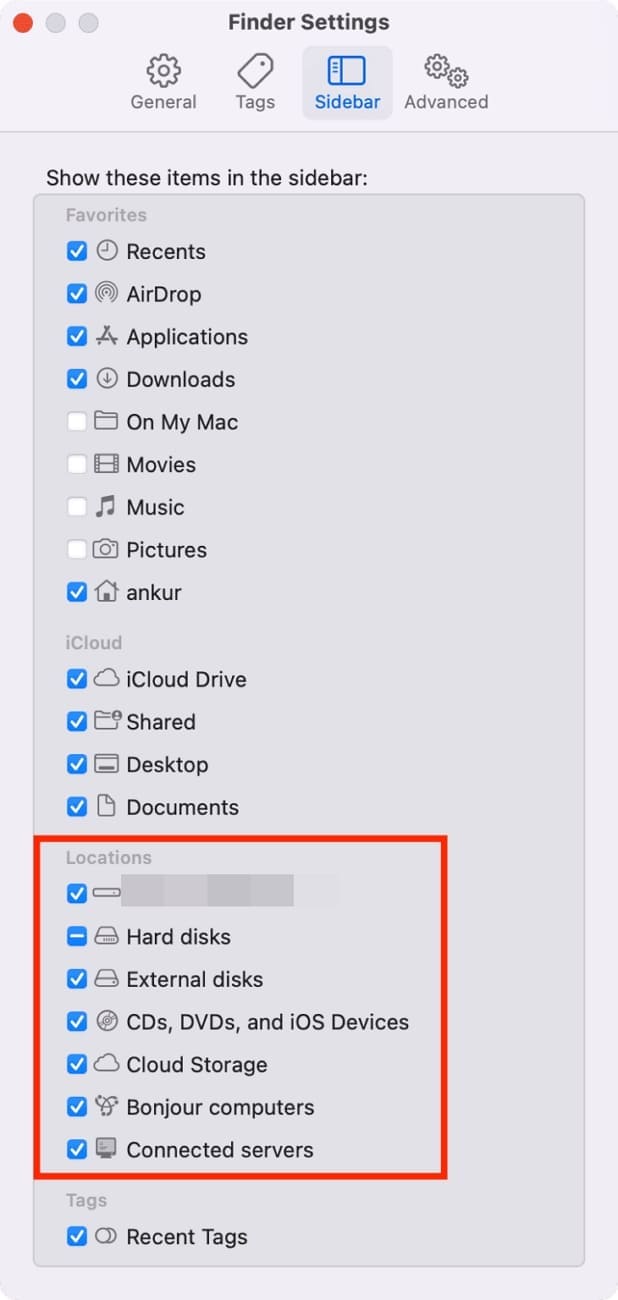
Step 3. Reconnect the iPhone and check the Locations list. If it is still missing, do not assume the sidebar setting is the only problem; the device may not have completed USB or Trust authorization.
Fix 5. Reset Location and Privacy Settings on Your iPhone
When to try it: You previously tapped Don't Trust, or the Trust alert remains unavailable after cable checks, reconnection, and a restart.
Step 1. On the iPhone, open Settings > General > Transfer or Reset iPhone > Reset > Reset Location & Privacy. Enter the device passcode and confirm.
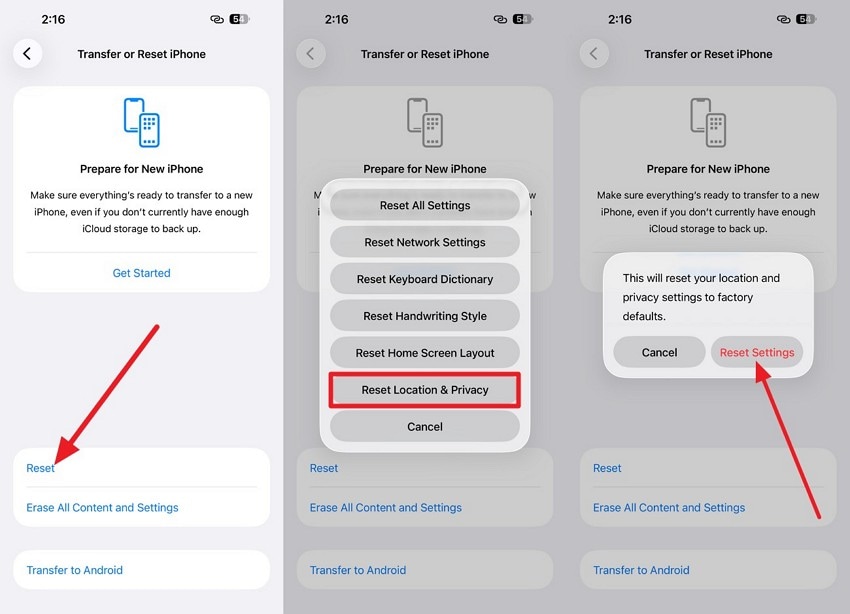
Step 2. Disconnect the cable and reconnect the unlocked iPhone. When the Trust prompt reappears, choose Trust and check Finder again.
Note: This is not a factory reset and should not erase your photos. It does reset other apps' location and privacy permissions, so you may have to approve those requests again.
Fix 6. Restart Your Mac and iPhone
When to try it: USB and permission checks look correct, but the connection still fails intermittently.
Step 1. Save your work on the Mac. Choose Apple menu > Restart and allow macOS to start again.
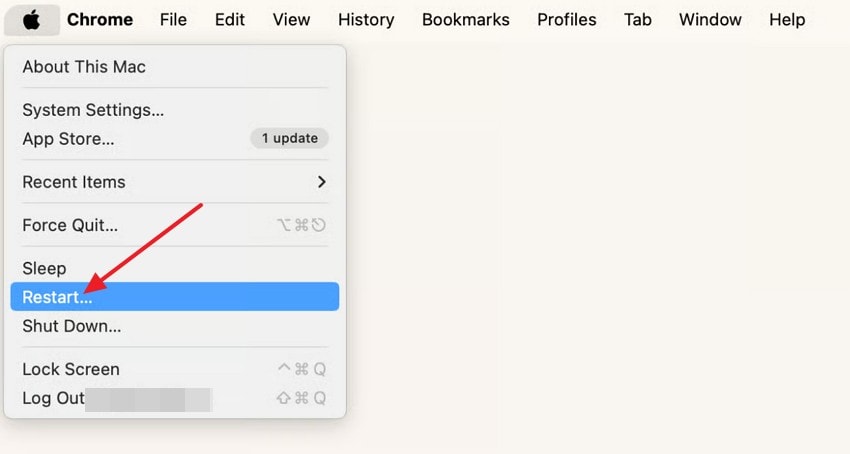
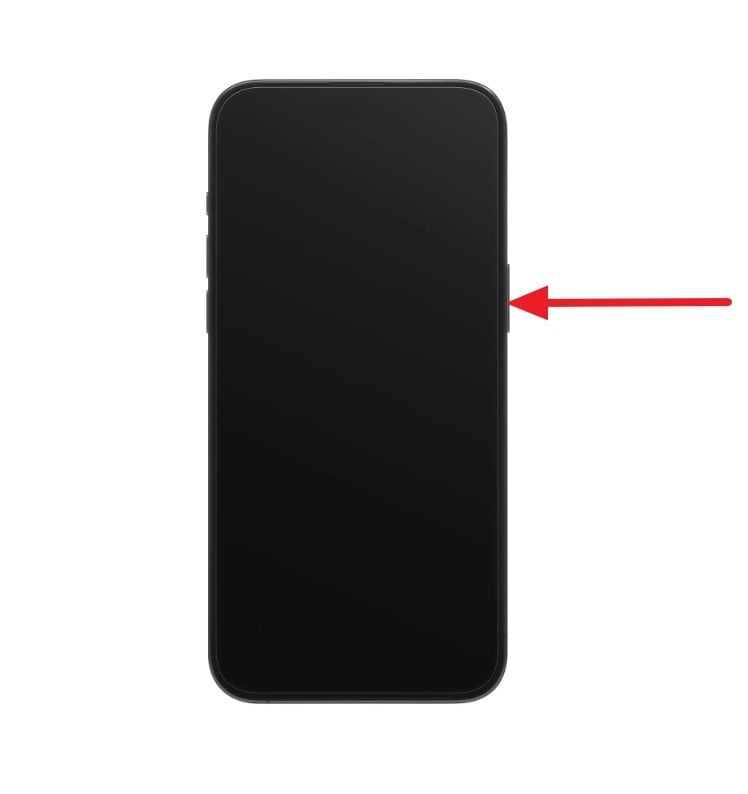
Step 2. Turn off the iPhone using the controls for your model. On an iPhone with Face ID, briefly hold the Side button and either volume button until the power-off slider appears, then release them and slide to power off. On models with a Home button, use the Side or Top button as appropriate.
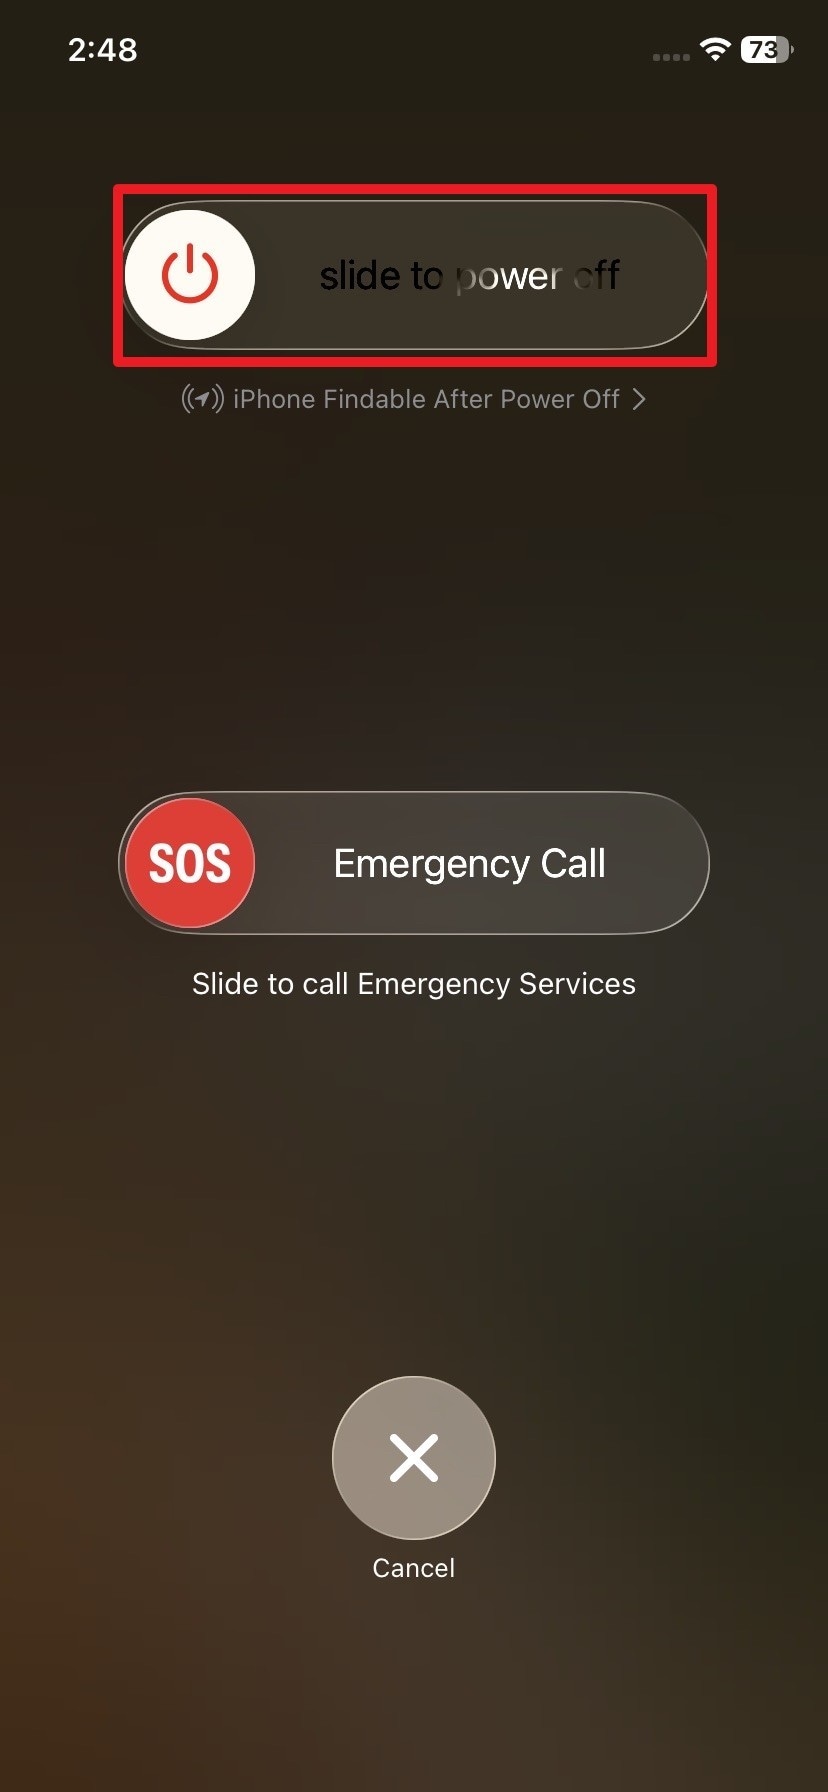
Note: The reference image also shows Emergency SOS controls. Release the buttons as soon as the power-off slider appears; do not keep holding them into an SOS countdown or place an emergency call accidentally.
Step 3. After the iPhone turns off, turn it back on using the Side or Top button. Unlock it, reconnect the cable, approve any prompts, and check Finder.
Fix 7. Update macOS and iOS to Compatible Versions
When to try it: You have a newer iPhone or recently updated one device but not the other. Apple sometimes requires additional software before a new iPhone can communicate with a Mac.
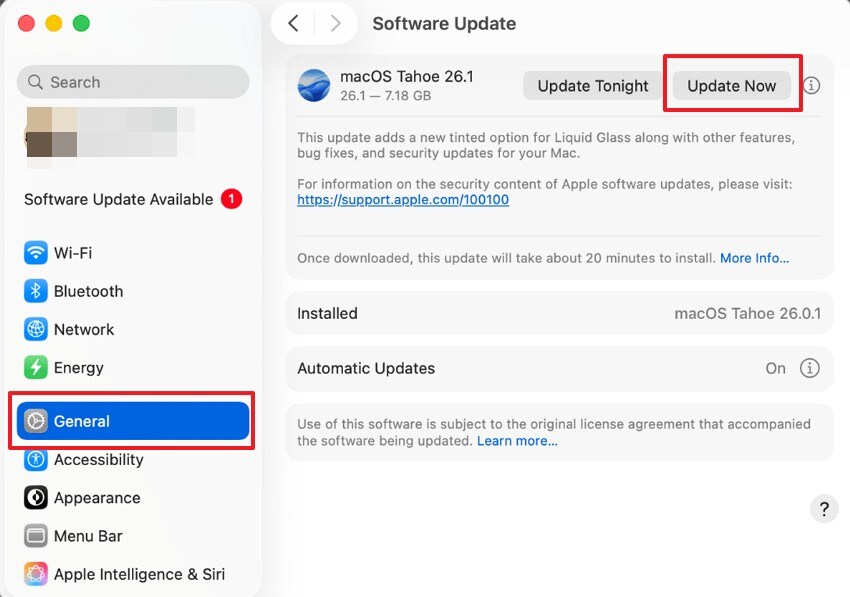
Step 1. Back up accessible files, then on the Mac go to Apple menu > System Settings > General > Software Update. Install compatible updates. If macOS offers a specific software update when you plug in the phone, follow that prompt.
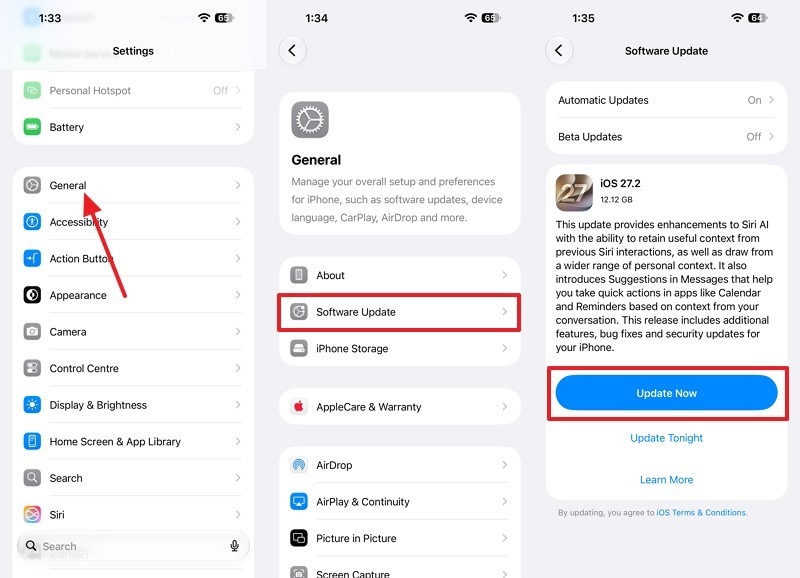
Step 2. On the iPhone, open Settings > General > Software Update and install an available compatible iOS update. Reconnect after both devices finish restarting.
Note: On macOS Catalina and later, iPhone management is generally in Finder. Older Mac systems use iTunes where supported. Do not assume that every old Mac can install the latest macOS or support every new iPhone.
Fix 8. Check VPN and Third-Party Security Software
When to try it: System Information detects the iPhone, but Finder or companion apps still fail to communicate after basic checks.
Step 1. If this is your personal Mac and you have permission to change its settings, briefly disconnect an active VPN using System Settings > VPN, and review third-party security software that may affect connections.
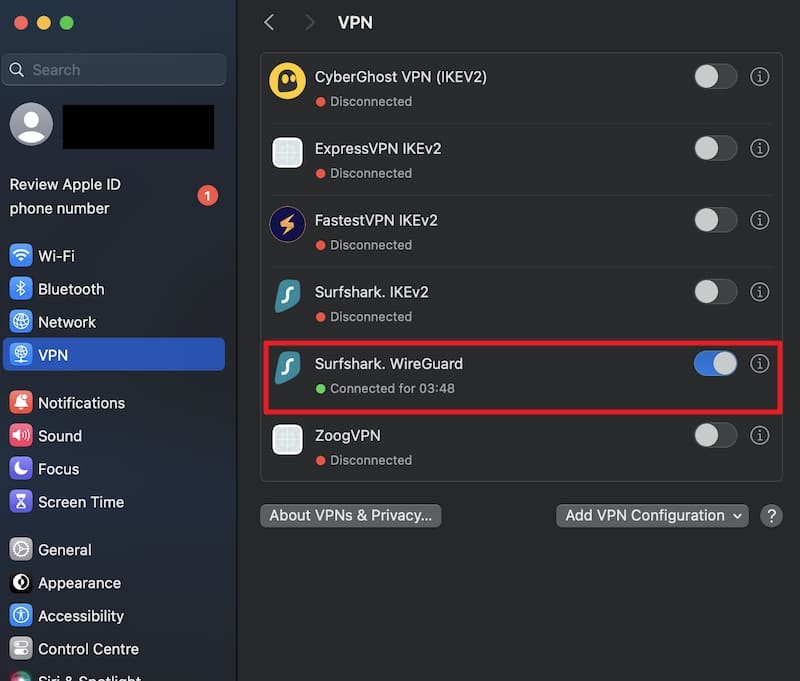
Step 2. Reconnect the iPhone and look for it in Finder. Re-enable VPN or security protection immediately after the test. On a managed work or school Mac, ask your administrator instead of disabling required security tools.
Note: A VPN is not a substitute for a working USB data cable or Trust permission. If the iPhone does not appear even at the USB hardware level, return to the cable and port checks.
Fix 9. Check iPhone Detection Through Mac System Information
When to try it: You need to establish whether macOS detects a connected USB device at all.
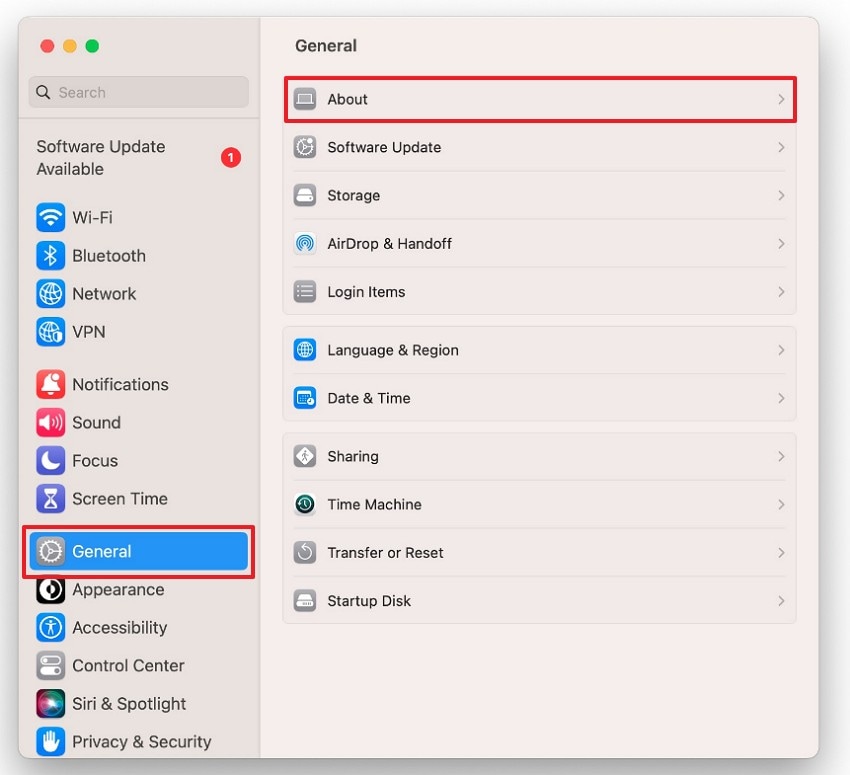
Step 1. Leave the iPhone connected and unlocked. On the Mac, choose Apple menu > System Settings > General > About > System Report. You can also open System Information through Spotlight on many macOS versions.
Step 2. Under Hardware, select USB and look for an entry corresponding to your iPhone. The model label may differ by device and software version.
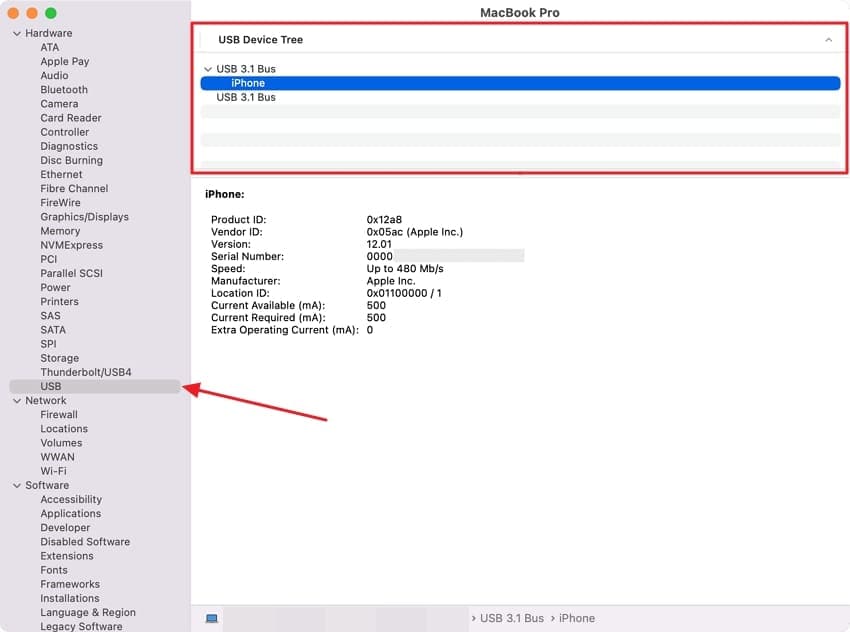
Step 3. If the phone appears here but not in Finder, revisit Trust, accessory approval, Finder visibility, and software updates. If it does not appear here, try a second known-good cable, another port, and another computer before seeking service. A USB listing alone does not prove that your iPhone's data is accessible.
Part 3. What If Your Mac Recognizes the iPhone but Cannot Import Photos?
If your iPhone appears in Finder but its pictures do not show up in Photos, the USB connection may be working normally. The issue can instead be the import workflow, where the originals are stored, or whether an album is available for import.
| Import issue | Why it happens | What to try |
| iCloud Photos with optimized storage | Some full-resolution originals are in iCloud rather than on the iPhone. | Use iCloud Photos on the Mac or download the needed originals to the phone before a USB import when feasible. |
| Locked Hidden album | On macOS 15.4 or later, locked Hidden album items may not be available for USB import. | Only if you intend to import those items, temporarily unlock the Hidden album in iPhone Photos settings; restore its protection afterward. |
| Not enough space or an import interruption | Mac storage is full, or a large import stops mid-transfer. | Choose an alternative destination with free space and import smaller batches. |
Apple explains both the optimized iCloud Photos import limitation and the locked Hidden album restriction in its current help pages.
Try Image Capture as an alternative:
Step 1. Connect and unlock the iPhone, open Image Capture on your Mac, and select the iPhone under Devices.
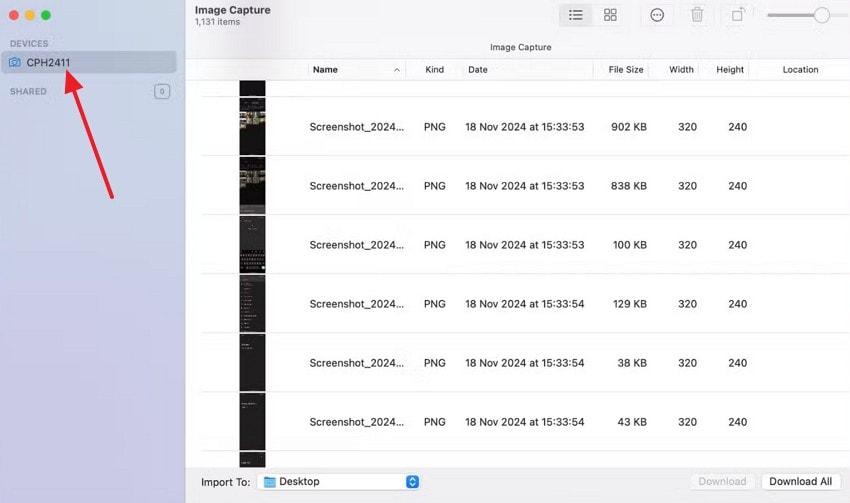
Step 2. Choose a destination using Import To. Select the photos you want and choose Download, or choose Download All to import available items. Open a sample file on your Mac to confirm the transfer succeeded.
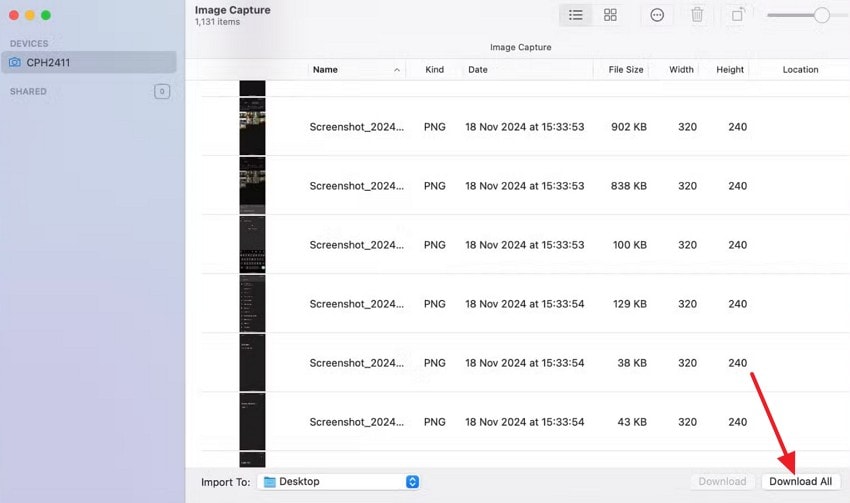
Note: Image Capture offers optional controls to delete imported items from the iPhone. Leave those controls off if you only want a copy. If an original exists only in iCloud, Image Capture cannot create it from a local thumbnail.
Part 4. What to Do If Your Mac Still Won't Recognize Your iPhone
Test the iPhone with another compatible computer and a known-good data cable. If it appears there, concentrate on your original Mac's ports, software, and permissions. If several computers cannot detect the iPhone, a connector or hardware fault becomes more likely.
Before arranging repair, back up any important data you can still access through iCloud or an existing computer backup. Contact Apple Support for hardware-level diagnosis. Avoid factory resetting the iPhone simply to resolve a missing Finder entry, especially when you lack a current backup.
Pro Tip. Recover Lost iPhone Files Previously Saved on Mac With Recoverit
If your iPhone's photos or videos were previously copied to your Mac or an external drive and those local copies were later deleted, you may have a separate file-recovery problem. First check Mac Trash and Time Machine. If no usable backup exists, avoid further writes to the affected storage, especially an SSD.
Wondershare Recoverit for Mac can scan supported, readable Mac drives and external storage for eligible lost files. It is not a connection repair tool and cannot scan an iPhone's encrypted internal storage through USB. Recovery is uncertain when files have been overwritten, deleted SSD blocks have been trimmed, or the source device is not readable.
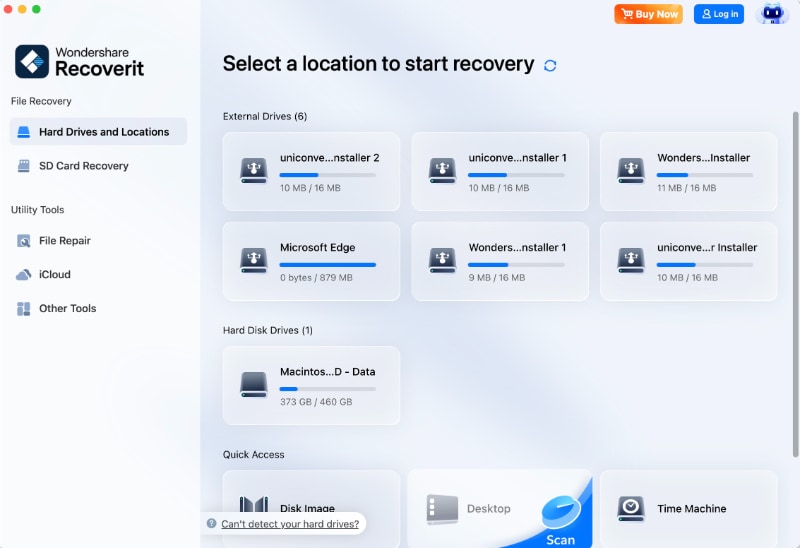
Step 1. Select the Mac storage containing the missing copies.
Open Recoverit and choose the accessible drive or location where your imported iPhone photos or videos were originally saved. If possible, run the software from a different physical disk.
Step 2. Scan and narrow the results.
Start a scan, then use available filename, location, photo/video type, or other applicable filters to find the missing Mac copies. The exact filter labels can vary by Recoverit version.
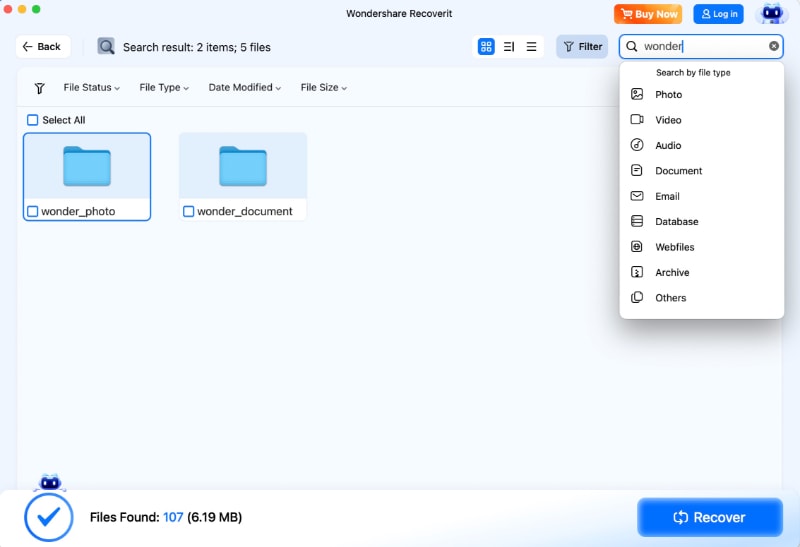
Step 3. Preview and save to a separate drive.
Check supported previews, select the files you want, click Recover, and save the results to another healthy physical drive. Open a few recovered files to verify that they work.

Conclusion
When your Mac does not recognize your iPhone, start with the USB cable, unlock the phone, and approve the connection prompts. Then check Finder visibility, accessory permissions, and software updates. System Information can help you tell a hardware-level connection problem from a Finder-only issue.
If Finder works but photo imports fail, check iCloud originals and try Image Capture. For persistent non-detection, contact Apple rather than resetting your iPhone. Recoverit is only relevant if previously imported files have disappeared from readable Mac storage.
FAQ
-
Why does my iPhone charge but not show up on my Mac?
The cable may supply power without carrying data, or your iPhone may still need to be unlocked and trusted. On supported Apple silicon Mac laptops, a declined accessory prompt can also block data while charging continues. Try a known-good data cable, approve the prompts, and check Finder. -
Why is my iPhone not showing up in Finder on Mac?
First open Finder and choose View > Show Sidebar. Then check Finder > Settings > Sidebar and enable the iOS device entry if available. If it still does not appear, verify the USB connection and Trust approval. Use System Information to check whether the Mac detects the phone at all. -
Can I connect my iPhone to my Mac without a USB cable?
Yes. Finder can sync a previously configured iPhone over Wi-Fi when the devices meet its setup requirements; initial configuration normally uses a cable. AirDrop and iCloud Photos offer other wireless ways to transfer or access media, but they are not equivalent to a wired Finder backup. -
Why does my Mac recognize my iPhone but not show its photos?
If the device appears in Finder but not all pictures appear in Photos, check that it is unlocked and trusted. iCloud Photos with Optimize Storage can leave full-resolution files in iCloud, and macOS 15.4 or later excludes a locked Hidden album from USB imports. Try iCloud Photos on the Mac or use Image Capture for available local items.


